goal : 제공받은 화면의 상태와 조건을 그대로 구현하자.
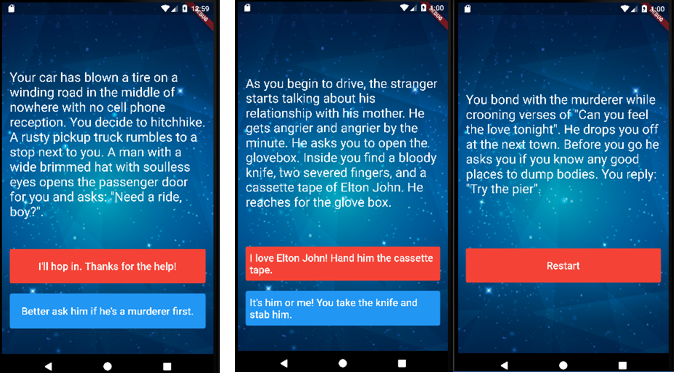
화면상에는 스토리와 두개의 선택상자 버튼이 표시된다. 어떤 버튼을 클릭하느냐에 따라서 보여지는 스토리와 선택상자가 달라진다.
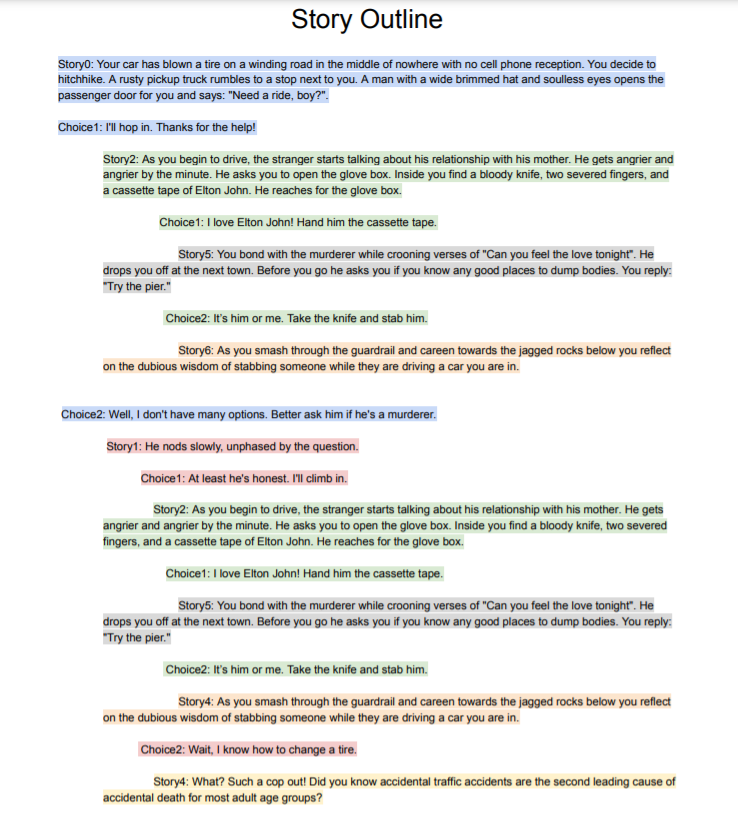
- story outline
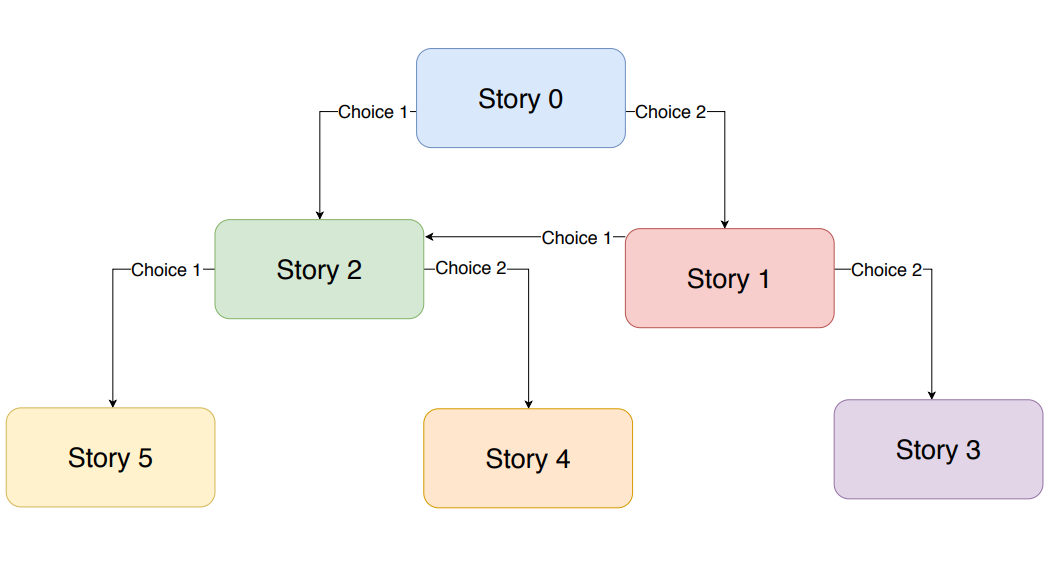
- story plan
먼저, 'github'에 준비되어 있는 시작파일을 'clone'을 통해 내 프로젝트에 가져오자.https://github.com/londonappbrewery/destini-challenge-starting
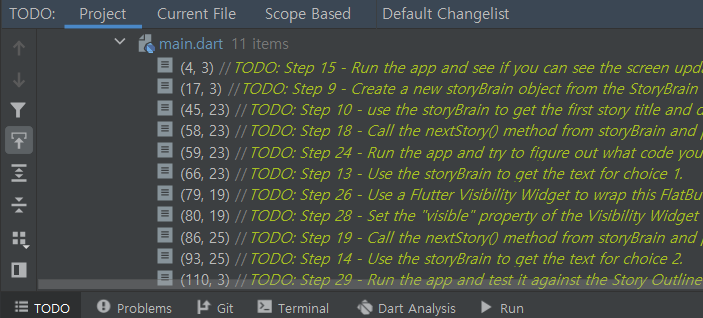
'TODO' 탭을 확인하면, 해야하는 작업들이 단계별로 나와있다. 덕분에 수월하게 앱을 완성할 수 있었다. ※ 또한, 작업에 필요한 이미지파일과 pubspec.yami파일설정도 이루어져있다. ※
'Story' 클래스
story.dart파일에 'Story' 클래스를 생성하자.
화면에 나타낼 스토리와 두개의 선택버튼에 나타낼 텍스트를 위해, 총 3개의 속성을 설정하고 생성자를 생성하자.
class Story {
  String storyTitle;
  String choice1;
  String choice2;
  Story({this.storyTitle, this.choice1, this.choice2}); // 생성자
}
'StoryBrain' 클래스
story_brain.dart파일에 'StoryBrain' 클래스를 생성하자.
class StoryBrain {}storyData & storyNumber 속성 작성
'Story' 클래스 타입의 'storyData' 속성(리스트)과 정수형 타입의 'storyNumber' 속성을 작성하자.
import 'story.dart'

int storyNumber = 0;

class StoryBrain {

  List<Story> storyData = [
    Story(
        storyTitle:
            'Your car has blown a tire on a winding road in the middle of nowhere with no cell phone reception. You decide to hitchhike. A rusty pickup truck rumbles to a stop next to you. A man with a wide brimmed hat with soulless eyes opens the passenger door for you and asks: "Need a ride, boy?".',
        choice1: 'I\'ll hop in. Thanks for the help!',
        choice2: 'Better ask him if he\'s a murderer first.'),
    Story(
        storyTitle: 'He nods slowly, unphased by the question.',
        choice1: 'At least he\'s honest. I\'ll climb in.',
        choice2: 'Wait, I know how to change a tire.'),
    Story(
        storyTitle:
            'As you begin to drive, the stranger starts talking about his relationship with his mother. He gets angrier and angrier by the minute. He asks you to open the glovebox. Inside you find a bloody knife, two severed fingers, and a cassette tape of Elton John. He reaches for the glove box.',
        choice1: 'I love Elton John! Hand him the cassette tape.',
        choice2: 'It\'s him or me! You take the knife and stab him.'),
    Story(
        storyTitle:
            'What? Such a cop out! Did you know traffic accidents are the second leading cause of accidental death for most adult age groups?',
        choice1: 'Restart',
        choice2: ''),
    Story(
        storyTitle:
            'As you smash through the guardrail and careen towards the jagged rocks below you reflect on the dubious wisdom of stabbing someone while they are driving a car you are in.',
        choice1: 'Restart',
        choice2: ''),
    Story(
        storyTitle:
            'You bond with the murderer while crooning verses of "Can you feel the love tonight". He drops you off at the next town. Before you go he asks you if you know any good places to dump bodies. You reply: "Try the pier".',
        choice1: 'Restart',
        choice2: '')
  ];

}
restart 메소드 작성
스토리가 끝난경우 'storyNumber'를 0으로 치환하는 'restart' 메소드를 작성하자.
void restart() {
  storyNumber = 0;
}
nextStory 메소드 작성
'story plan'을 만족하기 위해서 'nextStory' 메소드를 작성하자.
※ 'if/else if'를 이용하자 ※
void nextStory(int choiceNumber) {
  if (storyNumber == 0 && choiceNumber == 1) {
    storyNumber = 2;
  } else if (storyNumber == 0 && choiceNumber == 2) {
    storyNumber = 1;
  } else if (storyNumber == 1 && choiceNumber == 1) {
    storyNumber = 2;
  } else if (storyNumber == 1 && choiceNumber == 2) {
    storyNumber = 3;
  } else if (storyNumber == 2 && choiceNumber == 1) {
    storyNumber = 5;
  } else if (storyNumber == 2 && choiceNumber == 2) {
    storyNumber = 4;
  } else if (storyNumber == 3 || storyNumber == 4 || storyNumber == 5) { // 스토리가 끝난경우
    restart();
  }
}
getStory 메소드 작성
앱화면의 스토리를 나타내주는 'getStory' 메소드를 작성하자.
String getStory() {
  return storyData[storyNumber].storyTitle;
}
getChoic1 / getChoice2 메소드 작성
앱화면의 선택버튼 1/2의 텍스트를 나타내주는 'getChoice1' / 'getChoice2' 메소드를 작성하자.
String getChoice1() {
  return storyData[storyNumber].choice1;
}

String getChoice1() {
  return storyData[storyNumber].choice1;
}
buttonShouldBeVisible 메소드 작성
'StoryData' 속성을 확인하면 알 수 있듯이, 스토리가 끝내는 화면에는 선택버튼2가 필요없다.
따라서 스토리가 끝나는 조건에서는 선택버튼2를 'Visibility' 위젯을 이용하여 'visible' 속성을 'false' 값으로 설정함으로써 버튼이 안보이게 할것이다.
스토리가 끝났는지 판단하여 끝났다면 'false' 값을 반환하는 'buttonShouldBeVisible' 메소드를 작성하자.
bool buttonShouldBeVisible() {
  if (storyNumber == 0 || storyNumber == 1 || storyNumber == 2) {
    return true;
  } else {
    return false;
  }
}
private 설정
'storyNumber' 속성과 'storyData' 속성을 'private'으로 설정하여 안전하게 보호하자.※ '우클릭-Refactor-Rename'을 통해 간편하게 수정했다. ※
main.dart 파일
위에서만든 클래스의 객체를 생성하여 앱을 구현하자.
import 'package:flutter/material.dart';
import 'story_brain.dart';
void main() => runApp(Destini());
class Destini extends StatelessWidget {
Widget build(BuildContext context) {
return MaterialApp(
theme: ThemeData.dark(),
home: StoryPage(),
); // MaterialApp
}
}
StoryBrain storyBrain = StoryBrain(); // 객체생성
class StoryPage extends StatefulWidget {
_StoryPageState createState() => _StoryPageState();
}
class _StoryPageState extends State<StoryPage> {
Widget build(BuildContext context) {
return Scaffold(
body: Container(
decoration: BoxDecoration(
image: DecorationImage(
image: AssetImage('images/background.png'),
fit: BoxFit.cover,
), // DecorationImage
), // BoxDecoration
padding: EdgeInsets.symmetric(vertical: 50.0, horizontal: 15.0),
constraints: BoxConstraints.expand(),
child: SafeArea(
child: Column(
crossAxisAlignment: CrossAxisAlignment.stretch,
children: <Widget>[
Expanded(
flex: 12,
child: Center(
child: Text(
storyBrain.getStory(),
style: TextStyle(
fontSize: 25.0,
), // TextStyle
), // Text
), // Center
), // Expanded
Expanded(
flex: 2,
child: TextButton(
onPressed: () {
setState(() {
storyBrain.nextStory(1);
});
},
style: ButtonStyle(
backgroundColor: MaterialStateProperty.all(Colors.red)),
child: Text(
storyBrain.getChoice1(),
style: TextStyle(fontSize: 20.0, color: Colors.white),
), Text
), // TextButton
), Expanded
SizedBox(
height: 20.0,
), // SizedBox
Expanded(
flex: 2,
child: Visibility(
visible: storyBrain.buttonShouldBeVisible(),
child: TextButton(
onPressed: () {
setState(() {
storyBrain.nextStory(2);
});
},
style: ButtonStyle(
backgroundColor:
MaterialStateProperty.all(Colors.blue)), // ButtonStyle
child: Text(
storyBrain.getChoice2(),
style: TextStyle(fontSize: 20.0, color: Colors.white),
), // Text
), // TextButton
), // Visibility
), // Expanded
], // <widget>[]
), // Column
), // SafeArea
), Container
); // Scaffold
}
} 계획한대로 잘 실행되는것을 확인할 수 있다.

