goal : Layout 위젯을 사용해 제공받은 화면을 그대로 구현하자.
구현할 화면
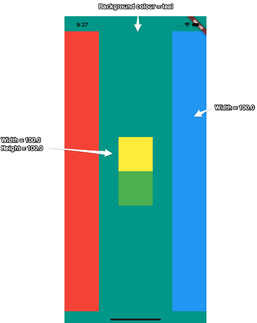
화면 배치
크게 3열로 구성되어있다 . 우선 'Multi-child layout widgets'인 'Row()'를 사용하여 3개의 'Container'을 만들고 각 열의 크기 및 색상 등을 설정하자.
- Scaffold
배경색 : teal
-컨테이너1
color : red
width : 100
height : double.infinity※화면내에서 가능한 최대의 크기를 가진다.※
-컨테이너2
color : yellow
width : 100
height : 100
-컨테이너3
color : blue
width : 100
height : double.infinity
import 'package:flutter/material.dart';
void main() {
runApp(
MyApp(),
);
}
class MyApp extends StatelessWidget {
Widget build(BuildContext context) {
return MaterialApp(
home: Scaffold(
backgroundColor: Colors.teal,
body: SafeArea(
child: Row(
children: [
Container(
color: Colors.red,
width: 100,
height: double.infinity,
), // Container
Container(
color: Colors.yellow,
width: 100,
height: 100,
), // Container
Container(
color: Colors.blue,
width: 100,
height: double.infinity,
) // Container
],
), // Row
), // SafeArea
), // Scaffold
); // MaterialApp
}
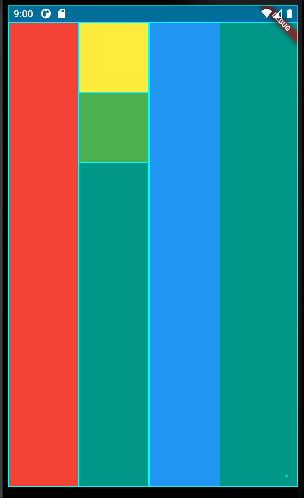
}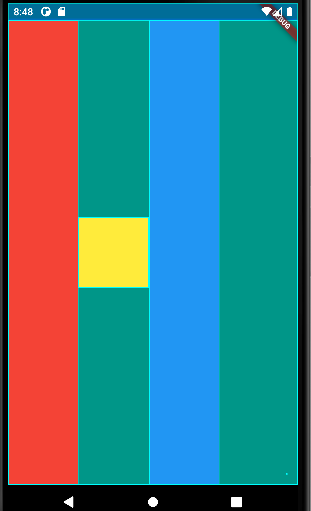 2번째 컨테이너는 다시 2개의 행으로 나눠야한다. 두번째 'Container'코드를 'Multi-child layout widgets'인 'Column'으로 바꿔서 'Column'안에 2개의 컨테이너를 만들자.
Column(
  children: [
    Container(
      color: Colors.yellow,
      width: 100,
      height: 100,
    ),
    Container(
      color: Colors.green,
      width: 100,
      height: 100,
    ),
  ],
),
위치정렬
이제 'Row'와 'Column'에 'mainAxisAlignment'속성을 적용하여 각열의 위치를 정렬시키자.
import 'package:flutter/material.dart';
void main() {
runApp(
MyApp(),
);
}
class MyApp extends StatelessWidget {
Widget build(BuildContext context) {
return MaterialApp(
home: Scaffold(
backgroundColor: Colors.teal,
body: SafeArea(
child: Row(
mainAxisAlignment: MainAxisAlignment.spaceBetween,
children: [
Container(
color: Colors.red,
width: 100,
height: double.infinity,
), // Container
Column(
mainAxisAlignment: MainAxisAlignment.center,
children: [
Container(
color: Colors.yellow,
width: 100,
height: 100,
), // Container
Container(
color: Colors.green,
width: 100,
height: 100,
), // Container
],
), // Column
Container(
color: Colors.blue,
width: 100,
height: double.infinity,
) // Container
],
), // Row
), // SafeArea
), // Scaffold
); // MaterialApp
}
}아래와 같이 제공받은 화면을 그대로 구현했다.

Flutter 학습 일기