ch10 ex5부터 시작함
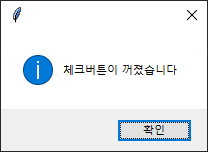
체크박스 버튼 클릭/해제


from tkinter import *
from tkinter import messagebox

window = Tk()

def myFunc():
    if chk.get() ==0:
        messagebox.showinfo('', '체크버튼이 꺼졌습니다')
    else:
        messagebox.showinfo('','체크버튼이 켜졌습니다')
chk = IntVar() #정수 변수 선언
# 전역변수
cb1 = Checkbutton(window,text='클릭하세요', variable=chk, command=myFunc)

cb1.pack()

window.mainloop()
라디오버튼 예제
#ex6.py
from tkinter import *
window = Tk()
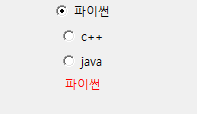
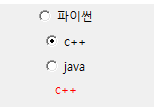
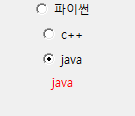
def myFunc():
if var.get()==1:
label1.configure(text='파이썬')
elif var.get()==2:
label1.configure(text='c++')
elif var.get()==3:
label1.configure(text='java')
var = IntVar()
rb1 = Radiobutton(window,text='파이썬', variable=var,value=1,command=myFunc)
rb2 = Radiobutton(window,text='c++', variable=var,value=2,command=myFunc)
rb3 = Radiobutton(window,text='java', variable=var,value=3,command=myFunc)
label1 = Label(window,text='선택한 언어', fg='red')
rb1.pack()
rb2.pack()
rb3.pack()
label1.pack()
window.mainloop()버튼만들기
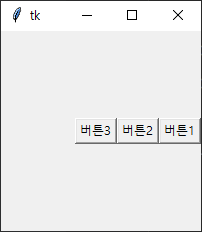
#ch10 ex.7

from tkinter import *

window = Tk()
window.geometry("500x500")
button1 = Button(window, text='버튼1')
button2 = Button(window, text='버튼2')
button3 = Button(window, text='버튼3')

button1.pack(side=RIGHT)
button2.pack(side=LEFT)
button3.pack(side=LEFT)

window.mainloop()
버튼 만들기2
#ch10 ex.8

from tkinter import *

window = Tk()
window.geometry("200x200")

butList = ['']*3

for i in range(0,3):
    butList[i] = Button(window, text='버튼' + str(i+1))

for btn in butList:
    btn.pack(side = RIGHT)

window.mainloop()

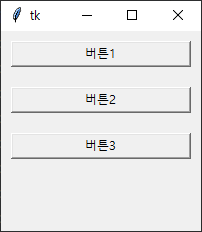
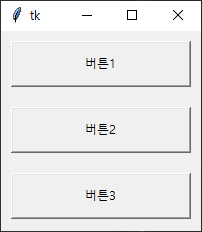
#ch10 ex.8

from tkinter import *

window = Tk()
window.geometry("200x200")

butList = ['']*3

for i in range(0,3):
    butList[i] = Button(window, text='버튼' + str(i+1))

for btn in butList:
    # btn.pack(side = RIGHT)
    btn.pack(side =TOP)
    btn.pack(side = BOTTOM)

window.mainloop()

btn.pack(side = TOP, fill=X)


안드로이드 디저트

# ch10 ex9
from tkinter import *

btnList = ['']*9
fnameList = ["froyo.gif", "gingerbread.gif", "honeycomb.gif", "icecream.gif",
             "jellybean.gif", "kitkat.gif", "lollipop.gif", "marshmallow.gif", "nougat.gif"]
photoList = [None]*9
i,k = 0, 0
xPos, yPos = 0, 0
num = 0

window = Tk()
window.geometry('210x210') # 화면크기설정

for i in range(0,9):
    photoList[i] = PhotoImage(file = 'gif/' + fnameList[i])
    btnList[i] = Button(window,image=photoList[i])

for i in range(0,3):
    for j in range(0,3):
        btnList[num].place(x=xPos, y=yPos)
        num += 1
        xPos += 70
    xPos = 0
    yPos += 70

window.mainloop()
사진 가져오기

# ch10 ex10.py
from tkinter import *
fnameList = ["jeju1.gif", "jeju2.gif", "jeju3.gif", "jeju4.gif", "jeju5.gif",
             "jeju6.gif", "jeju7.gif", "jeju8.gif", "jeju9.gif"]
photoList = [None] * 9
num = 0


def clickNext():
    global num
    num += 1
    if num > 8:
        num = 0
#         9밖에 없다 => 초기화해라
    photo = PhotoImage(file='gif/' + fnameList[num])
    pLabel.config(image = photo)
    pLabel.image = photo


def clickPrev():
    global num
    num -= 1
    if num < 0:
        num = 8
    #         9밖에 없다 => 초기화해라
    photo = PhotoImage(file='gif/' + fnameList[num])
    pLabel.config(image=photo)
    pLabel.image = photo


window = Tk()
window.geometry('700x500')
window.title('사진 앨범 보기')

photo = PhotoImage(file='gif/' + fnameList[0])
pLabel = Label(window, image=photo)

pLabel.place(x=15, y=50)
window.mainloop()

추가

마우스이벤트


# ch10 ex11
# 마우스이벤트
from tkinter import *
from tkinter import messagebox
def clickLeft(event):
messagebox.showinfo('마우스','마우스 왼쪽 버튼이 클릭됨')
window = Tk()
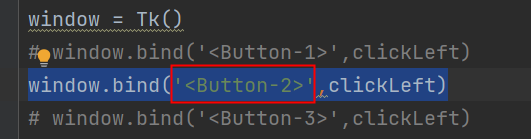
window.bind('<Button-1>',clickLeft)
window.mainloop()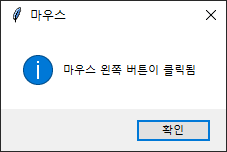

3은 오른쪽 버튼 눌러야 나옴
2는 가운데 버튼 눌러야 나옴
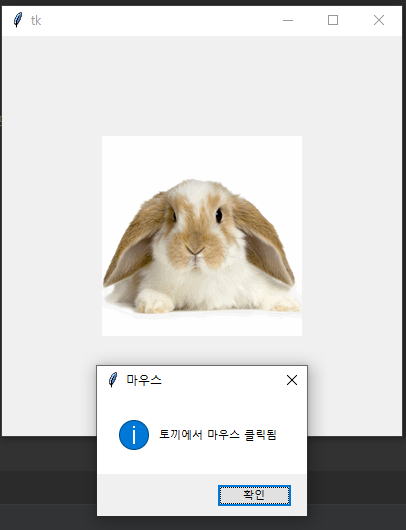
토끼 마우스이벤트
#ch10 ex12
from tkinter import *
from tkinter import messagebox
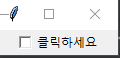
def clickImage(event):
messagebox.showinfo('마우스','토끼에서 마우스 클릭됨')
window = Tk()
window.geometry('400x400')
photo = PhotoImage(file='gif/rabbit.gif')
label1 = Label(window, image=photo)
label1.bind('<Button>', clickImage)
# 3개의 버튼 다 클릭하면
label1.pack(expand=True, anchor=CENTER)
window.mainloop()왼쪽 가운데 오른쪽 버튼 눌러도 다 이벤트리스너가 실행이 된다
이벤트 리스너 도표 정리해놓은 블로그
https://lcs1245.tistory.com/entry/Python-tkinter-Bind-Event-%EC%97%B0%EA%B2%B0
우리 교제 잘 정리해놓은 블로그
https://post.naver.com/my.naver?memberNo=11439725
마우스 클릭 위치


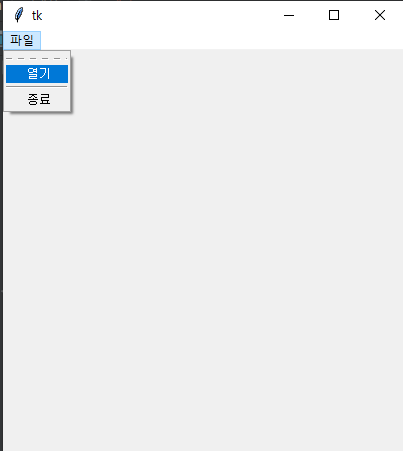
드롭다운

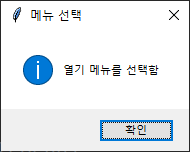
열기 눌렀을 때
종료 누르면 바로 꺼진다
from tkinter import *
from tkinter import messagebox
window = Tk()

def func_open():
    messagebox.showinfo('메뉴 선택','열기 메뉴를 선택함')

def func_exit():
    window.quit()
    window.destroy()

mainMenu = Menu(window)
window.configure(menu=mainMenu)

fileMenu = Menu(mainMenu)
mainMenu.add_cascade(label='파일', menu=fileMenu)
fileMenu.add_command(label='열기', command=func_open)
fileMenu.add_separator()
fileMenu.add_command(label='종료', command=func_exit)

window.mainloop()
파일 가져오기
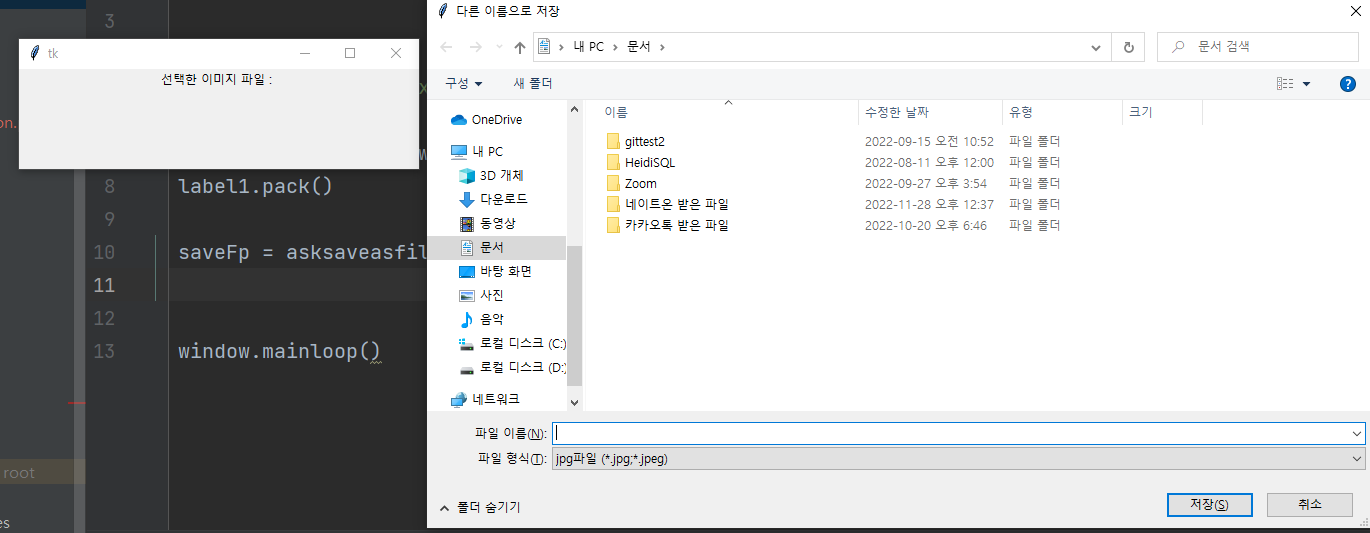
from tkinter import *
from tkinter.filedialog import *

window = Tk()
window.geometry('400x100')

label1 = Label(window, text='선택한 이미지 파일 : ')
label1.pack()

saveFp = asksaveasfile(parent=window, mode='w', defaultextension='.jpg',
                       filetypes=(('jpg파일','.jpg;*.jpeg'),('모든파일','*.*')))
# mode='w' = write 모드이다
label1.configure(text=saveFp)
saveFp.close()

window.mainloop()
근데 할 수 있는 건 없음
이미지 파일가져와서 띄우기

# ex17.py : 명화 감상하기
from tkinter import *
from tkinter.filedialog import *

window = Tk()
window.geometry('400x400')

# 함수선언
def func_open():
    filename = askopenfilename(parent=window, filetypes=(('GIF파일','.gif'),('모든 파일','*.*')))
    photo = PhotoImage(file = filename)
    pLabel.configure(image = photo)
    pLabel.image = photo

def func_exit():
    window.quit()
    window.destroy()

photo = PhotoImage()
pLabel = Label(window, image = photo)
pLabel.pack(expand=1 , anchor=CENTER)


mainMenu = Menu(window)
window.config(menu=mainMenu)
# config, configure 둘 다 동일한 것. 둘 중 어느 것 사용해도 괜찮다
fileMenu = Menu(mainMenu)
mainMenu.add_cascade(label='파일', menu=fileMenu)
fileMenu.add_command(label='열기', command=func_open)
fileMenu.add_separator()
fileMenu.add_command(label='종료', command=func_exit)


window.mainloop()
ch11생성


1번

inFp = None
inStr = ""

inFp = open('C:/temp/data1.txt','r',encoding="utf-8")

inStr = inFp.readline()
print(inStr, end='')

inStr = inFp.readline()
print(inStr, end='')

inStr = inFp.readline()
print(inStr, end='')

inFp.close()
while True:
    inStr = inFp.readline()
    if inStr == '':
        break
    print(inStr, end='')
inFp.close()
inList=''
inList = inFp.readlines()
print(inList)

파일명으로 검색하기

import os

inFp = None
fName, inList, inStr = '',[],''

fName = input('파일명을 입력하세요')

# inFp = open('C:/temp/data1.txt','r',encoding="utf-8") 파일명 때문에 가져옴

if os.path.exists(fName):
    inFp = open(fName, 'r', encoding='utf-8')
    inList = inFp.readlines()
    for inStr in inList:
        print(inStr, end='')
    inFp.close()
else:
    print('%s 파일이 없습니다' % fName)
파일 만들기
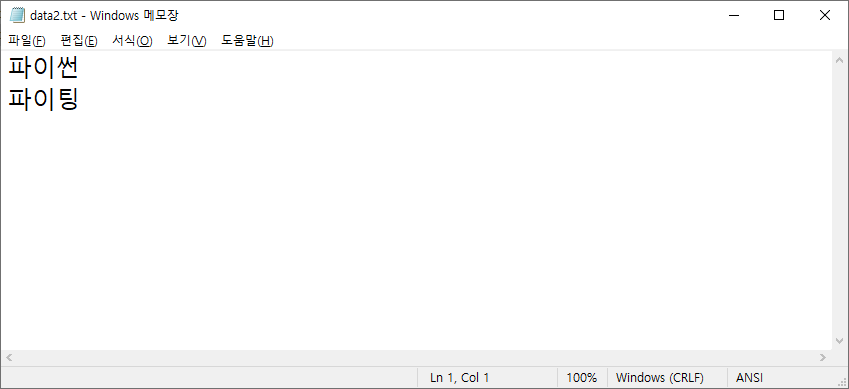
outFp = None
outStr = ''

outFp = open('C:/temp/data2.txt','w') # 파일이 w이기 때문에 만들어짐

while True:
    outStr = input('내용 입력 : ')
    if outStr != '':
        outFp.write(outStr + '\n')
    else:
        break
outFp.close()
print('파일이 정상적으로 써졌다')
# 마지막에 아무것도 치지 않아야 저장된다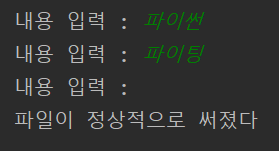
파일복사

data3이 data1 복사한 것이다
# ch11 ex4 파일복사

inFp, outFp = None, None
inStr = ''

inFp = open('C:/temp/data1.txt','r',encoding="utf-8")
outFp = open('C:/temp/data3.txt','w',encoding="utf-8")

inList = inFp.readlines()
for inStr in inList:
    outFp.writelines(inStr)

inFp.close()
outFp.close()
print('---복사완료---')
파일 암호화
# ch11 ex5 파일암호화

i = 0
secu = 0

secuYN = input('1.암호화 2.암호 해석 중 선택 : ')
inFname = input('입력 파일명을 입력하세요')
outFname = input('출력 파일명을 입력하세요')

if secuYN == '1':
    secu = 100
elif secuYN == '2':
    secu = -100
#     'C:/temp/data1.txt'
inFp = open(inFname, 'r', encoding='utf-8')
outFp = open(outFname, 'w', encoding='utf-8')

while True:
    inStr = inFp.readline()
    if not inStr:
        break

    outStr = ''
    for i in range(0, len(inStr)):
        ch = inStr[i]
        chNum = ord(ch)
        chNum += secu
        ch2 = chr(chNum)
        outStr += ch2

    outFp.write(outStr)

outFp.close()
inFp.close()
print('%s --> %s 변환완료' % (inFname, outFname))

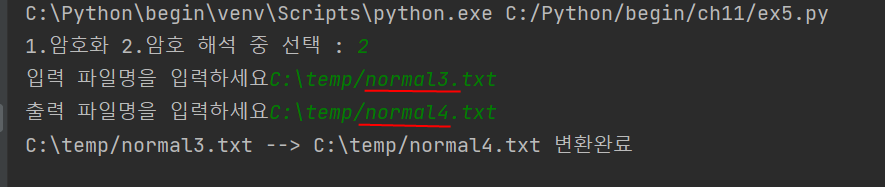
주의! 제 3의 파일을 사용해야 함. 먼저 파일생성하지 않더라고 콘솔에서 파일 제작 가능
이미지 파일 복사

inFp, outFp = None, None
inStr = ""

inFp = open('C:/temp/aa.jpg','rb')
outFp = open('C:/temp/bb.jpg','wb')

while True:
    inStr = inFp.read(1)
    if not inStr:
        break
    outFp.write(inStr)
inFp.close()
outFp.close()
print('---이미지 파일이 정상적으로 복사되었습니다-----')
특정단어 위치 찾아내기
myStr = '파이썬은 재미 있어요. 파이썬만 매일매일 공부하고 싶어요. *^^*'
strPostList = []
index = 0

while True:
    try:
        index = myStr.index('파이썬', index)
        # print(index) # 이러면 error남

        strPostList.append(index)
        index += 1
    except:
        break

print('파이썬 글자 위치 -> ', strPostList)

다중 exception
# 다중 exception
# ch11 ex8

num1 = input('숫자1 ---> ')
num2 = input('숫자2 ---> ')

try:
    num1 = int(num1)
    num2 = int(num2)
    while True:
        res = num1/num2
        print(res)
        break #이건 내가 넣은 거 계속 출력되서 정신없음

except ValueError:
    print('문자열은 숫자로 변환안됨')
except ZeroDivisionError:
    print('0으로 나누면 안됨')
except KeyboardInterrupt:
    print('Ctrl + C 를 눌렀군요')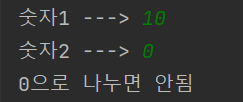

python 생성자
ch12 생성
생성자 활용하기(myCar)
#  ch12 ex1
# python 특징 :
#   변수 타입이 없고 중괄호 대신 : 사용한다(중괄호 들어가는 위치에 넣어준다)
#   들여쓰기가 아주 중요하다
class Car:
    color =''
    speed = 0
    # self => 객체 자신을 뜻한다
    def upSpeed(self, value):
        self.speed += value
    def downSpeed(self,value):
        self.speed -= value
        if self.speed < 0:
            self.speed = 0

# 여기까지 클래스 생성함

myCar1 = Car()
myCar1.color = 'red'
myCar1.speed = 0

myCar2 = Car()
myCar2.color = 'blue'
myCar2.speed = 0
myCar2.upSpeed(30)

print('자동차1의 색상은 %s이며, 현재 속도는 %dkm입니다' % (myCar1.color, myCar1.speed))
print('자동차2의 색상은 %s이며, 현재 속도는 %dkm입니다' % (myCar2.color, myCar2.speed))
myCar2
class Car:
    color =''
    speed = 0


    def __init__(self,var1,var2):
        self.speed = var1
        self.color = var2

    # self => 객체 자신을 뜻한다
    def upSpeed(self, value):
        self.speed += value

    def downSpeed(self,value):
        self.speed -= value
        if self.speed < 0:
            self.speed = 0

myCar3 = Car(50, 'orange')
print('자동차3의 색상은 %s이며, 현재 속도는 %dkm입니다' % (myCar3.color, myCar3.speed))
클래스 사용하기
class Car:
speed = 0
def upSpeed(self,value):
self.speed += value
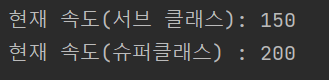
print('현재 속도(슈퍼클래스) : %d' % self.speed)
class Sedan(Car):
def upSpeed(self,value):
self.speed += value
if self.speed > 150:
self.speed = 150
print('현재 속도(서브 클래스): %d' % self.speed)
class Truck(Car):
pass
sedan1, truck1 = None, None
sedan1 = Sedan()
truck1 = Truck()
sedan1.upSpeed(200)
truck1.upSpeed(200)
거북이 클릭하면 사각형그리기
# ch12 ex5
import turtle
import random
# 거북이로 사각형 그리기
class Shape :

    myTurtle = None
    cx, cy = 0, 0

    def __init__(self):
        self.myTurtle = turtle.Turtle('turtle')

    def setPen(self):
        r = random.random()
        g = random.random()
        b = random.random()
        self.myTurtle.pencolor((r,g,b))
        pSize = random.randrange(1,10)
        self.myTurtle.pensize(pSize)

    def drawShape(self):
        pass # 하위클래스에서 상속 받아서 오버라이딩한다

class Rectangle(Shape):
    width, height = [0] * 2
    def __init__(self,x,y):
        Shape.__init__(self) # super클래스의 생성자호출
        self.cx = x
        self.cy = y
        self.width = random.randrange(20,100)
        self.height = random.randrange(20,100)

    def drawShape(self):
        # 네모 그리기기
        sx1, sy1, sx2, sy2 = [0] * 4  # 왼쪽 위 X, Y와 오른쪽 아래 X,Y

        sx1 = self.cx - self.width / 2
        sy1 = self.cy - self.height / 2
        sx2 = self.cx + self.width / 2
        sy2 = self.cy + self.height / 2

        self.setPen()
        self.myTurtle.penup()
        self.myTurtle.goto(sx1, sy1)
        self.myTurtle.pendown()
        self.myTurtle.goto(sx1,sy2)
        self.myTurtle.goto(sx2,sy2)
        self.myTurtle.goto(sx2,sy1)
        self.myTurtle.goto(sx1,sy1)

def screenLeftClick(x,y):
    rect = Rectangle(x,y)
    rect.drawShape()

turtle.title('거북이 객체지향 사각형 그리기')
turtle.onscreenclick(screenLeftClick,1)
turtle.done()
리본 그리는 것도 가능
JSP EL, JSTL
JSP 중급 문법
이런 것들..
멀티스레드

# 멀티 스레드
  #ch12 ex7

import time
import threading


class RacingCar:
    carName =''
    def __init__(self,name):
        self.carName = name

    def runCar(self):
        for _ in range(0,3):
            carStr = self.carName + '~~달립니다.\n'
            print(carStr, end='')
            time.sleep(0.1) #0.1초


car1 = RacingCar('@자동차1')
car2 = RacingCar('#자동차2')
car3 = RacingCar('$자동차3')

th1 = threading.Thread(target=car1.runCar)
th2 = threading.Thread(target=car2.runCar)
th3 = threading.Thread(target=car3.runCar)

th1.start()
th2.start()
th3.start()
ch13생성 db연결


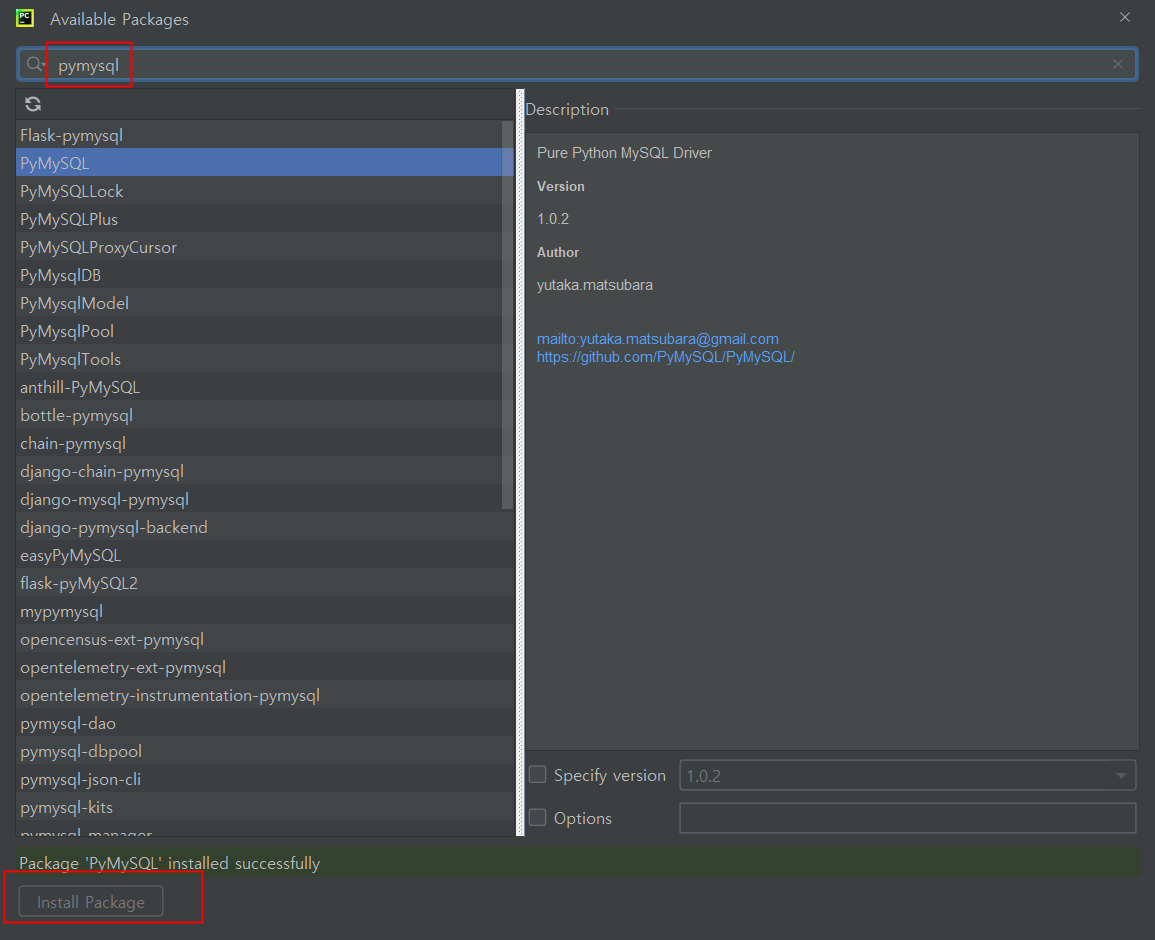
패키지 설치해줘야한다
# db연동
# ch13 ex1
import pymysql
# pip install pymysql
# pip : python install package
# 리눅스 환경
con, cur = None, None
data1, data2, data3, data4 = '','','',''
sql = ''
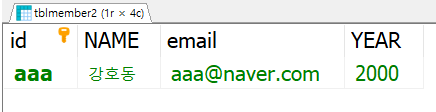
con = pymysql.connect(host='localhost', user = 'root', password = '1234', db='mydb', charset='utf8')
cur = con.cursor()
while True:
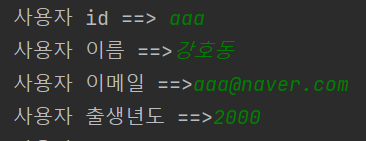
data1 = input('사용자 id ==> ')
if data1 == '':
break
data2 = input('사용자 이름 ==>')
data3 = input('사용자 이메일 ==>')
data4 = input('사용자 출생년도 ==>')
sql = "INSERT INTO tblMember2 VALUES ('"+data1 + "','" + data2 + "','" + data3 + "','" + data4 + "')"
cur.execute(sql)
con.commit()
con.close()