TIL Python Basics Day 61 - Flask-WTF/ Inheriting Templates Using Jinja2 / Flask-Bootstrap as an Inherited Template
Udemy Python Course
Flask-WTF
Flask extension to build forms
install
pip3 install flask flask-wtf
Benefits of WTF over HTML form
1. Easy Form Validation
e.g. checking that the user's email entry has a "@" and a "." at the end.
2. Less Code
3. Built in CSRF Protection
CSRF stands for Cross Site Request Forgery, it's an attack that can be made on website forms which forces your users to do unintended actions (e.g. transfer money to a stranger) or compromise your website's security if it's an admin.
Creating or using requirements.txt
It specifies all the dependencies.
This means that you can share your project without all the installed packages, making it a lot more lightweight.
pip freeze > requirements.txtCreating Login Form with Flask-WTF
Three parts to create a functioning form
1. Routes
for determining what users should be served when visiting a URL within our app. We're going to keep things simple by defining our routes in a single routes.py file.
2. Form classes
are Python models that determine the data our forms will capture, as well as the logic for validating whether or not a user has adequately completed a form when they attempt to submit. These classes are going to live in forms.py.
3. Jinja templates
will render the actual HTML forms that users will see. As we'll soon discover, Flask makes bridging the gap between Python models and HTML forms easy.
Fields
Form needs input fields, as well as a way of validating the content of those fields once submitted.
docs
Article I heavily relied on: hackersandslackers
1.Type of Input:
-StringField is a single-line text field
-TextField is a multiline textarea
a collection of input types which includes inputs for passwords, date-pickers, multi-select drop-downs, and so forth.
2. Label:
The first parameter passed to, AKA the human-readable name for each field. Labels are visible to our end users. Name it properly.
3. Validators:
-A validator is a restriction put on a field that must be met for the user's input to be considered valid.
-e.g. Ensuring a password is a minimum of 8 characters long.
-If submit invalid input, the form will fail and return an error to the user.
4. Error Message:
Any time a validator is not met, we need to tell the user what went wrong. Thus, every validator has an error message.
5. DataRequired:
DataRequired makes the two fields required fields, so the user must type something, otherwise an error will be generated.
Field Structure
field = FieldType(
    'LABEL',
    validators=[ExampleValidator(message="ERROR MESSAGE")],
    DataRequired()
)
Adding Validation to Forms with Flask-WTF
Validation Rules
-
DataRequired
when the user attempts to submit the form without filling the required fields: this prompt is actually built-in, and will occur for any field which contains the DataRequired() validator. -
Email: email must contain "@", "."
-
Length(min=8): passwords are minimum of 8 characters.
main.py
from wtforms.validators import DataRequired, Length, Email


class LoginForm(FlaskForm):
    """Login Form"""
    email = StringField(label='Email', validators=[
        Email(message=('Not a valid email address.')),
        DataRequired()
    ])
    password = PasswordField(label='Password', validators=[
        Length(min=8,
        message=('Your password is too short.')),
        DataRequired()
    ])
Routing & Validation
Our login route accepts both GET and POST requests; normally we handle routes like this by using a conditional on Flask's request object ( such as if request.method == 'POST' ), however, we used Flask-WTF's FlaskForm base class to create LoginForm(), we're able to simplify routes containing form logic into two scenarios:
1. one where the user submitted a valid, and
2. one for everything else. We're able to do this because our form now has a built-in method called validate_on_submit(), which detects if a request is both a POST request and a valid request.
@app.route("/login", methods=["GET", "POST"])
def login():
    """Standard `login` form."""
    form = LoginForm()
    if form.validate_on_submit():
        return render_template("success.html")
        #return redirect(url_for("success")) # doesn't work yet
    return render_template("login.html", form=form)
Errors
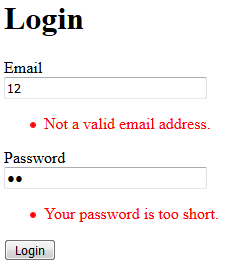
So a List of errors (errors are mutiple!) can be generated and passed over to our form HTML as a property on the field which generated the error, e.g.
<form_object>.<field>.errors
form.email.errors
We can tap into these errors and loop through them to show some text when an error appears.
login.html
<form method="POST" action="{{ url_for('login') }}" novalidate>
<p>
{{ form.csrf_token }}

{{ form.email.label }}
<br>
{{ form.email(size=30) }}

{% if form.email.errors %}
<ul class="errors">
{% for error in form.email.errors %}
<li style="color:red">{{ error }}</li>
{% endfor %}
</ul>
{% endif %}
</p>
Validation Message
Wwe have to switch off the browser validation, and we do that with an attribute on the form element called novalidate.
<form method="POST" action="{{ url_for('login') }}" novalidate>Receiving Form Data with WTForms
to get hold of the form data
<form_object>.<form_field>.data
login_form.email.data
task
@app.route("/login", methods=["GET", "POST"])
def login():
    """Standard `login` form."""
    login_form = LoginForm()
    if login_form.validate_on_submit():
        if login_form.email.data == "admin@email.com" and login_form.password.data == "12345678":
            return render_template("success.html")
        return render_template("denied.html", form=login_form)
    return render_template("login.html", form=login_form)
Inheriting Templates Using Jinja2
Template Inheritance
Often you'll find that you actually want to use the same design template for your entire website, but you might need to change some code in your header or footer. In these cases, it's better to use Template Inheritance instead.
Template inheritance is similar to Class inheritance, you can take a parent template and extend its styling in your child web pages.
- Notice that 'success.html' and'denied.html' doesn't follow conventional html template.
-style block located below title- super blocks for change in style block (denied.html has red color in h1 tag.)
base.html
<!DOCTYPE html>
<html lang="en">
<head>
    <meta charset="UTF-8">
    <title>{% block title %}{% endblock %}</title>
     <style>
    {% block styling %}
    body{
        background: purple;
    }
    {% endblock %}
    </style>
</head>
<body>
{% block content %}{% endblock %}
</body>
</html>
success.html
{% extends "base.html" %}
{% block title %}Success{% endblock %}
{% block content %}
	<div class="container">
		<h1>Top Secret </h1>
		<iframe src="https://giphy.com/embed/Ju7l5y9osyymQ" width="480" height="360" frameBorder="0" class="giphy-embed" allowFullScreen></iframe>
		<p><a href="https://giphy.com/gifs/rick-astley-Ju7l5y9osyymQ">via GIPHY</a></p>
	</div>
{% endblock %}
denied.html
{% extends "base.html" %}
{% block title %}Access Denied{% endblock %}
{% block styling %}
	{{ super() }}
	h1 {
		color:red;
	}
{% endblock %}
{% block content %}
	<div class="container">
		<h1>Access Denied </h1>
		<iframe src="https://giphy.com/embed/1xeVd1vr43nHO" width="480" height="271" frameBorder="0" class="giphy-embed" allowFullScreen></iframe>
		<p><a href="https://giphy.com/gifs/cheezburger-funny-dog-fails-1xeVd1vr43nHO">via GIPHY</a></p>
	</div>
On the denied.html page, add a super block using {{ super() }}, this will inject all the code in the styling block to this child page. Then afterwards before the {% endblock %}, we can add some more styling to change the colour of the h1
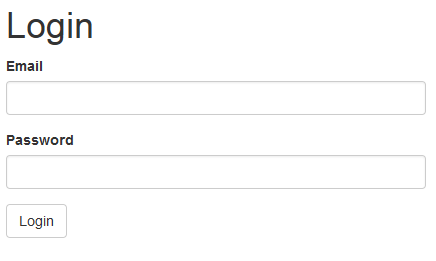
Flask-Bootstrap
{{ wtf.quick_form(form) }}What this line of code will do is generate all the labels, inputs, buttons, styling for your form just by taking the WTForm object that was passed to the template (form).
install
pip install Flask-Bootstrap
main.py
from flask_bootstrap import Bootstrap

app = Flask(__name__)
app.secret_key = "secret i am"
Bootstrap(app)
login.html
{% import "bootstrap/wtf.html" as wtf %}
  ~
{{ wtf.quick_form(form) }}
{% extends 'bootstrap/base.html' %}
{% import "bootstrap/wtf.html" as wtf %}

{% block title %}
Login
{% endblock %}

{% block content %}
<div class="container">
		<h1>Login</h1>
        {{ wtf.quick_form(form) }}
    </div>
{% endblock %}
denied.html
{% extends 'bootstrap/base.html' %}
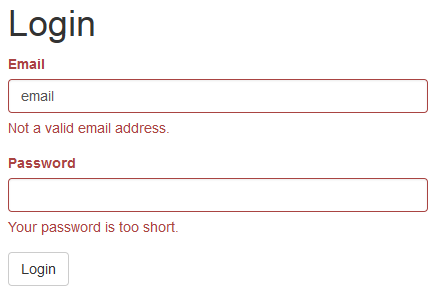
{% block title %}Access Denied{% endblock %}Result
- Login Form with bootstrap
- Invalid Input


Superbly written article, if only all bloggers offered the same content as you, the internet would be a far better place..pestoto daftar