Object Detection task에는 크게 아래 두 라이브러리를 사용한다.
- MMDetection
- Detectron2
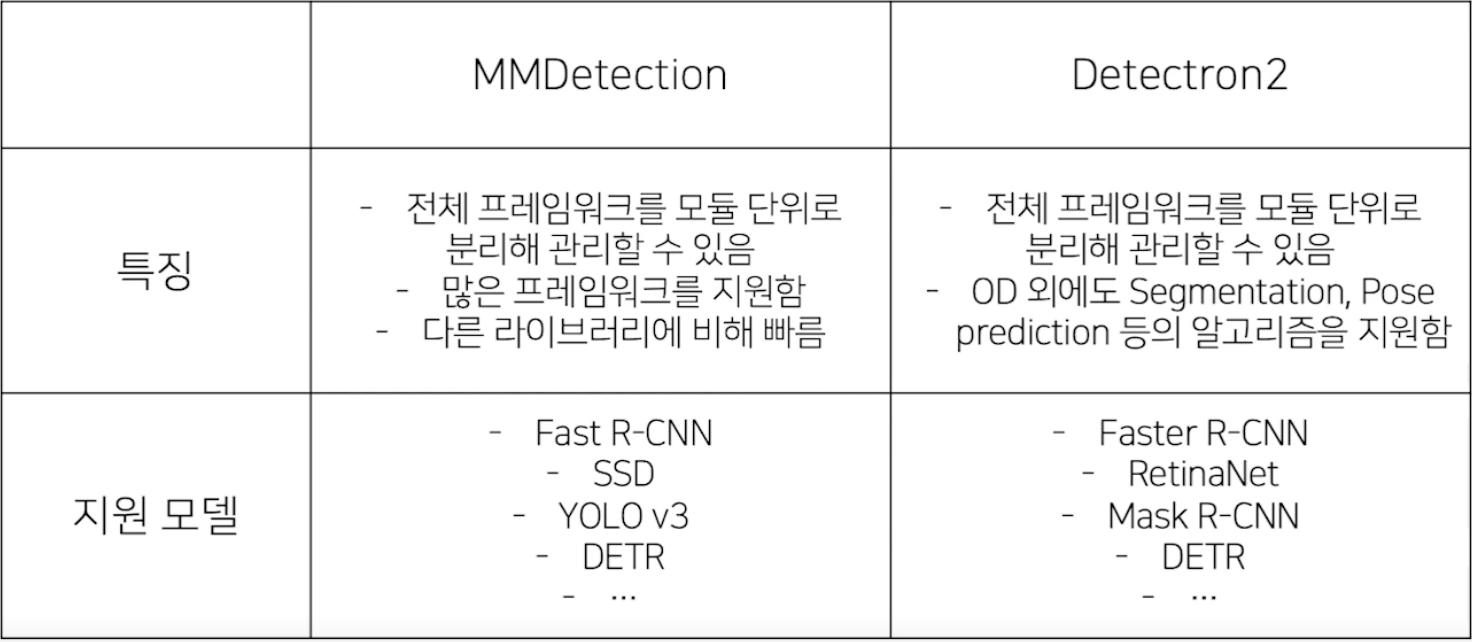
MMDetection
MMDetection은 pytorch 기반의 Object Detection 오픈소스 라이브러리로 각각의 모듈 단위로 커스터 마이징이 가능하다.
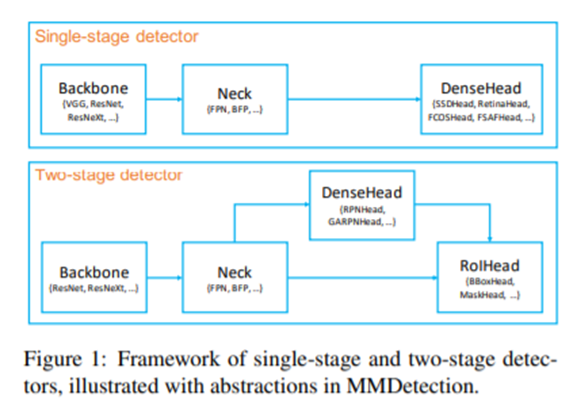
위 그림을 보면 Two-stage detector를 보면 Backbone,Neck, DenseHead, RoiHead 총 4가지 모듈로 나눌 수 있고 이러한 모듈들을 config파일을 이용해 통제한다.
MMDetection 파이프라인 실습
- 라이브러리 import
from mmcv import Config
from mmdet.datasets import build_dataset
from mmdet.models import build_detector
from mmdet.apis import train_detector
from mmdet.datasets import (build_dataloader,build_dataset,replace_ImageToTensor)- config 파일 불러오기
cfg = Config.fromfile('./configs/faster_rcnn_r50_fpn_fx_coco.py')# config파일의 경로를 파라미터로 넣어주면 됨- config 파일 수정하기
classes = ("UNKNOWN","General trash","Paper","Paper pack","Metal",
"Glass","Plastic","Styrofoam","Battery","Clothing")

#dataset 바꾸기
# 기존 pretrained된 모델은 coco데이터 셋 기준으로 학습이 되어있으므로
# 우리가 사용할 재활용 데이터 셋에 맞추어 준다.
cfg.data.train.classes = classes
cfg.data.train.img_prefix = PREFIX # 이미지가 위치하는 파일 디렉토리
cfg.data.train.ann_file = PREFIX + "train.json"#annotation파일의 위치
cfg.data.train.pipeline[2]['img_scale'] = (512,512)#이미지의 스케일

cfg.data.val.classes = classes
cfg.data.val.img_prefix = PREFIX
cfg.data.val.ann_file = PREFIX + "val.json"
cfg.data.val.pipeline[2]['img_scale'] = (512,512)

cfg.data.test.classes = classes
cfg.data.test.img_prefix = PREFIX
cfg.data.test.ann_file = PREFIX + "test.json"
cfg.data.test.pipeline[2]['img_scale'] = (512,512)
cfg.data.samples_per_gpu = 4

cfg.seed = 2020
cfg.gpu_ids = [0]
cfg.work_dir = './파일이 저장될 위치'

cfg.model.roi_head_bbox_head.num_classes = 11
cfg.optimizer_config.grad_clip = dict(max_norm=35,norm_type=2)- 모델,데이터 셋 build
model = bulid_detector(cfg.model)#모델 빌드
datasets = [bulid_dataset(cfg.data.train)]#데이터셋 빌드- 학습
train_detector(model,datasets[0], cfg, distibuted = False, validate = True)MMDetection Config file 구조
MMDetection의 Config file의 구조는 아래와 같다
-
configs를 통해 데이터 셋 부터 모델, scheduler, optimizer 정의 가능
-
특히, configs에는 다양한 object detection 모델들의 config 파일들이 정의 돼 있음
-
그 중, configs/base/ 폴더에 가장 기본이 되는 config 파일이 존재
- dataset, model, scheduler, default_runtime 4가지 기본 구성요소 존재
-
각각의 base/폴더에는 여러 버전의 config들이 담겨있음
- Dataset - COCO,VOC,Cityscape
- Model - faster_rcnn, retinanet, rpn 등
-
gitgub링크
MMDetection github
Dataset pipe line
MMDetection의 데이타셋 파이프라인은 다음과 같다
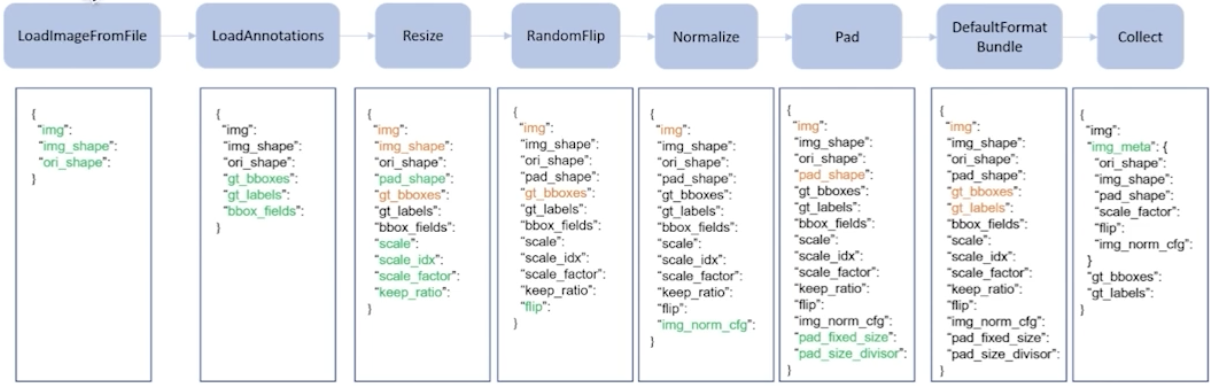
1. LoadImageFromFile: 하드 디스크에 있는 이미지로 부터 파일을 로드
2. LoadAnnotations: annotation을 로드
3. Resize: 이미지를 resize한다
Model
model = dict(
type='FasterRCNN',#type: 사용할 모델 유형
#backbone: 인풋 이미지의 feature map을 추출하는 네트워크
backbone=dict(
type='ResNet',
depth=50,
num_stages=4,
out_indices=(0, 1, 2, 3),
frozen_stages=1,
norm_cfg=dict(type='BN', requires_grad=True),
norm_eval=True,
style='pytorch',
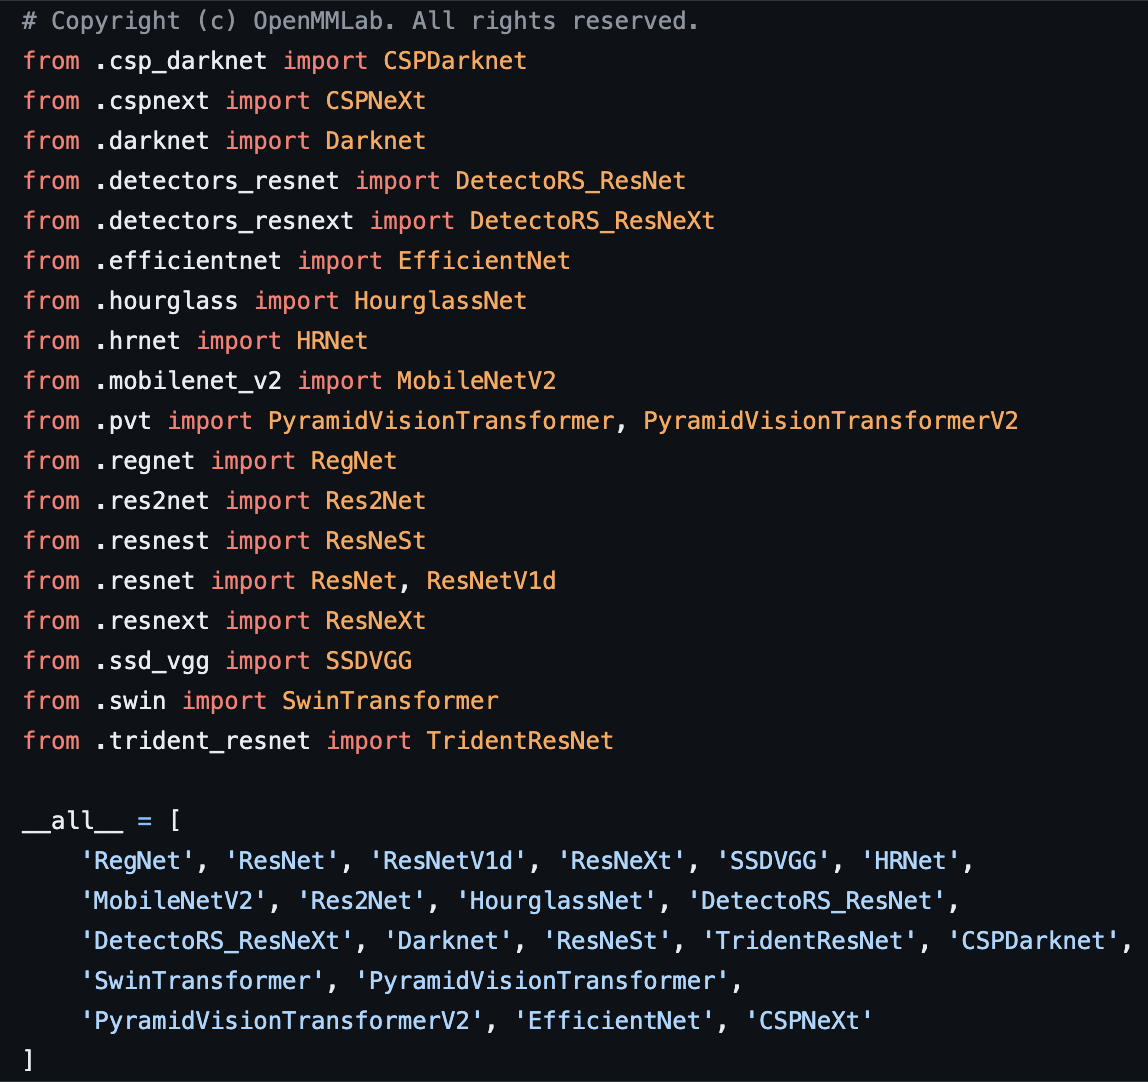
init_cfg=dict(type='Pretrained', checkpoint='torchvision://resnet50')),사용 가능한 backbone 모델
mmdetection/mmdet/models/backbones/init.py 을 보면 아래와 같이 backbone로 사용 가능한 모델들의 목록이 나온다.
- 커스텀 backbone 등록
만약 vgg16과 같이 새로운 backbone을 등록하고 싶으면 아래처럼 직접 등록할 수도 있다.- mmdet/models/backbones/mobilenet.py의 경로로 저장하면 됨
import torch.nn as nn
from ..builder import BACKBONES

@BACKBONES.register_module()
class MobileNet(nn.Module):

    def __init__(self, arg1,arg2):
        pass
    def forward(self,x):
        pass
Runtime settings
앞서 dataset, model에 대해 배웠다면 이번에은 runtime 즉 optimizer나 scheduler에 epoch 등 학습 적인 것 들에 대해 세팅하는 법을 배워보자.
-optimizer