Setup : refer to https://expo.dev
먼저 expo-cli 설치
npm install --global expo-cli expo로 프로젝트 생성
expo init 프로젝트명 cd 프로젝트명
init 할때 옵션 선택
blank
blank(typescript)
...
화살표 키로 선택 해서 init
새 프로젝트 생성 후
로그인한다.
expo loginUsername/Email Address: ..
Password: ...
을 입력 후
성공 메시지 : Success. You are now logged in as darcyu83.
가 뜨면 로그인 완료
expo start or npm startexpo로 앱을 실행하면
Developer tools running on http://localhost:xxxxx
터미널에 주소와 QR코드가 보인다.
이제 expo go와 연결을 해보자.
(in IOS app store)
터미널에 표시된 카메라 앱으로 QR을 읽어 expo go 앱과 연결한다.
(필자는 한번에 연결이 안된다.
에러메시지 :
There was a problem loading the requested app
It looks like you may be using a LAN URL. Make sure your device is on the same network as the server, and that you have granted Expo Go the Local Network permission in the Settings app, or try using the tunnel connection type.
솔루션
1. Expo Go 앱에 로컬 네트워크 퍼미션을 줘라
로컬 네트워크 접근 권한을 줬다. 안된다.
2. 그냥 터널 커넥션 타입을 써라.
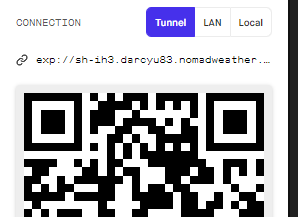
실행 후 터미널에 표시된 주소를 브라우저로 연다.
http://localhost:xxxxx
아래 그림과 같이 커넥션 옵션을 터널로 바꾼 후 QR을 읽는다.
앱 화면에 다운로딩 문구와 퍼센트가 올라간다.
app.js or app.tsx 파일안에 작성된 text가 표시된다.
잘 된 다.
연결 끝.
app.js의 내용을 바꾸고 세이브 한다.
업 데 이 트 가 된 다. cool~
