ConstraintLayout의 기본적인 사용
val (button, text) = createRefs()createRefs()또는createRef()를 사용하여, ConstraintLayout 내에서 각 컴포저블에 대한 참조를 선언해야합니다.- 이 과정은 xml에서 ConstraintLayout내에서의 참조를 위해 각 레이아웃에
id를 부여하는 작업과 유사합니다.
- 이 과정은 xml에서 ConstraintLayout내에서의 참조를 위해 각 레이아웃에
ConstraintLayout() {
	val (button, text) = createRefs()

	Button(
		onClick = { },
		modifier = Modifier.constrainAs(button) {
			// DO SOMETHING
		}
	) {
		Text("Button")
	}

	Text(
		"Text",
		modifier = Modifier.constrainAs(text) {
			// DO SOMETHING
		}
	)
}- ConstraintLayout 내의 컴포저블의 modifier에서
constrainAs(...)을 통해 해당 컴포저블이 어떤 참조에 해당되는 컴포저블인지 명시해야합니다.
- 미리 선언 된 참조에 한해
linkTo()등, 여러가지 방법을 사용하여 제약조건을 지정합니다.- 이 과정은 xml에서
app:layout_constraintTop_toBottomOf등을 사용하여 각 레이아웃이 어떤 레이아웃에 제약되는지 결정하는 작업과 유사합니다.
- 이 과정은 xml에서
아래는 간단한 예제입니다.
@Preview
@Composable
fun ConstraintLayoutContent() {
ConstraintLayout(
modifier = Modifier.size(200.dp)
) {
val (button1, button2, text) = createRefs()
Button(
onClick = { },
modifier = Modifier.padding(8.dp).constrainAs(button1) {
top.linkTo(parent.top, margin = 8.dp)
start.linkTo(parent.start)
}
) {
Text("Button 1")
}
Button(
onClick = { },
modifier = Modifier.padding(8.dp).constrainAs(button2) {
centerTo(parent)
}
) {
Text("Button 2")
}
Text(
"Text",
modifier = Modifier.constrainAs(text) {
top.linkTo(button.bottom, margin = 16.dp)
end.linkTo(parent.end, margin = 16.dp)
}
)
}
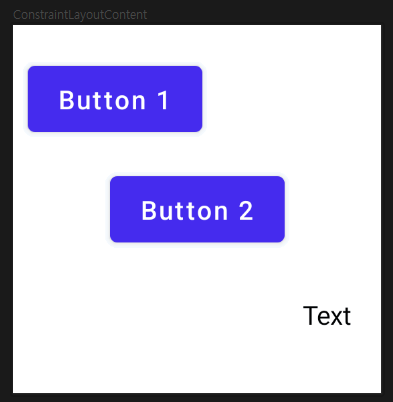
}위의 코드에서는 아래와 같이 컴포저블을 세팅했습니다.
button1: 부모의 top와 startbutton2: 부모의 중앙text:button2의 bottom과 부모의 end
결과는 아래와 같습니다.
Chain
기존 xml에서의 ConstraintLayout 안에서 여러 레이아웃을 app:layout_constraintVertical_chainStyle 등의 코드를 통해 체이닝하여 사용하였습니다.
이는 Jetpack Compose에서도 마찬가지로 사용 가능합니다.
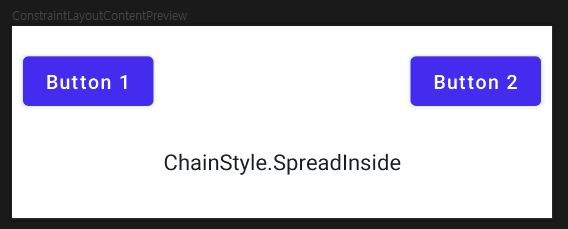
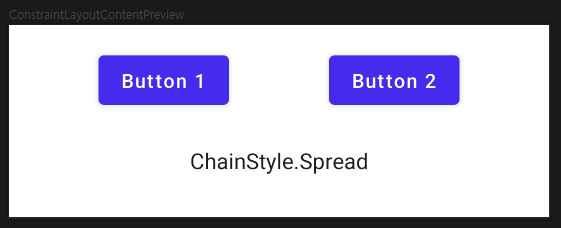
createHorizontalChain(button1, button2, chainStyle = ChainStyle.Packed)우선, createHorizontalChain()을 사용해 체인을 선언해야합니다. createVerticalChain()을 통해 세로로 체이닝 할 수도 있습니다.
chainStyle는 각 컴포저블을 어떤 형태로 체이닝할지 결정하는 요소로, 종류와 각각의 예제는 아래와 같습니다.
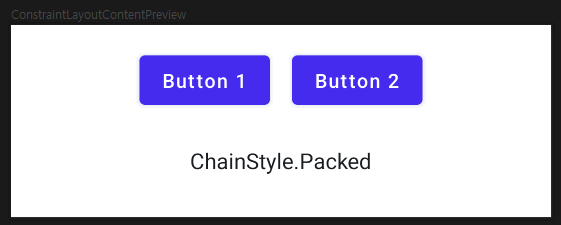
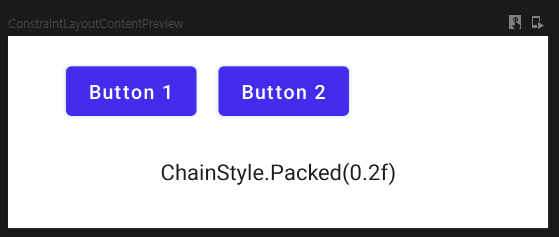
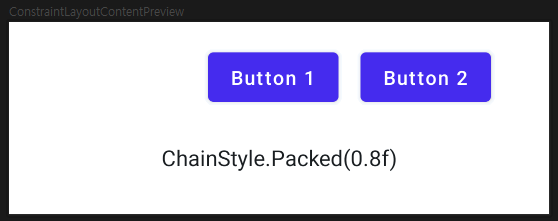
특히, ChainStyle.Packed()는 bias 설정을 통해 어느 한 쪽으로 쏠리게 할 수 있습니다.
아래는 전체 코드이며, ChainStyle에 따라 위의 결과 중 선택한 style에 따른 결과를 얻을 수 있습니다.
@Preview
@Composable
fun ConstraintLayoutContent() {
    ConstraintLayout (modifier = Modifier
        .fillMaxWidth()
        .height(200.dp)) {
        val (button1, button2, text) = createRefs()

        createHorizontalChain(button1, button2, chainStyle = ChainStyle.Packed) // SpreadInside, Spread, Packed

        Button(
            onClick = { },
            modifier = Modifier.padding(8.dp).constrainAs(button1) {
                top.linkTo(parent.top, margin = 8.dp)
            }
        ) {
            Text("Button 1")
        }

        Button(
            onClick = { },
            modifier = Modifier.padding(8.dp).constrainAs(button2) {
                top.linkTo(parent.top, margin = 8.dp)
            }
        ) {
            Text("Button 2")
        }

        Text(
            "Text",
            modifier = Modifier.constrainAs(text) {
                top.linkTo(button1.bottom, margin = 16.dp)
                centerHorizontallyTo(parent)
            }
        )
    }
}
GuideLine
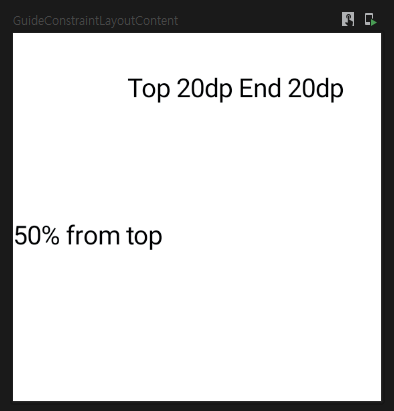
가이드라인은 컴포저블을 위치하게 할 수 있는 보이지 않는 뷰입니다.
가이드라인은 float, offset, dp를 사용하여 크기/위치를 설정할 수 있습니다.
아래와 같은 방식으로 가이드라인을 선언 할 수 있습니다.
val guideLineFromTop5f = createGuidelineFromTop(0.5f)
val guideLineFromTop20dp = createGuidelineFromTop(20.dp)
val guideLineFromEnd20dp = createGuidelineFromEnd(20.dp)
각각, 부모의 Top에서 50%, 20dp, End에서 20dp 만큼 떨어진 부분에 가이드라인이 생성됩니다.
선언 된 가이드라인은 다른 컴포저블들을 ConstraintLayout 내에서 위치시키는데 이용될 수 있습니다.
@Preview
@Composable
fun GuideConstraintLayoutContent() {
    ConstraintLayout (modifier = Modifier.size(200.dp)) {
        val (text1, text2) = createRefs()

        val guideLineFromTop5f = createGuidelineFromTop(0.5f)
        val guideLineFromTop20dp = createGuidelineFromTop(20.dp)
        val guideLineFromEnd20dp = createGuidelineFromEnd(20.dp)

        Text(
            "50% from top",
            modifier = Modifier.constrainAs(text1) {
                top.linkTo(guideLineFromTop5f)
            }
        )

        Text(
            "Top 20dp End 20dp",
            modifier = Modifier.constrainAs(text2) {
                top.linkTo(guideLineFromTop20dp)
                end.linkTo(guideLineFromEnd20dp)
            }
        )

    }
}
Barrier
Barrier는 가이드라인과 같이 보이지 않는 뷰로서, 다른 컴포저블을 위치시키는데 도움을 줍니다.
하지만 가이드라인이 부모를 기준으로 위치했다면 Barrier는 다른 컴포넌트를 기준으로 유동적으로 위치하게 할 수 있습니다.
아래는 text1, text2중 더 end가 긴 쪽에 가이드라인을 선언하는 코드입니다.
val endBarrier = createEndBarrier(text1, text2)End 대신 Top, Start, Bottom등을 넣어서 원하는 위치에 배리어를 생성할 수 있습니다.
이를 통해 아래와 같은 뷰를 만들 수 있습니다.
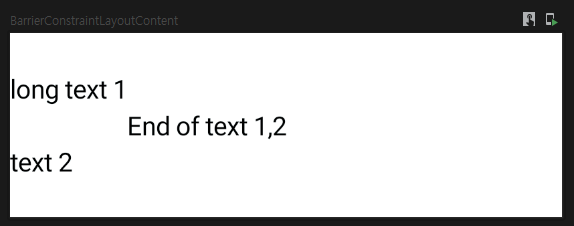
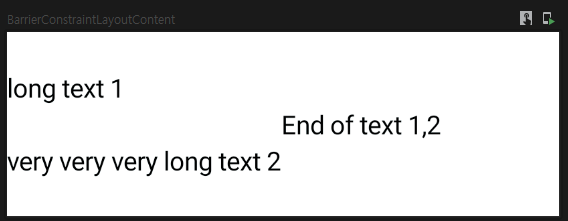
위 뷰를 만들 수 있는 코드는 아래와 같습니다.
@Preview
@Composable
fun BarrierConstraintLayoutContent() {
    ConstraintLayout (modifier = Modifier.size(height = 100.dp, width = 300.dp)) {
        val (text1, text2, text3) = createRefs()

        createVerticalChain(text1, text2, chainStyle = ChainStyle.Spread)

        val endBarrier = createEndBarrier(text1, text2)

        Text(
            "long text 1",
            modifier = Modifier.constrainAs(text1) { }
        )

        Text(
            "very very very long text 2",
            modifier = Modifier.constrainAs(text2) { }
        )

        Text(
            "End of text 1,2",
            modifier = Modifier.constrainAs(text3) {
                start.linkTo(endBarrier)
                centerVerticallyTo(parent)
            }
        )

    }
}