📔설명
Java Swing을 통해 입력을 받아보는 프로그램을 작성해보자.
📃소스 코드 1
import javax.swing.JOptionPane;

import org.opentutorials.iot.Elevator;
import org.opentutorials.iot.Lighting;
import org.opentutorials.iot.Security;

public class OKJavaGoInHomeInput {

	public static void main(String[] args) {

		String id = JOptionPane.showInputDialog("Enter a ID");

		//Elevator Call
		Elevator myElevator=new Elevator(id);
		myElevator.callForUp(1); //1floor

		//Security Off
		Security mySecurity=new Security(id);
		mySecurity.off();

		//Light On
		Lighting hallLamp = new Lighting(id+" / Hall Lamp");
		hallLamp.on();

		Lighting floorLamp = new Lighting(id+" / Floor Lamp");
		floorLamp.on();

	}

}
📰실행 1
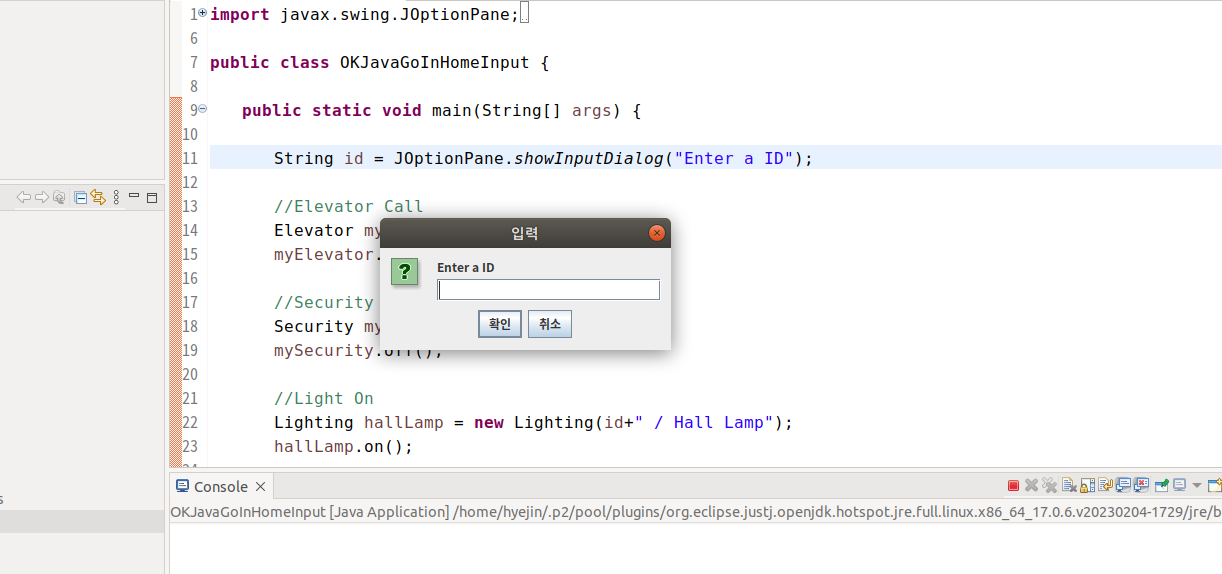
Windows로 만들었을 때 촌스러운 Swing 창과 많이 변했다...
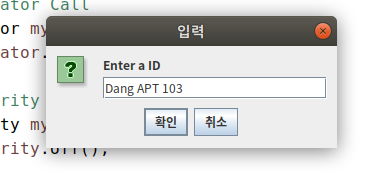
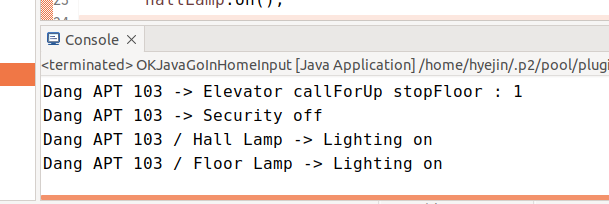
id값이 Dang APT 103으로 바뀌는 것을 확인할 수 있다!!
📃소스 코드 2
import javax.swing.JOptionPane;

import org.opentutorials.iot.DimmingLights;
import org.opentutorials.iot.Elevator;
import org.opentutorials.iot.Lighting;
import org.opentutorials.iot.Security;

public class OKJavaGoInHomeInput {

	public static void main(String[] args) {

		String id = JOptionPane.showInputDialog("Enter a ID");
		String bright = JOptionPane.showInputDialog("Enter a bright");

		//Elevator Call
		Elevator myElevator=new Elevator(id);
		myElevator.callForUp(1); //1floor

		//Security Off
		Security mySecurity=new Security(id);
		mySecurity.off();

		//Light On
		Lighting hallLamp = new Lighting(id+" / Hall Lamp");
		hallLamp.on();

		Lighting floorLamp = new Lighting(id+" / Floor Lamp");
		floorLamp.on();

		DimmingLights moodLamp=new DimmingLights(id+" moodLamp"); //control bright
		moodLamp.setBright(Double.parseDouble(bright)); //double type
		moodLamp.on();

	}

}Double.parseDouble()을 통해 String to Double을 할 수 있다.
📰실행 2
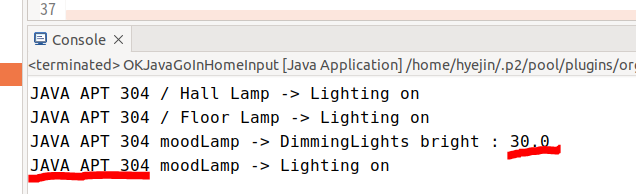
Input값을 showInputDialog를 통해 받아보았다.
📃소스 코드 3
import javax.swing.JOptionPane;

import org.opentutorials.iot.DimmingLights;
import org.opentutorials.iot.Elevator;
import org.opentutorials.iot.Lighting;
import org.opentutorials.iot.Security;

public class OKJavaGoInHomeInput {

	public static void main(String[] args) {

		String id = args[0];
		String bright = args[1];

		//Elevator Call
		Elevator myElevator=new Elevator(id);
		myElevator.callForUp(1); //1floor

		//Security Off
		Security mySecurity=new Security(id);
		mySecurity.off();

		//Light On
		Lighting hallLamp = new Lighting(id+" / Hall Lamp");
		hallLamp.on();

		Lighting floorLamp = new Lighting(id+" / Floor Lamp");
		floorLamp.on();

		DimmingLights moodLamp=new DimmingLights(id+" moodLamp"); //control bright
		moodLamp.setBright(Double.parseDouble(bright)); //double type
		moodLamp.on();

	}

}
📂인자 설정

실행 버튼 오른쪽의 아래삼각형을 누르면 Run Configurations라는 것이 있다.
그것을 누르면 창이 뜨게 된다.
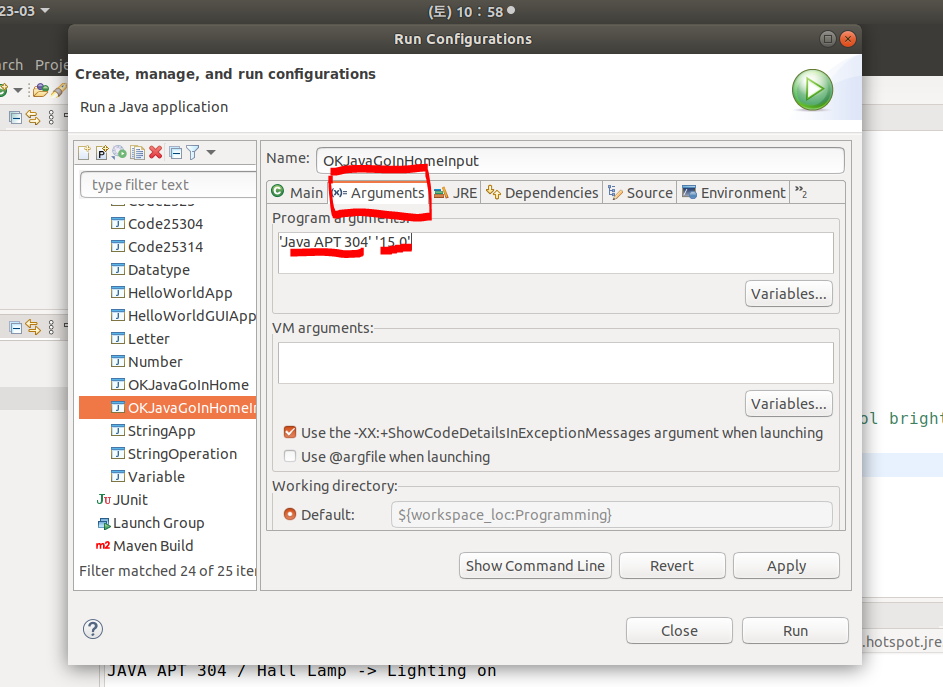
Arguments에서 입력값을 미리 설정할 수 있다.
입력값은 작은따옴표로 묶으며, 여러개 입력시 사이를 띄어쓰기 해주면 된다.
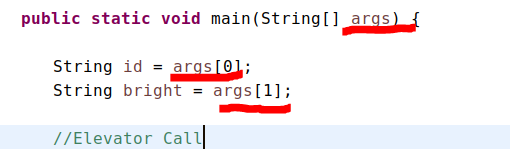
해당 인자(Arguments)를 작동시키려면
main문 옆에 있는 main(String[] args)의 args를 이용한다.
args는 매개변수(parameter)이라고 한다.
즉, 우리가 입력한 Arguments의 값이 args로 들어가게 된다.
📰실행 3
첫 번째 인자는 [0], 두 번째 인자는 [1]으로 실행시키면
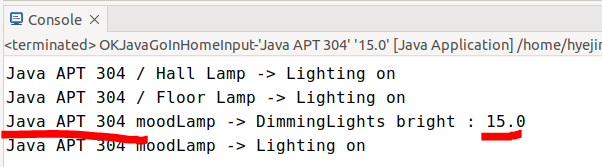
아까 입력한 Arguments대로 입력된 것을 볼 수 있다.

디버거로 확인할 수 있다.

MSSQL DBA 신입