Docker와 Docker Compose를 Linux 환경에 설치하는 과정을 작성해 보도록 하겠다.
설치환경
Ubuntu 22.04.3 LTS
Linux 5.10.16.3-mircrosoft-standard-WSL2 X86_64
설치 방법은 docker docs를 참고했다.
1. 구버전 삭제
설치 시에 충돌이 일어나지 않도록 구 버전을 모두 삭제한다. docker 관련된 패키지 말고도 containerd와 runc 패키지도 docker와 충돌이 발생할 수 있으니 삭제해야 한다고 한다.
아래 명령어를 사용하여 해당 패키지들을 삭제할 수 있다.
for pkg in docker.io docker-doc docker-compose docker-compose-v2 podman-docker containerd runc; do sudo apt-get remove $pkg; done패키지가 설치되어 있지 않다면 아래 이미지와 같이 스킵 된다.
Reading package lists... Done
Building dependency tree... Done
Reading state information... Done
Package 'docker.io' is not installed, so not removed
0 upgraded, 0 newly installed, 0 to remove and 5 not upgraded.
2. apt repository를 사용하여 설치
Docker 패키지를 설치하기 전, apt source에 repository를 추가한다. apt-get install를 사용하여 바로 설치하지 못하는 이유는 기본 저장소에 docker가 없기 때문이다.
# Docker의 GPG Key 등록
sudo apt-get update
sudo apt-get install ca-certificates curl gnupg
sudo install -m 0755 -d /etc/apt/keyrings
curl -fsSL https://download.docker.com/linux/ubuntu/gpg | sudo gpg --dearmor -o /etc/apt/keyrings/docker.gpg
sudo chmod a+r /etc/apt/keyrings/docker.gpg

# Apt Source에 repository 추가
echo \
  "deb [arch=$(dpkg --print-architecture) signed-by=/etc/apt/keyrings/docker.gpg] https://download.docker.com/linux/ubuntu \
  $(. /etc/os-release && echo "$VERSION_CODENAME") stable" | \
  sudo tee /etc/apt/sources.list.d/docker.list > /dev/null
sudo apt-get update
3. Docker 패키지 설치
최신 버전 설치
sudo apt-get install docker-ce docker-ce-cli containerd.io docker-buildx-plugin docker-compose-plugin특정 버전 설치
# 설치 가능한 버전 조회
apt-cache madison docker-ce | awk '{ print $3
아래와 같이 설치 가능한 버전이 조회되는데, 이 중에서 원하는 버전으로 설치하면 된다.
5:24.0.7-1~ubuntu.22.04~jammy
5:24.0.6-1~ubuntu.22.04~jammy
5:24.0.5-1~ubuntu.22.04~jammy
5:24.0.4-1~ubuntu.22.04~jammy
5:24.0.3-1~ubuntu.22.04~jammy
...
# VERSION_STRING에 설치하려는 버전을 입력한다
VERSION_STRING=5:24.0.0-1~ubuntu.22.04~jammy
sudo apt-get install docker-ce=$VERSION_STRING docker-ce-cli=$VERSION_STRING containerd.io docker-buildx-plugin docker-compose-plugin
4. 설치 확인하기
여기까지 왔다면 설치가 완료되었다. 테스트 이미지를 실행해봄으로써 정상적으로 설치가 되었는지 확인해 보자.
sudo docker run hello-worldWSL 환경에서 발생하는 오류
WSL에서 설치를 진행하는 경우, 아래와 같은 오류가 발생할 수 있다.
docker: Cannot connect to the Docker daemon at unix:///var/run/docker.sock. Is the docker daemon running?.
해당 오류는 WSL에는 systemd가 지원되지 않기 때문에 발생하는 문제로, docker를 수동으로 시작해 주어야 한다.
# docker 서비스 시작
sudo service docker start
# docker 서비스 조회
sudo service docker status
만약 서비스를 시작 후, 조회했는데 실행되지 않는다고 나온다면 alternative iptables 설정을 변경 후, 다시 시도해 보자.
# 아래 명령어 실행 후 iptables-legacy인 1 입력
sudo update-alternatives --config iptables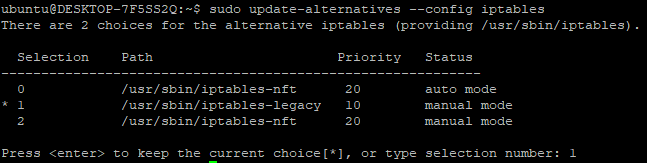
실행 결과 확인
정상적으로 docker가 설치되었다면 아래와 같은 결과를 확인할 수 있다.
Unable to find image 'hello-world:latest' locally
latest: Pulling from library/hello-world
719385e32844: Pull complete
Digest: sha256:c79d06dfdfd3d3eb04cafd0dc2bacab0992ebc243e083cabe208bac4dd7759e0
Status: Downloaded newer image for hello-world:latestHello from Docker!
This message shows that your installation appears to be working correctly.To generate this message, Docker took the following steps:
1. The Docker client contacted the Docker daemon.
2. The Docker daemon pulled the "hello-world" image from the Docker Hub.
(amd64)
3. The Docker daemon created a new container from that image which runs the
executable that produces the output you are currently reading.
4. The Docker daemon streamed that output to the Docker client, which sent it
to your terminal.To try something more ambitious, you can run an Ubuntu container with:
$ docker run -it ubuntu bashShare images, automate workflows, and more with a free Docker ID:
https://hub.docker.com/For more examples and ideas, visit:
https://docs.docker.com/get-started/