이 시리즈에 나오는 모든 내용은 인프런 인터넷 강의 - 스프링 시큐리티 - Spring Boot 기반으로 개발하는 Spring Security - 에서 기반된 것입니다. 그리고 여기서 인용되는 PPT 이미지 또한 모두 해당 강의에서 가져왔음을 알립니다.
스프링 부트 프로젝트를 생성하여 실습을 진행하고 환경은 아래와 같다.
- spring boot version :
2.6.10 - spring boot dependency:
spring-webspring-securitylombokthymeleaf
주의!
spring boot 2.7.x 버전 부터는 Spring Security 설정법이 좀 바뀌어서
강의의 내용과 다르다. 그러므로 2.6.x 버전으로 하겠다.
프로젝트 생성 이후에 application.properties 파일에 다음 2줄을 넣어서 앞으로
로그인할 때 사용하도록 하겠다.
# 스프링 시큐리티 로그인 아이디
spring.security.user.name=user

# 스프링 시큐리티 로그인 비밀번호
spring.security.user.password=1111
🥝 사용자 정의 보안 기능 구현
🥥 자동 보안 기능
Spring boot 프로젝트에서 Spring-Security 의존성을 넣으면 자동으로
스프링 시큐리티가 적용되기 시작한다.
하지만 자동으로 설정된 보안 기능은 실제로 쓰기에는 적절치 않다.
🥥 사용자 정의 보안 기능
그래서 스프링 시큐리티를 사용할 때는 개발자가 직접 스프링 시큐리티의 보안
기능들을 정의하는 것이 일반적이다.
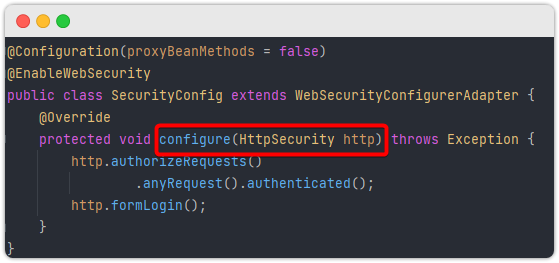
이때 직접 정의를 하기 위해서는 WebSecurityConfigurerAdapter 클래스를 상속한
자식 클래스를 하나 생성하고 나서 configure(HttpSecurity http) 를
override 하는 메소드를 작성하면 된다.
이때 override 하는 메소드의 파라미터인 http 를 사용해서 인증 및 인가 api 를
호출하여 스프링 시큐리티가 제공하는 보안기능을 입맛에 맞게 설정할 수 있다.
ex)
package me.dailycode.securitymemo;

import org.springframework.context.annotation.Configuration;
import org.springframework.security.config.annotation.web.builders.HttpSecurity;
import org.springframework.security.config.annotation.web.configuration.EnableWebSecurity;
import org.springframework.security.config.annotation.web.configuration
													.WebSecurityConfigurerAdapter;

@Configuration(proxyBeanMethods = false)
@EnableWebSecurity
public class SecurityConfig extends WebSecurityConfigurerAdapter {
    @Override
    protected void configure(HttpSecurity http) throws Exception {
    	// 인증, 인가 API 호출!
        http.authorizeRequests()
                .anyRequest().authenticated();
        http.formLogin();
    }
}
여기서 주요 포인트는 아래 2가지다.
WebSecurityConfigurerAdapter추상 클래스:- 스프링 애플리케이션이 시작 시 동작
- 웹 보안 기본 설정 초기화 수행
- configure 메소드의
HttpSecurity http파라미터:- 사용자의 세부적인 보안 기능 설정
HttpSecurity클래스에는 인증 및 인가와 관련된 다양한 API를 제공한다.
🥥 WebSecurityConfigurerAdapter
위에서 말했지만 WebSecurityConfigurerAdapter는 내부적으로 웹 보안에 필요한
기본 설정을 초기화한다. 많은 초기화들이 일어나겠지만 그중에서도 기본 보안 기능 적용
파트만 한번 보자.
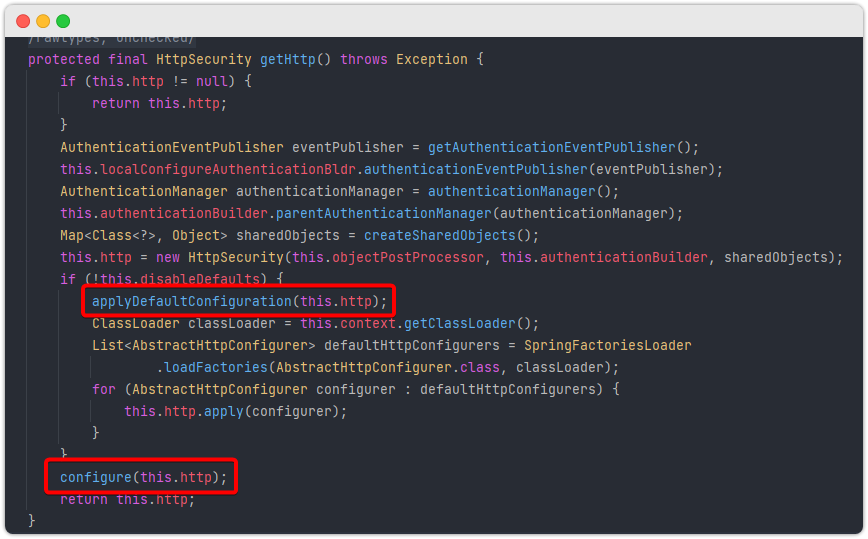
위 그림은 WebSecurityConfigurerAdapter 코드의 일부이며,
Spring boot 프로젝트를 실행하면 getHttp() 메소드가 자동으로 실행된다.
그리고 getHttp() 메소드 내에서 중요하게 볼 것은 딱 2가지 메소드이다.
applyDefaultConfiguration(this.http)호출configure(this.http)호출
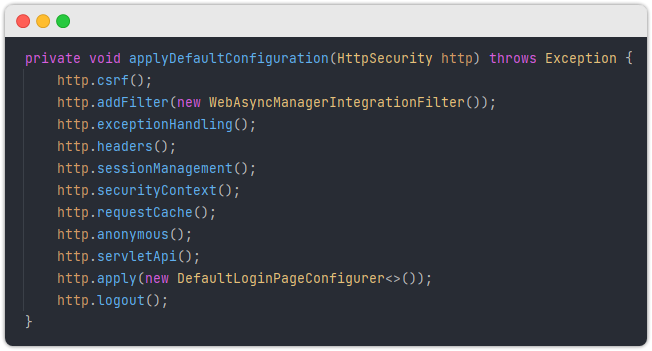
applyDefaultConfiguration(this.http) 는 WebSecurityConfigurerAdapter
내부에서 지정한 기본 보안 기능들을 적용하는 메소드이다.
이후에 나오는 configure(this.http)는 앞서 자식 클래스에서 override 했던 configure 메소드가 호출된다.
TIP : 기본으로 적용되는 보안기능을 끄고 싶다면 자신이 작성한 configure 메소드 내에서
http.csrf().disable();처럼 작성하면 된다.
참고:
사용자가 직접 정의하지 않았다면 WebSecurityConfigurerAdapter 에 선언된
configure(HttpSecurity http)메소드가 호출된다.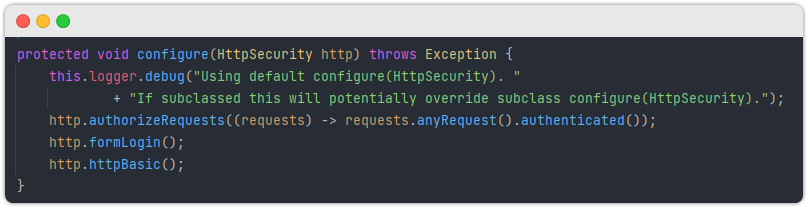
🥝 Form Login 인증 적용
이제 사용자 보안 기능 적용하는 법을 알았으니, 그 방법을 사용해서 Form Login 인증
기능을 적용해보자. 먼저 간단하게 스프링 시큐리티가 Form Login 에 대한 처리 프로세스와
API 사용법 그리고 실제 처리를 하는 Filter 클래스 내부의 프로세스를 알아보자.
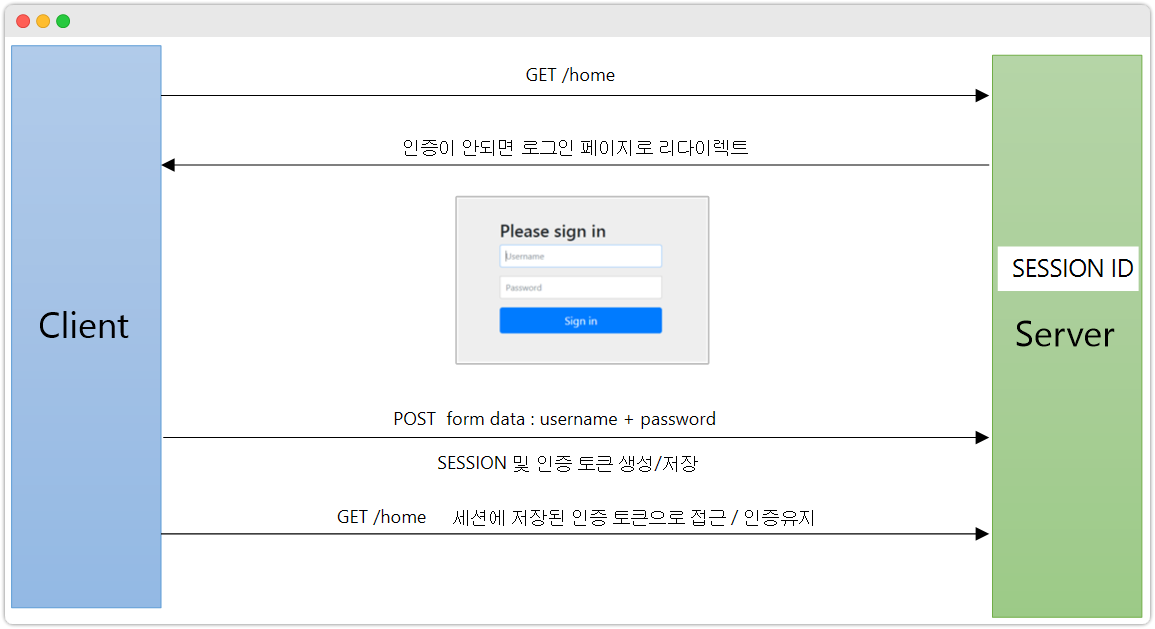
🥥 Form Login 동작방식
Spring Security 내에서는 Form Login 의 프로세스는 아래와 같다.
🥥 API 사용
@Configuration(proxyBeanMethods = false)
@EnableWebSecurity
public class SecurityConfig extends WebSecurityConfigurerAdapter {
    @Override
    protected void configure(HttpSecurity http) throws Exception {
        http.authorizeRequests(request -> request.anyRequest().authenticated());
        http
            .formLogin()			     // 로그인 기능 적용
            .loginPage("/loginPage")     // 커스텀 로그인 페이지 설정
            // .defaultSuccessUrl("/")   // successHandler 로 대체!
            // .failureUrl("/login")     // failureHandler 로 대체!
            // .loginProcessingUrl("/loginProcess") // 로그인 form action url
            .usernameParameter("userId") // form 아이디 파라미터 키값
            .passwordParameter("passwd") // form 비밀번호 파라미터 키값
            .successHandler((request, response, authentication) -> {
                System.out.println("authentication : " + authentication.getName());
                response.sendRedirect("/");
            })
            .failureHandler((request, response, exception) -> {
                System.out.println("exception : " + exception.getMessage());
                response.sendRedirect("/loginPage");
            })
            .permitAll();   // 로그인 페이지는 무조건 접근 가능하게.
    }
}
🥥 Form Login 인증 필터 : UsernamePasswordAuthenticationFilter
실제 인증 처리를 담당하는 UsernamePasswordAuthenticationFilter 필터에 대해서 알아보자.
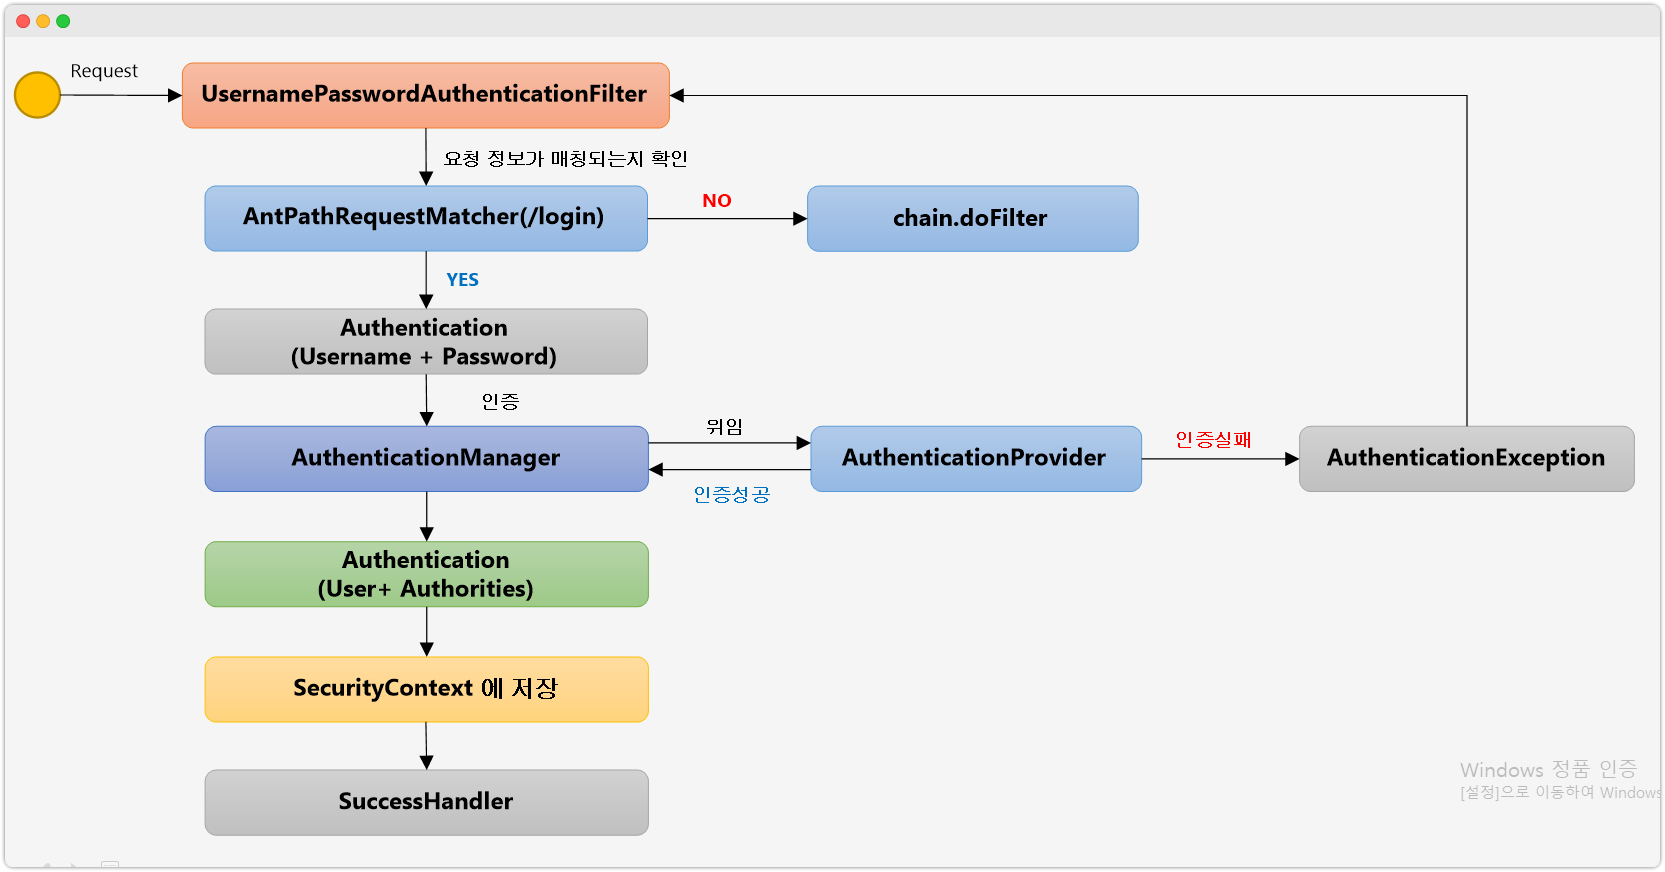
처리 흐름을 말로 풀면 아래와 같다.
- 사용자가 요청한 url 을 체크한다.
- 참고로 이 url
loginProcessingUrl()로 지정 가능하다.
- 참고로 이 url
- 인증 객체(Authentication)를 하나 생성하고, Username 과 Password 를 저장한다.
- 그 객체를 AuthenticationManager 에게 전달한다. 이 객체는 내부적으로
AuthenticationProvider 를 갖는다. - AuthenticationProvider 가 실제 인증 처리를 한다.
- 인증에 성공하면 Authentication 객체를 생성하고, 그 안에 User, Authorities 정보를 저장한다.
- 해당 Authentication 객체를 UsernamePasswordAuthenticationFilter 가 반환 받는다.
- 받은 객체를 SecurityContext 에 저장한다.
- 참고로 이 SecurityContext 는 이후에 Session에 저장된다.
- 마지막으로 Successhandler 에 지정한 추후 작업을 수행한다.
위 과정을 코드로도 확인할 수 있다.
UsernamePasswordAuthenticationFilter의 부모 클래스인
AbstractAuthenticationProcessingFilter 안에서 확인이 가능하다.
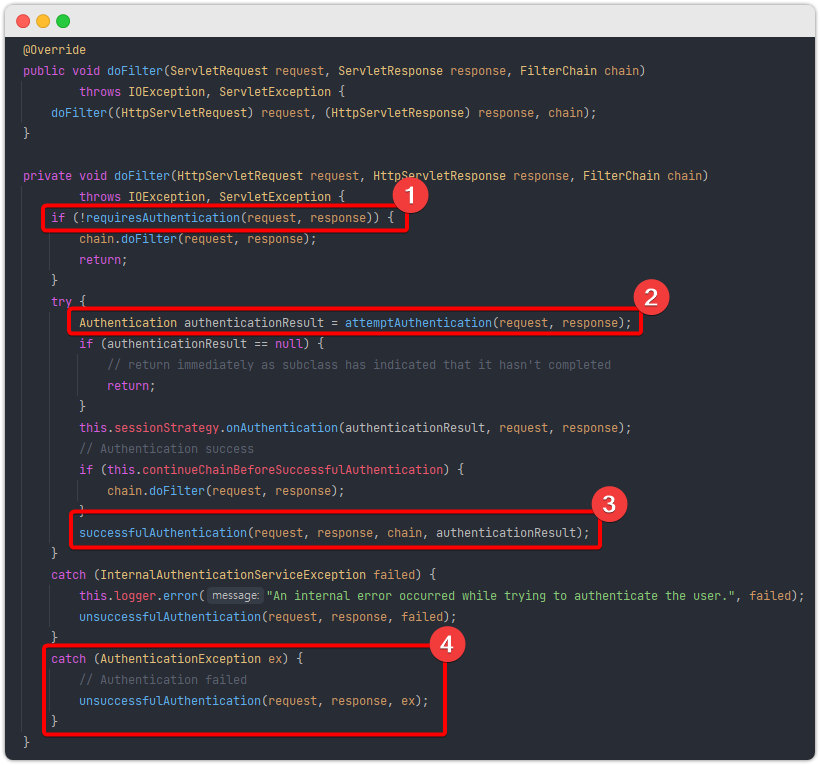
1. 요청한 url 이 loginProcessingUrl 에서 지정한 url이 맞는지 확인.
2. 실제 인증 처리를 AuthenticationManager 에게 위임하고, 인증 객체(Authentication)을 반환 받음
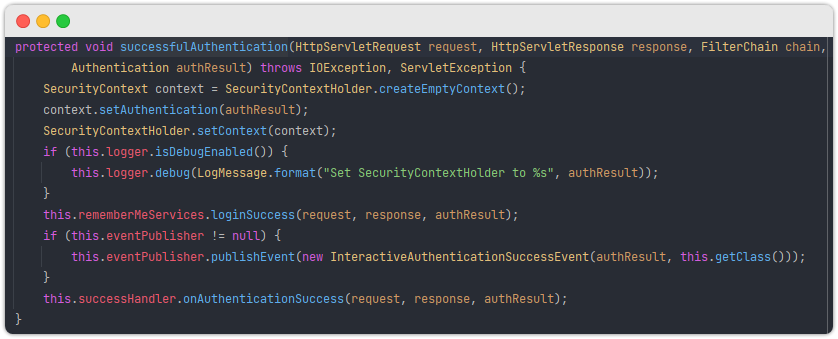
3. 인증처리 성공 시에는 successfulAuthentication 메소드가 호출되고,
내부적으로 사용자가 지정했던 successfulHandler 작동한다.
그리고 추가로 SecurityContext에 해당 인증객체를 저장하는 것도 확인할 수 있다.
--> context.setAuthentication(authResult);
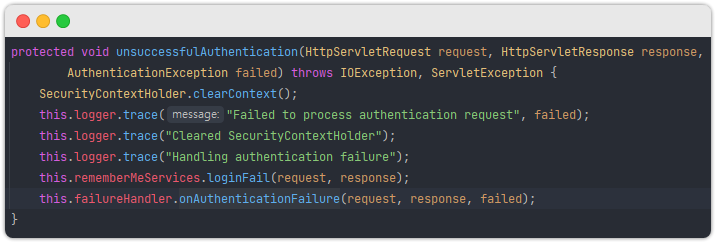
4. 인증처리 실패시에는 unsuccessfulAuthentication 메소드가 호출되고,
내부적으로 사용자가 지정했던 failureHandler 가 작동한다.
위에서 말한 2번, 즉 AuthenticationManager 에게 인증 작업을 위임하는 메소드인
attemptAuthentication(request, response) 를 좀 더 자세히 관찰해보자.
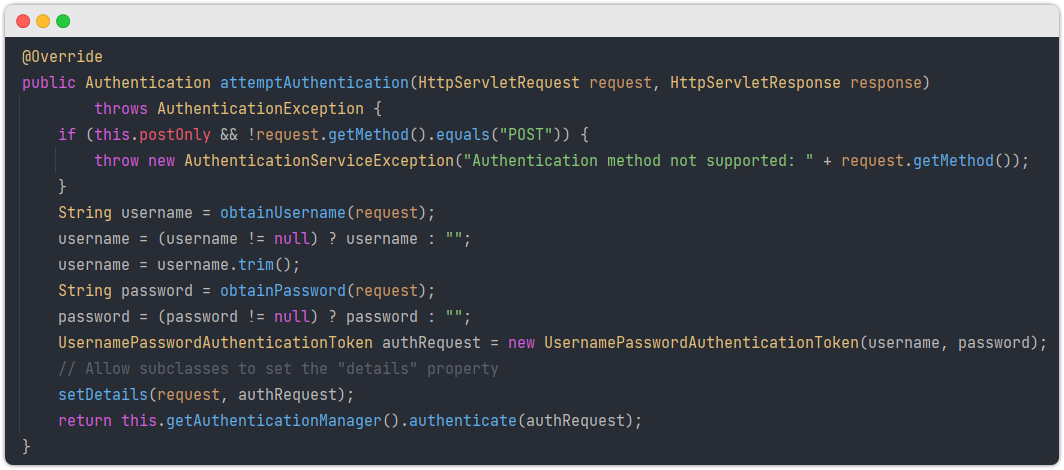
HttpServletRequest 에서 Username, Password를 추출해서 해당 값을
인증 토큰(UsernamePasswordAuthenticationToken)에 담는다.
그후에 이 토큰은 AuthenticationManager 의 인증 작업 위임 메소드 호출의 인자로 사용된다.
즉 this.getAuthenticationManager().authenticate(authRequest)의 인자로 보내진다.
이번에는 이 메소드 내용을 관찰해보자.
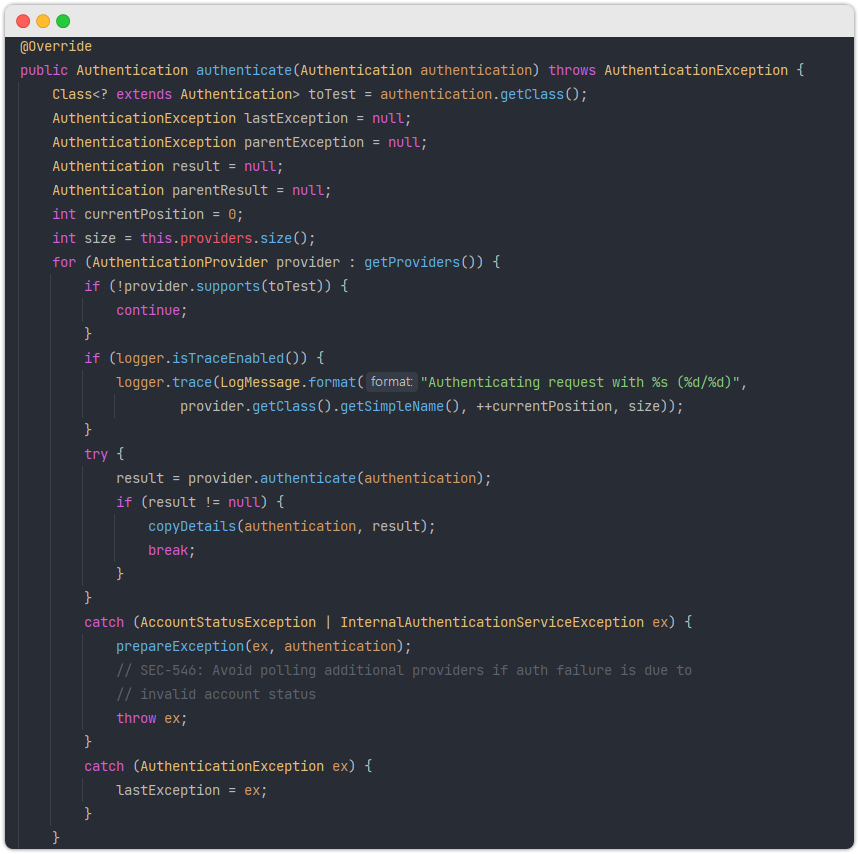
위 코드는 ProviderManager 객체 내용의 일부다.
ProviderManager 는 내부적으로 AuthenticationProvider 들을 갖고 있고,
이중에서 Form 인증 방식을 처리해줄 AuthenticationProvider 찾는다.
(여기서는 아마 DaoAuthenticationProvider 일 것이다)

Provider 를 통해서 제대로 인증이 제대로 된다면 위와 같은 메소드를 통해서
인증 객체를 새로이 만들어낸다.
결과적으로 이 인증 객체는 UsernamePasswordAuthenticationFilter 에게 반환될 것이다.
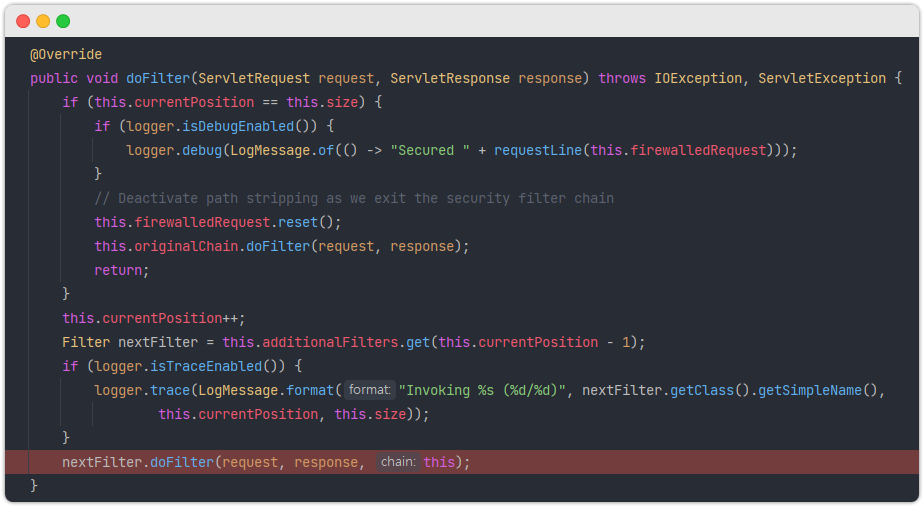
참고: "갑자기 웬 필터지?"라고 생각할 수 있을 것이다.
Spring Security는HttpSecurityapi 를 사용하게 되면 관련된
기능 처리를 위해서 필터를 생성해서 적용하는 경우가 많다.
적용되는 필터들을 확인하고 싶다면 FilterChainProxy$VirtualFilterChain 클래스에서
아래 그림처럼 디버깅 포인트를 잡으면 된다.
이 부분은 추후에 더 자세히 알아본다.