이번에 Spring Boot 와 Vue 를 하나의 Jar 로 배포해야되는 일이 생겨서 작업을 했느데,
그 과정을 정리해봅니다.
Spring boot 프로젝트 생성
스프링 프로젝트를 빠르게 하나 생성합니다.
자기가 사용하는 개발자 도구든, spring.start.io 사이트에서 생성해도 됩니다. 저는 intellij utlimate 으로 프로젝트를 생성해보겠습니다.
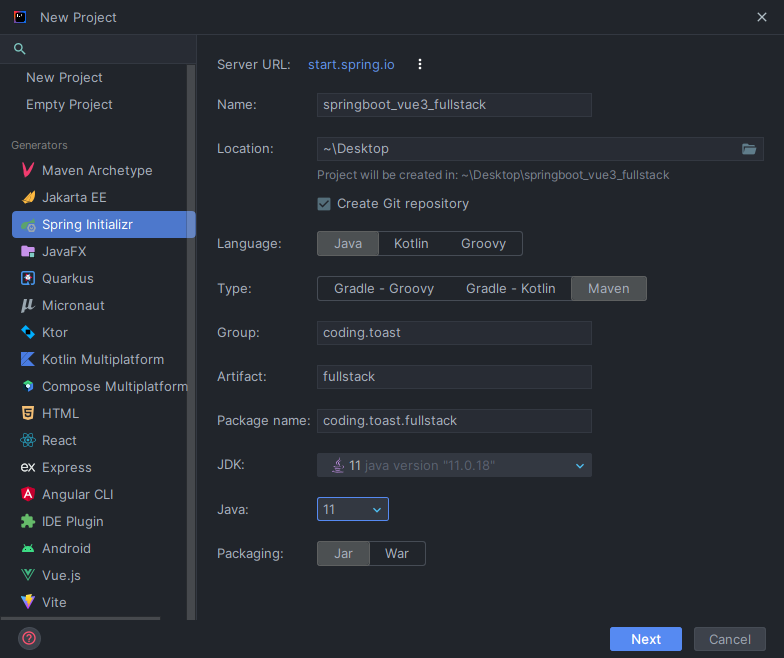
- 반드시
Maven기반으로 생성해주시기 바랍니다!!!
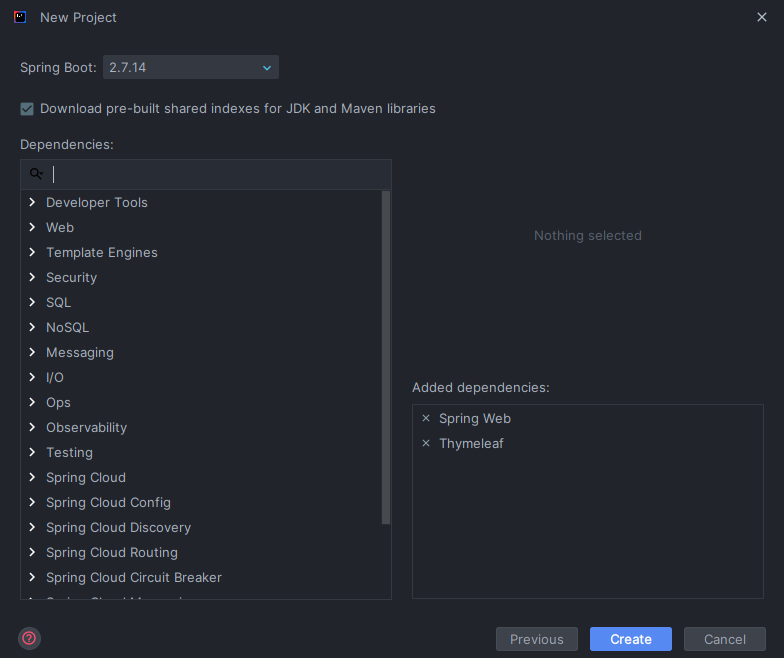
- 간단하게
Spring Web,Thymeleaf만 의존성을 추가 - 회사에서 사용하는
jdk버전이11이라서2.x.x버전을 사용 - (참고)
3.x.x버전의 spring boot 는 jdk 최소 버전이 17
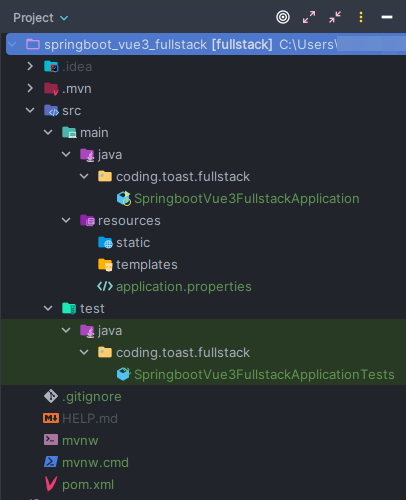
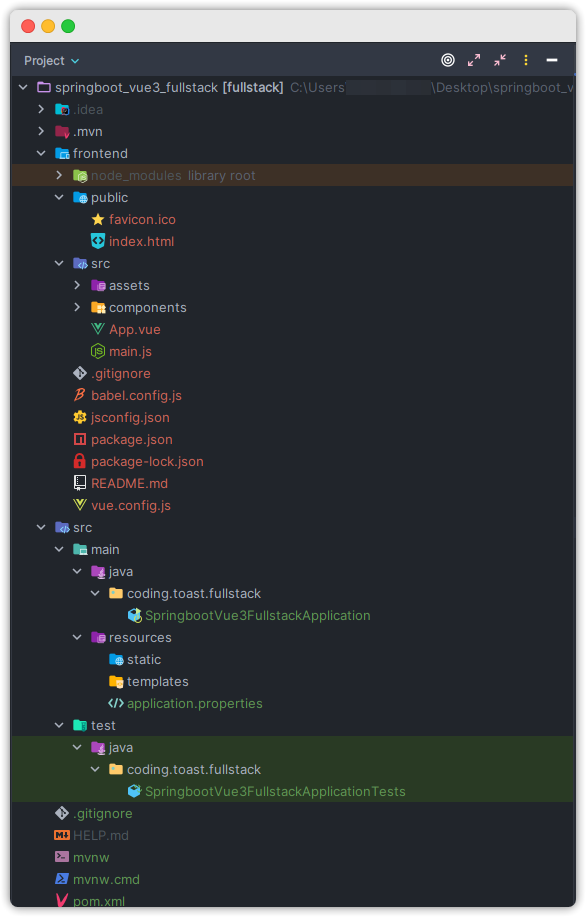
이렇게 하면 아래와 같은 프로젝트 디렉토리 구조가 생기게 됩니다.
Vue 프로젝트 생성
nodejs, npm 그리고 vue cli 가 이미 설치된 환경이라 가정하고 글을 작성했습니다.
혹시 vue cli 를 설치하고 싶다면npm install -g @vue/cli을 cmd 에 입력하세요.
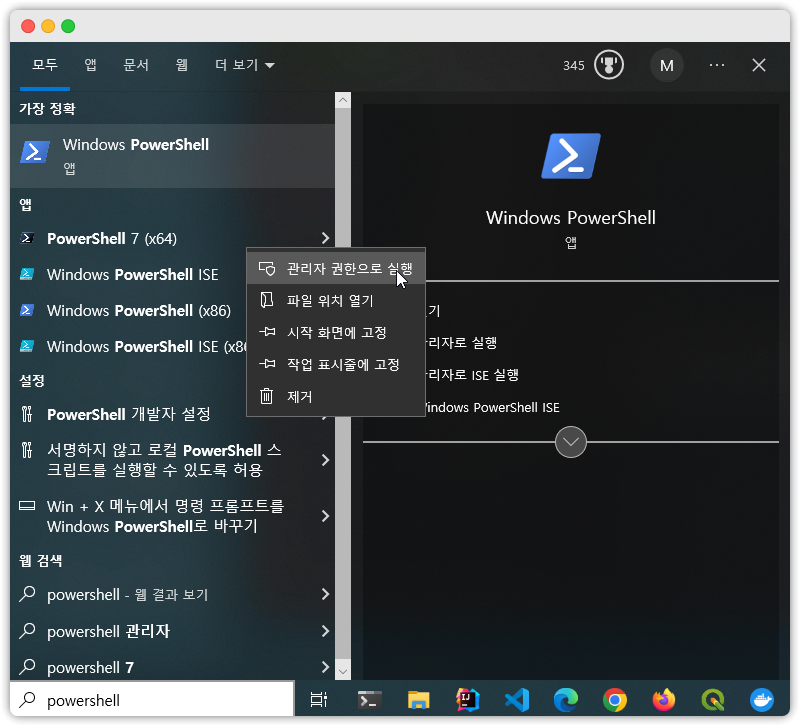
관리자 모드로 CMD (혹은 Powershell) 을 실행시킵니다.
(저는 powershell 기준으로 하겠습니다)
CMD 의 경로를 앞서 생성한 Spring boot 프로젝트 디렉토리로 이동시킵니다.
cd "프로젝트 경로를 입력하세요"해당 경로에서 vue cli 명령어를 통해서 vue 프로젝트 템플릿을 생성합니다.
vue create frontend 만약 패키지 매니저도 지정하고 싶다면 아래처럼 해준다.
vue create test --packageManager=npm # 또는 yarn
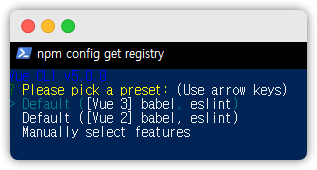
이후 아래와 같은 화면이 나오면 Default([Vue 3] babel, eslint) 를 선택합니다.
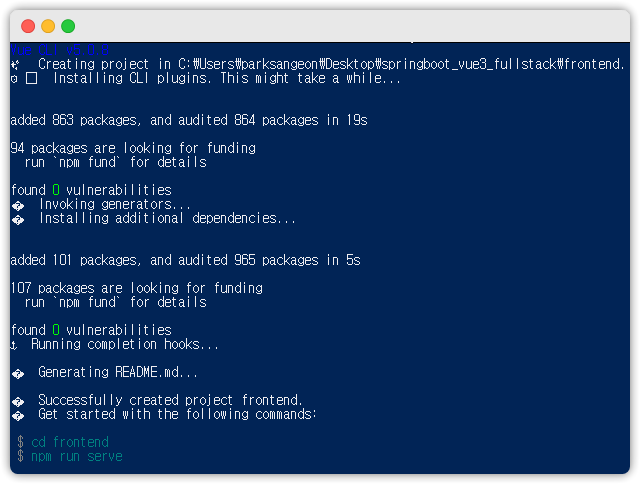
그러면 로그가 막 보이면서 설치가 진행됩니다.
Successfully created project 라는 문구가 보이면 완성입니다.
이후에는 프로젝트 디렉토리 구조가 아래처럼 보이게 됩니다.
vue cli 로 생성한 프론트엔드 전용 디렉토리 안에 있는 vue.config.js 파일을 수정합니다.
const { defineConfig } = require('@vue/cli-service')
module.exports = defineConfig({
  transpileDependencies: true,
  filenameHashing: false, // build 파일 해싱 제거
  productionSourceMap: true, // js source map 생성
  css: {sourceMap: true}    // css source map 생성
})
package.json 이라는 파일에서 "scripts > serve" 라는 속성의 내용을 아래와 같이 수정해줍니다.
{
  "name": "frontend",
  "version": "0.1.0",
  "private": true,
  "scripts": {
    "serve": "vue-cli-service serve --port 3000",
      // 생략...
  },
  // 생략...
}
Spring Boot + Vue 통합 jar 생성
통합된 Jar 를 생성하기 위해서 maven plugin 에 대한 추가적인 내용을 pom.xml 에
작성해야합니다. 지금부터 그 내용을 보죠.
pom.xml 내용 수정
<?xml version="1.0" encoding="UTF-8"?>
<project xmlns="http://maven.apache.org/POM/4.0.0" xmlns:xsi="http://www.w3.org/2001/XMLSchema-instance"
         xsi:schemaLocation="http://maven.apache.org/POM/4.0.0 https://maven.apache.org/xsd/maven-4.0.0.xsd">
    <modelVersion>4.0.0</modelVersion>
    <parent>
        <groupId>org.springframework.boot</groupId>
        <artifactId>spring-boot-starter-parent</artifactId>
        <version>2.7.14</version>
        <relativePath/> <!-- lookup parent from repository -->
    </parent>

    <groupId>coding.toast</groupId>
    <artifactId>fullstack</artifactId>
    <version>1.0.0</version>
    <name>fullstack</name>
    <description>fullstack</description>

    <properties>
        <!-- 자기가 쓰는 java 버전을 입력합니다. -->
        <java.version>11</java.version>

        <!-- 의외로 이걸 안하면 에러가 나는 경우가 있습니다. 꼭 해줍시다. -->
        <project.build.sourceEncoding>UTF-8</project.build.sourceEncoding>

        <!-- 테스트는 하지 않도록 하겠습니다. -->
        <maven.test.skip>true</maven.test.skip>

    </properties>


    <dependencies>
    	<!-- 생략합니다. 지금은 중요하지 않습니다. -->
    </dependencies>

    <build>
        <!-- 프로젝트를 최종 jar 로 배포할때 명칭을 커스터마이징합니다. -->
        <finalName>${project.artifactId}-${project.version}</finalName>
        <plugins>
            <!-- 스프링부트 프로젝트를 생성하면 기본으로 있는 플러그인 입니다.
                 별일 없으면 그냥 냅두시기 바랍니다. -->
            <plugin>
                <groupId>org.springframework.boot</groupId>
                <artifactId>spring-boot-maven-plugin</artifactId>
                <configuration>
                    <excludes>
                        <exclude>
                            <groupId>org.projectlombok</groupId>
                            <artifactId>lombok</artifactId>
                        </exclude>
                    </excludes>
                </configuration>
            </plugin>

            <!-- vue 프로젝트를 빌드하기 위한 명령어를 maven 라이프사이클 중간에 끼워넣습니다. -->
            <!-- 이것을 통해서 npm run build 라는 명령어가 실행됩니다. -->
            <plugin>
                <groupId>org.codehaus.mojo</groupId>
                <artifactId>exec-maven-plugin</artifactId>
                <version>1.6.0</version>
                <executions>
                    <execution>
                        <id>npm build the vue app</id>
                        <phase>generate-resources</phase>
                        <goals>
                            <goal>exec</goal>
                        </goals>
                        <configuration>
                            <workingDirectory>src/frontend</workingDirectory>
                            <executable>npm</executable>
                            <arguments>
                                <argument>run</argument>
                                <argument>build</argument>
                            </arguments>
                        </configuration>
                    </execution>
                </executions>
            </plugin>

            <!-- copy the vue js app dist folder to spring boot target static folder -->
            <plugin>
                <artifactId>maven-resources-plugin</artifactId>
                <!-- 버전 작성 -->
                <version>3.1.0</version>
                <executions>
                    <!-- static, template 파일 구분하고 싶지 않다면 executions 태그 내의 -->
                    <!-- execution 태그중 바로 아래 있는 것만 주석해제하고 나머지는 다 주석을 걸어줍니다. -->
                    <!-- <execution>
                        <id>Copy my Vuejs app into Spring boot target static folder</id>
                        <phase>process-resources</phase>
                        <goals>
                            <goal>copy-resources</goal>
                        </goals>
                        <configuration>
                            <outputDirectory>${basedir}/target/classes/static</outputDirectory>
                            <resources>
                                <resource>
                                    <directory>${basedir}/src/frontend/dist</directory>
                                    <filtering>true</filtering>
                                </resource>
                            </resources>
                            <nonFilteredFileExtensions>
                              <nonFilteredFileExtension>eot</nonFilteredFileExtension>
                               <nonFilteredFileExtension>svg</nonFilteredFileExtension>
                               <nonFilteredFileExtension>ttf</nonFilteredFileExtension>
                               <nonFilteredFileExtension>woff</nonFilteredFileExtension>
                               <nonFilteredFileExtension>woff2</nonFilteredFileExtension>
                            </nonFilteredFileExtensions>
                        </configuration>
                    </execution>-->

                    <!-- 저는 template 파일(servlet 환경의 jsp 라고 생각해면 됩니다)을 따로 copy 합니다. -->
                    <execution>
                        <id>copy front-end template to target, can use Thymeleaf!</id>
                        <goals>
                            <goal>copy-resources</goal>
                        </goals>
                        <phase>prepare-package</phase>
                        <configuration>
                            <outputDirectory>${basedir}/target/classes/templates</outputDirectory>
                            <resources>
                                <resource>
                                    <directory>${basedir}/src/frontend/dist</directory>
                                    <includes>
                                        <include>index.html</include>
                                    </includes>
                                </resource>
                            </resources>
                            <nonFilteredFileExtensions>
                            <!-- fonts. 이거 안하면 폰트 깨짐. -->
                                <nonFilteredFileExtension>eot</nonFilteredFileExtension>
                                <nonFilteredFileExtension>svg</nonFilteredFileExtension>
                                <nonFilteredFileExtension>ttf</nonFilteredFileExtension>
                                <nonFilteredFileExtension>woff</nonFilteredFileExtension>
                                <nonFilteredFileExtension>woff2</nonFilteredFileExtension>
                           </nonFilteredFileExtensions>
                        </configuration>
                    </execution>

                    <!-- 나머지 그냥 static 자원들은 모두 static 에 들어가도록 합니다. -->
                    <execution>
                        <id>copy front-end assets to target</id>
                        <goals>
                            <goal>copy-resources</goal>
                        </goals>
                        <phase>prepare-package</phase>
                        <configuration>
                            <outputDirectory>${basedir}/target/classes/static</outputDirectory>
                            <resources>
                                <resource>
                                    <directory>${basedir}/src/frontend/dist</directory>
                                    <excludes>
                                        <exclude>index.html</exclude>
                                    </excludes>
                                </resource>
                            </resources>
                            <nonFilteredFileExtensions>
                            <!-- fonts. 이거 안하면 폰트 깨짐. -->
                                <nonFilteredFileExtension>eot</nonFilteredFileExtension>
                                <nonFilteredFileExtension>svg</nonFilteredFileExtension>
                                <nonFilteredFileExtension>ttf</nonFilteredFileExtension>
                                <nonFilteredFileExtension>woff</nonFilteredFileExtension>
                                <nonFilteredFileExtension>woff2</nonFilteredFileExtension>
                           </nonFilteredFileExtensions>
                        </configuration>
                    </execution>
                </executions>
            </plugin>

            <!-- maven clean 을 할때 target 폴더뿐만 아니라, 다른 경로의 파일도 지우고 싶다면 아래처럼 설정 -->
            <!-- 저는 package 시에 vue cli 가 생성하는 index.html 이 무조건 사용되도록, 혹여라도 spring boot 프로젝트에 -->
            <!-- 있는 index.html 을 제거합니다. 저처럼 필요하면 주석을 해제하세요 -->
            <!--<plugin>
                <artifactId>maven-clean-plugin</artifactId>
                <configuration>
                    <filesets>
                        <fileset>
                            <directory>${basedir}/src/main/resources/static</directory>
                            <includes>
                                <include>index.html</include>
                            </includes>
                        </fileset>
                        <fileset>
                            <directory>${basedir}/src/main/resources/templates</directory>
                            <includes>
                                <include>index.html</include>
                            </includes>
                        </fileset>
                    </filesets>
                </configuration>
            </plugin>-->
        </plugins>
    </build>
</project>
플러그인 설명:
exec-maven-plugin: vue cli 로 생성한 디렉토리 경로 내에서npm run build를 실행합니다. 이러면 vue 프로젝트의 배포용 파일들이dist라는 폴더 안에 생성됩니다.maven-resources-plugin- 앞서 생성한
dist폴더의 내용들을 모두target안쪽에 적절히 배치시킵니다. - 실제 배포 시에는
target안의 내용을 사용하게되서 결국 최종 결과물(Jar)에
해당 dist 의 내용물들이 모두 들어갑니다. - 만약
<filtering>true</filtering>처럼 세팅하고 거기에 폰트까지 사용하신다면 반드시nonFilteredFileExtensions를 세팅해야합니다!
(참고링크) - 저의 경우는
<filtering>true</filtering>을 안 해도 혹시나 후배들이 복붙해가서 customizing 할 때 문제 생길까봐 그냥nonFilteredFileExtensions을 세팅합니다.
- 앞서 생성한
maven clean build
프로젝트 root 경로에서mvn clean build (또는 mvnw clean build) 명령어를 입력해서
최종 배포물을 target 디렉토리에 생성됩니다.
끝.
보충: devServer 사용을 위한 설정법
배포를 하면 결과물인 Jar 안에 모든 backend, frontend 소스가 있으니 CORS 는 걱정하지
않아도 됩니다. 하지만 배포하는 게 아닌 로컬 환경에서는 webpack 의 devServer 를
사용해야 합니다. 그래야 개발 속도가 납니다.
지금부터 devServer 를 위한 설정법도 알아보겠습니다.
package.json 에서는 아래와 같이 devServer 설정을 넣어줍니다.
const { defineConfig } = require('@vue/cli-service')
module.exports = defineConfig({
  transpileDependencies: true, // 이건 Vue cli 로 설치하면 기본으로 있는 겁니다. PASS.
  filenameHashing: false, // build 파일 해싱 제거
  productionSourceMap: true, // js source map 생성
  css: {sourceMap: true},    // css source map 생성
  devServer: {
    open: true, // devServer 초기화 후 자동으로 브라우저 열리도록 함.
  }
})
이후에 axios 패키지를 다운로드 받습니다.
yarn add axios그리고 나서 아래와 같은 axios 인스턴스 생성기를 만들어줍니다.
import axios from "axios";

/**
 * API 에 따른 URL 이 다름에 따라 다른 axios 를 사용하도록 한다.<br>
 * - base : Spring Boot 서버와 통신하기 위한 axios 인스턴스다.
 * - api : 연계 API 서버와 통신하기 위한 axios 인스턴스다.
 */
export default {
  base: axios.create({baseURL: process.env.VUE_APP_BASE_API_URL})
}
참고: VUE_APP_BASE_API_URL ??
이건 제가.env파일에 설정한 값입니다.VUE_APP_BASE_URL=http://localhost:8080 # ==> spring 이 도는 호스트 주소 VUE_APP_CONTEXT_PATH=/pbps VUE_APP_BASE_API_URL=$VUE_APP_BASE_URL$VUE_APP_CONTEXT_PATH여기서
VUE_APP_BASE_URL은local에서만 값을 할당합니다.
그외의 환경(ex: 배포환경)에서는VUE_APP_BASE_URL=처럼 세팅합니다.
VUE_APP_CONTEXT_PATH은 세팅을 했다면 넣어주시기 바랍니다.
ContextPath 관련해서는 다음 목차에서 자세히 작성했습니다.
이렇게 세팅하고 나서, 외부에서 아래처럼 spring 의 api 를 호출하면 됩니다.
<script>
import defaultAxios from "@/api/defaultAxios";

defaultAxios.base
  .get("/message/hello")
  .then(response => {
    this.msg = response.data;
  })
  .catch(err => console.log(err));

</script>
추가적으로 devServer 와 Spring Boot 의 Origin 이 다를 것이니,
Spring boot 에는 아래와 같은 CrossOrigin 세팅을 해줍니다.
개인 PC 용에서만 동작하도록 Profile 을 적절히 줍니다.
package coding.toast.fullstack.additional;

import org.springframework.context.annotation.Bean;
import org.springframework.context.annotation.Configuration;
import org.springframework.context.annotation.Profile;
import org.springframework.web.servlet.config.annotation.CorsRegistry;
import org.springframework.web.servlet.config.annotation.WebMvcConfigurer;

@Configuration
@Profile({"default", "local"})
public class CrossOriginConfig {
    @Bean
    public WebMvcConfigurer corsConfigurer() {
        return new WebMvcConfigurer() {
            public void addCorsMappings(CorsRegistry registry) {
                registry.addMapping("/**")
                        .allowedOrigins("*")
                        .allowedMethods("*")
                        .allowedHeaders("*");
            }
        };
    }
}
(보충) contextPath 에 대한 주의사항
spring boot 와 vue cli 의 contextPath 동기화
application.properties 에서 먼저 contextPath 설정합니다.
server.servlet.context-path=/pbpsfrontend 소스에서 vue.config.js 파일을 찾아서 아래와
같이 publicPath 를 설정합니다.
const { defineConfig } = require('@vue/cli-service')

module.exports = defineConfig({
  // ... 생략... //
  publicPath: process.env.VUE_APP_CONTEXT_PATH || '/'
})
그리고 적용할 .env 파일의 내용을 아래와 같이 작성합니다.
# spring 이 도는 호스트 주소
VUE_APP_BASE_URL=http://localhost:8080

# *** CONTEXT_PATH 설정 ***
VUE_APP_CONTEXT_PATH=/pbps

# AXIOS 가 사용할 base url
VUE_APP_BASE_API_URL=$VUE_APP_BASE_URL$VUE_APP_CONTEXT_PATH
index.html 에서 style, js 파일 import 유의사항
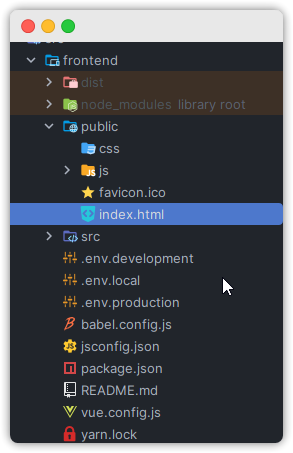
vue cli 를 통해서 생성한 프로젝트에서 public 디렉토리 안에 index.html 이라는 파일이 있습니다. 해당 html 파일은 npm run build 의 결과물로 사용될 최종 html 파일입니다.
이 파일 저희가 원하는 css, js 파일을 import 할 수 있습니다.
다만 여기서 주의할 게 <%= BASE_URL %> 입니다.
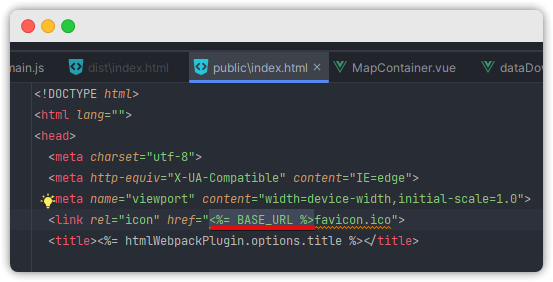
빌드를 하면 <%= BASE_URL %> 에 자동으로 값이 채워지고,
해당 값은 저희가 앞서 지정한 publicPath 경로값이 들어가게 됩니다.
그리고 저희는 publicPath 에 ContextPath 를 이미 동기화 했기 때문에,
결과적으로 빌드 이후에도 문제를 일으키지 않게 됩니다.
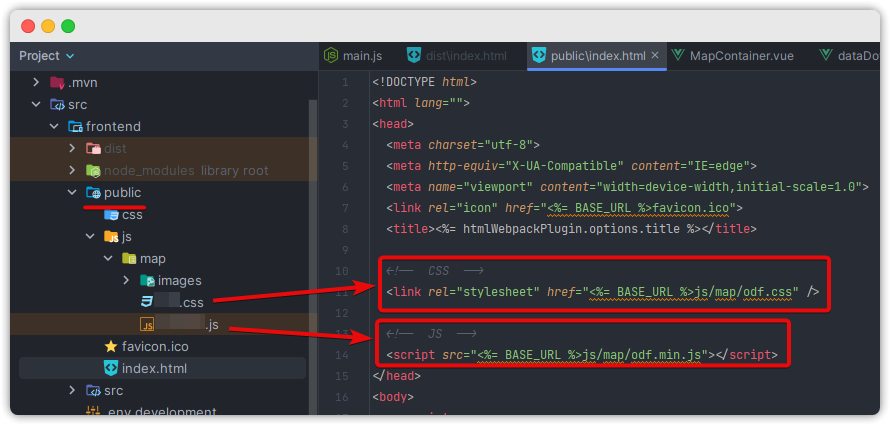
예시로 아래와 같이 public 폴더 하단에 파일을 잡은 후에,
index.html 에 경로를 아래와 같이 잡으면 됩니다.
index.html 의 js 사용 시...
여기서 주의할 점이 있습니다.
index.html 에 javascript 를 import 받는 이유가 있는데,
해당 js 라이브러리가 es module 기반의 라이브러리가 아니라서 그렇습니다.
es module 기반의 라이브러리가 아니라면 애초에 src 디렉토리 하단에 넣고 쓰면 되지만,
그게 아니기 때문에 public 폴더에 넣은 것도 이런 이유에서 입니다.
그렇다보니 이런 js 에서 사용되는 모든 변수, 함수명 등은 window(전역변수)의
속성으로 붙게 됩니다.
문제는 eslint 를 사용하다보니 *.vue 파일에서 window 라는 전역 변수를 씀에 따라
문제가 생깁니다. (참고로 js 파일은 괜찮습니다).
그래서 vue 컴포넌트에서도 모두 해당 전역 변수를 쓸 수 있도록 세팅을 해야하는데,
그 방법은 아래와 같습니다.
import { createApp } from 'vue'
import App from './App.vue'
import store from "@/store";

createApp(App)
  .use(store) // Insert Vuex Store
  // eslint-disable-next-line
  .provide('window', window)
  .mount('#app') // Mount Vue Instance to HTML
// eslint-disable-next-line는 바로 다음줄의 코드는 eslint 로 감지하지 않겠다는 의미입니다.provide를 통해서 아래와 같이 컴포넌트에서inject받아서 사용합니다.
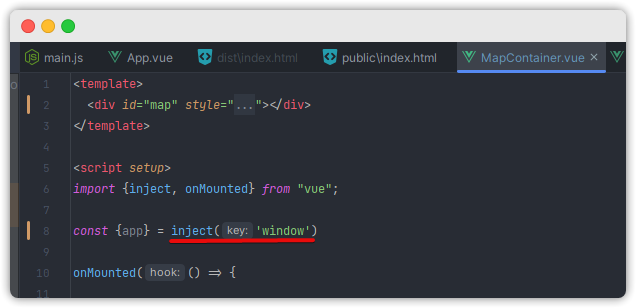
provide/inject 에 대한 더 자세한 내용은 여길 참조해주세요.
(보충) custom .env 파일을 읽도록 하기 위한 방법
저는 .env.local 이라는 파일을 사용해서 devServer 를 띄우고 싶어서
아래처럼 package.json 에서 명령어를 바꿨는데 적용이 되지 않더군요.
"serve": "vue-cli-service serve --mode local",그래서 찾아보니 이걸 우회할 수 있는 방법이 있더군요.
방법은 아래와 같습니다.
yarn add env-cmd를 통해서env-cmd설치- package.json
scripts영역에서 env-cmd 적절히 사용
{
  "name": "frontend",
  "version": "0.1.0",
  "private": true,
  "scripts": {
    "serve": "env-cmd -f .env.local vue-cli-service serve --port 3000",
    "build": "vue-cli-service build",
    "lint": "vue-cli-service lint"
  },
  // ... 생략 ...
}
이렇게 설정하면 프로젝트 frontend 단의 .env.local 파일을 적용해서
process.env.* 의 전역 변수값이 세팅됩니다.
참고한 영상 및 글
- vue 와 spring boot 합치는 법
- https://cli.vuejs.org/config/#css-loaderoptions
- Spring Boot and Vue.js build with Maven
- gradle 로 Spring Boot + Vuejs 한방에 배포하기
- https://gist.github.com/sidola/1d97959eeb2b7e3b8567b79c6f40dd1b
참고:
이글에서 작성된pom.xml은 https://song8420.tistory.com/376 을 최대한 참고한 것입니다. 해당 원문의pom.xml은 아래와 같이 작성되어 있었습니다.<build> <plugins> <plugin> <groupId>org.springframework.boot</groupId> <artifactId>spring-boot-maven-plugin</artifactId> <executions> <execution> <id>pre integration test</id> <goals> <goal>start</goal> </goals> </execution> <execution> <id>post integration test</id> <goals> <goal>stop</goal> </goals> </execution> </executions> <configuration> <excludes> <exclude> <groupId>org.projectlombok</groupId> <artifactId>lombok</artifactId> </exclude> </excludes> </configuration> </plugin> <plugin> <groupId>org.codehaus.mojo</groupId> <artifactId>exec-maven-plugin</artifactId> <version>1.6.0</version> <!-- executions 섹션은 npm 명령어 상세내용 추가하는 곳--> <executions> <!-- npm install 명령어 실행--> <execution> <id>front-end install</id> <goals> <goal>exec</goal> </goals> <phase>prepare-package</phase> <configuration> <executable>npm</executable> <arguments> <argument>install</argument> </arguments> </configuration> </execution> <!-- prepare-package 페이즈 동안 npm run test:unit 실행--> <execution> <id>front-end unit test</id> <goals> <goal>exec</goal> </goals> <phase>prepare-package</phase> <configuration> <executable>npm</executable> <arguments> <argument>run</argument> <argument>test:unit</argument> </arguments> </configuration> </execution> <!-- prepare-package 페이즈 동안 npm run build 실행--> <execution> <id>front-end build package</id> <goals> <goal>exec</goal> </goals> <phase>prepare-package</phase> <configuration> <executable>npm</executable> <arguments> <argument>run</argument> <argument>build</argument> </arguments> </configuration> </execution> <!-- integration-test 페이즈 동안 npm run test:e2e 실행--> <execution> <id>front-end e2e test</id> <goals> <goal>exec</goal> </goals> <phase>integration-test</phase> <configuration> <executable>npm</executable> <arguments> <argument>run</argument> <argument>test:e2e</argument> </arguments> </configuration> </execution> </executions> <configuration> <workingDirectory>${basedir}/front-end</workingDirectory> </configuration> </plugin> <!-- 프론트앤드 빌드 결과를 src/main/resources에 복사--> <plugin> <artifactId>maven-resources-plugin</artifactId> <version>3.1.0</version> <executions> <!-- index.html 파일을 prepare-package 페이즈 동안 src/main/resources/template에 복사--> <execution> <id>copy front-end template</id> <goals> <goal>copy-resources</goal> </goals> <phase>prepare-package</phase> <configuration> <outputDirectory>${basedir}/src/main/resources/templates</outputDirectory> <resources> <resource> <directory>front-end/dist</directory> <includes> <include>index.html</include> </includes> </resource> </resources> </configuration> </execution> <!-- static 폴더 전체를 src/main/resources/static 폴더로 복사--> <execution> <id>copy front-end assets</id> <goals> <goal>copy-resources</goal> </goals> <phase>prepare-package</phase> <configuration> <outputDirectory>${basedir}/src/main/resources/static</outputDirectory> <resources> <resource> <directory>front-end/dist</directory> <excludes> <exclude>index.html</exclude> </excludes> </resource> </resources> </configuration> </execution> <execution> <id>copy front-end template to target</id> <goals> <goal>copy-resources</goal> </goals> <phase>prepare-package</phase> <configuration> <outputDirectory>${basedir}/target/classes/templates</outputDirectory> <resources> <resource> <directory>front-end/dist</directory> <includes> <include>index.html</include> </includes> </resource> </resources> </configuration> </execution> <execution> <id>copy front-end assets to target</id> <goals> <goal>copy-resources</goal> </goals> <phase>prepare-package</phase> <configuration> <outputDirectory>${basedir}/target/classes/static</outputDirectory> <resources> <resource> <directory>front-end/dist</directory> <excludes> <exclude>index.html</exclude> </excludes> </resource> </resources> </configuration> </execution> </executions> </plugin> <plugin> <artifactId>maven-clean-plugin</artifactId> <configuration> <filesets> <fileset> <directory>${basedir}/src/main/resources/static/static</directory> </fileset> <fileset> <directory>${basedir}/src/main/resources/templates</directory> <includes> <include>index.html</include> </includes> </fileset> </filesets> </configuration> </plugin> </plugins> </build>