이 글에서는 Declarative Partitioning 과 관련된 방식만 작성합니다.
만약에 Inheritance Partitioning 을 알고 싶다면 공식 문서를 찾아보시기 바랍니다.
참고: https://www.postgresql.org/docs/current/ddl-partitioning.html
🙄 Table Partitioning?
Partitioning refers to splitting what is logically one large table into smaller physical pieces. [참고]
파티셔닝이란 논리적으로 존재하는 거대한 테이블을 쪼개서
물리적으로 작은 테이블 조각들로 만드는 것입니다.
좀 더 쉽게 얘기하자면 물리적으로 존재하는 테이블 여러 개를
자체적인 데이터를 갖지 않는 논리적인 테이블 하나로 그룹핑한다는 의미입니다.
당장 무슨 말인지 이해 못해도 실습을 하는 목차를 따라하면 이해가 될겁니다!
👍 장점이 뭘까?
1. 인덱스의 크기
거대한 테이블에 특정 컬럼에 인덱스를 생성하는 경우가 많습니다.
문제는 이 테이블이 너무 크다보니, 인덱스도 덩달아 크기가 커집니다.
이러면 index scan 을 위해 메모리에 인덱스를 올릴 때 많은 메모리를 소비하게 됩니다.
하지만 파티션을 통해서 거대한 table 을 쪼개면 각각의 table 단위로 인덱스가
생성되서 인덱스의 크기가 작아집니다. 덕분에 index scan 을 위해서 index 정보를 메모리에 올리는 IO 작업이 줄어듭니다.
2. sequential scan
이미 알고 있겠지만, 어떤 테이블에서 조건절을 쓰더라도 대부분의 row 를 읽어야 하는 경우에는 index scan 보다 sequential scan 이 훨배 효율적입니다. partitioning 을 잘하면 이런 혜택을 누릴 수 있습니다.
3. Bulk 성 데이터 관리
벌크성 insert, delete 대신에 ALTER TABLE ATTACH PARTITION , doing ALTER TABLE DETACH PARTITION 를 통해서 거대한 Data Set 을 없애거나 추가할 수 있습니다. 추가적으로 벌크성 insert, delete 에 의한 vacuum overhead 를 없앨 수 있습니다.
4. 부분적 데이터의 저장소 변경
거의 사용되지 않는 data set 에 대해서는 SSD 같은 비싼 보조기억장치가 아닌, HDD 처럼 비교적 값싼 보조기억 장치로 옮길 때 편합니다.
💻 파티셔닝 사용법
1. 논리 테이블 생성
일단 물리적으로 쪼개진 Table 들을 포괄하는 논리 테이블을 생성합니다.
여기서 "논리" 라고 말하는 이유는 이 테이블이 여느 테이블과 다르게 물리적인 공간을
잡지 않으며, 논리 테이블에 쿼리를 날리면 실제로 쿼리가 실행되는 대상체는
partitioning 에 의해서 쪼개진 물리적인 테이블이기 때문입니다.
논리적으로만 존재할 뿐, 물리적으로 존재하지 않다는 겁니다.
어떤 느낌인지 대충 아시겠죠?
-- 사원(employee) 논리 테이블 생성
create table employee_parts (
    id serial not null,
    dept_no int not null
) partition by range(dept_no);

comment on table employee_parts is '사원_테이블';
comment on column employee_parts.id is '사원_아이디(= 일련번호)';
comment on column employee_parts.dept_no is '사원_부서번호';- 아직 물리적으로 저장할 테이블을 지정하지 않았기 때문에 insert 를 하지는 못합니다.
- partition by range 를 하면 특정 범위를 통한 partition 을 할 수 있습니다.
- 이외에도 partition by list, partition by hash 도 있지만 이 글에서는 다루지 않겠습니다.
2. 쪼개진 물리 테이블 생성
create table employee_dept_01 (like employee_parts);
create table employee_dept_02 (like employee_parts);
create table employee_dept_03 (like employee_parts);
create table employee_dept_04 (like employee_parts);
create table employee_dept_05 (like employee_parts);
create table employee_dept_06 (like employee_parts);
create table employee_dept_07 (like employee_parts);
create table employee_dept_08 (like employee_parts);
create table employee_dept_09 (like employee_parts);
create table employee_dept_10 (like employee_parts);
create table employee_dept_11 (like employee_parts);
create table employee_dept_12 (like employee_parts);
create table employee_dept_13 (like employee_parts);
create table employee_dept_14 (like employee_parts);
create table employee_dept_15 (like employee_parts);
create table employee_dept_16 (like employee_parts);
create table employee_dept_17 (like employee_parts);
create table employee_dept_18 (like employee_parts);
create table employee_dept_19 (like employee_parts);
create table employee_dept_20 (like employee_parts);
참고:
create <복제_테이블명> (like <원본_테이블명>)문법을 쓰면 원본 테이블의column의 명칭, 타입, not null 제약 조건을 복사한 복제 테이블이 생성할 수 있습니다.이외에도 COMMENT, INDEXES 등을 추가로 복제하고 싶다면
including ~~문법을 사용하면 됩니다. 이와 관련해서 궁금하다면 postgresql 공식문서를 참조하시길 바랍니다.
3. 물리 테이블 ATTACH
이제 논리 테이블에서 사용할 실제 테이블인 물리 테이블을 추가하겠습니다.
아래와 같이 attach 명령어를 사용하면 됩니다.
alter table employee_parts attach partition employee_dept_01 for values from (01) to (02);
alter table employee_parts attach partition employee_dept_02 for values from (02) to (03);
alter table employee_parts attach partition employee_dept_03 for values from (03) to (04);
alter table employee_parts attach partition employee_dept_04 for values from (04) to (05);
alter table employee_parts attach partition employee_dept_05 for values from (05) to (06);
alter table employee_parts attach partition employee_dept_06 for values from (06) to (07);
alter table employee_parts attach partition employee_dept_07 for values from (07) to (08);
alter table employee_parts attach partition employee_dept_08 for values from (08) to (09);
alter table employee_parts attach partition employee_dept_09 for values from (09) to (10);
alter table employee_parts attach partition employee_dept_10 for values from (10) to (11);
alter table employee_parts attach partition employee_dept_11 for values from (11) to (12);
alter table employee_parts attach partition employee_dept_12 for values from (12) to (13);
alter table employee_parts attach partition employee_dept_13 for values from (13) to (14);
alter table employee_parts attach partition employee_dept_14 for values from (14) to (15);
alter table employee_parts attach partition employee_dept_15 for values from (15) to (16);
alter table employee_parts attach partition employee_dept_16 for values from (16) to (17);
alter table employee_parts attach partition employee_dept_17 for values from (17) to (18);
alter table employee_parts attach partition employee_dept_18 for values from (18) to (19);
alter table employee_parts attach partition employee_dept_19 for values from (19) to (20);
alter table employee_parts attach partition employee_dept_20 for values from (20) to (21);- (중요)
for values from (a) to (b)이면 partitioning 범위는a <= x < b입니다. - 만약 물리 테이블에 데이터를 넣고 alter 할 때 범위를 잘못 넣으면 오류가 발생합니다.
SQL Error [23514]: 오류: ?? 릴레이션의 파티션 제약 조건을 위반하는 몇몇 자료가 있습니다
혹시 물리 테이블 생성과 동시에 attach 를 원하시면 아래처럼 하시면 됩니다.
CREATE TABLE employee_dept_20 PARTITION OF employee_parts
    FOR VALUES FROM (20) TO (21);
4. 논리 테이블에 데이터 INSERT
-- 1000 만명의 사원을 거느린 대기업이군요 😅
insert into employee_parts(dept_no)
select (floor(random()*20) + 1)  from generate_series(1,10000000);

-- 참고: 만약에 이미 데이터 테이블이 존재하고, 그 데이터를 복사해오는 거면?
-- insert into employee_parts(id, dept_no)
-- select id, dept_no from employee;
5. 논리 테이블에 index 생성
create index employee_parts_idx on employee_parts(dept_no);위처럼 논리 테이블에 index 를 생성하면,
논리 테이블이 포함한 모든 물리 테이블에 자신만의 index 를 생성합니다.(아래 그림 참고)
그림(1). 논리 테이블 상세정보
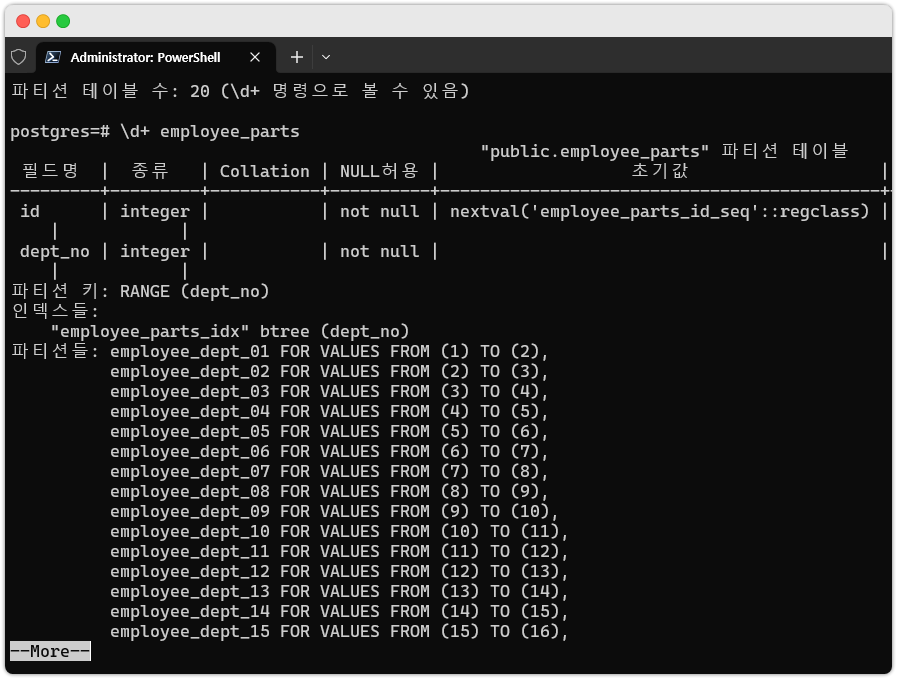
- 하나의 인덱스가 있고, 그 밑으로 수많은 파티션들이 매달려있습니다.
그림(2). 물리 테이블 상세정보
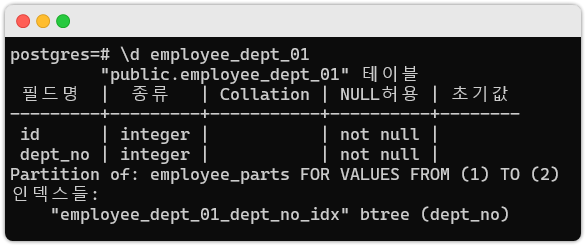
- 물리 테이블 중 하나를 조회한 결과이며, 자동으로 인덱스가 생성된 것을 확인할 수 있습니다.
참고: attach 한 테이블 삭제 혹은 숨기기
-- 삭제
DROP TABLE employee_dept_20;

-- 숨기기: 이렇게 하면 이후 employee_parts 를 통해서 조회가 안된다.
-- 하지만 employee_dept_20 데이터는 유지되고, employee_dept_20 에
-- 직접 조회는 가능합니다.
ALTER TABLE employee_parts DETACH PARTITION employee_dept_20;
여기까지가 단순 사용법입니다.
방법만 알고 싶던 분들은 여기까지만 읽고 가셔도 무방합니다.
🧐 관찰하기
여기서부터는 partitioning 을 활용한 결과물들에 대한 관찰을 해보도록 하겠습니다.
그전에 지금처럼 테이블을 쪼개지 않고, 그냥 모든 데이터를 담는 하나의 테이블과
비교하기 위해서 아래처럼 쿼리를 실행하겠습니다.
create table employee (
    id serial not null,
    dept_no smallint not null
);
insert into employee(dept_no)
select (floor(random()*20) + 1)  from generate_series(0,10000000);
create index employee_dept_no_idx on employee(dept_no);- partitioning 과 달리, 모든 데이터를 다 담는 employee 테이블이 생성됩니다.
1. Partition 테이블 확인하기
-- 확인 방법 1
SELECT inhrelid::regclass AS child
FROM pg_catalog.pg_inherits
WHERE inhparent = 'employee_parts'::regclass;

-- 확인 방법 2. 논리 테이블 명으로 물리 테이블 조회
select * from  pg_partition_tree('public.employee_parts'::regclass)
where parentrelid is not null;

-- 확인 방법 3. 물리 테이블 명으로 논리 테이블 조회
select * from pg_partition_ancestors('public.employee_dept_20'::regclass);
먼저 위 3가지 방법들 중 아무거나 하나를 선택해서
논리/물리 테이블이 제대로 생성 및 매핑되었는지 확인합니다.
2. 테이블, 인덱스의 크기 비교
select
       pg_size_pretty(pg_relation_size(oid)) as pretty_size,
       relname,
       case
           when relkind = 'r' then '일반 테이블'
           when relkind = 'i' then '인덱스'
           when relkind = 'S' then '시퀀스'
           when relkind = 'v' then '뷰'
           when relkind = 'm' then '마테리얼라이즈드 뷰'
           when relkind = 'c' then '컴파일된 테이블 함수'
           when relkind = 'f' then '컴파일된 외부 테이블 함수'
           when relkind = 'p' then '파티션'
           when relkind = 'I' then '퍼지 인덱스'
           when relkind = 's' then '토스트 테이블'
           when relkind = 't' then 'TOAST 인덱스'
           end reltype_nm,
       relispartition -- 파티션 테이블 여부
from pg_class
where relname like '%employee%'
order by pg_relation_size(oid) desc;
쿼리 결과
| pretty_size | relname | reltype_nm | relispartition |
|---|---|---|---|
| 346 MB | employee | 일반 테이블 | false |
| 66 MB | employee_dept_no_idx | 인덱스 | false |
| 17 MB | employee_dept_1 | 일반 테이블 | true |
| 3416 kB | employee_dept_01_dept_no_idx | 인덱스 | true |
| 0 bytes | employee_parts_idx | 퍼지 인덱스 | false |
| 0 bytes | employee_parts | 파티션 | false |
employee_dept_2 ~ employee_dept_20은 중복되는 내용이므로 생략했습니다.employee_dept_02_dept_no_idx~employee_dept_20_dept_no_idx도 같은 이유로 생략합니다.
보면 알겠지만 하나의 테이블에 모든 데이터를 다 때려박은 것보다,
쪼개진 테이블의 크기와, 인덱스 크기가 훨배 작다는 것을 확인할 수 있습니다.
그리고 논리 테이블(employee_parts)는 0 byte 라는 것을 통해서
실제 크기를 갖지 않는다는 것도 확인할 수 있습니다.
3. query plan
이번에는 partitioning 테이블과 일반 테이블의 조회 방식의 차이를 관찰해보겠습니다.
explain analyze
select count(*) from employee_parts
where dept_no =10;


explain analyse
select count(*) from employee
where dept_no = 10;
1. employee_parts 조회
Finalize Aggregate (cost=7627.51..7627.52 rows=1 width=8) (actual time=42.513..44.556 rows=1 loops=1)
-> Gather (cost=7627.40..7627.51 rows=1 width=8) (actual time=42.338..44.549 rows=2 loops=1)
Workers Planned: 1
Workers Launched: 1
-> Partial Aggregate (cost=6627.40..6627.41 rows=1 width=8) (actual time=28.819..28.820 rows=1 loops=2)
-> Parallel Seq Scan on employee_dept_10 employee_parts (cost=0.00..5891.83 rows=294226 width=0) (actual time=0.008..20.204 rows=250092 loops=2)
Filter: (dept_no = 10)
Planning Time: 0.084 ms
Execution Time: 44.609 ms
2. employee 조회
Finalize Aggregate (cost=9000.68..9000.69 rows=1 width=8) (actual time=34.532..36.752 rows=1 loops=1)
-> Gather (cost=9000.46..9000.67 rows=2 width=8) (actual time=34.463..36.745 rows=3 loops=1)
Workers Planned: 2
Workers Launched: 2
-> Partial Aggregate (cost=8000.46..8000.47 rows=1 width=8) (actual time=15.488..15.489 rows=1 loops=3)
-> Parallel Index Only Scan using employee_dept_no_idx on employee (cost=0.43..7482.76 rows=207083 width=0) (actual time=0.049..9.601 rows=166942 loops=3)
Index Cond: (dept_no = 10)
Heap Fetches: 0
Planning Time: 0.106 ms
Execution Time: 36.789 msemployee 테이블 조회시에는 인덱스를 사용하여 조회를 합니다.
반면 employee_part 테이블은 인덱스 대신 seq scan 을 하는 것을 확인할 수 있습니다.
아무래도 지금같이 count(*) 집계함수를 쓰는 경우에는 seq scan 이 훨배 낫겠죠?
이렇듯 partitioning 테이블에 대해서 적절한 쿼리를 사용하면 더 나은 성능을 기대할 수도 있습니다.
주의사항: 물리 테이블의 컬럼 alter 사용
cannot alter inherited column "<컬럼명>" 처럼 에러를 뱉어냅니다!
한번 논리 테이블에서 지정된 컬럼 형식은 계속 유지되어야 한다는 점도 알아두면 좋습니다.
✨ 참고링크
- https://www.postgresql.org/docs/current/ddl-partitioning.html
- table-partitioning vs use only index
- 인덱스만 사용할지, table partitioning 을 쓸지 잘 모를 때 읽어보면 좋은 글
- 쿼리로 현재 테이블이 파티셔닝이 되어 있는지 아는 방법