이 글은
네트워크 소녀 Netty저서에 대한2022-05-13공부 내용을 정리한 것이다.
아직 정제되지 않은 study memo 여서 오타 및 문맥 이상이 많다는 것을 미리 알립니다.
이 글에 나오는 소스코드 깃허브에서 제공된다.
자바 버퍼는 바이트 데이터를 저장하는 저장소이다. 이 버퍼를 통해서 읽기, 쓰기가 가능하고 데이터 타입에 따라 그에 맞는 클래스와 메소드를 제공한다. 그런데 이러한 자바 버퍼가 있음에도 Netty 프레임워크에서 자체적인 버퍼 API 를 사용한다.
지금부터 자바 버퍼와 Netty 프레임워크 자체의 버퍼의 사용법과 특징을 알아보자.
참고
나는 현재 Maven 프로젝트로 코드를 작성하며 pom.xml 은 아래와 같다.
<?xml version="1.0" encoding="UTF-8"?>

<project xmlns="http://maven.apache.org/POM/4.0.0"
          xmlns:xsi="http://www.w3.org/2001/XMLSchema-instance"
  xsi:schemaLocation="http://maven.apache.org/POM/4.0.0 http://maven.apache.org/xsd/maven-4.0.0.xsd">
  <modelVersion>4.0.0</modelVersion>

 <groupId>me.dailycode</groupId>
 <artifactId>netty-network</artifactId>
 <version>1.0.0</version>

 <name>netty-network</name>

 <properties>
   <project.build.sourceEncoding>UTF-8</project.build.sourceEncoding>
    <maven.compiler.source>11</maven.compiler.source>
    <maven.compiler.target>11</maven.compiler.target>
  </properties>

  <dependencies>
    <dependency>
      <groupId>org.junit.jupiter</groupId>
      <artifactId>junit-jupiter-engine</artifactId>
      <version>5.8.2</version>
      <scope>test</scope>
    </dependency>
    <dependency>
      <groupId>org.assertj</groupId>
      <artifactId>assertj-core</artifactId>
      <version>3.21.0</version>
    </dependency>
    <dependency>
      <groupId>org.mockito</groupId>
      <artifactId>mockito-junit-jupiter</artifactId>
      <version>3.9.0</version>
      <scope>test</scope>
    </dependency>
    <!-- https://mvnrepository.com/artifact/io.netty/netty-all -->
    <dependency>
      <groupId>io.netty</groupId>
      <artifactId>netty-all</artifactId>
      <version>4.1.76.Final</version>
    </dependency>
  </dependencies>
</project>
🍀 자바 NIO 바이트 버퍼
자바 NIO 바이트 버퍼는 바이트 데이터를 저장하고 읽는 저장소이다.
여러 데이터 타입을 지원하기 위해서 아래와 같은 클래스를 제공한다.
ByteBufferCharBufferIntBufferShortBufferLongBufferFloatBufferDoubleBuffer
그리고 각 클래스는 내부적으로 배열을 가지며, 해당 배열에 대한 읽기/쓰기가 가능한 메서드를 제공한다.
이때 배열 상태 관리를 위해서 3가지 속성값(= 배열의 인덱스 포인터)을 갖는다.
capacity: 버퍼(= 내부 배열)의 최대 크기. 버퍼 생성 시 최초 한번만 지정하고 이후 변경 불가limit: capacity 지정 후에 읽기/쓰기의 범위를 제한하는 인덱스를 지정하는 값. 버퍼 생성 시 capacity와 동일한 값을 갖는다.position- 읽거나 쓸 때 사용할 인덱스
- 버퍼 객체 생성시 0으로 초기화된다
- 항상 limit 보다 작거나 같음
- 읽거나 쓸 때 모두 position 값이 증가
이외에도 mark 라는 부가적인 속성값도 제공된다.
mark: 자신이 원하는 position을 북마크하기 위한 속성값이다.
버퍼의 reset 메서드를 호출해서 해당 위치로 position을 이동시킨다.
📌 자바 바이트 버퍼 생성
위에서 말했지만 자바 버퍼는 데이터 타입에 따라 여러 클래스를 제공하지만,
allocateDirect라는 버퍼 생성 메소드는 오로지ByteBuffer만 제공하기 때문에
ByteBuffer클래스 위주로 설명하겠다.
자바 버퍼는 추상 클래스 팩토리 메서드(ex: List.of())를 통해 인스턴스를 생성한다.
이런 팩토리 메서드는 아래와 같이 3가지가 있다.
public static ByteBuffer allocate(int capacity)JVM의 힙 영역에 바이트 버퍼를 생성- 이 방식으로 생성된 버퍼를
힙 버퍼라고 부름 - 생성된 버퍼 내부의 배열에는 모든 요소의 값들이
0으로 초기화
public static ByteBuffer allocateDirect(int capacity)- 운영체제 커널 영역에 바이트 버퍼를 생성
- 이 방식으로 생성된 버퍼를
다이렉트 버퍼라고 부름 - 생성된 버퍼 내부의 배열에는 모든 요소의 값들이
0으로 초기화
public static ByteBuffer wrap(byte[] array)- 인자로 입력한 바이트 배열을 사용하여 바이트 버퍼 생성
allocate와 마찬가지로힙 버퍼를 생성
간단한 테스트 코드
package me.dailycode.bytebuffer;

import org.junit.jupiter.api.Test;

import java.nio.ByteBuffer;
import java.nio.IntBuffer;

import static org.assertj.core.api.Assertions.assertThat;

class CreateByteBufferTest {

    @Test
    void createTest() {
        ByteBuffer heapBuffer = ByteBuffer.allocate(9);
        assertThat(heapBuffer.capacity()).isEqualTo(9);
        assertThat(heapBuffer.isDirect()).isFalse();

        ByteBuffer directBuffer = ByteBuffer.allocateDirect(50);
        assertThat(directBuffer.capacity()).isEqualTo(50);
        assertThat(directBuffer.isDirect()).isTrue();

        int[] array = {1, 2, 3, 4, 5, 6, 7, 8, 9, 0, 0, 1, 5};
        IntBuffer intHeapBuffer = IntBuffer.wrap(array);
        assertThat(intHeapBuffer.capacity()).isEqualTo(13);
        assertThat(intHeapBuffer.isDirect()).isFalse();
    }
}
📌 버퍼 사용
Junit5 테스트를 통해서 버퍼를 사용하면서 머리로 이해해보자.
1. position 인덱스 테스트
package me.dailycode.bytebuffer;
import org.junit.jupiter.api.Assertions;
import org.junit.jupiter.api.Test;
import java.nio.BufferOverflowException;
import java.nio.CharBuffer;
import java.nio.charset.StandardCharsets;
import static org.assertj.core.api.Assertions.*;
class ByteBufferTest {
@Test
void test01() {
ByteBuffer firstBuffer = ByteBuffer.allocate(10);
System.out.println("before : " + firstBuffer);
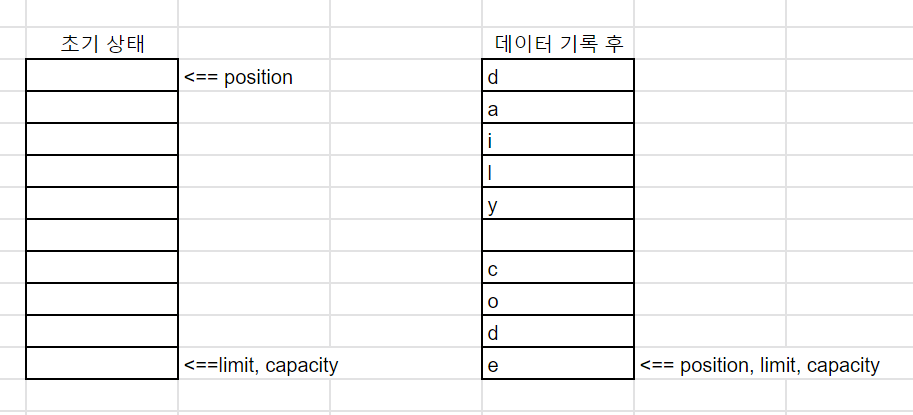
byte[] source = "daily code".getBytes(StandardCharsets.UTF_8);
firstBuffer.put(source);
System.out.println("after : " + firstBuffer);
}
}콘솔 출력
before : java.nio.HeapByteBuffer[pos=0 lim=10 cap=10]
after : java.nio.HeapByteBuffer[pos=10 lim=10 cap=10]
위 코드의 position 속성값의 변화는 아래 그림과 같다.
-
참고로 position 이 limit 을 넘어가면 java.nio.BufferOverflowException 예외가 통보된다.
-
@Test
void test02() {
    ByteBuffer buffer = ByteBuffer.allocate(10);
    System.out.println("before : " + buffer);

    byte[] source = "daily code!".getBytes(StandardCharsets.UTF_8);

    catchThrowableOfType(() -> {
        for (byte item : source) {
            buffer.put(item);
            System.out.println("after: " + buffer);
        }
    }, BufferOverflowException.class).printStackTrace();
}
2. 쓰기와 읽기
자바 버퍼는 읽거나 쓸 때 모두 position 이 가르키는 인덱스에 값에 대한 작업을 마치고
동시에 position 값을 증가시킨다고 했다. 이러다 보니 우리가 단순히 put 이후에
get 을 하면 바로 앞에서 put 한 정보가 조회되지 않는다.
그렇기 때문에 자바 버퍼는 쓰기 작업이 완료된 이후에 특수한 메서드 호출
후에 get을 통한 읽기가 정상적으로 이루어진다.
특수한 메서드 중 하나인 "rewind" 메서드 사용 코드를 관찰해보자.
@Test
@DisplayName("쓰고 읽기 테스트(feat. rewind)")
void rewindTest() {
    ByteBuffer firstBuffer = ByteBuffer.allocate(11);
    System.out.println("at first : " + firstBuffer);

    firstBuffer.put((byte) 1);
    firstBuffer.put((byte) 2);
    assertThat(firstBuffer.position()).isEqualTo(2);

    firstBuffer.rewind(); // 👈👈👈 바로 위에서 설명한 특수한 메서드 중 하나이다.
    assertThat(firstBuffer.position()).isEqualTo(0);
    assertThat(firstBuffer.get()).isEqualTo((byte) 1);
    assertThat(firstBuffer.position()).isEqualTo(1);
    assertThat(firstBuffer.limit()).isEqualTo(11); // limit 은 영향을 받지 않는다.

    System.out.println(firstBuffer);
    while (firstBuffer.hasRemaining()) { // 현재 position 과 limit 까지 읽는다.
        System.out.println(firstBuffer.get());
    }
}
/*
콘솔 출력 결과:
at first : java.nio.HeapByteBuffer[pos=0 lim=11 cap=11]
java.nio.HeapByteBuffer[pos=1 lim=11 cap=11]
2
0
0
0
0
0
0
0
0
0
*/- 루프를 돌며 출력을 해보니 처음부터 position 까지 읽는게 아니라, position 부터 limit 까지 읽는다.
- 필요할 수도 있겠지만, 지금의 경우에는 쓸데없는 것까지 읽어버리는 느낌이 강하다.
- 이런 경우를 방지하기 위해서
flip이라는 특수한 메서드도 버퍼가 제공한다.
rewind 에 대한 설명은 api 설명에 잘 나온다.
Rewinds this buffer. The position is set to zero and the mark is discarded.
Invoke this method before a sequence of channel-write or get operations,
assuming that the limit has already been set appropriately. For example:
  out.write(buf);    // Write remaining data
  buf.rewind();      // Rewind buffer
  buf.get(array);    // Copy data into array
rewind 외에도 flip 이라는 메서드도 제공된다.
@Test
@DisplayName("쓰고 읽기 테스트(feat. flip)")
void flipTest() {
ByteBuffer firstBuffer = ByteBuffer.allocateDirect(8);
assertThat(firstBuffer.position()).isEqualTo(0);
assertThat(firstBuffer.limit()).isEqualTo(8);
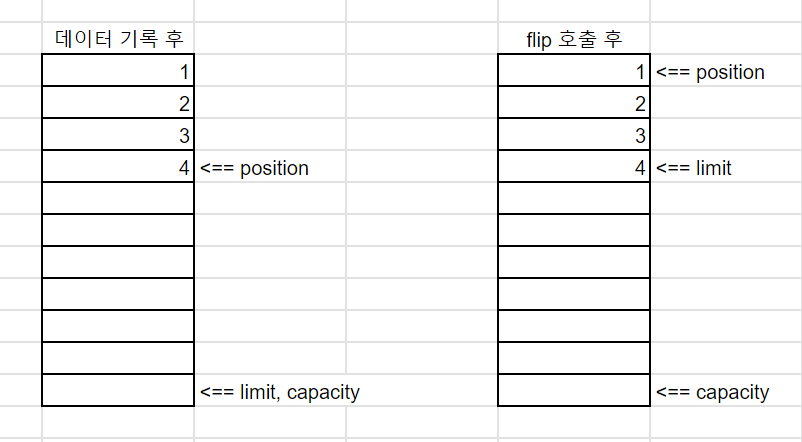
firstBuffer.put((byte) 1);
firstBuffer.put((byte) 2);
firstBuffer.put((byte) 3);
firstBuffer.put((byte) 4);
assertThat(firstBuffer.position()).isEqualTo(4);
assertThat(firstBuffer.limit()).isEqualTo(8);
firstBuffer.flip();
assertThat(firstBuffer.position()).isEqualTo(0);
assertThat(firstBuffer.limit()).isEqualTo(4);
while (firstBuffer.hasRemaining()) {
System.out.println(firstBuffer.get());
}
}
/*
콘솔 출력 내용:
1
2
3
4
*/flip 메서드 호출 전후 버퍼 상태
flip에 관한 api 설명은 아래와 같다.
Flips this buffer. The limit is set to the current position and
then the position is set to zero. If the mark is defined then it is discarded.
After a sequence of channel-read or put operations, invoke this method to prepare for
a sequence of channel-write or relative get operations.

For example:

  buf.put(magic);    // Prepend header
  in.read(buf);      // Read data into rest of buffer
  buf.flip();        // Flip buffer
  out.write(buf);    // Write header + data to channel

This method is often used in conjunction with the compact method when transferring data
from one place to another.
만약 어떤 곳에 버퍼 데이터를 전송하려고 할 때,
rewind 처럼 실제 put을 한 데이터 뿐만 아니라 limit 까지의 요소들도 모두 전송해버리면 리소스가 낭비된다. 이런 것을 방지하기 위해서는 rewind 대신 flip을 사용하는 것이 옳다.
🍀 네티 바이트 버퍼
자바 버퍼는 뭔가 쓰기가 좀 불편했다. put 을 통해 데이터를 넣고,
get 을 통해 읽기 전에 먼저 rewind 또는 flip 메서드를 호출해야 했다.
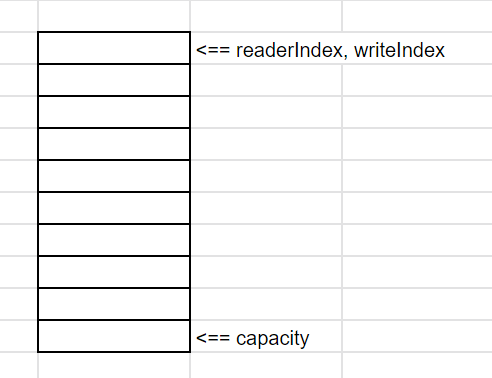
하지만 네티에서는 읽기와 쓰기를 위한 별도의 인덱스를 나누기 때문에
자바 버퍼와 같은 특수 메서드를 호출할 필요가 없다.
그리고 읽을 때는 읽기 전용 인덱스만 증가하고, 쓸 때는 쓰기 전용 인덱스만 값이 증가한다.
아래 그림은 초기 네티 바이트 버퍼 생성 시에 인덱스 상태이다.
이외에도 네티 버퍼는 데이터형에 따른 별도의 버퍼 클래스를 제공하는 대신 각 데이터 형에
맞는 메서드를 제공한다. 예를 들어서 Float 형은 readFloat, writeFloat 메서드를 제공한다.
📌 네티 바이트 버퍼 생성
네티의 바이트 버퍼는 프레임워크 레벨의 바이트 버퍼 풀을 제공한다.
이를 사용하면 생성된 바이트 버퍼를 재사용이 가능해진다.
아무튼 이런 버퍼 풀을 사용할지 말지에 따라 버퍼 생성하는 메서드가 다르다.
그리고 자바 버퍼와 마찬가지로 다이렉트 버퍼인지 힙 버퍼인지에 따라서도 메서드가 다르다.
| Use Pooling | No Pooling | |
|---|---|---|
| Heap Buffer | ByteBufAllocator.Default.heapBuffer() | UnPooled.buffer() |
| Direct Buffer | ByteBufAllocator.Default.directBuffer() | UnPooled.directBuffer() |
간단한 버퍼 생성 테스트
package me.dailycode.bytebuffer;

import io.netty.buffer.ByteBuf;
import io.netty.buffer.PooledByteBufAllocator;
import io.netty.buffer.Unpooled;
import org.junit.jupiter.api.Test;

import static org.assertj.core.api.Assertions.assertThat;

public class NettyBufferTest {
    @Test
    void createBufferTest() {
        ByteBuf unPooledDirectBuf = Unpooled.directBuffer(8);
        ByteBuf unPooledHeapBuf = Unpooled.buffer(8);
        ByteBuf pooledDirectBuf = PooledByteBufAllocator.DEFAULT.directBuffer(8);
        ByteBuf pooledHeapBuf = PooledByteBufAllocator.DEFAULT.heapBuffer(8);

        simpleBufTest(unPooledDirectBuf, true);
        simpleBufTest(unPooledHeapBuf, false);
        simpleBufTest(pooledDirectBuf, true);
        simpleBufTest(pooledHeapBuf, false);
    }

    private void simpleBufTest(ByteBuf buf, boolean isDirect) {
        assertThat(8).isEqualTo(buf.capacity());
        assertThat(buf.isDirect()).isEqualTo(isDirect);
        assertThat(buf.readableBytes()).isEqualTo(0);
        assertThat(buf.writableBytes()).isEqualTo(11);
    }
}
📌 버퍼 사용
가볍게 코드를 통해서 테스트만 해보자.
1. 읽기 / 쓰기
@Test
void bufferSizeTest() {
    ByteBuf buffer = Unpooled.buffer(8);

    assertThat(buffer.readableBytes()).isEqualTo(0);
    assertThat(buffer.writableBytes()).isEqualTo(8);
    assertThat(buffer.isReadable()).isFalse();


    buffer.writeByte(1);
    buffer.writeByte(2);
    // 위처럼 하면 0b 0000 0001 0000 0010 이 들어간다.

    assertThat(buffer.readableBytes()).isEqualTo(2); // 읽을 수 있는 바이트 수 증가
    assertThat(buffer.writableBytes()).isEqualTo(6); // 쓸 수 있는 바이트 수 감소
    assertThat(buffer.isReadable()).isTrue();
    assertThat(buffer.readShort()).isEqualTo((short) 258);

    buffer.clear(); // readIndex, writeIndex 모두 초기화
    assertThat(buffer.readableBytes()).isEqualTo(0);
    assertThat(buffer.writableBytes()).isEqualTo(8);
}
참고: 258의 2진수 표기

2. 가변 크기 버퍼
네티 버퍼는 자바 버퍼와 달리 capacity, 즉 총용량이 가변적이다.
아래 코드를 통해서 알아보자.
@Test
void dynamicSizingBufferTest() {
    ByteBuf buffer = Unpooled.buffer(10);
    String source = "daily code";

    buffer.writeBytes(source.getBytes(StandardCharsets.UTF_8));
    assertThat(buffer.readableBytes()).isEqualTo(10);
    assertThat(buffer.writableBytes()).isEqualTo(0);

    buffer.capacity(5); // 가변적으로 capacity 변경 ==> capacity 를 넘는 데이터는 삭제
    assertThat(buffer.toString(StandardCharsets.UTF_8)).isEqualTo("daily");

    // 원래 크기인 10 바이트보다 좀 더 큰 12바이트로 변경해보자.
    buffer.capacity(12);
    assertThat(buffer.toString(StandardCharsets.UTF_8)).isEqualTo("daily");
    // 가변을 일이키기 전에 있던 데이터는 유지되는 것을 확인할 수 있다.

    buffer.writeBytes(" life".getBytes(StandardCharsets.UTF_8));
    assertThat(buffer.toString(StandardCharsets.UTF_8)).isEqualTo("daily life");
    assertThat(buffer.readableBytes()).isEqualTo(10);
    assertThat(buffer.writableBytes()).isEqualTo(2);

}
3. 바이트 버퍼 풀링
네티는 바이트 버퍼 풀링을 위한 버퍼 풀을 제공한다.
이 바이트 버퍼 풀링을 사용하면 다음과 같은 장점이 있다.
그 중에서 가장 큰 장점은 버퍼의 할당/해제할 때 일어나는 가비지 컬렉션의 횟수 감소이다.
자바 가비지 컬렉션
자바의 가비지 컬렉션은 더 이상 참조되지 않는 객체가 점유하는 메모리를 가상머신에 반환하는 것이다.
그리고JVM이 스스로 사용할 수 있는 메모리 영역이 모자라다고 판단하면 자동으로 수행된다.그런데 문제는 JVM 에서 유효한 참조가 있는지 없는지를 위해서 모든 객체를 검사하고 메모리를 해제한다. 그리고 이 작업에 걸리는 시간은 객체의 개수와 메모리의 크기에 따라 달라진다.
만약 메모리를 늘려서 그만큼 JVM 에 할당하는 메모리도 또한 늘리게 되거나, 객체의 개수를 무리하게 늘리면
JVM에 의한 가비지 컬렉션에 소요되는 시간은 늘어나는 것이다.참고로 이 시간 동안
JVM은 멈춘 것과 같아서 마치 애플리케이션이 죽은 것 처럼 보이게 된다.
네티 바이트 버퍼 풀링은 ByteBufAllocator 를 사용하면 바이트 버퍼를 생성할 때 자동으로 수행된다.
그리고 버퍼 풀에 대한 버퍼의 참조 수를 관리하기 위한 ReferenceCountUtil 클래스가 있다.
retain, release 메서드를 사용하면 된다. retain 은 증가, release 는 감소시킨다.
4. 바이트 버퍼 상호 변환
@Test
void convertEachOtherTest() {

    // 1. Netty Buf ==> Java Buf
    ByteBuf nettyBuffer = Unpooled.buffer(10);

    String source = "daily code";
    nettyBuffer.writeBytes(source.getBytes(StandardCharsets.UTF_8));

    ByteBuffer javaBuffer = nettyBuffer.nioBuffer();
    assertNotNull(javaBuffer);
    assertThat(source).isEqualTo(
        new String(
            javaBuffer.array(),
            javaBuffer.arrayOffset(),
            javaBuffer.remaining()
        )
    );

    // 2. Java Buf ==> Netty Buf
    javaBuffer = ByteBuffer.wrap(source.getBytes(StandardCharsets.UTF_8));
    nettyBuffer = Unpooled.wrappedBuffer(javaBuffer);
    assertThat(source).isEqualTo(nettyBuffer.toString(StandardCharsets.UTF_8));
}
5. 채널과 바이트 버퍼 풀
이벤트 메서드 작성 시 받는 인자인 ChannelHandlerContext ctx를 사용하면 바이트 풀을 편하게 사용할 수 있다.
package me.dailycode;

import io.netty.buffer.ByteBuf;
import io.netty.buffer.ByteBufAllocator;
import io.netty.channel.ChannelHandlerContext;
import io.netty.channel.ChannelInboundHandlerAdapter;

public class EchoServerV5Handler extends ChannelInboundHandlerAdapter {
    @Override
    public void channelRead(ChannelHandlerContext ctx, Object msg) {
        ByteBuf readMessage = (ByteBuf) msg;

        ByteBufAllocator byteBufAllocator = ctx.alloc(); // 👈
        ByteBuf buffer = byteBufAllocator.buffer(); // 👈

        // buffer 를 사용한 다양한 연산 수행

        ctx.write(msg); // 👈
    }

    @Override
    public void exceptionCaught(ChannelHandlerContext ctx, Throwable cause) throws Exception {
        cause.printStackTrace();
        ctx.close();
    }
}ctx.alloc()를 통해서 네티 프레임워크에서 초기화된ByteBufAllocator를 참조할 수 있다.- 기본적으로 이렇게 사용되는
ByteBufAllocator는 다이렉트 버퍼를 사용한다. 변경 가능하다. byteBufAllocator.buffer()로 얻은 버퍼는 채널에 기록되거나 release 메소드를 명시적으로 호출하면 버퍼 풀에 반환된다.ctx.write메서드의 인수로 사용된 바이트 버퍼는 데이터를 채널에 기록 후 버퍼 풀에 반환된다.