🎯 글의 목표
이 글의 핵심 목표는 NetCDF 를 GeoTiff 로 변환 하는 것입니다.
NetCDF 에 는 여러개의 SubData 가 있는 구조이고, 이 각각의 SubData 를 GeoTiff 로 뽑아내는 게 목표입니다.
🙄 NetCDF 란?
위 영상에서 잘 설명하니 한번 보시길 바랍니다.
또는 [파이썬] 해양수치모델 NetCDF 형식의 이해 라는 게시물을 참조하셔도 좋습니다.
💾 netCdf 샘플 데이터 수집
데이터 출처
자세한 데이터 요청 및 다운로드 방법
해양수치모델 하이컴 다운로드 1 - 데이터 개요 및 웹 다운로드
🧪 유틸 설치
1. netcdf c 라이브러리 (Option)
이 글에서는
gdal만으로 거의 모든 작업을 하기 때문에 필수는 아닙니다.
다만 다른 블로그 글에서 많이 사용해서 그냥 다운로드 받았습니다.
netcdf 를 사용할 때 반드시 필요한 ncdump 명령어를
곧바로 사용해줄 수 있게 해주는 고마운 설치 프로그램을 제공해줍니다.
다운로드 과정에서 PATH 에 netcdf 경로 추가를 할거냐는 선택지를 주는데,
All User 가 사용할 수 있는 선택지를 골라주시기 바랍니다.
설치 이후에 곧바로 ncdump 를 cli 툴에서 사용이 가능합니다.
netcdf -h ???.nc
netcdf g120v070ereaunish000.2024011400 {
dimensions:
        y = 419 ;
        x = 491 ;
        time = UNLIMITED ; // (1 currently)
variables:
        double y(y) ;
                y:long_name = "y coordinate of projection" ;
                y:standard_name = "projection_y_coordinate" ;
                y:units = "m" ;
                y:grid_spacing = 12000. ;
        double x(x) ;
                x:long_name = "x coordinate of projection" ;
                x:standard_name = "projection_x_coordinate" ;
                x:units = "m" ;
                x:grid_spacing = 12000. ;
        double latitude(y, x) ;
                latitude:units = "degrees_north" ;
                latitude:long_name = "latitude" ;
        double longitude(y, x) ;
                longitude:units = "degrees_east" ;
                longitude:long_name = "longitude" ;
        double time(time) ;
                time:units = "seconds since 1970-01-01 00:00:00.0 0:00" ;
                time:long_name = "verification time generated by wgrib2 function verftime()" ;
                time:reference_time = 1705190400. ;
                time:reference_time_type = 1 ;
                time:reference_date = "2024.01.14 00:00:00 UTC" ;
                time:reference_time_description = "analyses, reference date is fixed" ;
                time:time_step_setting = "auto" ;
                time:time_step = 0. ;
        float UGRD_10maboveground(time, y, x) ;
                UGRD_10maboveground:_FillValue = 9.999e+20f ;
                UGRD_10maboveground:short_name = "UGRD_10maboveground" ;
                UGRD_10maboveground:long_name = "U-Component of Wind" ;
                UGRD_10maboveground:level = "10 m above ground" ;
                UGRD_10maboveground:units = "m/s" ;
                UGRD_10maboveground:coordinates = "longitude latitude" ;

///////////////////////////// 생략 /////////////////////////////

// global attributes:
                :Conventions = "CF-1.0" ;
                :History = "created by wgrib2" ;
                :GRIB2_grid_template = 30 ;
}
2. gdal 설치 (필수)
제가 이전에 작성한 gdal 설치법 게시물을 참고해주세요.
🚀 netcdf 분석
gdalinfo .\g120v070ereaunish000.2024011400.nc
ToastBread → gdalinfo .\g120v070ereaunish000.2024011400.nc
Driver: netCDF/Network Common Data Format
Files: .\g120v070ereaunish000.2024011400.nc
Size is 512, 512
Metadata:
  NC_GLOBAL#Conventions=CF-1.0
  NC_GLOBAL#GRIB2_grid_template=30
  NC_GLOBAL#History=created by wgrib2
Subdatasets:
  SUBDATASET_1_NAME=NETCDF:".\g120v070ereaunish000.2024011400.nc":latitude
  SUBDATASET_1_DESC=[419x491] latitude (64-bit floating-point)
  SUBDATASET_2_NAME=NETCDF:".\g120v070ereaunish000.2024011400.nc":longitude
  SUBDATASET_2_DESC=[419x491] longitude (64-bit floating-point)
  SUBDATASET_3_NAME=NETCDF:".\g120v070ereaunish000.2024011400.nc":UGRD_10maboveground
  SUBDATASET_3_DESC=[1x419x491] UGRD_10maboveground (32-bit floating-point)
  SUBDATASET_4_NAME=NETCDF:".\g120v070ereaunish000.2024011400.nc":VGRD_10maboveground
  SUBDATASET_4_DESC=[1x419x491] VGRD_10maboveground (32-bit floating-point)
  SUBDATASET_5_NAME=NETCDF:".\g120v070ereaunish000.2024011400.nc":TMP_1_5maboveground
  SUBDATASET_5_DESC=[1x419x491] TMP_1_5maboveground (32-bit floating-point)
  SUBDATASET_6_NAME=NETCDF:".\g120v070ereaunish000.2024011400.nc":RH_1_5maboveground
  SUBDATASET_6_DESC=[1x419x491] RH_1_5maboveground (32-bit floating-point)
  SUBDATASET_7_NAME=NETCDF:".\g120v070ereaunish000.2024011400.nc":APCP_surface
  SUBDATASET_7_DESC=[1x419x491] APCP_surface (32-bit floating-point)
  SUBDATASET_8_NAME=NETCDF:".\g120v070ereaunish000.2024011400.nc":PRMSL_meansealevel
  SUBDATASET_8_DESC=[1x419x491] PRMSL_meansealevel (32-bit floating-point)
Corner Coordinates:
Upper Left  (    0.0,    0.0)
Lower Left  (    0.0,  512.0)
Upper Right (  512.0,    0.0)
Lower Right (  512.0,  512.0)
Center ( 256.0, 256.0)SUBDATASET_?_NAME: 이거 하나하나가 GeoTiff 로 생각하면 됩니다.
이번에는 SubData 하나에 대한 정보를 조회해봅시다.
위에서 출력됐던 SUBDATASET_4_NAME 의 값을 그대로 복사해서,
gdalinfo 의 파라미터로 넘겨주기만 하면 됩니다.
#### 명령어 입력:
gdalinfo NETCDF:"g120v070ereaunish000.2024011400.nc":UGRD_10maboveground

#### 명령어 실행 후 출력:
# Driver: netCDF/Network Common Data Format
# Files: g120v070ereaunish000.2024011400.nc
# Size is 491, 419
# Metadata:
# NC_GLOBAL#Conventions=CF-1.0
# NC_GLOBAL#GRIB2_grid_template=30
# NC_GLOBAL#History=created by wgrib2
#### ... 중간 생략 ... ###
# SRS=GEOGCS["WGS 84",DATUM["WGS_1984",SPHEROID["WGS 84",6378137,298.257223563,AUTHORITY["EPSG","7030"]],AUTHORITY["EPSG","6326"]],PRIMEM["Greenwich",0,AUTHORITY["EPSG","8901"]],UNIT["degree",0.0174532925199433,AUTHORITY["EPSG","9122"]],AXIS["Latitude",NORTH],AXIS["Longitude",EAST],AUTHORITY["EPSG","4326"]]
# X_BAND=1
# X_DATASET=NETCDF:"g120v070ereaunish000.2024011400.nc":longitude
#         Y_BAND=1
# Y_DATASET=NETCDF:"g120v070ereaunish000.2024011400.nc":latitude
# Corner Coordinates:
# Upper Left  (    0.0,    0.0)
# Lower Left  (    0.0,  419.0)
# Upper Right (  491.0,    0.0)
# Lower Right (  491.0,  419.0)
# Center      (  245.5,  209.5)
# Band 1 Block=491x1 Type=Float32, ColorInterp=Undefined
# NoData Value=9.999e+20
# Unit Type: m/s
# Metadata:
# coordinates=longitude latitude
#         level=10 m above ground
#         long_name=U-Component of Wind
# NETCDF_DIM_time=1705190400
# NETCDF_VARNAME=UGRD_10maboveground
# short_name=UGRD_10maboveground
# units=m/s
# _FillValue=9.9990003e+20
💉 GeoTiff 추출방법
방법 1 - gdal_translate
gdal_translate "NETCDF:g120v070ereaunish000.2024011400.nc:RH_1_5maboveground" "g120v070ereaunish000.2024011400.tiff"

# 난감한 점... GeoTiff 는 이미지인데, 이걸 Extent 를 어떻게 맞춰야 할지는
# gdal 사용자가 직접 "a_ullr" 옵션으로 세팅해줘야 한다.
# 모르면? 그냥 못쓴다고 생각하면 된다. 이런 이유 때문에 나는 gdalwarp 를 많이 사용한다.
gdal_translate -a_srs EPSG:4326 -a_ullr 567.4 8321.8 571.4 8318.8 `
"NETCDF:g120v070ereaunish000.2024011400.nc:TMP_1_5maboveground" "somesome.tif"- 음...
-a_ullr이 진짜 좀 타격이 생각보다 큽니다. - NetCDF 자체에서도 좌표값이 있긴한데, 이게 꼭 맞다는 보장을 못합니다.
- 가끔 자신들만의
OffSet을 지정해서 QGIS 에 올리면 완전히 엉뚱한 곳에 나오더라구요... gdalwarp를 대신 사용하는 걸 정말 추천합니다. 얘는 알아서 딱딱 맞춰줍니다!
방법 2 - gdalwarp
# 1. 기본 (결과물에 EPSG:4326 반영)
gdalwarp -t_srs EPSG:4326 -geoloc NETCDF:g120v070ereaunish000.2024011400.nc:RH_1_5maboveground some.tiff

## gdal_translate 처럼 -a_ullr 를 사용해서 정확히 지정해주는 게 아니라,
## "-geoloc" 옵션 하나만 주면 알아서 맞춰집니다! 마법같은 기능입니다.
## 자세한 원리는 잘 모르겠지만, 데이터에 존재하는 GeoLocation Array 를 강제로
## 사용해서 이를 맞춰준다고 하네요.


# 2. 좌표계 변환
gdalwarp -geoloc -s_srs EPSG:4326 -t_srs EPSG:5179 `
NETCDF:g120v070ereaunish000.2024011400.nc:RH_1_5maboveground some.tiff


# 3. 사이즈 줄이기
gdalwarp -geoloc -co COMPRESS=DEFLATE `
NETCDF:g120v070ereaunish000.2024011400.nc:RH_1_5maboveground some.tiff


# 4. 너무 넓으면 잘라내기. EPSG:4326 기준의 좌표계로 잘라낸겁니다!
# gdalwarp  [-te xmin ymin xmax ymax]
# gdalwarp  -te 122.2672 32.4611 131.6114 42.4758 output.tif output_cropped.tif
gdalwarp  -te 116.80 30.88 140.80 40.88 output.tif output_cropped.tif


# 5. 2번, 4번을 합쳐서 아래처럼 사용도 가능합니다.
gdalwarp -overwrite -geoloc `
-t_srs EPSG:4326 -te 116.80 30.88 140.88 44.88 `
NETCDF:g120v070ereaunish000.2024011400.nc:TMP_1_5maboveground `
output.tif;


# tip: 한방에 여러개를 하려면 스크립트를 짜시면 됩니다. 아래는 pwsh 예시
Get-ChildItem | foreach -ErrorAction Stop {
    gdalwarp -geoloc "NETCDF:$($_.Name):RH_1_5maboveground" "$($_.BaseName).tiff"
}- 보면 알겠지만 웬만한 건 다됩니다.
gdalwarp를 씁시다 👍
이후에 QGIS 에 올려보면? 아래처럼 보입니다.
GeoTiff 에 좌표계도 제대로 적용됐는지 확인해야 합니다!
QGIS 배경지도를 하나 깔아주고 확인해봅시다.

🌈 Tip: GeoTiff 색상 바꾸기
위에서 봐서 알겠지만, 온통 회색입니다.
물론 이게 나름 간지(?)가 나지만, 좀 더 다채로운 색깔을 원하는 경우에는
아래와 같은 방법으로 수정이 가능합니다.
참고 링크:
https://tilemill-project.github.io/tilemill/docs/guides/terrain-data/#generating-color-relief
# 1. 먼저 geotiff 가 갖는 최소, 최대값을 구해야 합니다.
# gdalinfo 를 사용해서 알아냅시다.
[D:\shape_files\netcdf_sample]
ToastBread → gdalinfo .\output.tif
################## gdalinfo 출력 중간 생략 ##################
Band 1 Block=205x9 Type=Float32, ColorInterp=Gray
Min=247.076 Max=288.996
Minimum=247.076, Maximum=288.996, Mean=274.351, StdDev=8.854
NoData Value=9.999e+20
Unit Type: K
Metadata:
coordinates=longitude latitude
level=1.5 m above ground
long_name=Temperature
NETCDF_DIM_time=1705190400
NETCDF_VARNAME=TMP_1_5maboveground
short_name=TMP_1_5maboveground
STATISTICS_MAXIMUM=288.99591064453
STATISTICS_MEAN=274.35103008179
STATISTICS_MINIMUM=247.07598876953
STATISTICS_STDDEV=8.853821109044
STATISTICS_VALID_PERCENT=100
units=K
_FillValue=9.9990003e+20
## ==> 여기서 STATISTICS_MAXIMUM, STATISTICS_MINIMUM
## ==> 또는 Minimum=247.076, Maximum=288.996 을 통해서 확인이 가능합니다.
## 2. min, max value 기반으로 color table 정보를 담는 txt 파일을 하나 생성합니다.
[D:\shape_files\netcdf_sample]
ToastBread → cat .\color_ramp.txt
247 0 0 0 0
260 255 0 0
270 0 255 0
290 0 0 255
## ==> 자세히 보면 제일 좌측에 column 에 247, 260, 270, 290 처럼
## 최소값,최대값 기반으로 적절히 bandwidth 을 나눠주고,
## 각각의 bandwidth 에 색깔(RGB) 값을 오른쪽에 지정해주는 형식입니다.
## 3. 색깔 입히기 시작합시다. gdal 라이브러리 중 gdaldem 을 사용하면 됩니다.
[D:\shape_files\netcdf_sample]
ToastBread → gdaldem color-relief .\output.tif color_ramp.txt output-color-relief.tif
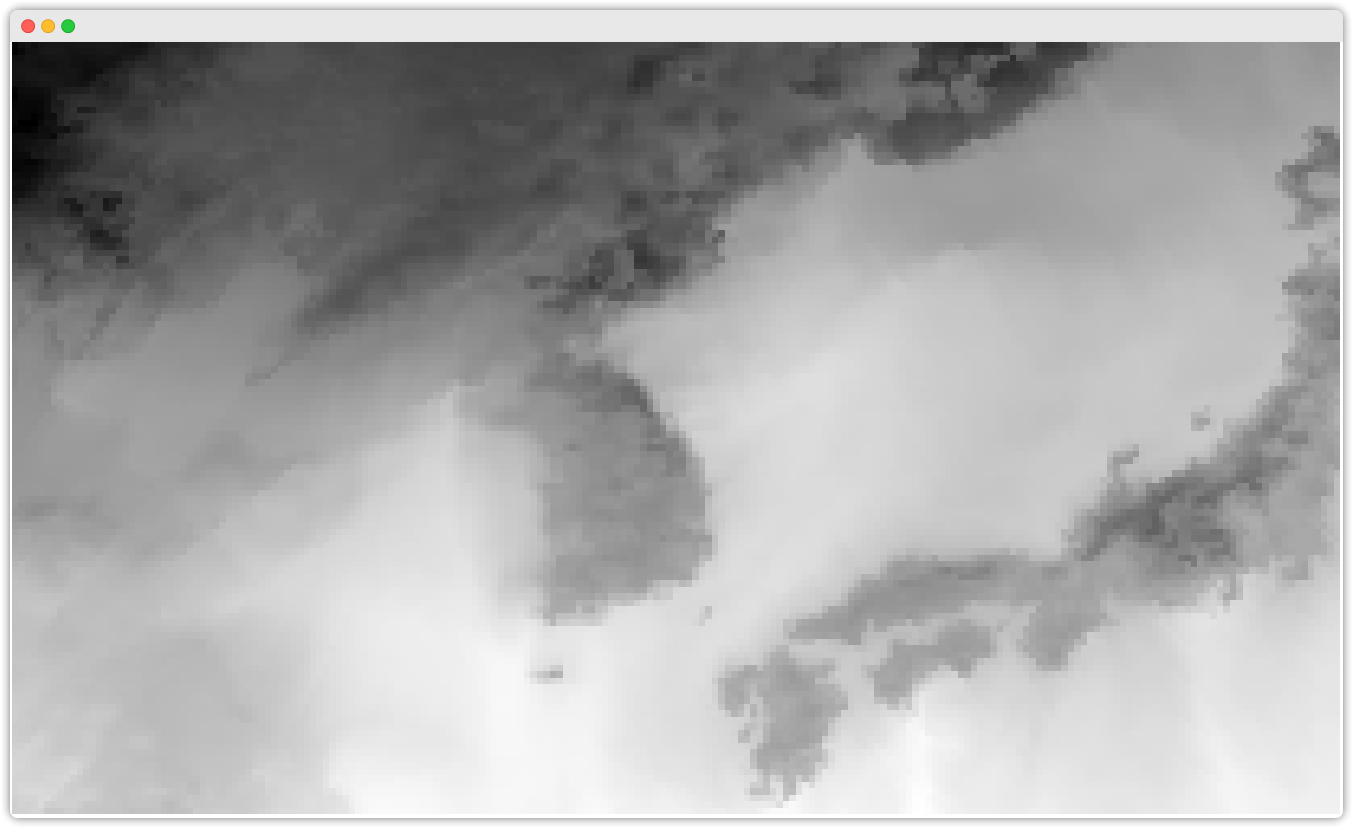
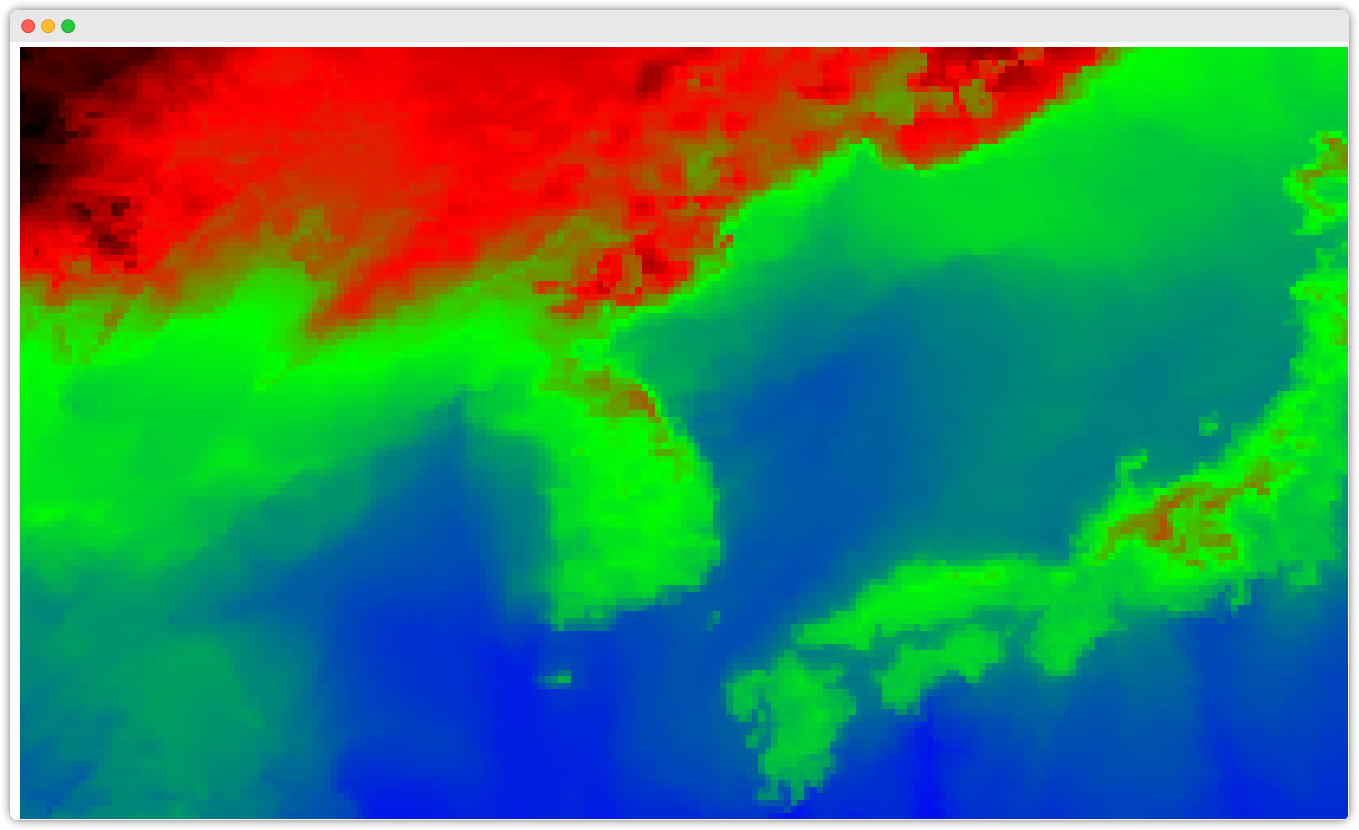
0...10...20...30...40...50...60...70...80...90...100 - done.output.tif, output-color-relief.tif 두 개의 파일을 QGIS 에 올리고 확인해봅시다.
색깔 입히기 전 (output.tif)

색깔 입힌 후 (output-color-relief.tif)
Stackoverflow 글입니다.
봐두면 좋은 내용들이 제법 있습니다. 한번 답변들 읽어보면 자신의
프로젝트에서 어떻게 동적으로 색깔을 입힐지 힌트를 얻을 수 있습니다.그외에도 color_ramp.txt 같은 color table 을 생성해주는 유틸도 있다고 합니다.
https://grass.osgeo.org/grass84/manuals/r.colors.html.
아직 안 써봐서 이와 관련해서는 PASS 합니다!
GeoTiff 에서 NetCDF 로 변경하기
참고: 기본 사용법
✅ 참고 링크