이 시리즈에 나오는 모든 내용은 인프런 인터넷 강의 - 스프링 시큐리티 - Spring Boot 기반으로 개발하는 Spring Security - 에서 기반된 것입니다. 그리고 여기서 인용되는 PPT 이미지 또한 모두 해당 강의에서 가져왔음을 알립니다. 추가적으로 여기에 작성된 코드들 또한 해당 강의의 github 에 올라와 있는 코드를 참고해서 만든 겁니다.
이전까지는 HTML 페이지에서 form 태그를 통해서 로그인을 시도했다면,
이번에는 AJAX 를 통한 로그인 기능도 만들어보자.
1. 프로세스 한눈에 보기

지금부터 위 구조를 직접 코드로 짜볼 것이다.
이전 Form 기능 구현 때 나온 내용이 중복되는 부분이 많아서, 약간의 설명 생략이 있다.
2. AjaxAuthenticationFilter
이전에는 UsernamePasswordAuthenticationFilter 가 이미 있어서 딱히
Filter 를 구현할 필요는 없었지만, Ajax 전용 인증 필터는 없기 때문에 직접 구현해야 한다.
이 클래스를 구현하기 위해서는 다음과 같은 점이 핵심이다.
- AbstractAuthenticationProcessingFilter 상속
- 필터 작동 조건 :
AntPathRequestMatcher("/api/login")처럼 작성/적용 AjaxAuthenticationToken생성 및AuthentiationManager에게 전달- Filter 추가:
http.addFilterBefore(AjaxAuthenticationFilter(), UsernamePasswordAuthenticationFilter.class);처럼 spring security 설정에서 filter 추가
2-1. AjaxAuthenticationFilter 생성
package me.dailycode.security.filter;
import com.fasterxml.jackson.databind.ObjectMapper;
import me.dailycode.dto.AccountDto;
import me.dailycode.security.token.AjaxAuthenticationToken;
import org.springframework.security.core.Authentication;
import org.springframework.security.core.AuthenticationException;
import org.springframework.security.web.authentication.AbstractAuthenticationProcessingFilter;
import org.springframework.security.web.util.matcher.AntPathRequestMatcher;
import org.springframework.util.StringUtils;
import javax.servlet.ServletException;
import javax.servlet.http.HttpServletRequest;
import javax.servlet.http.HttpServletResponse;
import java.io.IOException;
import static org.springframework.http.HttpMethod.POST;
public class AjaxLoginProcessingFilter extends AbstractAuthenticationProcessingFilter {
private ObjectMapper objectMapper = new ObjectMapper();
public AjaxLoginProcessingFilter() {
// 작동 조건은 잘~~ 써야 한다!
super(new AntPathRequestMatcher("/api/login", POST.name()));
}
@Override
public Authentication attemptAuthentication(HttpServletRequest request, HttpServletResponse response) throws AuthenticationException, IOException, ServletException {
if (!isAjax(request)) {
throw new IllegalStateException("Authentication is not supported");
}
AccountDto accountDto = objectMapper.readValue(request.getReader(), AccountDto.class);
if (!StringUtils.hasText(accountDto.getUsername())
|| !StringUtils.hasText(accountDto.getPassword())) {
throw new IllegalArgumentException("username or password is empty");
}
AjaxAuthenticationToken ajaxAuthenticationToken
= new AjaxAuthenticationToken(accountDto.getUsername(), accountDto.getPassword());
return getAuthenticationManager().authenticate(ajaxAuthenticationToken);
}
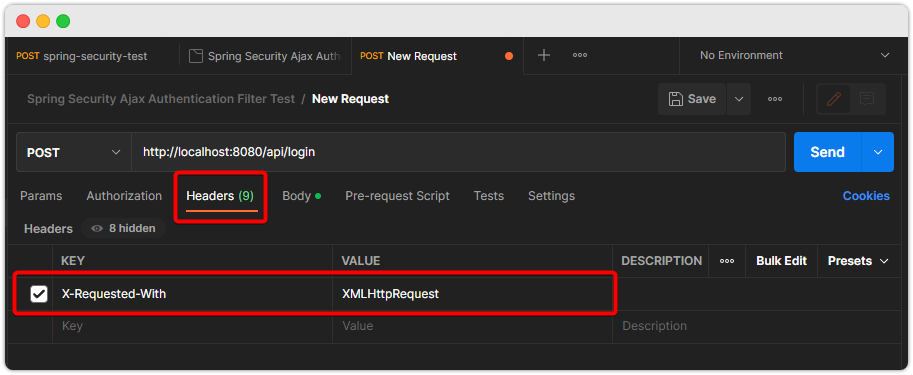
private boolean isAjax(HttpServletRequest request) {
return "XMLHttpRequest".equals(request.getHeader("X-Requested-With"));
}
}2-2. AjaxAuthenticationToken 생성
package me.dailycode.security.token;

import org.springframework.security.authentication.AbstractAuthenticationToken;
import org.springframework.security.core.GrantedAuthority;
import org.springframework.util.Assert;

import java.util.Collection;

// UsernamePasswordAuthenticationToken 내용을 복붙!
public class AjaxAuthenticationToken extends AbstractAuthenticationToken {

	private final Object principal;

	private Object credentials;

	public AjaxAuthenticationToken(Object principal, Object credentials) {
		super(null);
		this.principal = principal;
		this.credentials = credentials;
		setAuthenticated(false);
	}

	public AjaxAuthenticationToken(Object principal, Object credentials,
	                                           Collection<? extends GrantedAuthority> authorities) {
		super(authorities);
		this.principal = principal;
		this.credentials = credentials;
		super.setAuthenticated(true); // must use super, as we override
	}

	@Override
	public Object getCredentials() {
		return this.credentials;
	}

	@Override
	public Object getPrincipal() {
		return this.principal;
	}

	@Override
	public void setAuthenticated(boolean isAuthenticated) throws IllegalArgumentException {
		Assert.isTrue(!isAuthenticated,
			"Cannot set this token to trusted - use constructor which takes a GrantedAuthority list instead");
		super.setAuthenticated(false);
	}

	@Override
	public void eraseCredentials() {
		super.eraseCredentials();
		this.credentials = null;
	}

}- UsernamePasswordAuthenticationToken 내용을 복붙한 것이다!
2-3. Spring Security 설정
저번 Form 인증 구현을 위해서 사용했던 SecurityConfig 클래스가 있다. 이어서 작성하겠다.
이것과는 별개로 다른 AjaxSecurityConfig 클래스를 생성하고,
해당 클래스에 AJAX 전용 Security 설정을 지정하겠다.
package me.dailycode.security.configs;

import me.dailycode.security.filter.AjaxLoginProcessingFilter;
import org.springframework.context.annotation.Bean;
import org.springframework.context.annotation.Configuration;
import org.springframework.core.annotation.Order;
import org.springframework.security.authentication.AuthenticationManager;
import org.springframework.security.config.annotation.web.builders.HttpSecurity;
import org.springframework.security.config.annotation.web.configuration.WebSecurityConfigurerAdapter;
import org.springframework.security.web.authentication.UsernamePasswordAuthenticationFilter;

@Configuration
@Order(0) // 중요!
public class AjaxSecurityConfig extends WebSecurityConfigurerAdapter {

	@Override
	protected void configure(HttpSecurity http) throws Exception {
		http.antMatcher("/api/**")
			.authorizeRequests()
			.anyRequest().authenticated()
			.and()
			.addFilterBefore(ajaxLoginProcessingFilter(), UsernamePasswordAuthenticationFilter.class);
		http.csrf().disable();
	}

	@Override
	public AuthenticationManager authenticationManagerBean() throws Exception {
		return super.authenticationManagerBean();
	}

	@Bean
	public AjaxLoginProcessingFilter ajaxLoginProcessingFilter() throws Exception {
		AjaxLoginProcessingFilter ajaxLoginProcessingFilter = new AjaxLoginProcessingFilter();
		ajaxLoginProcessingFilter.setAuthenticationManager(authenticationManagerBean());
		return ajaxLoginProcessingFilter;
	}

}-
csrf 는 기본적으로 항상 켜져있다. 그리고 csrf 를 하면 모든 POST 방식에 대해서 csrf 토큰 유무를 체킹한다.
-
지금은 그렇게 까지 빡세게 할 필요가 없으므로 잠시
http.csrf().disable()한다.
이후에는 기존 SecurityConfig 클래스에도 @Order(1) 을 지정해준다.
@Configuration
@EnableWebSecurity
@Order(1) // ***
public class SecurityConfig extends WebSecurityConfigurerAdapter { ~ }
2-4. postman 실행 및 테스트
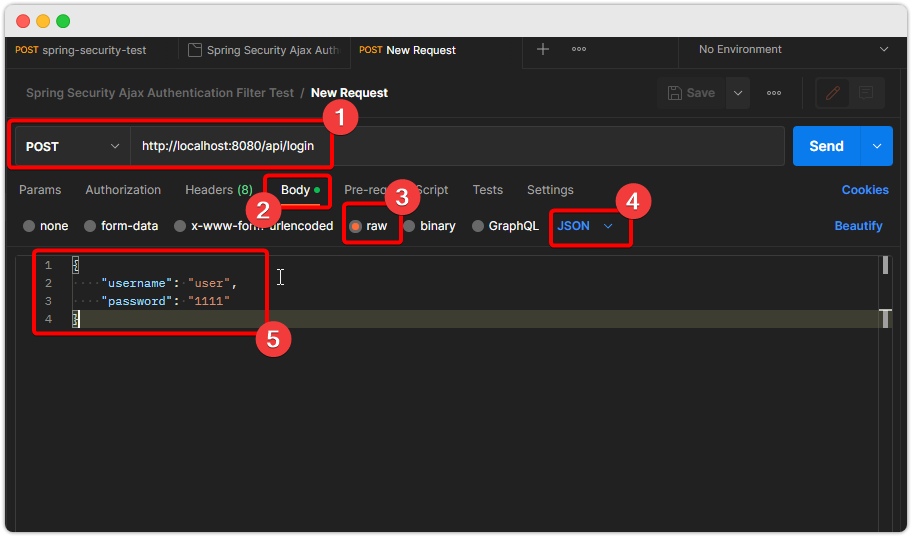
실행하면...

어라? 정상적으로 보냈는데 왜 안되는 걸까?
이건 우리가 생성한 Token 을 받아줄 AuthenticationProvider 가 없기 때문이다.
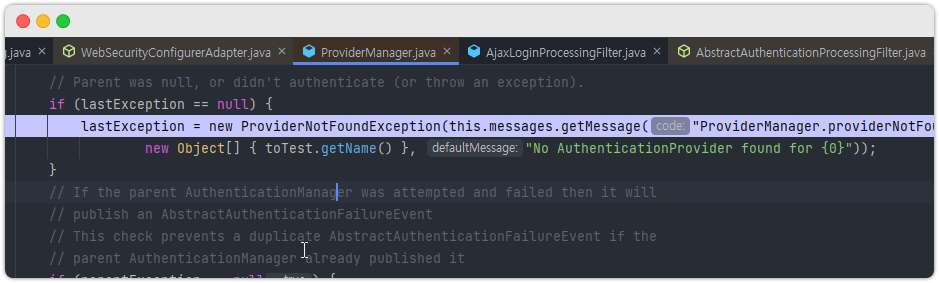
ProviderManager 내에서 적절한 AuthenticationProvider 를 못찾아서 위처럼 예외를 생성하고 던져버린다.
그러니 바로 이어서 AuthenticationProvider 를 하나 생성해보자.
잠깐! postman redirect 자동화를 끄자!

3. AjaxAuthenticationProvider 작성
AjaxAuthenticationToken 을 받아줄 AjaxAuthenticationProvider를 작성해보자.
package me.dailycode.security.provider;

import me.dailycode.security.service.AccountContext;
import me.dailycode.security.token.AjaxAuthenticationToken;
import org.springframework.beans.factory.annotation.Autowired;
import org.springframework.security.authentication.AuthenticationProvider;
import org.springframework.security.authentication.BadCredentialsException;
import org.springframework.security.core.Authentication;
import org.springframework.security.core.AuthenticationException;
import org.springframework.security.core.userdetails.UserDetailsService;
import org.springframework.security.crypto.password.PasswordEncoder;

public class AjaxAuthenticationProvider implements AuthenticationProvider {

	@Autowired
	private UserDetailsService userDetailsService;

	@Autowired
	private PasswordEncoder passwordEncoder;

	@Override
	public Authentication authenticate(Authentication authentication) throws AuthenticationException {

		String username = authentication.getName();
		String password = (String)authentication.getCredentials();

		AccountContext accountContext
        = (AccountContext) userDetailsService.loadUserByUsername(username);

		if (!passwordEncoder.matches(password, accountContext.getPassword())) {
			throw new BadCredentialsException("BadCredentialsException'");
		}

		return new AjaxAuthenticationToken(
			accountContext.getAccount(),
			null,
			accountContext.getAuthorities()
		);
	}

	@Override
	public boolean supports(Class<?> authentication) {
		return AjaxAuthenticationToken.class.isAssignableFrom(authentication);
	}
}
설정 적용은 아래처럼...
@Configuration
@Order(0)
public class AjaxSecurityConfig extends WebSecurityConfigurerAdapter {

	@Override
	protected void configure(AuthenticationManagerBuilder auth) throws Exception {
		auth.authenticationProvider(ajaxAuthenticationProvider());
	}

	@Bean
	public AuthenticationProvider ajaxAuthenticationProvider() {
		return new AjaxAuthenticationProvider();
	}

	// ... 생략 ...
}
이후에 테스트하면...
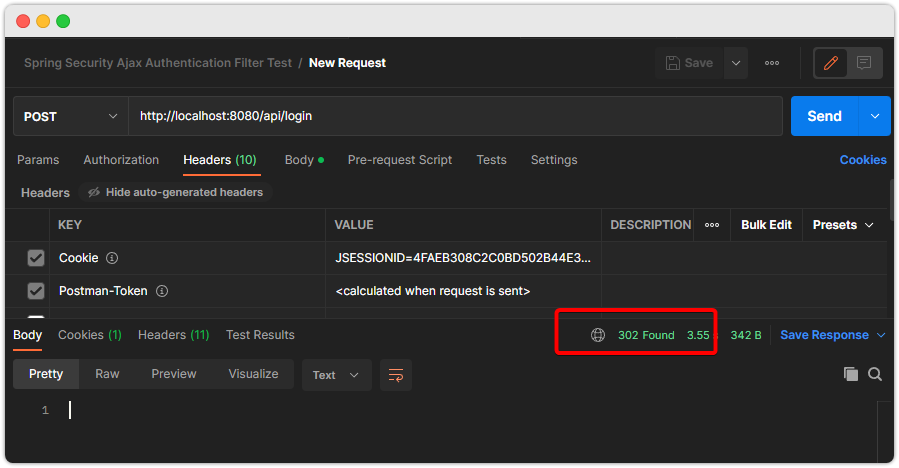
redirect 를 일으킨다. 우리가 원하는건 JSON 결과이다.
이를 위해서 SuccessHandler/FailureHandler 를 작성해야 한다.
4. AjaxAuthenticationSuccessHandler, AjaxAuthenticationFailureHandler
1) 클래스 작성
- AjaxAuthenticationSuccessHandler.java
package me.dailycode.security.handler;

import com.fasterxml.jackson.databind.ObjectMapper;
import me.dailycode.domain.Account;
import me.dailycode.security.service.AccountContext;
import org.springframework.http.HttpStatus;
import org.springframework.http.MediaType;
import org.springframework.security.core.Authentication;
import org.springframework.security.web.authentication.AuthenticationSuccessHandler;

import javax.servlet.ServletException;
import javax.servlet.http.HttpServletRequest;
import javax.servlet.http.HttpServletResponse;
import java.io.IOException;

public class AjaxAuthenticationSuccessHandler implements AuthenticationSuccessHandler {

	private ObjectMapper objectMapper = new ObjectMapper();

	@Override
	public void onAuthenticationSuccess(HttpServletRequest request, HttpServletResponse response, Authentication authentication) throws IOException, ServletException {

		Account account = (Account) authentication.getPrincipal();

		response.setStatus(HttpStatus.OK.value());
		response.setContentType(MediaType.APPLICATION_JSON_VALUE);

		objectMapper.writeValue(response.getWriter(), account);
	}
}- 여기서 Authentication 객체는
AjaxAuthenticationProvider.authenticate(~)메소드에서 반환한AjaxAuthenticationToken객체이다.
- AjaxAuthenticationFailureHandler.java
package me.dailycode.security.handler;

import com.fasterxml.jackson.databind.ObjectMapper;
import org.springframework.http.HttpStatus;
import org.springframework.http.MediaType;
import org.springframework.security.authentication.BadCredentialsException;
import org.springframework.security.authentication.CredentialsExpiredException;
import org.springframework.security.authentication.InsufficientAuthenticationException;
import org.springframework.security.core.AuthenticationException;
import org.springframework.security.web.authentication.AuthenticationFailureHandler;

import javax.servlet.ServletException;
import javax.servlet.http.HttpServletRequest;
import javax.servlet.http.HttpServletResponse;
import java.io.IOException;


public class AjaxAuthenticationFailureHandler implements AuthenticationFailureHandler {

	private final ObjectMapper objectMapper = new ObjectMapper();

	@Override
	public void onAuthenticationFailure(HttpServletRequest request, HttpServletResponse response, AuthenticationException exception) throws IOException, ServletException {

		String errMsg;

		response.setStatus(HttpStatus.UNAUTHORIZED.value());
		response.setContentType(MediaType.APPLICATION_JSON_VALUE);

		if (exception instanceof BadCredentialsException e) {
			errMsg = "Invalid Username Or Password";
		} else if (exception instanceof InsufficientAuthenticationException e) {
			errMsg = "Locked";
		} else if (exception instanceof CredentialsExpiredException) {
			errMsg = "Expired password";
		}

		objectMapper.writeValue(response.getWriter(), errMsg);

	}
}
2) Spring Security 설정
@Configuration
@Order(0)
public class AjaxSecurityConfig extends WebSecurityConfigurerAdapter {

	@Bean
	public AuthenticationSuccessHandler ajaxAuthenticationSuccessHandler() {
		return new AjaxAuthenticationSuccessHandler();
	}

	@Bean
	public AuthenticationFailureHandler ajaxAuthenticationFailureHandler() {
		return new AjaxAuthenticationFailureHandler();
	}

	@Bean
	public AjaxLoginProcessingFilter ajaxLoginProcessingFilter() throws Exception {
		AjaxLoginProcessingFilter ajaxLoginProcessingFilter = new AjaxLoginProcessingFilter();
		ajaxLoginProcessingFilter.setAuthenticationManager(authenticationManagerBean());
        // 2줄 추가!
        ajaxLoginProcessingFilter.setAuthenticationSuccessHandler(ajaxAuthenticationSuccessHandler());
		ajaxLoginProcessingFilter.setAuthenticationFailureHandler(ajaxAuthenticationFailureHandler());
		return ajaxLoginProcessingFilter;
	}
    // ... 생략 ...
}
3) POST MAN 테스트 결과
- 인증 성공 시 사용되는 코드
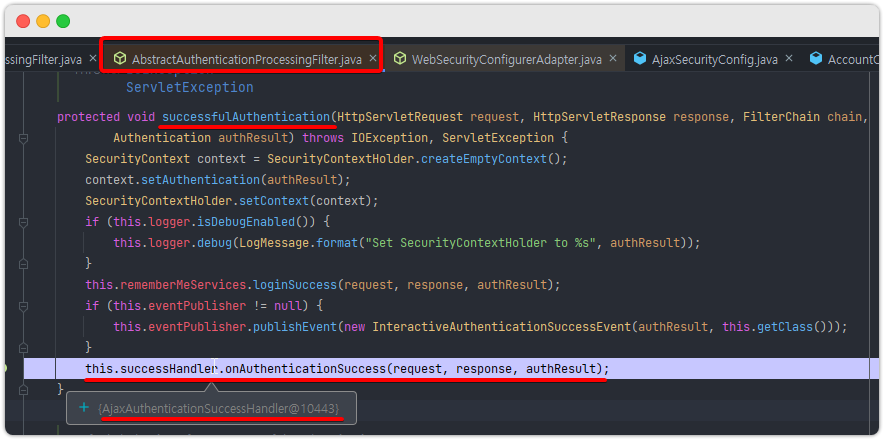
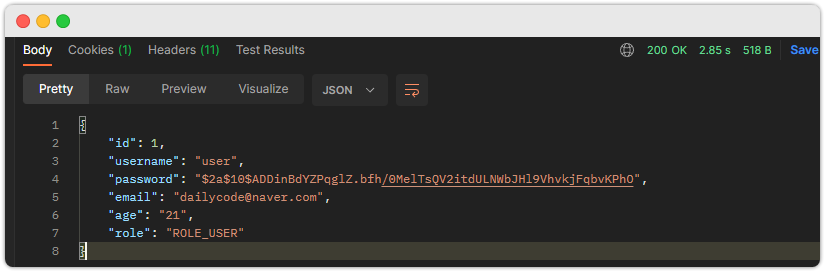
- 인증 성공 결과
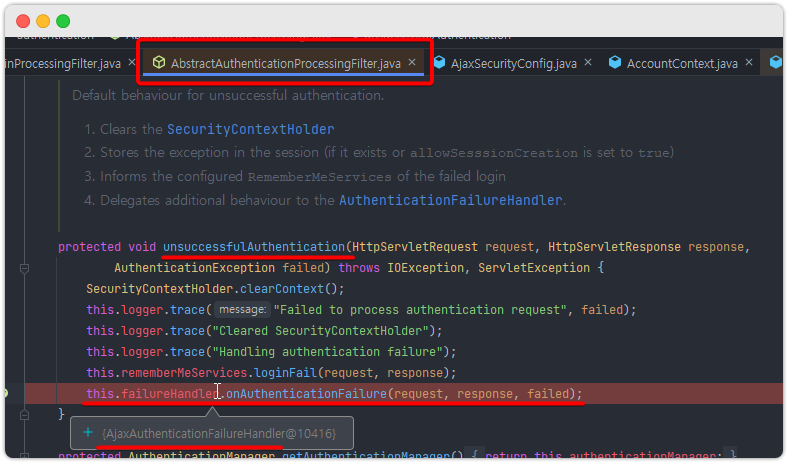
- 인증 실패 시 사용되는 코드
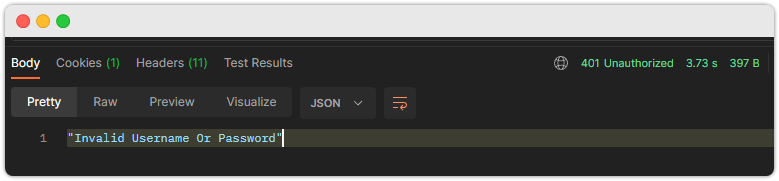
인증 실패 결과
5. 인가처리
스프링 시큐리티에서 인가 검증에 대한 처리는 다음과 같은 경우를 위해서다.
- 인증되지 않은 사용자(= 익명사용자)가 보호자원에 접근하는 경우
- 인증은 했지만, 보호자원에 대한 접근권한이 없는 사용자가 접근하는 경우
이런 두 가지 경우를 대비해서 각각의 예외가 발생하고,
해당 예외에 대한 최종 처리를 하는 2개의 클래스가 Spring Security 내에서 사용된다.
AuthenticationEntryPoint(인증X)AccessDeniedHandler(인증 O, 권한X)
이것은 ExceptionTranslatorFilter 에서 확인이 가능하다.
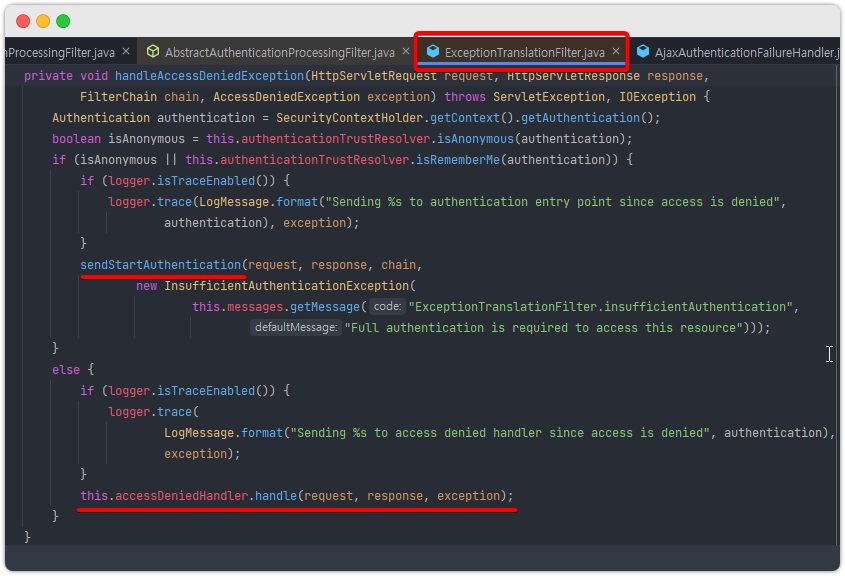
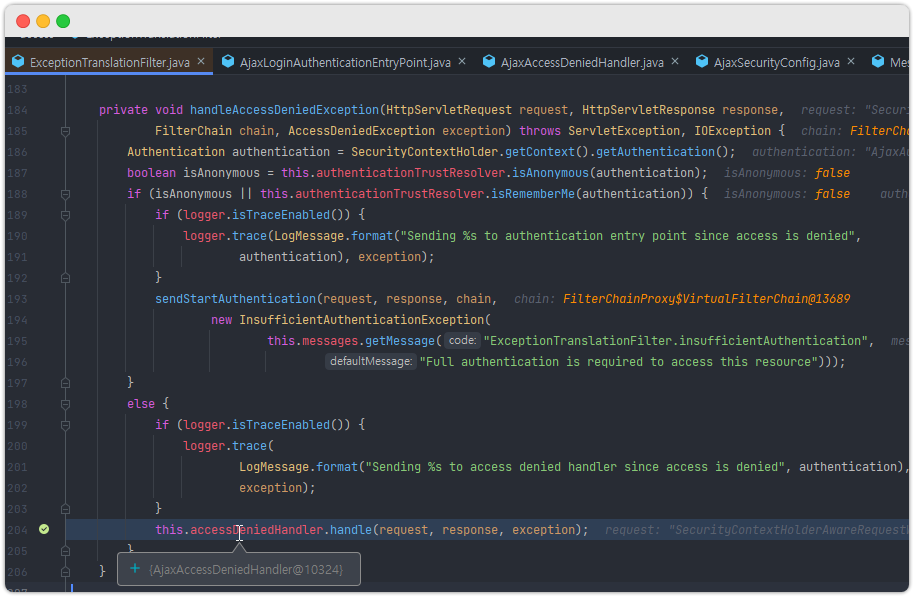
accessDeniedHandler 라는 클래스에 의해서 (인증O, 권한X)에 대한 처리가 일어나고

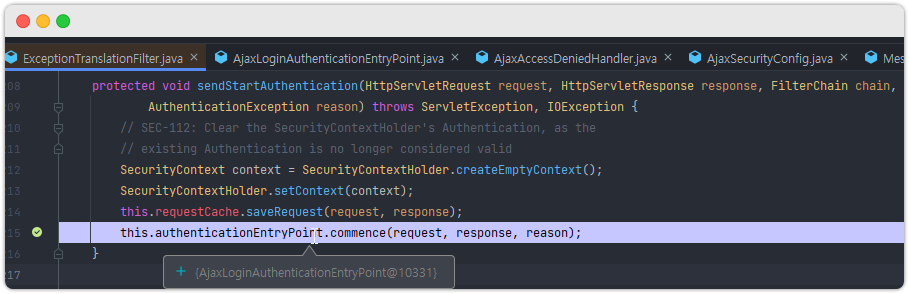
sendStartAuthentication 메소드 내용을 보면 authenticationEntryPoint 라는 객체에 의해서 (인증X) 에 대한 처리가 일어남을 확인 할 수 있다.
지금부터 이 2개의 클래스를 우리가 직접 작성해서 적용해보자.
1) AjaxLoginAuthenticationEntryPoint 클래스
package me.dailycode.security.common;

import org.springframework.security.core.AuthenticationException;
import org.springframework.security.web.AuthenticationEntryPoint;

import javax.servlet.ServletException;
import javax.servlet.http.HttpServletRequest;
import javax.servlet.http.HttpServletResponse;
import java.io.IOException;

public class AjaxLoginAuthenticationEntryPoint implements AuthenticationEntryPoint {

	@Override
	public void commence(HttpServletRequest request, HttpServletResponse response, AuthenticationException authException) throws IOException, ServletException {
		response.sendError(HttpServletResponse.SC_UNAUTHORIZED, "Unauthorized");
	}
}
2) AjaxAccessDeniedHandler 클래스
package me.dailycode.security.handler;

import org.springframework.security.access.AccessDeniedException;
import org.springframework.security.web.access.AccessDeniedHandler;

import javax.servlet.ServletException;
import javax.servlet.http.HttpServletRequest;
import javax.servlet.http.HttpServletResponse;
import java.io.IOException;

public class AjaxAccessDeniedHandler implements AccessDeniedHandler {

	@Override
	public void handle(HttpServletRequest request, HttpServletResponse response, AccessDeniedException accessDeniedException) throws IOException, ServletException {
		response.sendError(HttpServletResponse.SC_FORBIDDEN, "Access is Denied");
	}
}
3) Spring Security 설정
@Configuration
@Order(0)
public class AjaxSecurityConfig extends WebSecurityConfigurerAdapter {

    // ... 생략 ...

	@Override
	protected void configure(HttpSecurity http) throws Exception {
		http.antMatcher("/api/**")
			.authorizeRequests()
			.antMatchers("/api/messages").hasRole("MANAGER") // 추가
			.anyRequest().authenticated()
			.and()
			.addFilterBefore(ajaxLoginProcessingFilter(),
            				 UsernamePasswordAuthenticationFilter.class);

		http.csrf().disable();

		// 추가!
		http.exceptionHandling()
			.authenticationEntryPoint(new AjaxLoginAuthenticationEntryPoint())
				.accessDeniedHandler(ajaxAccessDeniedHandler());

	}

	@Bean
	public AccessDeniedHandler ajaxAccessDeniedHandler() {
		return new AjaxAccessDeniedHandler();
	}

}
4) "/api/messages" 엔드 포인트 추가
@Controller
public class MessageController {
// ... 생략 ...
@GetMapping("/api/messages")
@ResponseBody
public String apiMessage() {
return "messages ok";
}
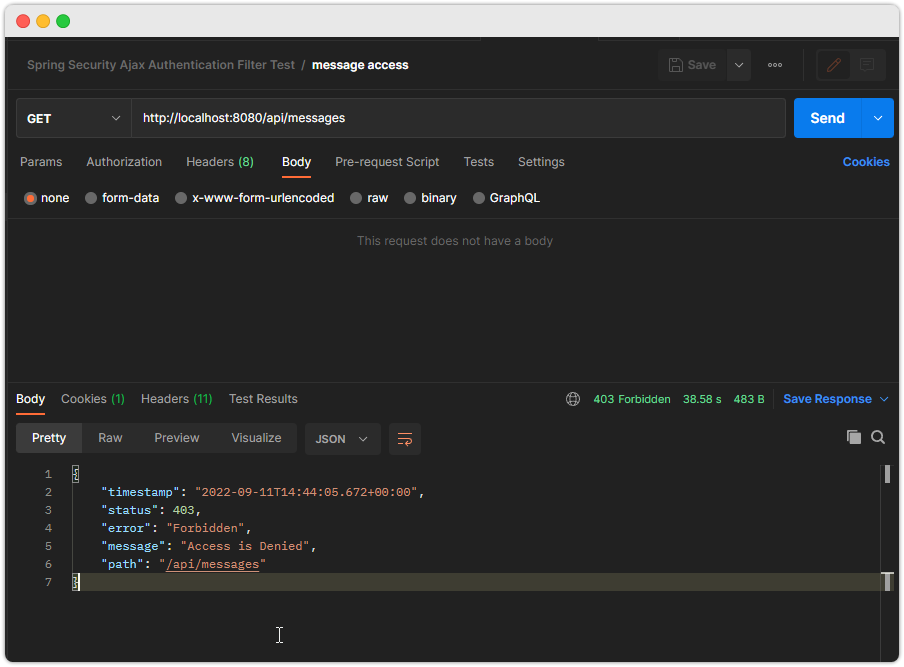
}5) 테스트
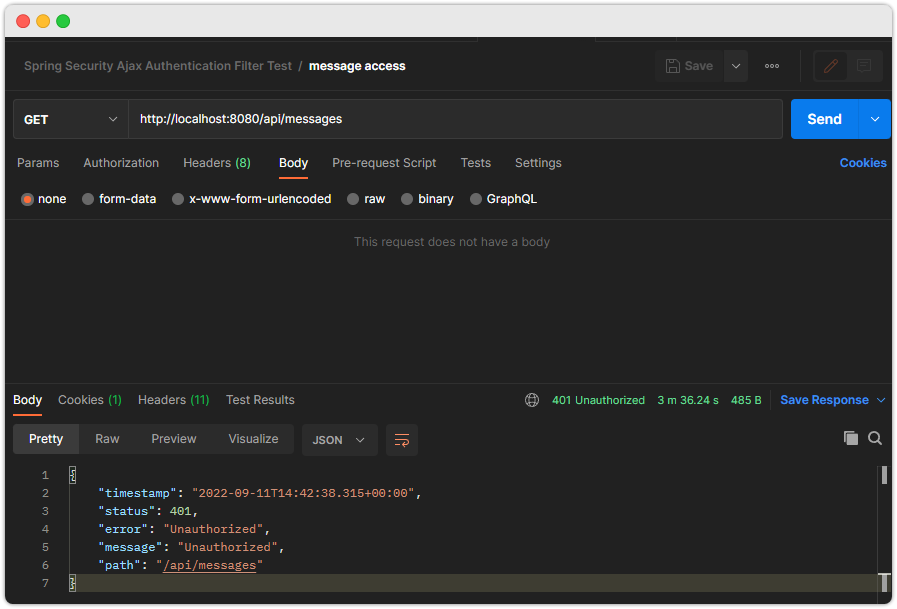
- 인증없이 접근하는 경우
-인증 있지만 권한이 없는 경우
6. ajax Custom DSLs 구현
참고: DSL(도메인 특화 언어)
AbstractHttpConfigurer를 상속하여 구현- 필터, 핸들러, 메서드, 속성 등을 한 곳에 정의
public void init(H http): 초기화public void configure(H http): 설정
최종적으로 저렇게 상속하여 만든 클래스 인스턴스를 HttpSecurity 설정의 apply 메소드에서 사용하면 끝이다.
강의의 깃헙 코드를 복붙함. 실무에서 잘 안 쓰인다고 함.
package me.dailycode.security.configs;

import me.dailycode.security.filter.AjaxLoginProcessingFilter;
import org.springframework.security.authentication.AuthenticationManager;
import org.springframework.security.config.annotation.web.HttpSecurityBuilder;
import org.springframework.security.config.annotation.web.configurers.AbstractAuthenticationFilterConfigurer;
import org.springframework.security.web.authentication.AuthenticationFailureHandler;
import org.springframework.security.web.authentication.AuthenticationSuccessHandler;
import org.springframework.security.web.authentication.RememberMeServices;
import org.springframework.security.web.authentication.UsernamePasswordAuthenticationFilter;
import org.springframework.security.web.authentication.session.SessionAuthenticationStrategy;
import org.springframework.security.web.util.matcher.AntPathRequestMatcher;
import org.springframework.security.web.util.matcher.RequestMatcher;

public final class AjaxLoginConfigurer<H extends HttpSecurityBuilder<H>> extends
	AbstractAuthenticationFilterConfigurer<H, AjaxLoginConfigurer<H>, AjaxLoginProcessingFilter> {

	private AuthenticationSuccessHandler successHandler;
	private AuthenticationFailureHandler failureHandler;
	private AuthenticationManager authenticationManager;

	public AjaxLoginConfigurer() {
		super(new AjaxLoginProcessingFilter(), null);
	}

	@Override
	public void init(H http) throws Exception {
		super.init(http);
	}

	@Override
	public void configure(H http) {

		if(authenticationManager == null){
			authenticationManager = http.getSharedObject(AuthenticationManager.class);
		}
		getAuthenticationFilter().setAuthenticationManager(authenticationManager);
		getAuthenticationFilter().setAuthenticationSuccessHandler(successHandler);
		getAuthenticationFilter().setAuthenticationFailureHandler(failureHandler);

		SessionAuthenticationStrategy sessionAuthenticationStrategy = http
			.getSharedObject(SessionAuthenticationStrategy.class);
		if (sessionAuthenticationStrategy != null) {
			getAuthenticationFilter().setSessionAuthenticationStrategy(sessionAuthenticationStrategy);
		}
		RememberMeServices rememberMeServices = http
			.getSharedObject(RememberMeServices.class);
		if (rememberMeServices != null) {
			getAuthenticationFilter().setRememberMeServices(rememberMeServices);
		}
		http.setSharedObject(AjaxLoginProcessingFilter.class,getAuthenticationFilter());
		http.addFilterBefore(getAuthenticationFilter(), UsernamePasswordAuthenticationFilter.class);
	}

	public AjaxLoginConfigurer<H> successHandlerAjax(AuthenticationSuccessHandler successHandler) {
		this.successHandler = successHandler;
		return this;
	}

	public AjaxLoginConfigurer<H> failureHandlerAjax(AuthenticationFailureHandler authenticationFailureHandler) {
		this.failureHandler = authenticationFailureHandler;
		return this;
	}

	public AjaxLoginConfigurer<H> setAuthenticationManager(AuthenticationManager authenticationManager) {
		this.authenticationManager = authenticationManager;
		return this;
	}

	@Override
	protected RequestMatcher createLoginProcessingUrlMatcher(String loginProcessingUrl) {
		return new AntPathRequestMatcher(loginProcessingUrl, "POST");
	}

}
적용은 아래처럼...
@Configuration
@Order(0)
public class AjaxSecurityConfig extends WebSecurityConfigurerAdapter {

    // ... 생략 ...

	@Override
	protected void configure(HttpSecurity http) throws Exception {
		http.antMatcher("/api/**")
			.authorizeRequests()
			.antMatchers("/api/messages").hasRole("MANAGER") // 추가
			.anyRequest().authenticated()
			.and()
			.addFilterBefore(ajaxLoginProcessingFilter(), UsernamePasswordAuthenticationFilter.class);

		http.csrf().disable();

		// 추가!
		http.exceptionHandling()
			.authenticationEntryPoint(new AjaxLoginAuthenticationEntryPoint())
				.accessDeniedHandler(ajaxAccessDeniedHandler());


		customConfigurerAjax(http);
	}


	private void customConfigurerAjax(HttpSecurity http) throws Exception {
		http.
			apply(new AjaxLoginConfigurer<>())
			.successHandlerAjax(ajaxAuthenticationSuccessHandler())
			.failureHandlerAjax(ajaxAuthenticationFailureHandler())
			.setAuthenticationManager(authenticationManagerBean())
			.loginProcessingUrl("/api/login");
	}

}
... 너무 난해하다. 안 쓸 거 같다.
그냥 적용하지 않겠다 ^^;
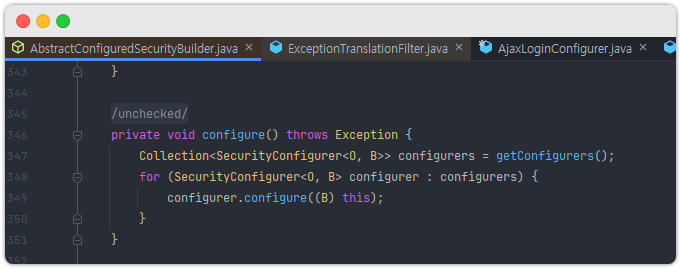
참고로 이게 적용되는지 안되는지는 AbstractConfiguredSecurityBuilder.configure() 메소드에 디버깅 포인트를 잡으면 볼 수 있다.
7. CSRF 처리
헤더 설정이 중요하다.
- 전송 방식이 Ajax 인지의 여부를 위한 헤더 설정
xhr.setRequestHeader("X-Requested-With", "XMLHttpRequest");
- CSRF 헤더 설정 예)
<meta id="_csrf" name="_csrf" th:content="${_csrf.token}">
<meta id="_csrf_header" name="_csrf_header" th:content="${_csrf.headerName}">


<script>
  var csrfHeader = $('meta[name="_csrf_header"]').attr('content');
  var csrfToken = $('meta[name="_csrf"]').attr('content');

  // ...
  xhr.setRequestHeader(csrfHeader, csrfToken);
</script>
1) login.html 수정
<!DOCTYPE html>
<html xmlns:th="http://www.thymeleaf.org">

<meta id="_csrf" name="_csrf" th:content="${_csrf.token}"/>
<meta id="_csrf_header" name="_csrf_header" th:content="${_csrf.headerName}"/>

<head th:replace="layout/header::userHead"></head>
<script>
    function formLogin(e) {

        var username = $("input[name='username']").val().trim();
        var password = $("input[name='password']").val().trim();
        var data = {"username" : username, "password" : password};

        var csrfHeader = $('meta[name="_csrf_header"]').attr('content')
        var csrfToken = $('meta[name="_csrf"]').attr('content')

        $.ajax({
            type: "post",
            url: "/api/login",
            data: JSON.stringify(data),
            dataType: "json",
            beforeSend : function(xhr){
                xhr.setRequestHeader(csrfHeader, csrfToken);
                xhr.setRequestHeader("X-Requested-With", "XMLHttpRequest");
                xhr.setRequestHeader("Content-type","application/json");
            },
            success: function (data) {
                console.log(data);
                window.location = '/';
            },
            error : function(xhr, status, error) {
                console.log(error);
                window.location = '/login?error=true&exception=' + xhr.responseText;
            }
        });
    }
</script>
<body>
<div th:replace="layout/top::header"></div>
<div class="container text-center">
    <div class="login-form d-flex justify-content-center">
        <div class="col-sm-5" style="margin-top: 30px;">
            <div class="panel">
                <p>아이디와 비밀번호를 입력해주세요</p>
            </div>
            <div th:if="${param.error}" class="form-group">
                <span th:text="${exception}" class="alert alert-danger">잘못된 아이디나 암호입니다</span>
            </div>
            <form th:action="@{/login_proc}" class="form-signin" method="post">
                <input type="hidden" th:value="secret" name="secret_key" />
                <div class="form-group">
                    <input type="text" class="form-control" name="username" placeholder="아이디" required="required" autofocus="autofocus">
                </div>
                <div class="form-group">
                    <input type="password" class="form-control" name="password" placeholder="비밀번호" required="required">
                </div>
                <button type="button" onclick="formLogin()" id="formbtn" class="btn btn-lg btn-primary btn-block">로그인</button>
                <!--<button type="submit" class="btn btn-lg btn-primary btn-block">로그인</button>-->
            </form>
        </div>
    </div>
</div>
</body>
</html>
2) home.html 상단 메뉴 변경
<!DOCTYPE html>
<html lang="ko" xmlns:th="http://www.thymeleaf.org">
<head th:replace="layout/header::userHead"></head>
<html xmlns:th="http://www.thymeleaf.org">

<meta id="_csrf" name="_csrf" th:content="${_csrf.token}"/>
<meta id="_csrf_header" name="_csrf_header" th:content="${_csrf.headerName}"/>

<head th:replace="layout/header::userHead"></head>
<script>
    function messages() {

        var csrfHeader = $('meta[name="_csrf_header"]').attr('content')
        var csrfToken = $('meta[name="_csrf"]').attr('content')

        $.ajax({
            type: "post",
            url: "/api/messages",
            //dataType: "json",
            beforeSend : function(xhr){
                xhr.setRequestHeader(csrfHeader, csrfToken);
                xhr.setRequestHeader("X-Requested-With", "XMLHttpRequest");
                xhr.setRequestHeader("Content-type","application/json");
            },
            success: function (data) {
                console.log(data);
                window.location = '/messages';
            },
            error : function(xhr, status, error) {
                console.log(error);
                if(xhr.responseJSON.status == '401'){
                    window.location = '/api/login?error=true&exception=' + xhr.responseJSON.message;
                }else if(xhr.responseJSON.status == '403'){
                    window.location = '/api/denied?exception=' + xhr.responseJSON.message;
                }
            }
        });
    }
</script>
<body>
<div th:replace="layout/top::header"></div>
<div class="container">
    <div class="row align-items-start">
        <nav class="col-md-2 d-none d-md-block bg-light sidebar">
            <div class="sidebar-sticky">
                <ul class="nav flex-column">
                    <li class="nav-item">
                        <div style="padding-top:10px;" class="nav flex-column nav-pills" aria-orientation="vertical">
                            <a th:href="@{/}" style="margin:5px;" class="nav-link active">대시보드</a>
                            <a th:href="@{/mypage}" style="margin:5px;" class="nav-link text-primary">마이페이지</a>
                            <a href="#" onclick="messages()" style="margin:5px;" class="nav-link text-primary">메시지</a>
                            <a th:href="@{/config}" style="margin:5px;" class="nav-link text-primary">환경설정</a>
                        </div>
                    </li>
                </ul>
            </div>
        </nav>
        <!-- ... 생략 ... -->
    </div>
</div>
<div th:replace="layout/footer::footer"></div>
</body>
</html>
3) top.html 링크 변경
<!DOCTYPE html>
<html lang="ko" xmlns:th="http://www.thymeleaf.org"
      xmlns:sec="http://www.thymeleaf.org/thymeleaf-extras-springsecurity5">
<div th:fragment="header">
  <nav class="navbar navbar-dark sticky-top bg-dark ">
    <div class="container">
      <a class="text-light" href="#"><h4>Core Spring Security</h4></a>
      <ul class="nav justify-content-end">
        <!--<li class="nav-item" sec:authorize="isAnonymous()"><a class="nav-link text-light" th:href="@{/login}">로그인</a></li>-->
        <li class="nav-item" sec:authorize="isAnonymous()"><a class="nav-link text-light" th:href="@{/api/login}">로그인</a></li>
        <li class="nav-item" sec:authorize="isAnonymous()"><a class="nav-link text-light" th:href="@{/users}">회원가입</a></li>
        <li class="nav-item" sec:authorize="isAuthenticated()"><a class="nav-link text-light" th:href="@{/logout}">로그아웃</a></li>
        <li class="nav-item" ><a class="nav-link text-light" href="/">HOME</a></li>
      </ul>
    </div>
  </nav>
</div>
</html>
4) "/api/~~" 관련 엔드포인트 작성
@Controller
public class LoginController {

	@GetMapping({"/login", "/api/login"}) // 변경!
	public String login(@RequestParam(value = "error", required = false) String error,
	                    @RequestParam(value = "exception", required = false) String exception,
	                    Model model) {

		// ... 생략 ...
		return "user/login/login";
	}

	@GetMapping({"/denied", "/api/denied"}) // 변경!
	public String accessDenied(@RequestParam(value = "exception", required = false) String exception,
	                           Model model) {

		// ... 생략 ...
		return "user/login/denied";
	}
}
5) AjaxSecurityConfig 설정 변경
@Configuration
@Order(0)
public class AjaxSecurityConfig extends WebSecurityConfigurerAdapter {

    // ... 생략 ...

	@Override
	protected void configure(HttpSecurity http) throws Exception {
		http
			.authorizeRequests()
			.antMatchers("/api/messages").hasRole("MANAGER")
			.antMatchers("/api/login").permitAll() // 추가!!!
			.anyRequest().authenticated()
			// ... 생략 ...

		// http.csrf().disable(); // 주석처리!
	}

}
구현 끝!
추가로 참고했던 링크: