Pytest의 fixture 기능을 이용해서 테스트의 setup과 teardown 로직을 구현하는 것에 대해 기재합니다.
Fixture
https://velog.io/@dahunyoo/Test-fixture-on-Pytest
본 시리즈의 이전 포스트에서도 한 번 기재했습니다만, Pytest는 fixture 라는 것을 이용하여 모든 테스트에서 일관적이고 반복적으로 사용할 수 있는 어떠한 고정되어있는 기능을 제공할 수 있습니다.
fixture는 testcase의 디렉토리 위치와는 관계없이 테스트메소드의 argument로 선언하여 바로 사용할 수 있습니다. pytest가 실행하면서 실행해야할 테스트 메소드들에 대해 자동적으로 fixture를 parameter로 주입해줍니다.
특히 fixture 내부에서 yield 키워드를 사용한다면, fixture의 실행 중에 다음 코드로 실행을 넘겨 실행해야할 테스트 코드들을 전부 실행한 후에 다시 yield 로 돌아와 그 다음 코드들을 마저 실행시켜줍니다.
# conftest.py
@pytest.fixture(scope="function", autouse=True)
def setup_and_teardown(request) -> webdriver:

    # setup logic
    platform = request.config.getoption('platform').lower()

    driver = driver_factory(platform)

    if platform == "web":
        driver.get("https://www.google.com/intl/ko/gmail/about/")

    request.cls.driver = driver

    if platform == "android":
        time.sleep(3)

    yield

	# teardown logic
    driver.quit()
    time.sleep(1)
class Test01GoogleCreateAccount:
    """
    계정만들기 페이지의 테스트를 수행합니다.
    """

    def test_create_account_not_input_name(self):
        """
        아무것도 입력하지 않는 케이스
        """
        google_home_page = GmailHomePage(self.driver)
        google_login_page = GoogleLoginPage(self.driver)
        google_signup_page = GoogleSignUpPage(self.driver)
        base_testsuite = SuiteGmailSignUp(self.driver, google_home_page, google_login_page, google_signup_page)

        base_testsuite.step_check_home_image_and_click_login_button()
        base_testsuite.step_check_login_page_and_click_create_account_button()
        google_signup_page.input_firstname("")
        google_signup_page.input_lastname("")
        google_signup_page.click_next_button()

        assert google_signup_page.check_name_error_message("이름을 입력하세요.")
예를 들어 위와 같은 fixture와 테스트케이스가 존재한다고 가정합시다.
fixture의 autouse 옵션으로 인해 전체 테스트가 실행되면 일련의 순서에 따라 Pytest가 자동으로 실행해줍니다.
실제 실행 순서는 아래와 같을 것 입니다.
    # setup logic
    platform = request.config.getoption('platform').lower()

    driver = driver_factory(platform)

    if platform == "web":
        driver.get("https://www.google.com/intl/ko/gmail/about/")

    request.cls.driver = driver

    if platform == "android":
        time.sleep(3)

	Test01GoogleCreateAccount.test_create_account_not_input_name()

	# teardown logic
    driver.quit()
    time.sleep(1)
pytest의 공식 문서에서도 yield 키워드 후에 teardown 로직을 기재하도록 권장하고 있습니다.
“Yield” fixtures yield instead of return. With these fixtures, we can run some code and pass an object back to the requesting fixture/test, just like with the other fixtures. The only differences are:
1.returnis swapped out foryield.
2. Any teardown code for that fixture is placed after theyield.https://docs.pytest.org/en/stable/how-to/fixtures.html#yield-fixtures-recommended
xUnit setup and teardown
Pytest를 사용한다고해서 fixture만 사용해야하는 것은 아닙니다. pytest는 기존에 unittest 에서도 사용되었던 setup과 teardown로직도 사용할 수 있습니다.
xunit스타일은 정해진 명명규약대로 메소드를 생성하면 pytest가 알아서 해당 범위 내의 테스트코드를 실행하기 앞뒤로 실행해줍니다.
- setup_module / teardown_module
- setup_class / teardown_class
- setup_method / teardown_method
Setup and teardown
위에서의 fixture와 xunit 스타일의 setup / teardown 기능을 이용해서 테스트 실행 전후로 필요한 로직들을 설정할 수 있습니다.
예를들어 testsuite 실행 단계인 session 과 테스트 케이스 실행 단계인 function 단계에서 각각 필요한 setup / teardown 로직이 있다고 가정합시다.
그리고 다시 기능별 테스트케이스들을 그룹핑하기 위한 클래스 내에, setup_method, teardown_method 가 있다고 가정합시다.
그럼 아래 그림과 같은 실행 순서가 될 것 입니다.
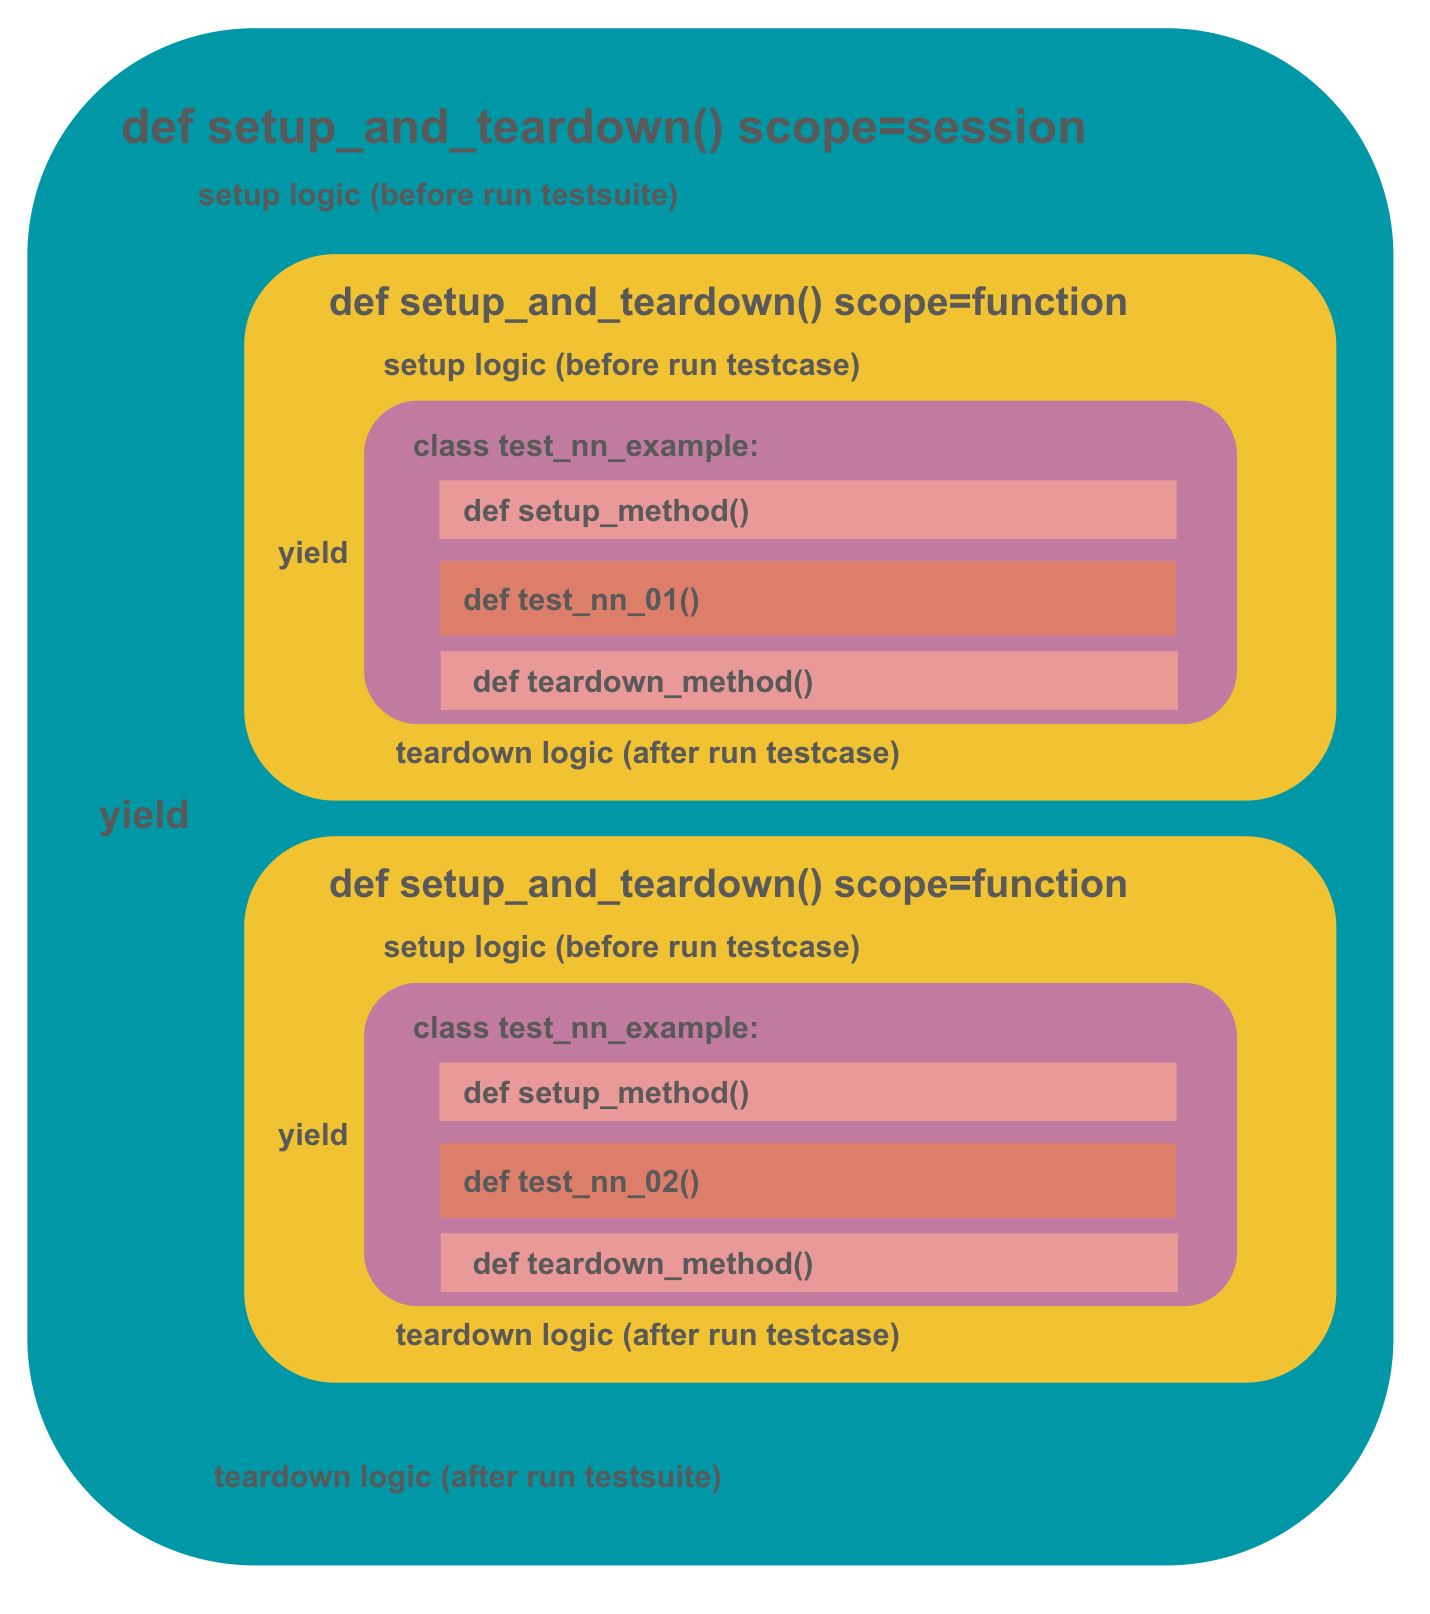
실행 순서는 아래와 같습니다.
- 전체 테스트 스위트가 실행되는
session스코프에서setup_and_teardown()이 실행됩니다. - setup 로직이 실행되고
yield가 실행됩니다. - 각각의 테스트케이스 실행 시도 시에 다시
function스코프에 선언되어있는setup_and_teardown()이 실행됩니다. - setup 로직이 실행되고
yield가 실행됩니다. - 각 클래스에 선언된
setup_method()가 실행됩니다. - 실제 테스트케이스가 실행되고 종료됩니다.
- 각 클래스에 선언된
teardown_method()가 실행됩니다. - 4번의 실행단계로 돌아와
yield후의 teardown 로직이 실행됩니다. - 이후 모든 테스트케이스가 실행되고 2번단계로 돌아와
yield이후의 teardown 로직이 실행됩니다. - 전체 테스트케이스가 종료되고 이후 hook이 실행됩니다.
테스트 병렬실행 시
xdist를 이용한 병렬실행 시에 각각의 워커들은 고유한 세션이 생성됩니다. 즉 워커별로 실행될 테스트케이스는 고정됩니다. 따라서 session단위의 fixture는 워커별로 각각 실행됩니다.
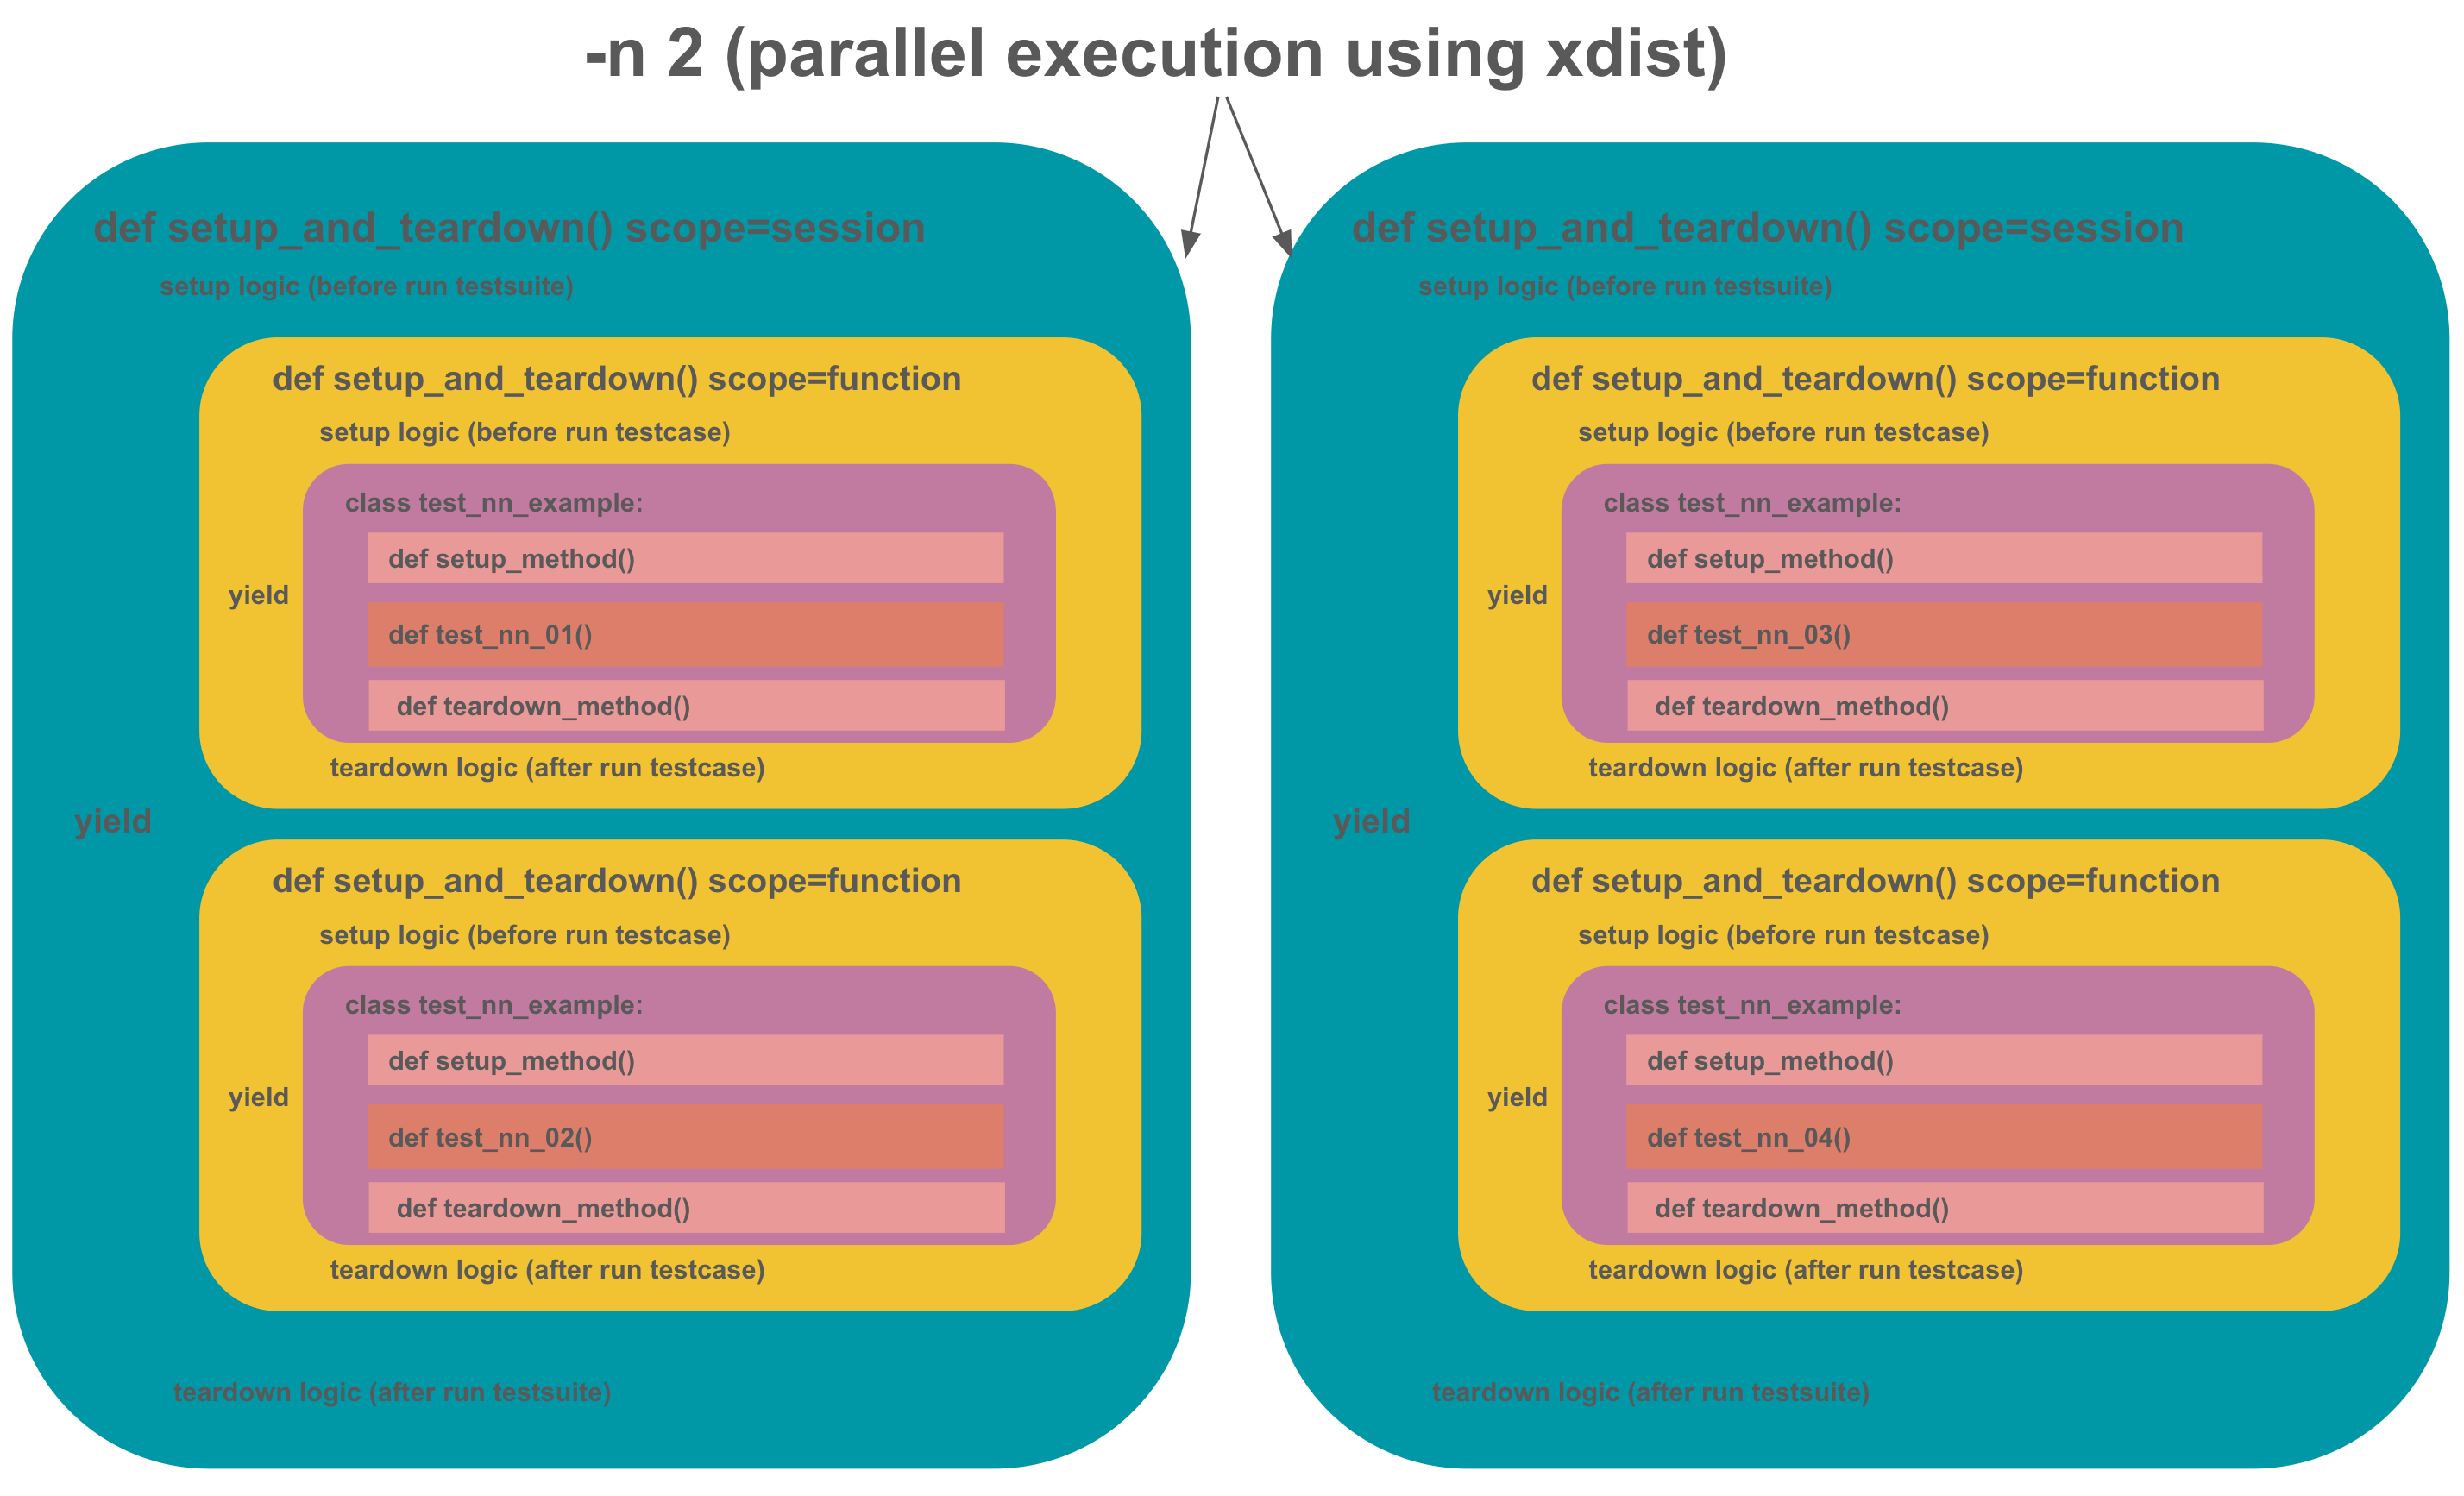
만약 전체 테스트케이스 실행 전에 데이터베이스 조작들을 해야한다면, 이 경우라면 중복으로 수행될 것입니다. 따라서 유저가 정의한 fixture보다는 pytest에 미리 정의되어있는 hook의 실행순서를 확인하고, 최초 실행 시에 단 한 번만 실행되는 hook에서 실행하는 것이 좋습니다.
ref