vue3 기초
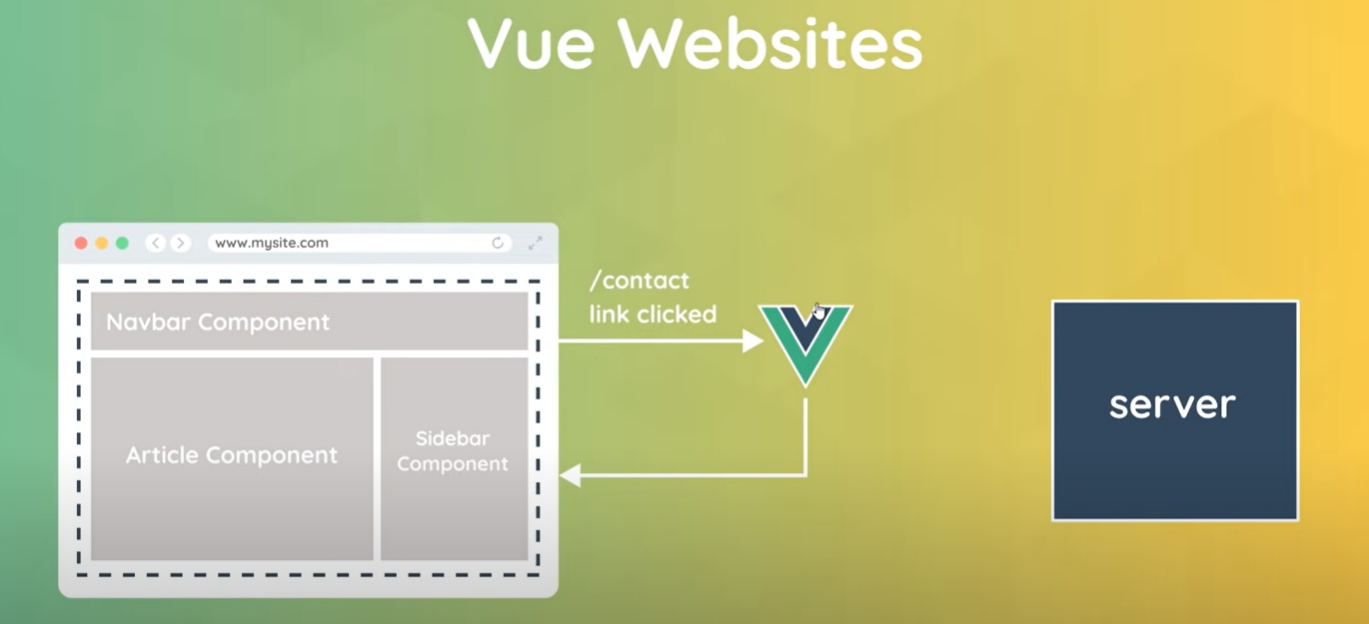
vue components를 통해 여러 화면에서 재사용이 가능하다.
해당 위젯을 뷰 구성 요소 자체에 있다.
웹사이트를 누르면 서버에 요청을 처리하고 httml페이지를 response받는다.
해당 페이지 안에서 또다른 요청이 있을 때
vue는 전체 웹 사이트의 으흐름을 제어하지 않는다.
v-model
기본 활용
//index.html
<!DOCTYPE html>
<html lang="en">
    <head>
        <meta charset="UTF-8" />
        <meta http-equiv="X-UA-Compatible" content="IE=edge" />
        <meta name="viewport" content="width=device-width, initial-scale=1.0" />
        <title>Document</title>
        <!-- vue 3 -->
        <script src="https://unpkg.com/vue@3.0.2"></script>
    </head>
    <body>
        <h1>Hello vue</h1>
        <div id="app">
            <p>{{title}} - {{author}} - {{age}}</p>
            <button v-on:click="age++">Increase</button>
            <button v-on:click="age--">Decrease</button>
            <!-- <div @click="title ='something else'">change book title</div> -->
            <div @click="changeTitle">change book title</div>
        </div>
        <script src="./app.js"></script>
    </body>
</html>
//app.js
const app = Vue.createApp({
    data() {
        return {
            title: "the final empire",
            author: "brandon sanderson",
            age: 45,
        };
    },
    methods: {
        changeTitle() {
            this.title = "words of Randiance";
        },
    },
});

app.mount("#app");
조건부 렌더링
//index.html

    <body>
        <h1>Hello vue</h1>
        <div id="app">
            <div v-if="showBooks">
                <p>{{title}} - {{author}}</p>
                <div>{{age}}</div>
            </div>

            <!-- <button @click="changeHideBooks">Control book</button> -->
            <button @click="changeHideBooks">
                <span v-if="showBooks">Hide Books</span>
                <!-- <span v-if="!showBooks">Show Books</span> -->
                <span v-else>Show Books</span>
            </button>

            <button v-show="showBooks">currently show books</button>
        </div>
        <script src="./app.js"></script>
    </body>
//app.js
const app = Vue.createApp({
data() {
return {
title: "the final empire",
author: "brandon sanderson",
age: 45,
showBooks: true,
};
},
methods: {
changeTitle() {
this.title = "words of Randiance";
},
changeHideBooks() {
this.showBooks = !this.showBooks;
},
},
});
app.mount("#app");
-
v-if는 DOM 영역에 실제로 그려주지 않는 방법을 사용하고 이와 달리 v-show는 단지 css style의 display: none을 사용하여 보여주지만 않는다는 차이가 있다
-
dom에서 무언가를 제거하는 것은 css를 사용하여 숨기고 표시하는 것보다 성능 측면에서 더 많은 시간과 비용이 소모된다.
other mouse event
//index.html
<style>
    .box {
        display: inline-block;
        margin: 20px;
        padding: 100px 0;
        width: 400px;
        text-align: center;
        background-color: #ddd;
    }
</style>

    <body>
        <h1>Hello vue</h1>
            <div class="box" @mouseover="handleEvent($event, 5)">mouseOver</div>
            <div class="box" @mouseleave="handleEvent">mouseLeave</div>
            <div class="box" @dblclick="handleEvent">double click</div>
            <div class="box" @mousemove="handleMouseMove">
                position - {{x}} {{y}}
            </div>
        </div>
        <script src="./app.js"></script>
    </body>
//app.js
const app = Vue.createApp({
data() {
return {
x: 0,
y: 0,
};
},
methods: {
handleEvent(event, data) {
console.log(event, event.type);
if (data) {
console.log(data);
}
},
handleMouseMove(e) {
this.x = e.offsetX;
this.y = e.offsetY;
},
},
});
app.mount("#app");
v-for
//index.html
<div v-if="showBooks">
  <ul>
      <li v-for="book in books">
          <h3>{{book.title}}</h3>
          <p>{{book.author}}</p>
      </li>
  </ul>
</div>
//app.js
const app = Vue.createApp({
    data() {
        return {
            showBooks: true,
            books: [
                {
                    userId: 1,
                    title: "AAAAA",
                    author: "as23",
                    age: "123456",
                },
                {
                    userId: 2,
                    title: "BBBB",
                    author: "h5jdd",
                    age: "123456",
                },
                {
                    userId: 3,
                    title: "CCCCC",
                    author: "2dhbs",
                    age: "33333333",
                },
                {
                    userId: 4,
                    title: "DDDDD",
                    author: "bacasd",
                    age: "222222222",
                },
                {
                    userId: 5,
                    title: "EEEEE",
                    author: "asdfasdf",
                    age: "111111111",
               }
            ],
        };
    },
    methods: {
        toggleShowBooks() {
            this.showBooks = !this.showBooks;
        },
    },
});

app.mount("#app");
속성 데이터 바인딩
Dynamic class
- 미리 클래스 이름에 스타일을 지정해 놓고 조건에 맞추어 해당 클래스 적용을 시킬 때 사용한다.
방법1. 객체
v-bind: calss  = "{클래스 이름: 조건}"
or
:calss = "{클래스 이름: 조건}"
//index.html
<div v-if="showBooks">
<ul>
<li
v-for="book in books"
:class="{fav : book.isFav}"
@click="toggleFev(book)"
>
<img :src="book.img" :alt="book.title" />
<h3>{{book.title}}</h3>
<p>{{book.author}}</p>
</li>
</ul>
</div>
computed property
//index.html
<li v-for="book in filterdBooks"
  :class="{fav : book.isFav}"
  @click="toggleFev(book)"
>
  <img :src="book.img" :alt="book.title" />
  <h3>{{book.title}}</h3>
  <p>{{book.author}}</p>
</li>


//app.js
computed: {
    filterdBooks() {
        return this.books.filter((book) => book.isFav);
    },
},
비니로그 쳌킨