요약
상품(객체) 공장을 어떻게 만들고 구성하고 어떻게 운영할까? 설명서 같은 것
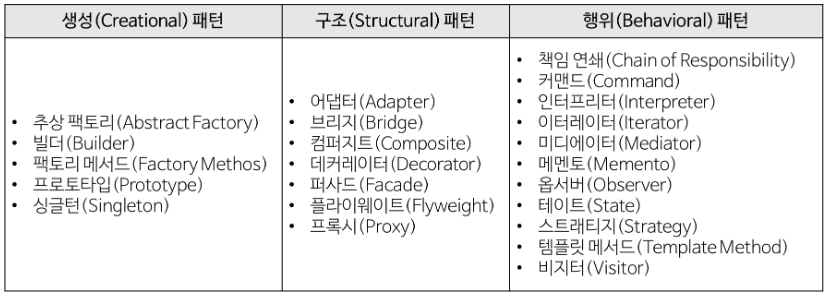
생성 패턴
접근점에 인터페이스 사용, 역할 분리
-
추상 펙토리 패턴 :독립적인 객체들을 생성하기 위한 인터페이스를 제공하는 이걸 토대로 구체적인 클래스를 지정하는 패턴
-
빌더 패턴 : 복합 객체의 생성과정과 표현과정을 분리시켜 동일한 생성과정에서 다양한 표현을 생성할 수 있는 패턴입니다.
-
팩토리 메소드 패턴 : 자식 클래스가 객체를 생성하고 부모 클래스는 생성 메소드만 선언만하는 인터페이스 역할을 한다.
-
싱글톤 패턴 : 클래스의 인스턴스가 하나임을 보장하고 접근할 수 있는 전역적인 접근점을 제공하는 패턴
구조 패턴
용도변화, 트리구조 사용, 인터페이스로 통합
-
어댑터 패턴 : 용도에 맞게끔 인터페이스를 바꿔주는 어댑터 클래스를 사용. 다른 곳에서 개발했거나 수정이 어려울 때 사용.
-
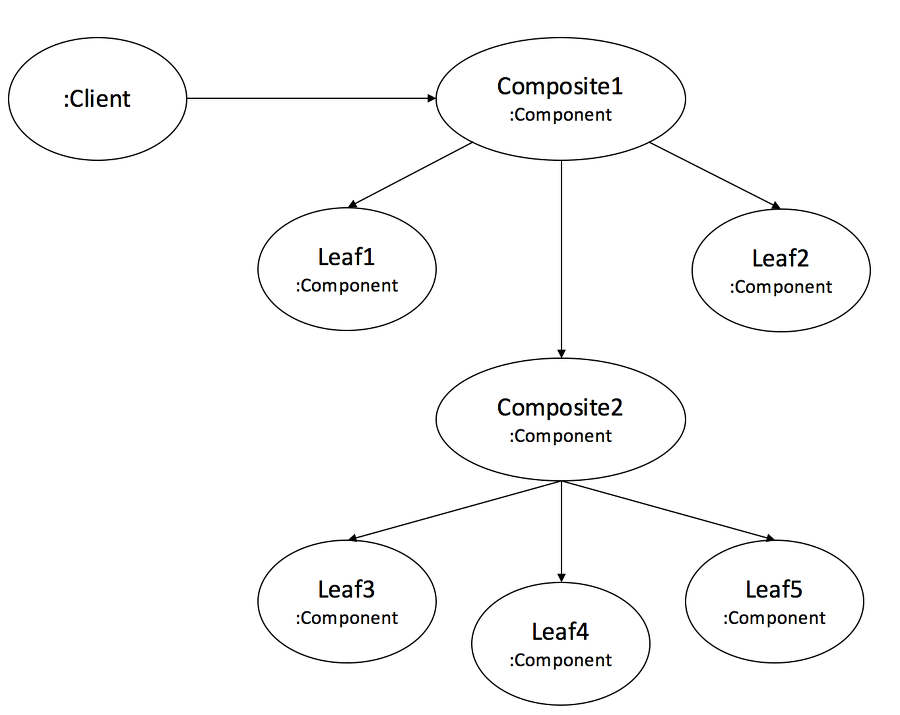
컴포시트 패턴 : 브랜치(leaf)로 인터페이스를 구현하고 복합체(composite) 클래스는 자식 클래스를 관리하기 위한 함수를 정의한다. 전체-부분 관계를 트리구조로 표현할 때 사용
-
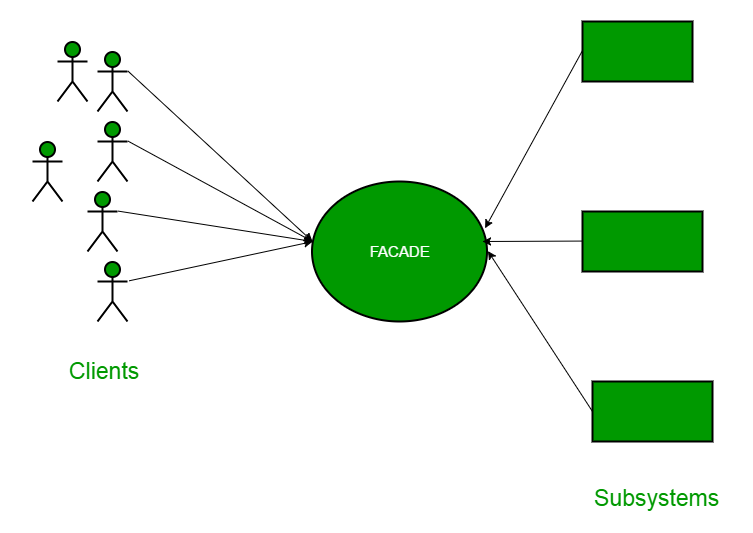
퍼사드 패턴 : 통합된 인터페이스를 만들어서 서브시스템을 쉽게 접근/사용. All for One
행위 패턴
상태변화 인지, 동작/요청 통합 관리
-
옵저버 패턴 : 이벤트 리스너 패턴. 한 객체의 상태 변화를 인지하고 바뀌면 그 객체에 의존하는 다른 객체들을 호출해서 정보 갱신을 한다.
-
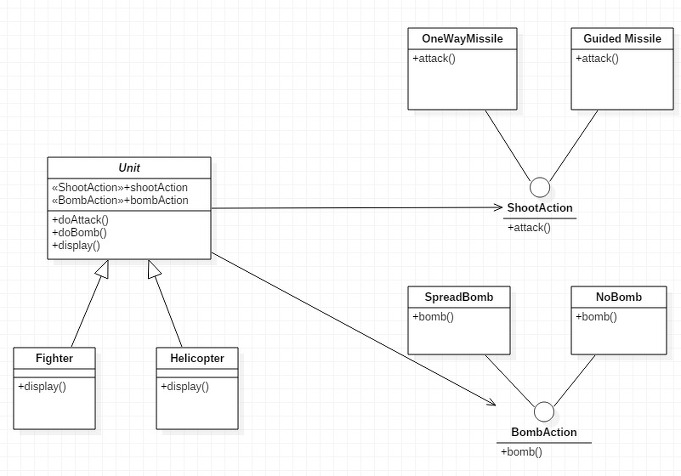
전략 패턴 : 동작을 하는 로직을 다수 정의하고 하나로 묶어서 관리함.
-
상태 패턴 : 객체 자체의 내부 생태에 따라 행위 변경
-
메멘토 패턴 : 상태값 미리 기록/저장 후 복구, 이전값 저장으로 인한 오버헤드 발생
생성 패턴
추상 팩토리 패턴 (오브젝트)
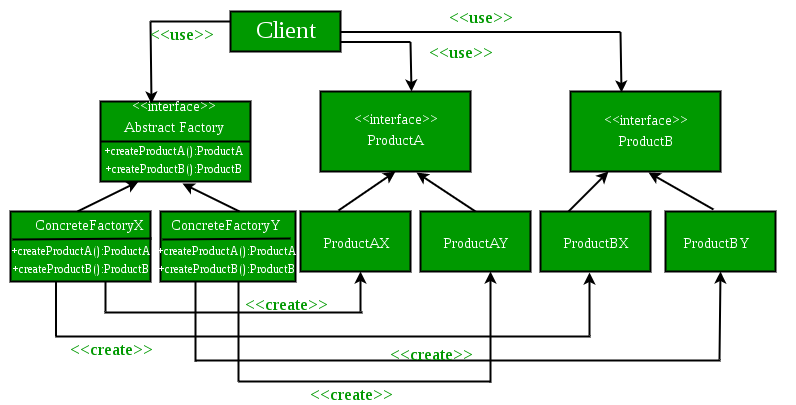
정의
AbstractFactory
- 객체 생성 클래스를 위한 인터페이스
- Interface for opertations that creates abstract Product objects without specifing concrete classes
ConcreteFactory
- 객체 생성 클래스
- Implements AbstractFactory to create Product objects.
Product
- 펙토리 클래스에서 만든 객체
- Implements AbstractProduct interface, defines
objects made by ConcreteFactory.
Client
- 펙토리와 (추상화) 객체에서 만들어진 제품 사용 UI
- Uses interfaces made by AbstractFactory and
AbstractProduct classes.
장점
- when client doesn't know exactly what type to create.
- Isolation of concrete classes
- Exchanging Product Families easily
- Promoting consistency among products
단점
- Difficult to support new kinds of products
코드 응용
// Java Program to demonstrate the
// working of Abstract Factory Pattern

enum CarType
{
	MICRO, MINI, LUXURY
}

// Abstract Product
abstract class Car
{
	Car(CarType model, Location location)
	{
		this.model = model;
		this.location = location;
	}

	abstract void construct();

	CarType model = null;
	Location location = null;

	CarType getModel()
	{
		return model;
	}

	void setModel(CarType model)
	{
		this.model = model;
	}

	Location getLocation()
	{
		return location;
	}

	void setLocation(Location location)
	{
		this.location = location;
	}

	@Override
	public String toString()
	{
		return "CarModel - "+model + " located in "+location;
	}
}

// Product
class LuxuryCar extends Car
{
	LuxuryCar(Location location)
	{
		super(CarType.LUXURY, location);
		construct();
	}
	@Override
	protected void construct()
	{
		System.out.println("Connecting to luxury car");
	}
}

// Product
class MicroCar extends Car
{
	MicroCar(Location location)
	{
		super(CarType.MICRO, location);
		construct();
	}
	@Override
	protected void construct()
	{
		System.out.println("Connecting to Micro Car ");
	}
}

// Product
class MiniCar extends Car
{
	MiniCar(Location location)
	{
		super(CarType.MINI,location );
		construct();
	}

	@Override
	void construct()
	{
		System.out.println("Connecting to Mini car");
	}
}

enum Location
{
DEFAULT, USA, INDIA
}

// Concrete Factory
class INDIACarFactory
{
	static Car buildCar(CarType model)
	{
		Car car = null;
		switch (model)
		{
			case MICRO:
				car = new MicroCar(Location.INDIA);
				break;

			case MINI:
				car = new MiniCar(Location.INDIA);
				break;

			case LUXURY:
				car = new LuxuryCar(Location.INDIA);
				break;

				default:
				break;

		}
		return car;
	}
}

// Concrete Factory
class DefaultCarFactory
{
	public static Car buildCar(CarType model)
	{
		Car car = null;
		switch (model)
		{
			case MICRO:
				car = new MicroCar(Location.DEFAULT);
				break;

			case MINI:
				car = new MiniCar(Location.DEFAULT);
				break;

			case LUXURY:
				car = new LuxuryCar(Location.DEFAULT);
				break;

				default:
				break;

		}
		return car;
	}
}

// Concrete Factory
class USACarFactory
{
	public static Car buildCar(CarType model)
	{
		Car car = null;
		switch (model)
		{
			case MICRO:
				car = new MicroCar(Location.USA);
				break;

			case MINI:
				car = new MiniCar(Location.USA);
				break;

			case LUXURY:
				car = new LuxuryCar(Location.USA);
				break;

				default:
				break;

		}
		return car;
	}
}


// Abstract Factory
class CarFactory
{
	private CarFactory()
	{

	}
	public static Car buildCar(CarType type)
	{
		Car car = null;
		// We can add any GPS Function here which
		// read location property somewhere from configuration
		// and use location specific car factory
		// Currently I'm just using INDIA as Location
		Location location = Location.INDIA;

		switch(location)
		{
			case USA:
				car = USACarFactory.buildCar(type);
				break;

			case INDIA:
				car = INDIACarFactory.buildCar(type);
				break;

			default:
				car = DefaultCarFactory.buildCar(type);

		}

		return car;

	}
}

class AbstractDesign
{
	public static void main(String[] args)
	{
		System.out.println(CarFactory.buildCar(CarType.MICRO));
		System.out.println(CarFactory.buildCar(CarType.MINI));
		System.out.println(CarFactory.buildCar(CarType.LUXURY));
	}
}

/*
OUTPUT

Connecting to Micro Car
CarModel - MICRO located in INDIA
Connecting to Mini car
CarModel - MINI located in INDIA
Connecting to luxury car
CarModel - LUXURY located in INDIA
*/
빌더 패턴
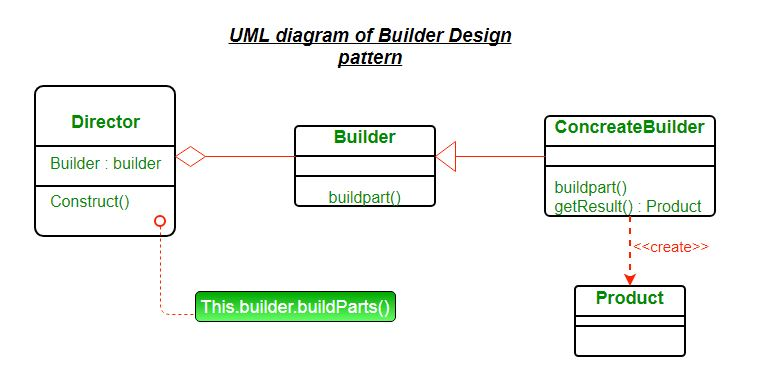
정의
Product
- 구현할 객체 타입 정의
- Defines the type of object to be generated
Builder
- 객체 생성을 위한 과정 정의
- Abstract base class that defines all steps needed to create product.
ConcreteBuilder
- Builder 클래스를 상속받아서 객체를 만드는 역할
- Inherits builder and has function to create objects
Director
- 최종 제품 객체를 만드는 알고리즘 제어
- Controls algorithm that makes final product object.
장점
- highly readable due to minimal constructor parameters
- objects build with minimal complex logic
단점
- code lines increase
- requires create separate ConcreteBuilder for each different type of product
코드 응용
// Abstract Prodyuct
interface HousePlan
{
	public void setBasement(String basement);

	public void setStructure(String structure);

	public void setRoof(String roof);

	public void setInterior(String interior);
}

// Product
class House implements HousePlan
{

	private String basement;
	private String structure;
	private String roof;
	private String interior;

	public void setBasement(String basement)
	{
		this.basement = basement;
	}

	public void setStructure(String structure)
	{
		this.structure = structure;
	}

	public void setRoof(String roof)
	{
		this.roof = roof;
	}

	public void setInterior(String interior)
	{
		this.interior = interior;
	}

}

// Builder
interface HouseBuilder
{

	public void buildBasement();

	public void buildStructure();

	public void buildRoof();

	public void buildInterior();

	public House getHouse();
}

// Concrete Builder
class IglooHouseBuilder implements HouseBuilder
{
	private House house;

	public IglooHouseBuilder()
	{
		this.house = new House();
	}

	public void buildBasement()
	{
		house.setBasement("Ice Bars");
	}

	public void buildStructure()
	{
		house.setStructure("Ice Blocks");
	}

	public void buildInterior()
	{
		house.setInterior("Ice Carvings");
	}

	public void buildRoof()
	{
		house.setRoof("Ice Dome");
	}

	public House getHouse()
	{
		return this.house;
	}
}

// Concrete Builder
class TipiHouseBuilder implements HouseBuilder
{
	private House house;

	public TipiHouseBuilder()
	{
		this.house = new House();
	}

	public void buildBasement()
	{
		house.setBasement("Wooden Poles");
	}

	public void buildStructure()
	{
		house.setStructure("Wood and Ice");
	}

	public void buildInterior()
	{
		house.setInterior("Fire Wood");
	}

	public void buildRoof()
	{
		house.setRoof("Wood, caribou and seal skins");
	}

	public House getHouse()
	{
		return this.house;
	}

}

// Director
class CivilEngineer
{

	private HouseBuilder houseBuilder;

	public CivilEngineer(HouseBuilder houseBuilder)
	{
		this.houseBuilder = houseBuilder;
	}

	public House getHouse()
	{
		return this.houseBuilder.getHouse();
	}

	public void constructHouse()
	{
		this.houseBuilder.buildBasement();
		this.houseBuilder.buildStructure();
		this.houseBuilder.buildRoof();
		this.houseBuilder.buildInterior();
	}
}

class Builder
{
	public static void main(String[] args)
	{
		HouseBuilder iglooBuilder = new IglooHouseBuilder();
		CivilEngineer engineer = new CivilEngineer(iglooBuilder);

		engineer.constructHouse();

		House house = engineer.getHouse();

		System.out.println("Builder constructed: "+ house);
	}
}
/*
Output :
Builder constructed: House@6d06d69c
*/
싱글톤 패턴
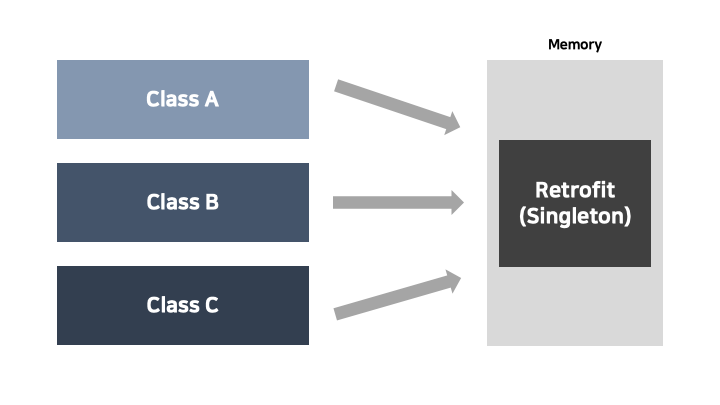
- 인스턴스가 필요할 때, 똑같은 인스턴스를 만들지 않고 기존의 인스턴스를 사용.
- 앱 시작시 최초 한번만 메모리에 인스턴스를 만듬
왜 쓰나요?
- 메모리 낭비를 방지하고 다른 클래스 인스턴스와 공유할 수 있다.
장점
많이 사용하는 경우가 언제인가요?
- 공통된 객체를 여러개 생성해야 하는 상황
데이터베이스에서 커넥션풀, 스레드풀, 캐시, 로그 기록 객체 등
단점
- 싱글톤 인스턴스가 혼자 너무 많은 일을 하거나, 많은 데이터를 공유시키면 다른 클래스들 간의 결합도가 높아지게 되는데, 이때 개방-폐쇄 원칙이 위배
- 멀티 스레드 환경에서 동기화 처리를 하지 않았을 때, 인스턴스가 2개가 생성되는 문제
VS
코드 응용
멀티스레드 환경에서 안전한 싱글톤 만드는 법
//1 Lazy Initialization (초기화 지연)
public class ThreadSafe_Lazy_Initialization{

    private static ThreadSafe_Lazy_Initialization instance;

    private ThreadSafe_Lazy_Initialization(){}

    public static synchronized ThreadSafe_Lazy_Initialization getInstance(){
        if(instance == null){
            instance = new ThreadSafe_Lazy_Initialization();
        }
        return instance;
    }

}

//2 Lazy Initialization + Double-checked Locking (성능저하 완화)
public class ThreadSafe_Lazy_Initialization{
    private volatile static ThreadSafe_Lazy_Initialization instance;

    private ThreadSafe_Lazy_Initialization(){}

    public static ThreadSafe_Lazy_Initialization getInstance(){
    	if(instance == null) {
        	synchronized (ThreadSafe_Lazy_Initialization.class){
                if(instance == null){
                    instance = new ThreadSafe_Lazy_Initialization();
                }
            }
        }
        return instance;
    }
}

//3 Initialization on demand holder idiom (holder에 의한 초기화) - 일반적이고 가장 많이 사용!
public class Something {
    private Something() {
    }

    private static class LazyHolder {
        public static final Something INSTANCE = new Something();
    }

    public static Something getInstance() {
        return LazyHolder.INSTANCE;
    }
}
3번 설명
- 싱글톤의 초기화 문제에 대한 책임을 JVM에게 떠넘기기 위해 동기화 사용 X
- holder에서 선언된 인스턴스는 static이기 때문에 클래스 로딩시점에서 한번만 호출
- final을 사용해서 다시 값이 할당되지 않도록 만드는 방식
펙코리 메소드 패턴 (메소드)
객체를 만드는 부분을 Sub class에 맡김.
즉 부모는 클래스의 인터페이스 역할을 하고 자식이 인터페이스를 갖고 클래스 생성을 담당함
public abstract class RobotFactory {
	abstract Robot createRobot(String name);
}
public class SuperRobotFactory extends RobotFactory {
@Override
Robot createRobot(String name) {
switch(name) {
case "super" :
return new SuperRobot();
case "power" :
return new PowerRobot();
}
return null;
}
}구조 패턴
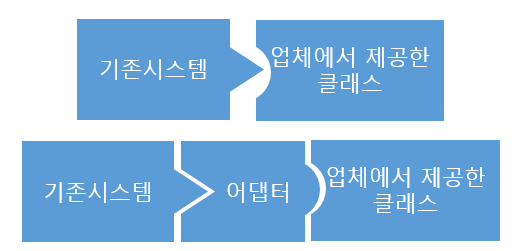
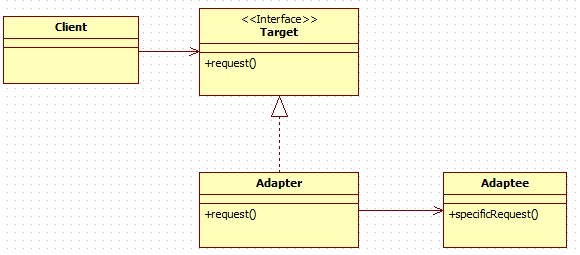
어댑터 패턴
- 호환되지 않는 인터페이스를 어뎁터로 변환해서 호환되게끔 사용.
코드 응용
package AdapterPattern;

public interface Duck {
	public void quack();
	public void fly();
}
package AdapterPattern;
public interface Turkey {
public void gobble();
public void fly();
}package AdapterPattern;
public class WildTurkey implements Turkey {
@Override
public void gobble() {
System.out.println("Gobble gobble");
}
@Override
public void fly() {
System.out.println("I'm flying a short distance");
}
}package AdapterPattern;
public class TurkeyAdapter implements Duck {
Turkey turkey;
public TurkeyAdapter(Turkey turkey) {
this.turkey = turkey;
}
@Override
public void quack() {
turkey.gobble();
}
@Override
public void fly() {
turkey.fly();
}
}package AdapterPattern;
public class DuckTest {
public static void main(String[] args) {
MallardDuck duck = new MallardDuck();
WildTurkey turkey = new WildTurkey();
Duck turkeyAdapter = new TurkeyAdapter(turkey);
System.out.println("The turkey says...");
turkey.gobble();
turkey.fly();
System.out.println("The Duck says...");
testDuck(duck);
System.out.println("The TurkeyAdapter says...");
testDuck(turkeyAdapter);
}
public static void testDuck(Duck duck) {
duck.quack();
duck.fly();
}
}컴포시트 패턴
정의
- Compose objects into tree structures to represeent part-whole hierarchies. Each node in the tree performs a task.
- Composition object create 'has-a' relationship between objects. Grouped objects of similar functions.
Component
- Makes interface for objects in composition and to access child components
Leaf
- Defines behavior for primitive objects
Composite
- Stores child components and implements child related operations
Client
- Manipulates objects in compositions.
장점:
- children을 관리하는 함수를 Composite 클래스에 선언 되어있으며 Safety를 제공
단점:
- Leaf 클래스가 children 관리 함수 호출 시 runtime에서 exception 발생
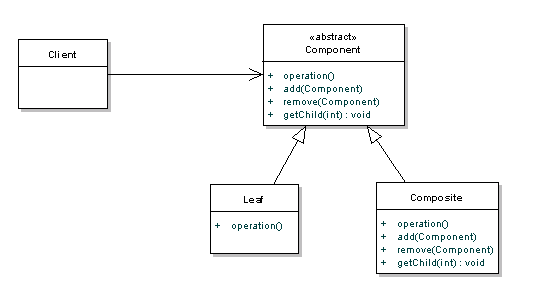
"Client" 클래스는 "Leaf" 와 "Composite" 클래스를 직접 참조하지 않고, 공통 인터페이스 "Component" 를 참조한다.
"Leaf" 클래스는 "Component" 인터페이스를 구현한다.
"Composite" 클래스는 "Component" 객체 자식들을 유지하고, operation() 과 같은 요청을 통해 자식들에게 전달한다.
코드 응용
// A Java program to demonstrate working of
// Composite Design Pattern with example
// of a company with different
// employee details

import java.util.ArrayList;
import java.util.List;

// A common interface for all employee

// Interface Component
interface Employee
{
	public void showEmployeeDetails();
}

// Leaf 1
class Developer implements Employee
{
	private String name;
	private long empId;
	private String position;

	public Developer(long empId, String name, String position)
	{
		// Assign the Employee id,
		// name and the position
		this.empId = empId;
		this.name = name;
		this.position = position;
	}

	@Override
	public void showEmployeeDetails()
	{
		System.out.println(empId+" " +name+ " " + position );
	}
}

// Leaf 2
class Manager implements Employee
{
	private String name;
	private long empId;
	private String position;

	public Manager(long empId, String name, String position)
	{
		this.empId = empId;
		this.name = name;
		this.position = position;
	}

	@Override
	public void showEmployeeDetails()
	{
		System.out.println(empId+" " +name+ " " + position );
	}
}


// Class used to get Employee List
// and do the opertions like
// add or remove Employee

// Composite
class CompanyDirectory implements Employee
{
	private List<Employee> employeeList = new ArrayList<Employee>();

	@Override
	public void showEmployeeDetails()
	{
		for(Employee emp:employeeList)
		{
			emp.showEmployeeDetails();
		}
	}

	public void addEmployee(Employee emp)
	{
		employeeList.add(emp);
	}

	public void removeEmployee(Employee emp)
	{
		employeeList.remove(emp);
	}
}

// Driver class

// Client
public class Company
{
	public static void main (String[] args)
	{
		Developer dev1 = new Developer(100, "Lokesh Sharma", "Pro Developer");
		Developer dev2 = new Developer(101, "Vinay Sharma", "Developer");
		CompanyDirectory engDirectory = new CompanyDirectory();
		engDirectory.addEmployee(dev1);
		engDirectory.addEmployee(dev2);

		Manager man1 = new Manager(200, "Kushagra Garg", "SEO Manager");
		Manager man2 = new Manager(201, "Vikram Sharma ", "Kushagra's Manager");

		CompanyDirectory accDirectory = new CompanyDirectory();
		accDirectory.addEmployee(man1);
		accDirectory.addEmployee(man2);

		CompanyDirectory directory = new CompanyDirectory();
		directory.addEmployee(engDirectory);
		directory.addEmployee(accDirectory);
		directory.showEmployeeDetails();
	}
}
Output
100 Lokesh Sharma Pro Developer
101 Vinay Sharma Developer
200 Kushagra Garg SEO Manager
201 Vikram Sharma  Kushagra's Manager
퍼사드 패턴
- 브시스템들에 대한 통합된 단순화된 인터페이스로 서브시스템에 쉽게 접근/사용. All for One
장점
- Isolation of complexity
- Testine Process - process of testing convenient
- Loose Coupling between client and subsystem.
단점
- change in method requires change in facade
- costly process of establishing facade method
- violation of rules during facade construction
코드 응용
// Product Interface
package structural.facade;
public interface Hotel
{
	public Menus getMenus();
}

// Product
package structural.facade;

public class NonVegRestaurant implements Hotel
{
	public Menus getMenus()
	{
		NonVegMenu nv = new NonVegMenu();
		return nv;
	}
}

// Product
package structural.facade;

public class VegRestaurant implements Hotel
{
	public Menus getMenus()
	{
		VegMenu v = new VegMenu();
		return v;
	}
}

// Product
package structural.facade;

public class VegNonBothRestaurant implements Hotel
{
	public Menus getMenus()
	{
		Both b = new Both();
		return b;
	}
}


// Facade
package structural.facade;

public class HotelKeeper
{
	public VegMenu getVegMenu()
	{
		VegRestaurant v = new VegRestaurant();
		VegMenu vegMenu = (VegMenu)v.getMenus();
		return vegMenu;
	}

	public NonVegMenu getNonVegMenu()
	{
		NonVegRestaurant v = new NonVegRestaurant();
		NonVegMenu NonvegMenu = (NonVegMenu)v.getMenus();
		return NonvegMenu;
	}

	public Both getVegNonMenu()
	{
		VegNonBothRestaurant v = new VegNonBothRestaurant();
		Both bothMenu = (Both)v.getMenus();
		return bothMenu;
	}
}

// Client
package structural.facade;

public class Client
{
	public static void main (String[] args)
	{
		HotelKeeper keeper = new HotelKeeper();

		VegMenu v = keeper.getVegMenu();
		NonVegMenu nv = keeper.getNonVegMenu();
		Both = keeper.getVegNonMenu();

	}
}
행위 패턴
옵저버 패턴
-
상태를 가지고 있는 주체 객체 & 상태의 변경을 알아야 하는 관찰 객체
-
이벤트가 발생할 때마다 미리 정의해둔 어떠한 동작을 즉각 수행하게 해주는 프로그래밍 패턴
-
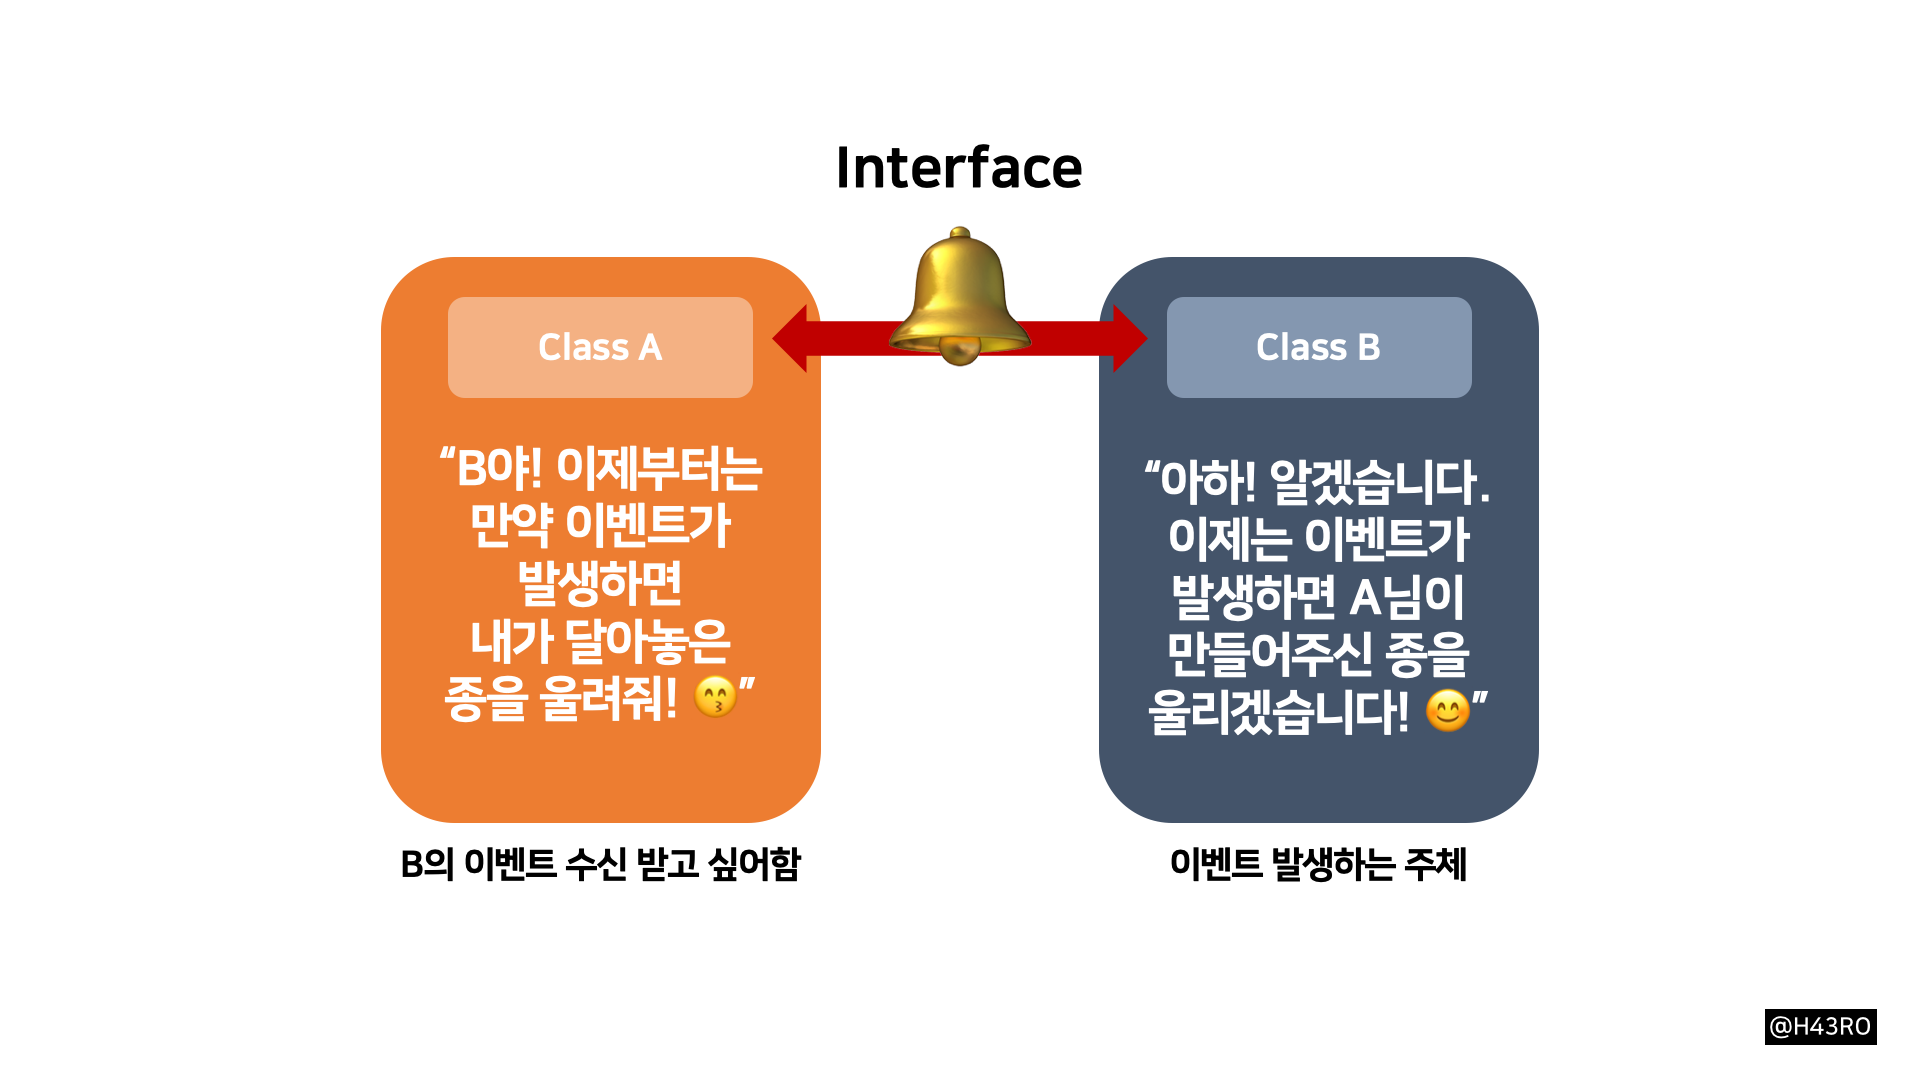
옵저버 패턴은, 한 객체의 상태가 바뀌면 그 객체에 의존하는 다른 객체들에게 연락이 가고, 자동으로 정보가 갱신되는 1:N 관계(혹은 1대1)를 정의
-
클래스 A 에서 B 의 이벤트를 수신받기 위해 클래스 B 를 인스턴스화 한 뒤, B 가 자신에게 이벤트가 발생할 때마다 클래스 A 가 갖고있는 메소드를 호출
-
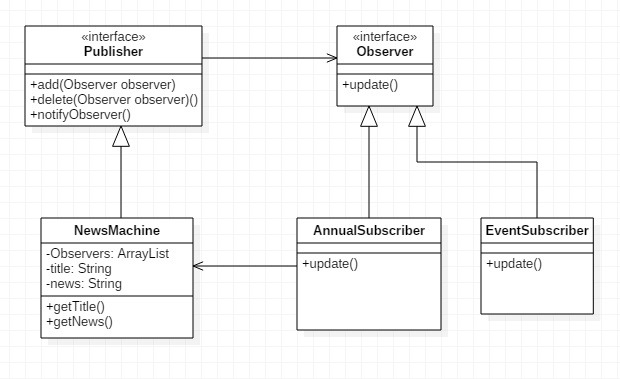
안드로이드 개발시, OnClickListener와 같은 것들이 옵저버 패턴이 적용된 것 (버튼(Publisher)을 클릭했을 때 상태 변화를 옵저버인 OnClickListener로 알려주로독 함
// 이 인터페이스를 상속받아, 이벤트가 발생할 때마다 호출할 메소드를 구현하면 됨
interface EventListener {
    fun onEvent(count: Int)
}

// 5의 배수가 감지되면 이벤트를 발생하는 Counter
class Counter(var listener: EventListener) { // 생성자로 EventListener 넘겨받음
    fun count() {
        for (i in 1..100) {  // 1부터 100까지 숫자 세기
            if (i % 5 == 0) {
                listener.onEvent(i)
            }
        }
    }
}

// 이벤트를 수신받았을 때 화면에 5의 배수를 출력하는 EventPrinter
class EventPrinter: EventListener {
	  // 리스너를 상속받아 콜백 메소드를 구현함 (5의 배수 출력)
    override fun onEvent(count: Int) {
        print("${count}-")
    }

    fun start(){
        // this 를 통해 EventListener 구현부를 넘겨줌 (다형성 활용!)
        Counter(this).count()  //
    }
}

// EventPrinter : 이벤트를 수신해서 출력하는, 인터페이스 구현체
// Counter : 숫자를 카운트 하면서 5의 배수가 감지되면 이벤트를 발생시키는 클래스
// EventListener : 위 두 요소를 연결지어줄 옵저버 (리스너)

fun main() {
    EventPrinter().start()
}
전략 패턴 (Strategy Pattern)
-
로직을 독립적으로 관리하고, 안에 행동을 담은 클래스를 선언하고, 인터페이스와 연결해서 관리하는 방식
-
새로운 로직을 추가하거나 변경할 때, 한번에 효율적으로 변경이 가능
출처
https://mygumi.tistory.com/343