Declarative rendering
The core feature of Vue is declarative rendering:
1 Using a template syntax that extends HTML we can describe how the HTML should look like based on JavaScript state.
2 When the state changes, the HTML updates automatically.
Reactive State
State that can trigger updates when changed are considered reactive.
In Vue, reactive state is held in components.
We declare reactive state using the data component option
(reactive state) data option should be a function that returns an object:
<script>
export default {
  data() {
    return {
      message: 'Hello World!',
      abc: 'abc'
    }
  }
}

</script>

<template>
  <h1>{{ abc }}</h1>
  <h1>{{ message.split('').reverse().join('') }}</h1>
</template>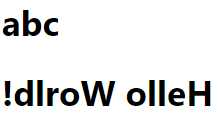
Attribute Bindings
A directive is a special attribute that starts with the v- prefix.
They are part of Vue's template syntax.
Similar to text interpolations,
Directive values are JavaScript expressions that have access to the component's state.
The part after the colon (:id) is the "argument" of the directive.
The element's id attribute will be synced with the dynamic Id property from the component's state.
ShortHand :
v-bind:id -> :id
<script>
export default {
  data() {
    return {
      titleClass: 'title'
    }
  }
}
</script>

<template>
  <h1 v-bind:class="titleClass">Make me red</h1> <!-- add dynamic class binding here -->
</template>

<style>
.title {
  color: red;
}
</style>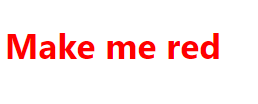
Event Listeners
We can listen to DOM events using the v-on directive
Inside a method, we can access the component instance using this.
The component instance exposes the data properties declared by data.
We can update the component state by mutating these properties.
Event handlers can also use inline expressions, and can simplify common tasks with modifiers.
ShortHand :
v-on:click -> @click
<script>
export default {
  data() {
    return {
      count: 0
    }
  },
  methods: {
    increment() {
      // update component state
      this.count++
    }
  }
}
</script>

<template>
  <!-- make this button work -->
  <button @click="increment">count is: {{ count }}</button>
</template>
Form Bindings
Using v-bind and v-on together, we can create two-way bindings on form input elements:
v-model automatically syncs the <input>'s value with the bound state, so we no longer need to use an event handler for that.
v-model works not only on text inputs, but also on other input types such as checkboxes, radio buttons, and select dropdowns.
Shorthand :
:value="text" @input="onInput" -> v-model="text"
<script>
export default {
  data() {
    return {
      text: ''
    }
  },
  methods: {
  /*
  Refactored
    onInput(e) {
      this.text = e.target.value
    }
  */
  }
}
</script>

<template>
  <input v-model="text" placeholder="Type here">
  <p>{{ text }}</p>
</template>
Conditional Rendering
v-if directive to conditionally render an element
<script>
export default {
  data() {
    return {
      awesome: true
    }
  },
  methods: {
    toggle() {
      // ...
      this.awesome = !this.awesome
    }
  }
}
</script>

<template>
  <button @click="toggle">toggle</button>
  <h1 v-if="awesome">Vue is awesome!</h1>
  <h1 v-else>Oh no 😢</h1>
</template>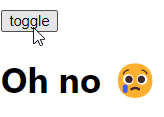
List Rendering
v-for directive to render a list of elements based on a source array
Ways to update a list
1 Call mutating methods on the source array:
this.todos.push(newTodo)2 Replace the array with a new one:
this.todos = this.todos.filter(/* ... */)<script>
// give each todo a unique id
let id = 0
export default {
data() {
return {
newTodo: '',
todos: [
{ id: id++, text: 'Learn HTML' },
{ id: id++, text: 'Learn JavaScript' },
{ id: id++, text: 'Learn Vue' }
]
}
},
methods: {
addTodo() {
// ...
const inputAddToDo = { id: this.todos.length + 1, text: this.newTodo };
this.todos.push(inputAddToDo);
this.newTodo = ''
},
removeTodo(id) {
// ...
this.todos = this.todos.filter(todo => todo.id !== id);
}
}
}
</script>
<template>
<form @submit.prevent="addTodo">
<input v-model="newTodo">
<button>Add To Do</button>
</form>
<ul>
<li v-for="todo in todos" :key="todo.id">
{{ todo.text }}
<button @click="removeTodo(todo.id)">X</button>
</li>
</ul>
</template>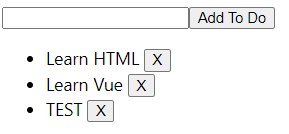
Computed Property
We can declare a property that is reactively computed from other properties using the computed option
A computed property is a property that is automatically updated based on other properties in the component's data or props objects.
It caches the result and automatically updates it when its dependencies change.
The main benefit of using computed properties is that they can simplify complex logic in a component by breaking it down into smaller, more manageable pieces.
Computed properties also provide a way to cache and reuse computed values, which can improve performance by avoiding unnecessary re-computations.
How do we render different list items based on that state?
HideCompleted Button!
<script>
let id = 0

export default {
  data() {
    return {
      newTodo: '',
      hideCompleted: false,
      todos: [
        { id: id++, text: 'Learn HTML', done: true },
        { id: id++, text: 'Learn JavaScript', done: true },
        { id: id++, text: 'Learn Vue', done: false }
      ]
    }
  },
  computed: {
    filteredTodos() {
      return this.hideCompleted
        ? this.todos.filter((t) => !t.done)
        : this.todos
    }
  },
  methods: {
    addTodo() {
      this.todos.push({ id: id++, text: this.newTodo, done: false })
      this.newTodo = ''
    },
    removeTodo(todo) {
      this.todos = this.todos.filter((t) => t !== todo)
    }
  }
}
</script>

<template>
  <form @submit.prevent="addTodo">
    <input v-model="newTodo">
    <button>Add Todo</button>
  </form>
  <ul>
    <li v-for="todo in filteredTodos" :key="todo.id">
      <input type="checkbox" v-model="todo.done">
      <span :class="{ done: todo.done }">{{ todo.text }}</span>
      <button @click="removeTodo(todo)">X</button>
    </li>
  </ul>
  <button @click="hideCompleted = !hideCompleted">
    {{ hideCompleted ? 'Show all' : 'Hide completed' }}
  </button>
</template>

<style>
.done {
  text-decoration: line-through;
}
</style>
Reference
https://vuejs.org/guide/essentials/template-syntax.html
https://vuejs.org/guide/essentials/event-handling.html
https://vuejs.org/guide/essentials/forms.html