Node.js 500줄로 SSO 서버 만들기
Why is security required in the browser?
- HTTP is state-less protocol
- Server requests are independent and distinct not linked to previous or subsequent request.
- This means any user can access server resources through the broser.
- To limit the browser request, you must authenticate the browser request, respond to the legitimate request, ignore Illegal request; to authenticate a browser request, you must be aware of the browser request status
- Server and browser maintain a state together, using the mechanism such as ‘Cookies’ or ‘Sessions’ or ‘JWT’.
What is the use of the state mechanism?
- When we have a single system the state mechanism, through the the login authentication is easy to maintain
- But having multiple makes maintaining state of each individual system difficult. Users have to log in one by one and then log out one by one.
SSO is the solution to a single-sign-on syncing state between multiple systems.
- Users can log in to a system in a multi-system application group and be authorized in all other systems without having to log in again, including single sign-on and single sign-off.
Time to make using Node.js
1 User Accesses SSO-consumer -> SSO-server
The user accesses the protected resource of system “sso-consumer” (REQUEST ADDRESS) . “sso-consumer” finds that the user is not logged in, jumps to the “sso-server”, using his own address as a parameter.
We are going to build the express.js middleware to check the same for our request.
const isAuthenticated = (req, res, next) => {
// simple check to see if the user is authenicated or not,
// if not redirect the user to the SSO Server for Login
// pass the redirect URL as current URL
// serviceURL is where the sso should redirect in case of valid user
const redirectURL = `${req.protocol}://${req.headers.host}${req.path}`;
if (req.session.user == null) {
return res.redirect(
`http://sso.ankuranand.com:3010/simplesso/login?serviceURL=${redirectURL}`
);
}
next();
};
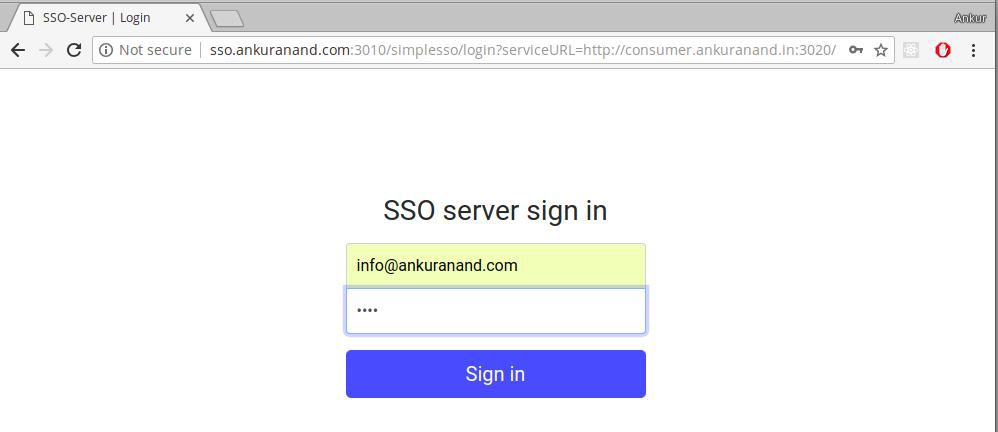
module.exports = isAuthenticated;2 SSO server directs user to login page
The SSO authentication server finds that the user is not logged in and directs the user to the login page.
const login = (req, res, next) => {
  // The req.query will have the redirect url where we need to redirect after successful
  // login and with sso token.
  // This can also be used to verify the origin from where the request has came in
  // for the redirection
  const { serviceURL } = req.query;
  // direct access will give the error inside new URL.
  if (serviceURL != null) {
    const url = new URL(serviceURL);
    if (alloweOrigin[url.origin] !== true) {
      return res
        .status(400)
        .json({ message: "Your are not allowed to access the sso-server" });
    }
  }
  if (req.session.user != null && serviceURL == null) {
    return res.redirect("/");
  }
  // if global session already has the user directly redirect with the token
  if (req.session.user != null && serviceURL != null) {
    const url = new URL(serviceURL);
    const intrmid = encodedId();
    storeApplicationInCache(url.origin, req.session.user, intrmid);
    return res.redirect(`${serviceURL}?ssoToken=${intrmid}`);
  }

  return res.render("login", {
    title: "SSO-Server | Login"
  });
};
Check if serviceURL that has came as query to the ‘sso-server’ has been registered to use the ‘sso-server’ or not.
    const alloweOrigin = {
    "http://consumer.ankuranand.in:3020": true,
    "http://consumertwo.ankuranand.in:3030": true,
    "http://test.tangledvibes.com:3080": true,
    "http://blog.tangledvibes.com:3080": fasle,
    };
3 User login
User enters username and password to submit login request.
4 SSO server verifies user and creates global session
The SSO authentication server verifies the user information and creates a session between the user and the sso authentication server. This is called a global session and creates an authorization token.
The authorization token is a string of random characters.
It doesn’t matter how it is generated. As long as it is not repeated and not easy to forge,
5 SSO server -> SSO-consumer
The SSO authentication server takes the authorization token to jump to the initial request address (system “sso-consumer”).
const doLogin = (req, res, next) => {
  // do the validation with email and password
  // but the goal is not to do the same in this right now,
  // like checking with Datebase and all, we are skiping these section
  const { email, password } = req.body;
  if (!(userDB[email] && password === userDB[email].password)) {
    return res.status(404).json({ message: "Invalid email and password" });
  }

  // else redirect
  const { serviceURL } = req.query;
  const id = encodedId();
  req.session.user = id;
  sessionUser[id] = email;
  if (serviceURL == null) {
    return res.redirect("/");
  }
  const url = new URL(serviceURL);
  const intrmid = encodedId();
  storeApplicationInCache(url.origin, id, intrmid);
  return res.redirect(`${serviceURL}?ssoToken=${intrmid}`);
};
Extra security
Always consider this token as intermediate token and exchange the real data using this token.
If you are using JWT as the intermediate token please avoid sharing any critical data over this JWT.*
6 SSO consumer checks token validity with SSO-server
The ‘sso-consumer’ gets the token and goes to the ‘sso-server’ authentication to check if the token is valid.
The ‘SSO-SERVER’ verifies the token and return another token with user information to the “sso-consumer”.
The “sso-consumer” uses this token to create a session with the user. This session is called local session.
sso-consumer middle-ware inside the “sso-consumer” application, built using the ‘express.js’
const ssoRedirect = () => {
  return async function(req, res, next) {
    // check if the req has the queryParameter as ssoToken
    // and who is the referer.
    const { ssoToken } = req.query;
    if (ssoToken != null) {
      // to remove the ssoToken in query parameter redirect.
      const redirectURL = url.parse(req.url).pathname;
      try {
        const response = await axios.get(
          `${ssoServerJWTURL}?ssoToken=${ssoToken}`,
          {
            headers: {
              Authorization: "Bearer l1Q7zkOL59cRqWBkQ12ZiGVW2DBL"
            }
          }
        );
        const { token } = response.data;
        const decoded = await verifyJwtToken(token);
        // now that we have the decoded jwt, use the,
        // global-session-id as the session id so that
        // the logout can be implemented with the global session.
        req.session.user = decoded;
      } catch (err) {
        return next(err);
      }

      return res.redirect(`${redirectURL}`);
    }

    return next();
  };
};
After the request from the sso-consumer , the sso-server checks the token to find out whether the token exists and expires.
The token verification succeeds.
The SSO-Server in our case we are going to return a signed JWT with user information, after successful validation.
const verifySsoToken = async (req, res, next) => {
  const appToken = appTokenFromRequest(req);
  const { ssoToken } = req.query;
  // if the application token is not present or ssoToken request is invalid
  // if the ssoToken is not present in the cache some is
  // smart.
  if (
    appToken == null ||
    ssoToken == null ||
    intrmTokenCache[ssoToken] == null
  ) {
    return res.status(400).json({ message: "badRequest" });
  }

  // if the appToken is present and check if it's valid for the application
  const appName = intrmTokenCache[ssoToken][1];
  const globalSessionToken = intrmTokenCache[ssoToken][0];
  // If the appToken is not equal to token given during the sso app registraion or later stage than invalid
  if (
    appToken !== appTokenDB[appName] ||
    sessionApp[globalSessionToken][appName] !== true
  ) {
    return res.status(403).json({ message: "Unauthorized" });
  }
  // checking if the token passed has been generated
  const payload = generatePayload(ssoToken);

  const token = await genJwtToken(payload);
  // delete the itremCache key for no futher use,
  delete intrmTokenCache[ssoToken];
  return res.status(200).json({ token });
};
Extra Security Pointers:
Inside “sso-server” register each application that’s going to use the sso-server for authentication and give them some sort of verification header while making a request.
This establishes a better security between consumer and “sso-server”.
You can also generate different “private” and “public” rsa file for each application and let each application verify their JWT with their respective Public Key at the consumer side.*
You can also define application-level policy at the centralized place.
const userDB = {
  "info@ankuranand.com": {
    password: "test",
    userId: encodedId(), // incase you dont want to share the user-email.
    appPolicy: {
      sso_consumer: { role: "admin", shareEmail: true },
      simple_sso_consumer: { role: "user", shareEmail: false }
    }
  }
};
7 Session made with SSO-server and SSO-consumers
After the user logs in successfully, a session is established with the “sso authentication server” and each consumer subsystem.
The session established between the user and the “sso authentication server” is called a global session.
The session established between the user and each “consumer subsystem” is called a local session.
After the local session is established, the user can access the consumer subsystem protected resources.
“Local session” and “Global session” both are established.
SSO-Consumer
- The sso-consumer subsystem does not log in to the user request and jumps to the sso server for authentication.
- Receive the token sent by the sso authentication server.
- Communicate with sso-server to verify the validity of the token.
- Receives a JWT, verifies the JWT using the public key.
- Establish a local session
SSO-Server
- Verify the user’s login information.
- Create a global session.
- Create an authorization token.
- Send a token with sso-client communication.
- Verify sso-client token validity.
- Send a JWT with the user information.
In summary, there are many options for system integration single sign-on solutions, each of which has its own advantages and adaptation environment.
Building one from scratch is an iterative project that needs to analyze the characteristics of each system, including login methods, user information storage and synchronization, etc., and cannot blindly rely on the single way to solve the problem.
Similarly we can implement the “Logout”, just we need to consider these three relationship in mind while writing the “Logout” Functionality.
Local session exists, global session must exist.
Global session exists, local session does not necessarily exist.
Global session is destroyed, local session must be destroyed.
sso-server is our central authorization unit
sso-consumer is how different consumer can be implemented to talk with sso-server and use sso feature.
출처