SQLAlchemy란?
- Python에서 관계형 데이터베이스와의 연결 및 ORM 등을 활용할 수 있도록 해주는 라이브러리
- 데이터베이스를 table의 모음이 아닌 algebra engine으로 봄.
SQLAlchemy는 다음 2가지로 나뉨
-
Core
- 데이터베이스 도구 키트로, SQLAlchemy의 기본 아키텍쳐
- 데이터베이스에 대한 연결을 관리하고, 데이터베이스 쿼리 및 결과와 상호작용하고 SQL문을 프로그래밍 방식으로 구성하기 위한 도구를 제공합니다. -
ORM(Object Relational Mapper)
- Core를 기반으로 구축되어 선택적 ORM 기능을 제공합니다.
ORM 관계도
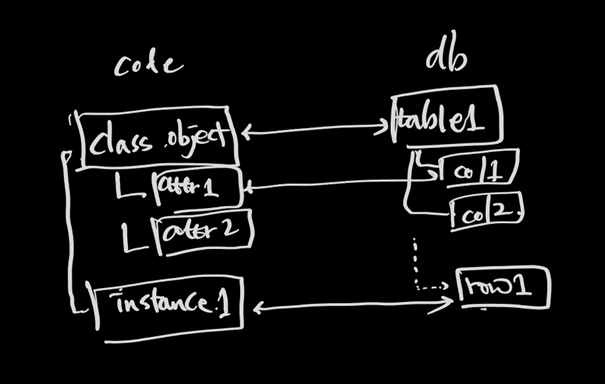
1. sqlalchemy class (object) : db table
2. sqlalchemy class attribute : db column
3. sqlalchemy class instance : db row
sqlalchemy 엔진 생성
DATABASE_URL: 연결할 sql db 주소
- sqlite : "sqlite:///{주소}"- mysql : "mysql://user:password@postgresserver/db"
- postgresql : "postgresql://user:password@postgresserver/db"
create_engine: 으로 엔진생성SessionLocal: ORM specific한 access point 를 위한 class.
sqlalchemy db model 생성
declarative_base()로Baseclass (sqlalchemy model) 생성Baseclass로부터 상속받아 db 에 해당하는 model class(model) 생성
model Attribute 및 column 생성
- class attribute로
Column과ForeignKey,Integer등을 활용하여 각 칼럼의 자료형과 key값을 정의해 줌
relationship 생성
Pydantic Schema 생성
pydantic의BaseModel모듈 이용
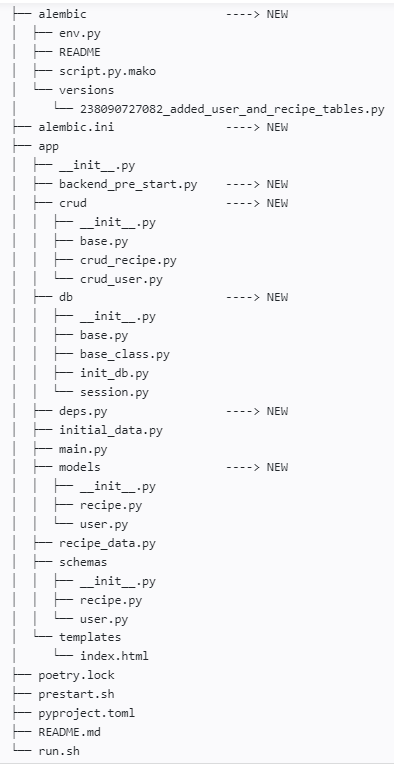
아래 내용은 The Ultimate Fastapi Tutorial 블로그와 github을 기반으로 작성되었습니다.
파일 구조에 따른 모듈의 역할에 집중해서 이해해 봅시다.
파일 구조
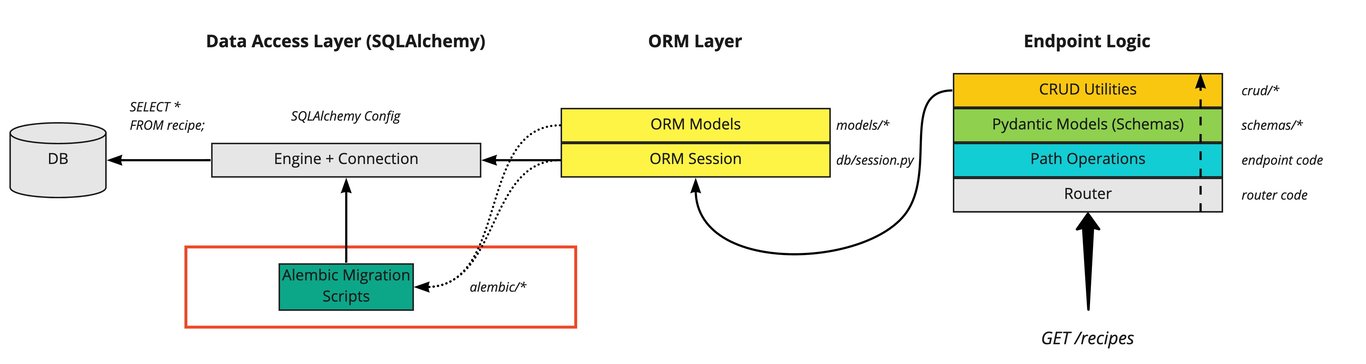
FastAPI SQLAlchemy Diagram
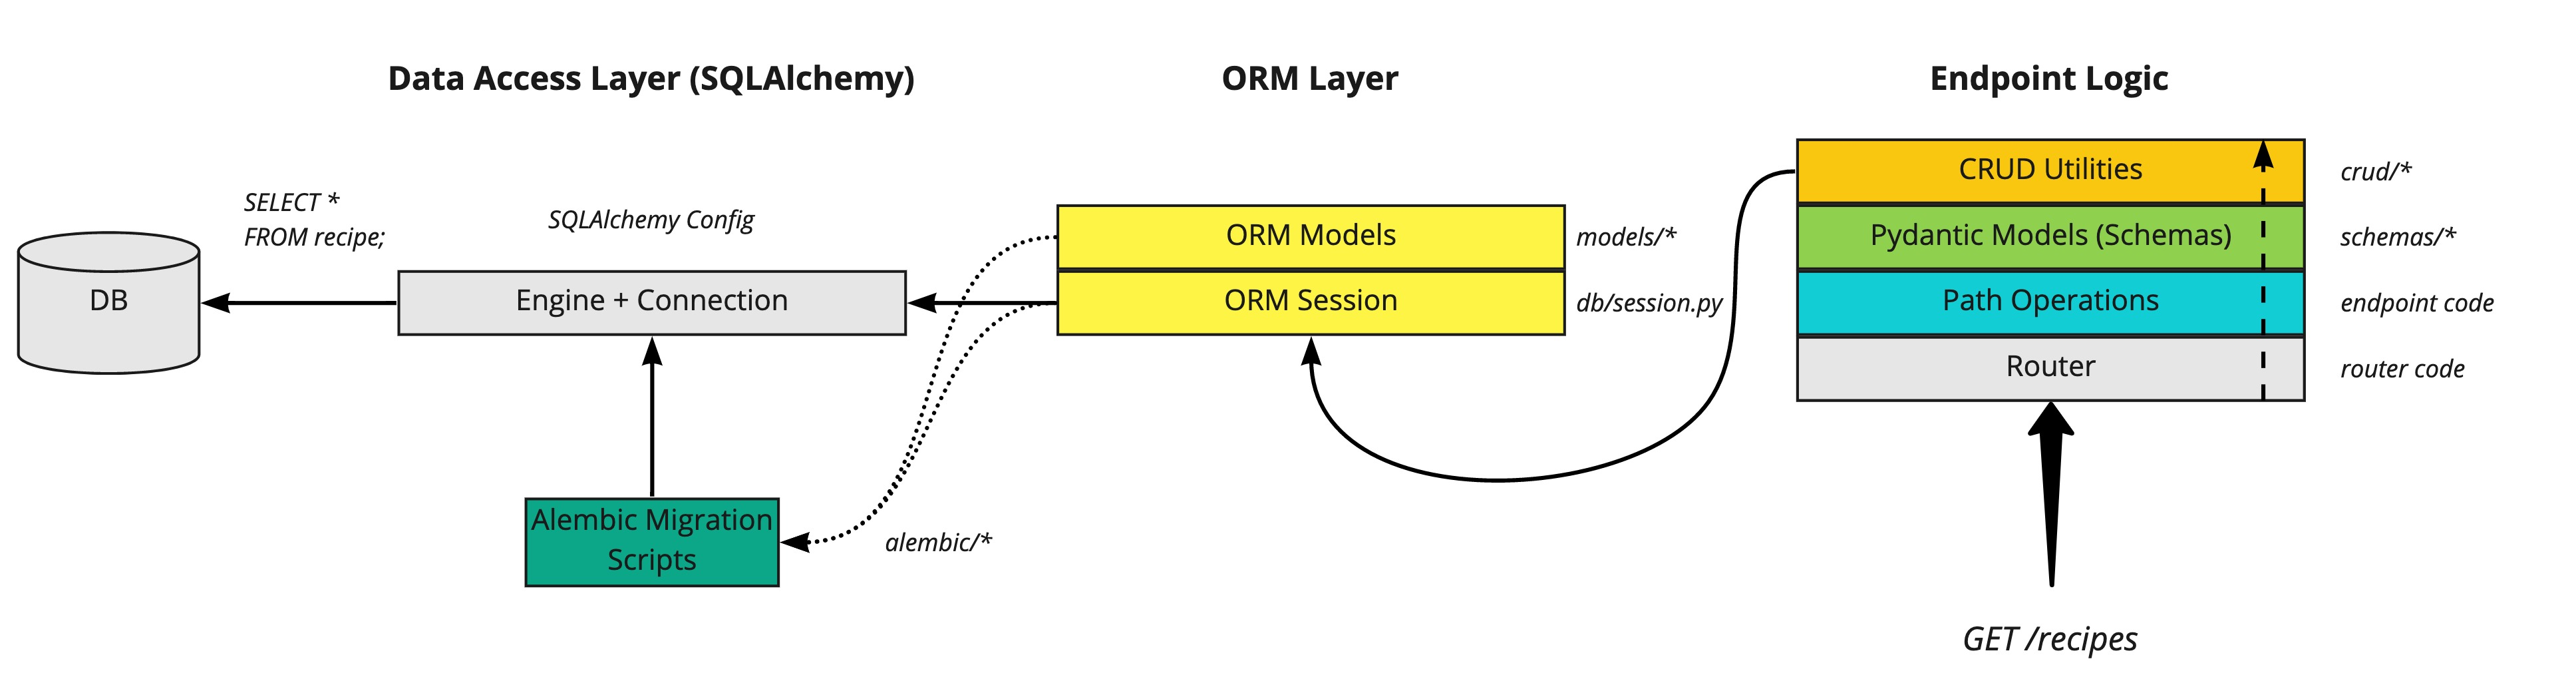
-😀 ORM을 이용, Python class로부터 table과 column을 정의하고자 함
- 가장 흔한 방식은, SQLAlchemy에서 declarative mapping을 통해 활성화된 후, 모든 DB model class를 이 base class로부터 상속되도록 하는 방법
*** Declarative Mapping?
- base class를 생성함으로서 활성화(
declarative_base) - 모든 DB class들이 이 base class로부터 상속되도록 함
I. Class 정의, ORM, Engine
1. recipe 및 User db 연결을 위한 class 준비
-
db/base_class.py
-Baseclass 생성 : SQLalchemy로 class와 DB를 이어주는 역할! -
models/recipe.pyfrom sqlalchemy import Column, Integer, String, ForeignKey from sqlalchemy.orm import relationship from app.db.base_class import Base class Recipe(Base): # 1 id = Column(Integer, primary_key=True, index=True) # 2 label = Column(String(256), nullable=False) url = Column(String(256), index=True, nullable=True) source = Column(String(256), nullable=True) submitter_id = Column(String(10), ForeignKey("user.id"), nullable=True) # 3 submitter = relationship("User", back_populates="recipes") # 41) Base class import 한 것들을 상속받아
Recipeclass 생성
2)sqlalchemy로 부터Column을 import하여 recipe의 id, label, url, source 등을 Column화해주고,String,Integer으로 data type을 지정해 줍니다.
3)recipe와user간에 1:多 관계를 정의합니다. 다시말해, 하나의 recipe에 다양한 유저를 mapping합니다.
4) 多:1 관계로도 bidirectional하게 mapping하기 위해relationship()을 정의하고relationship.back_populates를 이용하여 둘을 연결합니다. -
models/user.py
    class User(Base):
	id = Column(Integer, primary_key=True, index=True)
    first_name = Column(String(256), nullable=True)
    surname = Column(String(256), nullable=True)
    email = Column(String, index=True, nullable=False)
    is_superuser = Column(Boolean, default=False)
    recipes = relationship(
        "Recipe",
        cascade="all,delete-orphan",
        back_populates="submitter",
        uselist=True,
    )
2. SQLAlchemy보고 DB연결 어떻게 하는지 알려주기
db/session.py에서 Engine에 해당하는 인스턴스 생성from sqlalchemy import create_engine from sqlalchemy.orm import sessionmaker, Session SQLALCHEMY_DATABASE_URI = "sqlite:///example.db" # 1 engine = create_engine( # 2 SQLALCHEMY_DATABASE_URI, # required for sqlite connect_args={"check_same_thread": False}, # 3 ) SessionLocal = sessionmaker(autocommit=False, autoflush=False, bind=engine) # 4 ```
1) SQLALCHEMY_DATABASE_URI가 SQLite가 어디서 data를 지속할지 정의합니다.
2) create_engine 함수를 통해 엔진을 생성합니다.
- URI 이외에도 driver, dialect, database server location, users 그리고 passwords and ports 등 훨씬 더 복잡한 string이 들어갈 수 있음.[참고]
3) check_same_thread : False
- Fastapi는 하나의 request안에 다양한 thread의 db에 접근 가능하므로, False로 설정해야 됨.
4) DB Session 만들기 : engine과 달리 ORM-specific하고, database로의 main access point 역할. "holding zone"이라고 표현되어 있음.
II. Pydantic DB Schema와 CRUD utility
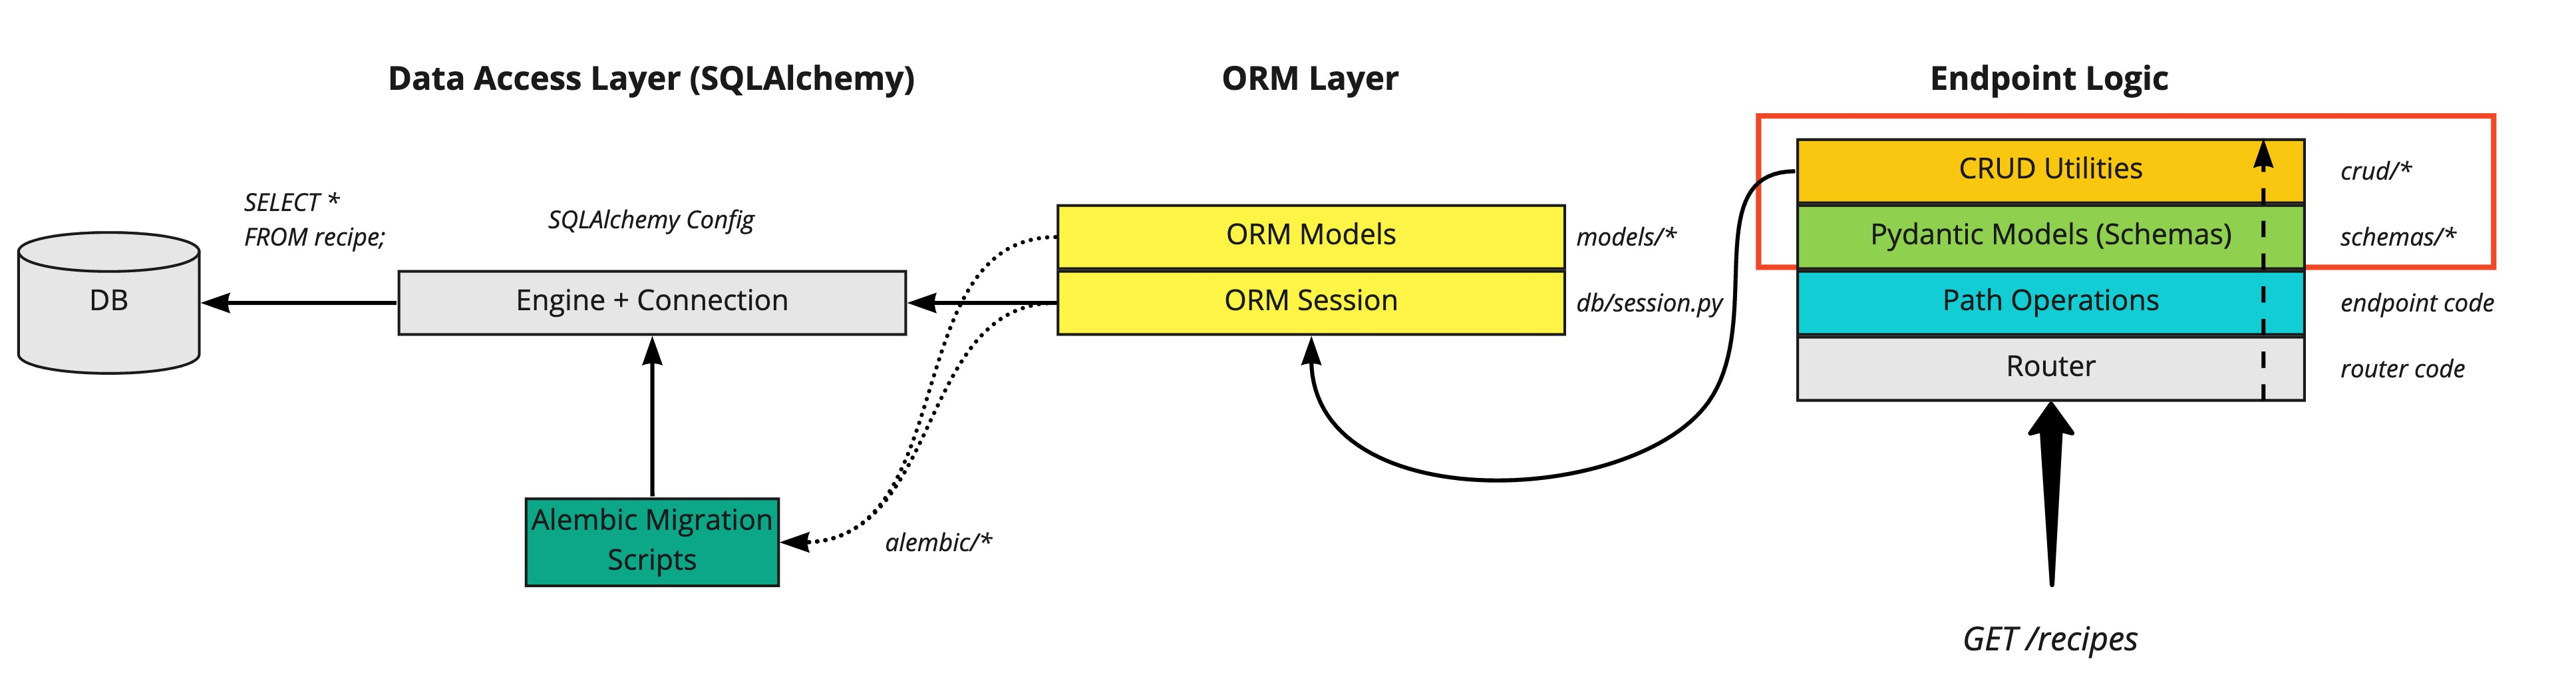
Endpoint Logic 이해하기
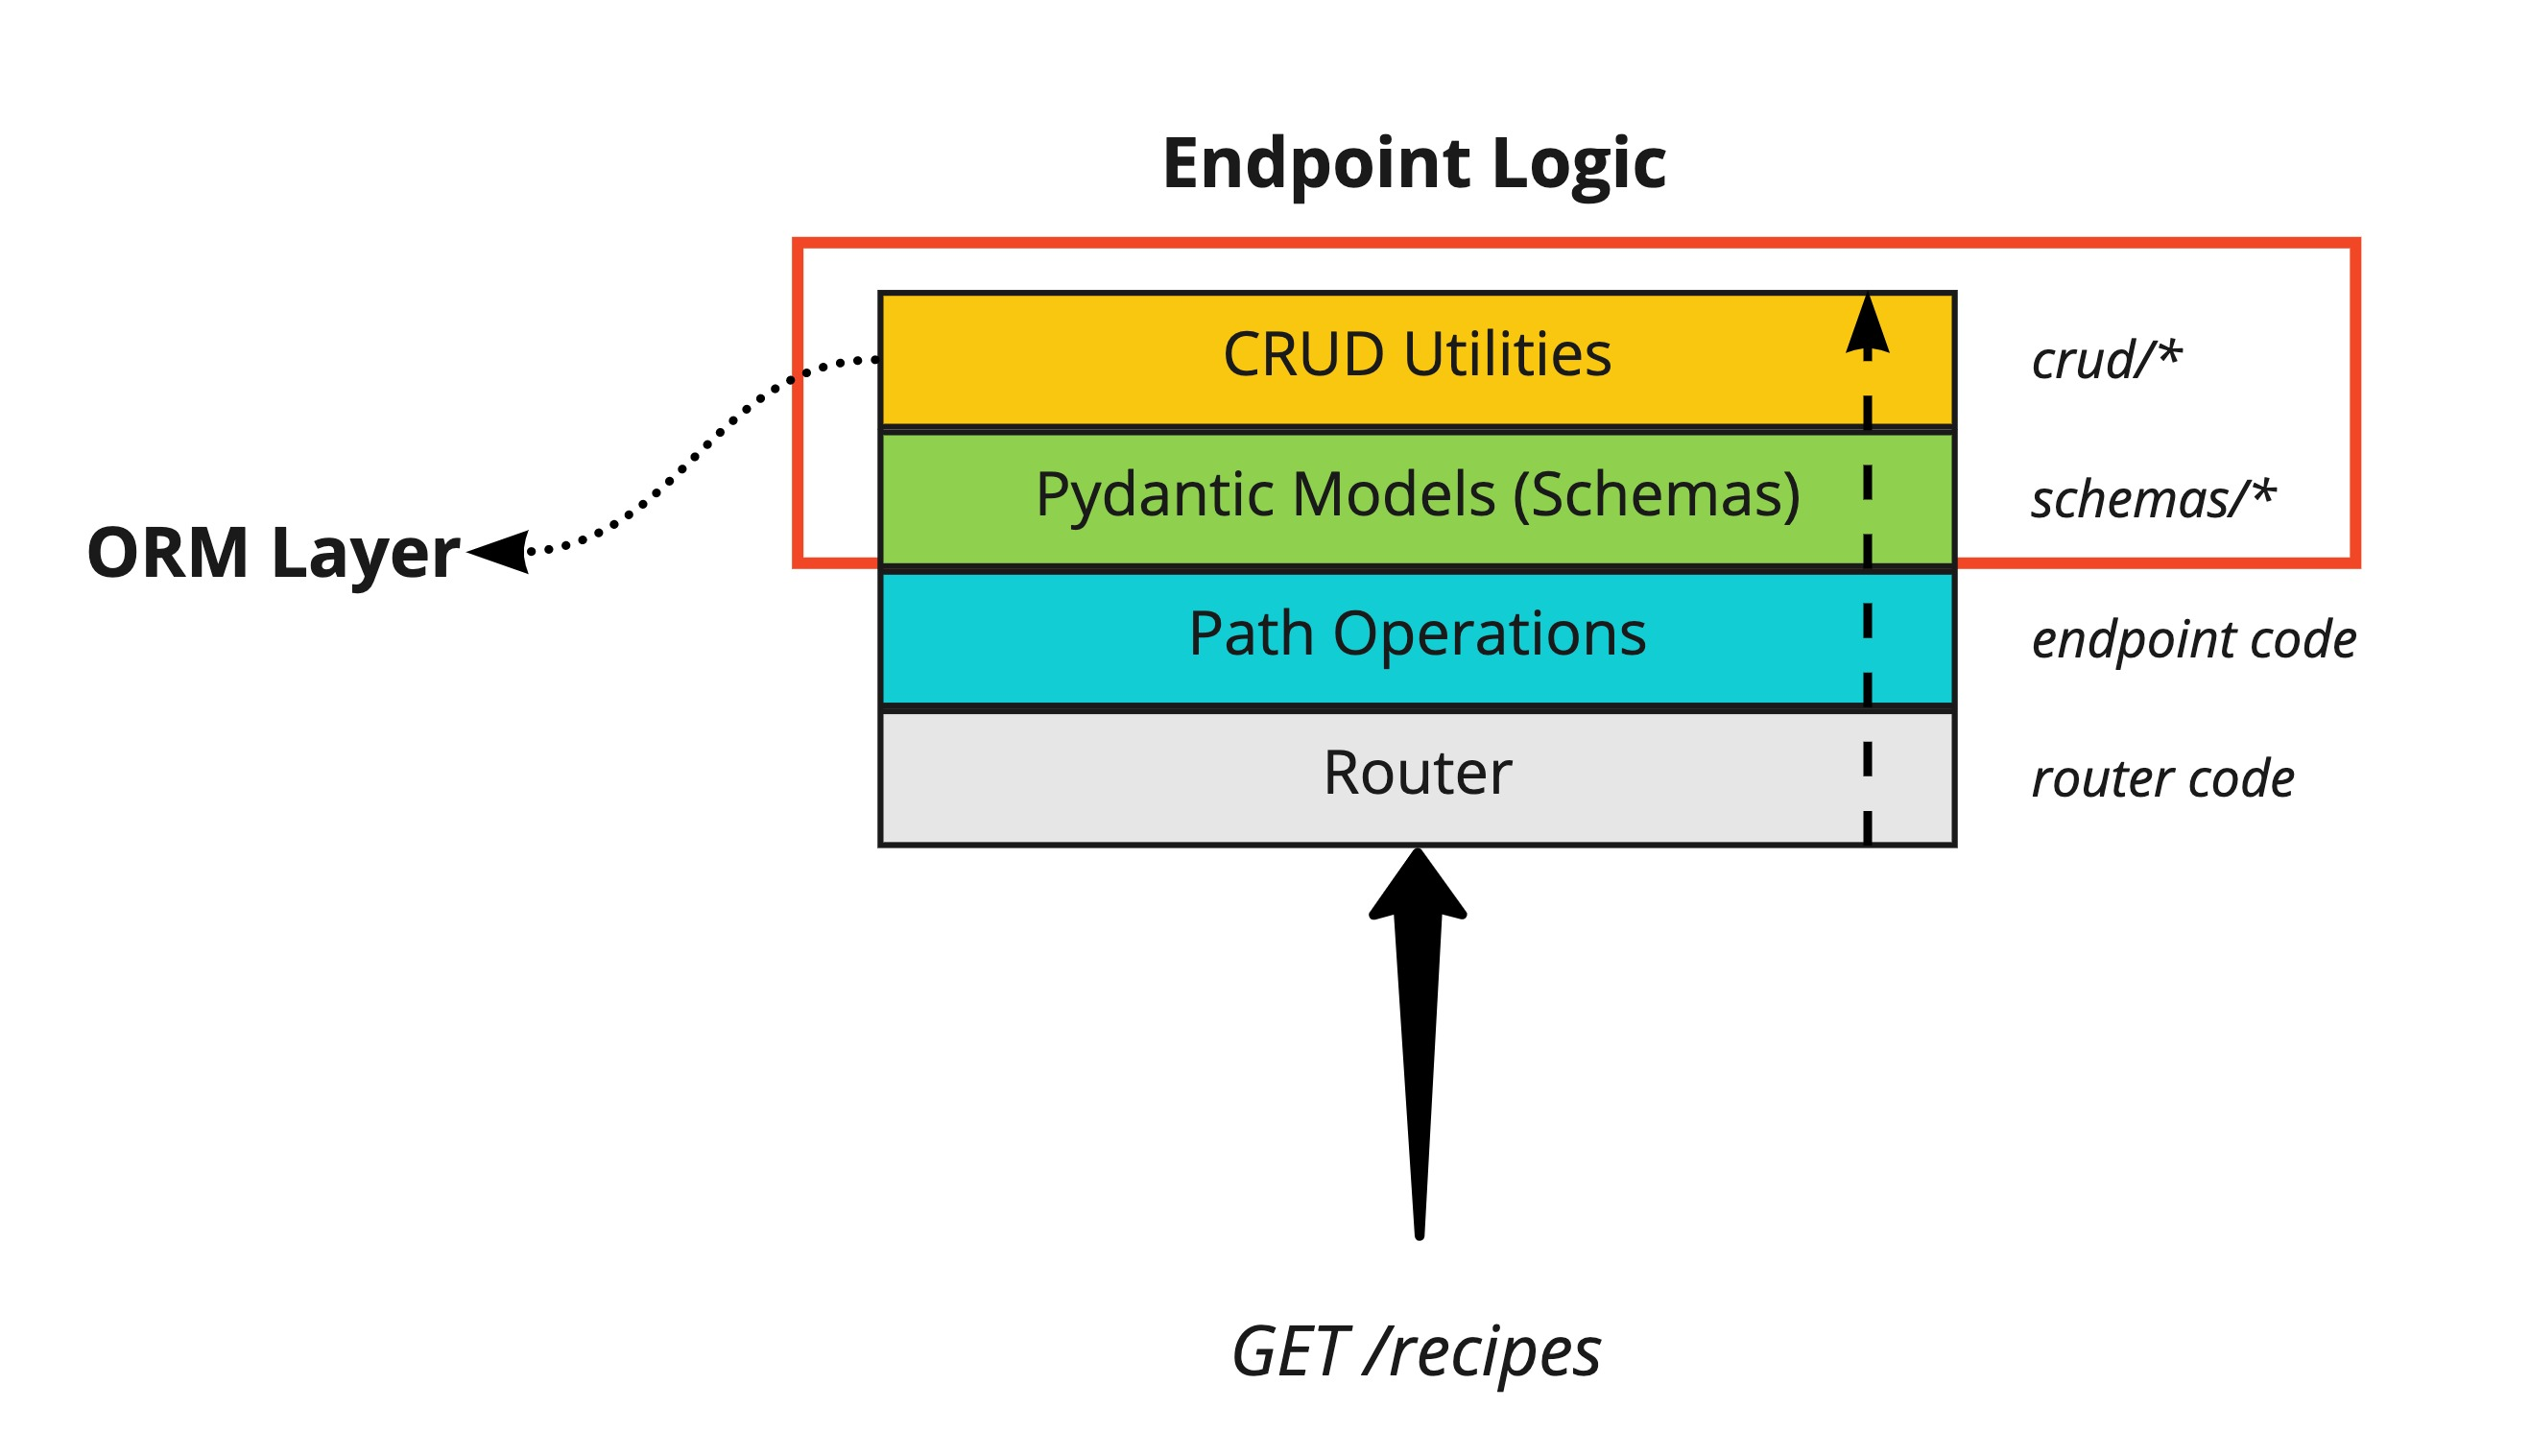
- request가 알맞은 path operation으로 routing 됨.
- request로 들어온 data구조에에 알맞은
Pydanticmodel이 validation에 활용되어CRUD utility에 전달됨. - CRUD utility function은
DB query를 준비하기 위해ORM Session과shaped data structure을 함께 이용
혼동 금지🤣
name = Column(String): SQLAlchemy model
name : str: Pydantic model
schemas/recipe.py
from pydantic import BaseModel, HttpUrl

from typing import Sequence


class RecipeBase(BaseModel):
    label: str
    source: str
    url: HttpUrl


class RecipeCreate(RecipeBase):
    label: str
    source: str
    url: HttpUrl
    submitter_id: int


class RecipeUpdate(RecipeBase):
    label: str


# Properties shared by models stored in DB
class RecipeInDBBase(RecipeBase):
    id: int
    submitter_id: int

    class Config:
        orm_mode = True


# Properties to return to client
class Recipe(RecipeInDBBase):
    pass


# Properties properties stored in DB
class RecipeInDB(RecipeInDBBase):
    pass
- pydantic
orm_mode: dictionary 자료형이 아니라도 읽을 수 있게 해줌 orm_mode가 아니라면, path operation으로부터 SQLAlcemy model을 반환했을 때 relationship data는 반환하지 않을 것임.
Recipe와RecipeInDB분리하는 이유?
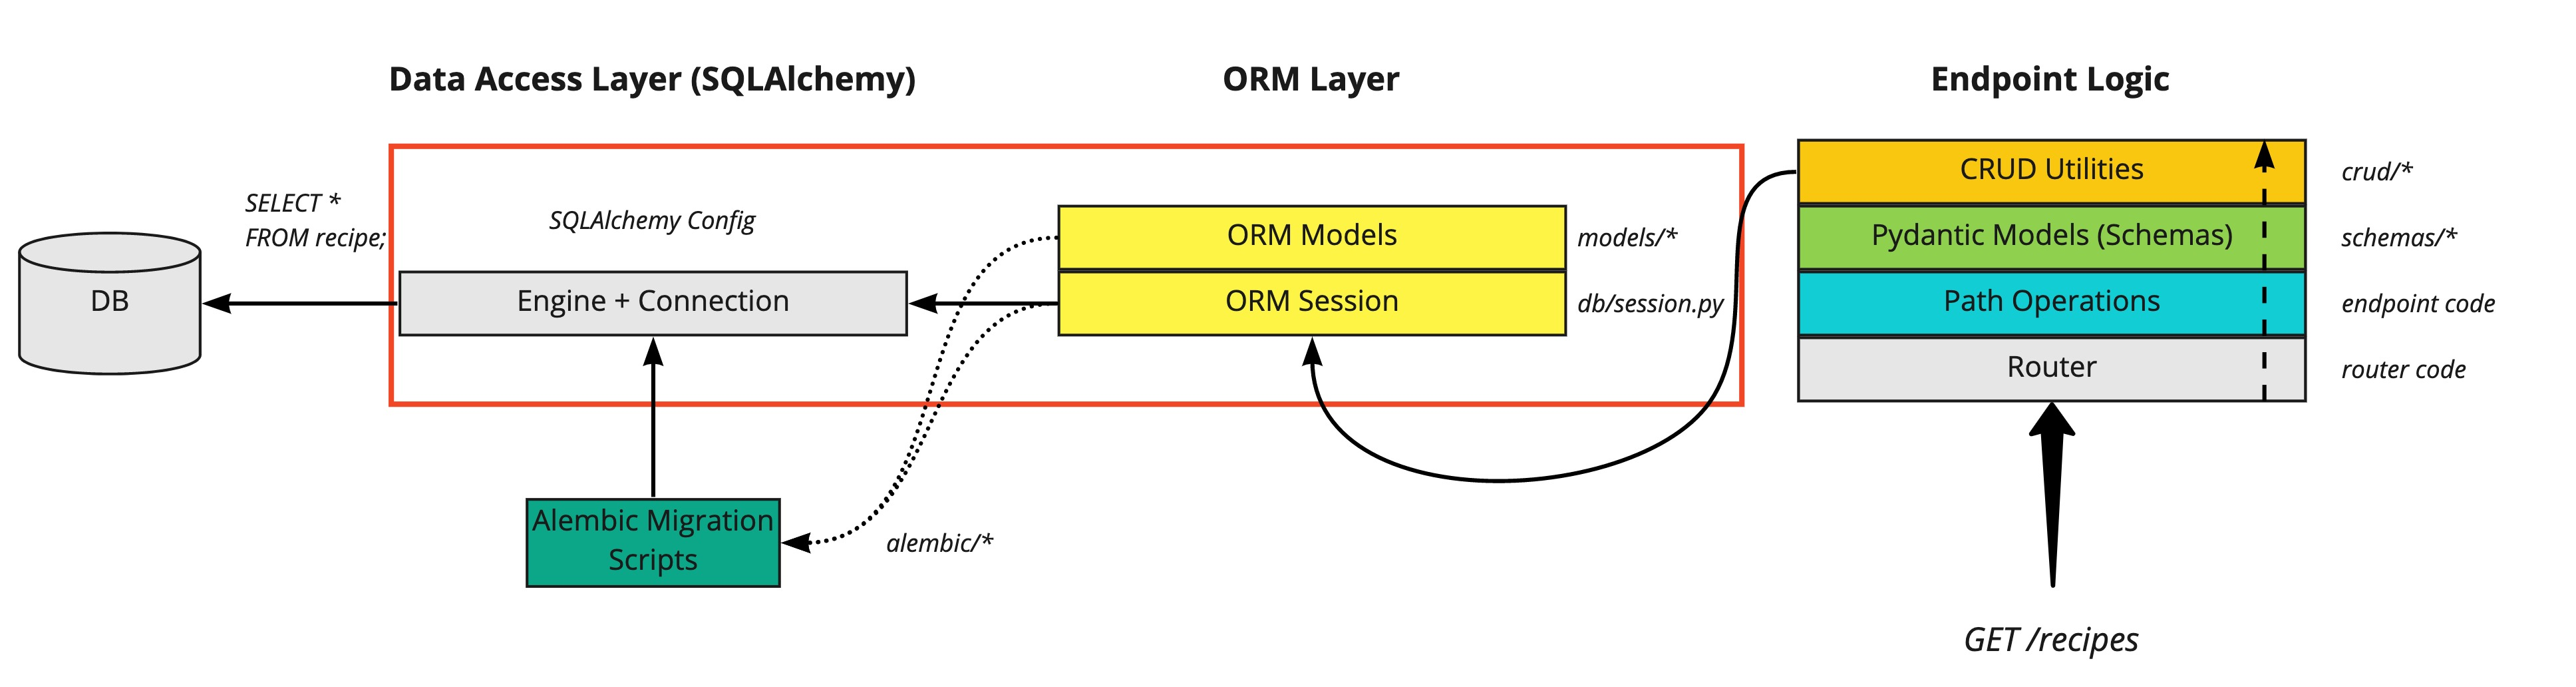
- DB와 관련된 것만 분리해서 받을 수 있게 만듦-> Pydantic Schema 뿐 아니라 database와 상호작용할 reusable function 필요
- CRUD directory 안에 이러한 data access layer가 정의됨!
CRUD utility class
- sqlalchemy와 마찬가지로 base class를 상속받음
- table로부터 ID/attribute로 호출
- 여러 filter 및 limit에 근거하여 호출
- table
insert/update/delete
crud/base.py
- crud class 상속시킬 class 가지고 있음
from typing import Any, Dict, Generic, List, Optional, Type, TypeVar, Union

from fastapi.encoders import jsonable_encoder
from pydantic import BaseModel
from sqlalchemy.orm import Session

from app.db.base_class import Base


ModelType = TypeVar("ModelType", bound=Base)
CreateSchemaType = TypeVar("CreateSchemaType", bound=BaseModel)
UpdateSchemaType = TypeVar("UpdateSchemaType", bound=BaseModel)


class CRUDBase(Generic[ModelType, CreateSchemaType, UpdateSchemaType]):  # 1
    def __init__(self, model: Type[ModelType]):  # 2
    """
    CRUD object with default methods to Create, Read, Update, Delete (CRUD).
    **Parameters**
    * `model`: A SQLAlchemy model class
    * `schema`: A Pydantic model (schema) class
    """
    self.model = model

    def get(self, db: Session, id: Any) -> Optional[ModelType]:
        return db.query(self.model).filter(self.model.id == id).first()  # 3

    def get_multi(
        self, db: Session, *, skip: int = 0, limit: int = 100
    ) -> List[ModelType]:
        return db.query(self.model).offset(skip).limit(limit).all()  # 4

    def create(self, db: Session, *, obj_in: CreateSchemaType) -> ModelType:
        obj_in_data = jsonable_encoder(obj_in)
        db_obj = self.model(**obj_in_data)  # type: ignore
        db.add(db_obj)
        db.commit()  # 5
        db.refresh(db_obj)
        return db_obj

# skipping rest... CRUDBaseClass 정의
SQLAlchemy model로부터 Base 1개 import,pydantic으로부터 BaseModel 2개 import 해서 총 3개 input으로 넣음(ModelType,CreateSchemaType,UpdateSchemnaType)Modeltype이 인스턴스 생성 시 input으로 들어감getmethod : 하나의 database row를 가져온다.Session: sqlalchemy로부터 import된 모듈로db를 입력받음.query: 다른 DB query들을 하나로 묶는 방법
get_multi: 여러 database row 가져오기.offset과.limit이용,all()로 마무리
.commit()- db object를 만들어내고자 한다면, row 삽입을 위해
commit()필요
- db object를 만들어내고자 한다면, row 삽입을 위해
CRUD Utility(SQLalchemy model과, pydantic schema 활용)
from app.crud.base import CRUDBase
from app.models.recipe import Recipe
from app.schemas.recipe import RecipeCreate, RecipeUpdate


class CRUDRecipe(CRUDBase[Recipe, RecipeCreate, RecipeUpdate]):  # 1
    ...

recipe = CRUDRecipe(Recipe) # 2-
각 모듈의 출처를 유념하면서 아래를 확인해 봅시다.
-
ModelType :
Recipe -
CreateSchemaType :
RecipeCreate -
UpdateSchemnaType :
RecipeUpdate -
이후 recipe class 생성
중간정리😎
- 정의된 Base Class로부터
User/Recipeclass 선언. 이는 sqlalchemy로부터 생성되었고 db 자료형등을 정의함.session.py에서 sqlalchemyengine및session정의함schemas/recipe.py에서 pydantic class 정의함.(이는 request온 정보를 validation하기 위함)- CRUD Utility를 위해
CRUDBase정의하고,sqlalchemyclass와pydanticclass 활용하여 생성
III. Albemic 활용한 migration
- API 를 구축하는 데 있어서, table의 변화를 고려하여야 함.
- sqlalchemy와 연동된
alembiclibrary 활용하여 이를 해결 가능함
directory
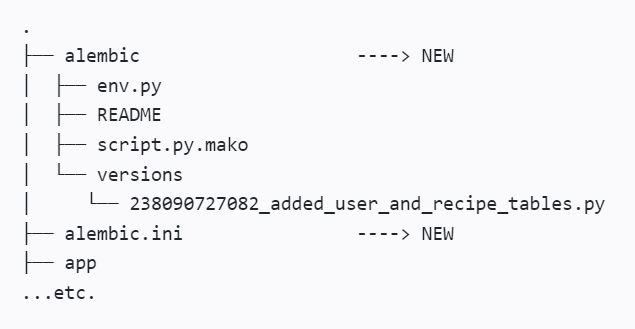
env.py: database connection, 및 sqlalchemy engine, class 선언과 관련한 환경설정version.py: migration이 작동하기 위한 directory
- 다음 또는 이전 migration에 대한 reference를 담고 있음
script.py.mako,README: alembic으로부터 생성된 boilerplate(표준 문안)- alembic.ini : alembic에게 다른 파일을 어디서 찾을지를 알려줌
prestart.sh : migration command
#! /usr/bin/env bash

# Let the DB start
python ./app/backend_pre_start.py

# Run migrations
alembic upgrade head    <---- ALEMBIC MIGRATION COMMAND

# Create initial data in DB
python ./app/initial_data.py-
database 변화뿐만 아니라 table/column 을 처음에 만도는 과정을 포함
-
backend_pre_start.py: SQLSELECT 1 -
initial_data.py:db/init_db.py로부터init_db함수를 사용한다.
code
db/init_db.py: DB 생성!
from app import crud, schemas
from app.db import base  # noqa: F401
from app.recipe_data import RECIPES

logger = logging.getLogger(__name__)

FIRST_SUPERUSER = "admin@recipeapi.com"


def init_db(db: Session) -> None:  # 1
    if FIRST_SUPERUSER:
        user = crud.user.get_by_email(db, email=FIRST_SUPERUSER)  # 2
        if not user:
            user_in = schemas.UserCreate(
                full_name="Initial Super User",
                email=FIRST_SUPERUSER,
                is_superuser=True,
            )
            user = crud.user.create(db, obj_in=user_in)
        else:
            logger.warning(
                "Skipping creating superuser. User with email "
                f"{FIRST_SUPERUSER} already exists. "
            )
        if not user.recipes:
            for recipe in RECIPES:
                recipe_in = schemas.RecipeCreate(
                    label=recipe["label"],
                    source=recipe["source"],
                    url=recipe["url"],
                    submitter_id=user.id,
                )
crud.recipe.create(db, obj_in=recipe_in) # 3init_db는Sessionobject(sqlalchemy로부터온)만을 인자로 받음.(import 참조)- user를 정의하고,
submitter를 initalrecipe에 할당 app/recipe_data.pyiterating 및RecipeCreateschema 적용
이하 pip install poetry, install sqlite 등 과정 생략
IV. API Endpoints에 모든것들 넣기
-app/main.py 확인 시 db argument를 추가로 받는 것을 확인 가능
from fastapi import Request, Depends
# skipping...

@api_router.get("/", status_code=200)
def root(
    request: Request,
    db: Session = Depends(deps.get_db), # db 인자, Depends class 사용
) -> dict:
    """
    Root GET
    """
    recipes = crud.recipe.get_multi(db=db, limit=10)
    return TEMPLATES.TemplateResponse(
        "index.html",
        {"request": request, "recipes": recipes},
    )

# skippping...- Fastapi는 Dependency Injection이 간편하다.
- dependency를 특정하는Depends함수 임포트하여 사용
db: Session = Depends(deps.get_db)
Dependency injection이란? 🤔
- 함수에서 작동해야하는 것들을 선언하는 방법(db를 선언한 것처럼)
deps.py: dependency 추가한 또다른 모듈
from typing import Generator

from app.db.session import SessionLocal  # 1


def get_db() -> Generator:
    db = SessionLocal()  # 2
    try:
        yield db  # 3
    finally:
db.close() # 4app/db/session.py로부터SessionLocalclass 임포트db인스턴스 생성- lazy execution 을 활용하는
yield문을 통해 database와 효율적인 connection 유지 finally구문을 통해 DB session을 닫아놓음,
Database 호출!
@api_router.get("/recipe/{recipe_id}", status_code=200, response_model=Recipe)  # 1
def fetch_recipe(
    *,
    recipe_id: int,
    db: Session = Depends(deps.get_db),
) -> Any:
    """
    Fetch a single recipe by ID
    """
    result = crud.recipe.get(db=db, id=recipe_id)  # 2
    if not result:
        # the exception is raised, not returned - you will get a validation
        # error otherwise.
        raise HTTPException(
            status_code=404, detail=f"Recipe with ID {recipe_id} not found"
        )

return result-
response_model=Recipe가 이제는 pydantic modelRecipe를 인자로 받는다. 이는 ORM call과 함께 작동한다는 것을 의미한다. -
crud유틸리티 함수 이용 -> db session 객체를 dependency로서 통과시키면서recipe_id로 recipe를 호출!
** CRUD utility 함수로 endpoint의 db query가 조절되었음.