6장 내비게이션
-
앱을 만들기 전에 시간을 내서 내비게이션과 라우팅을 어떻게 처리할지 계획해야 합니다.
-
리액트 네이티브에서 사용할 수 있는 대표적인 내비게이션 라이브러리
-
React Navigation (얘 사용)
: 자바스크립트로 구현된 라이브러리
-
React Native Navigation
: 네이티브 방식으로 구현된 라이브러리
-
-
모바일에서 사용하는 세 가지 주요 내비게이터
-
탭 내비게이션
: 화면 상단이나 하단에 탭이 있습니다. 탭을 누르면 탭과 연결된 화면으로 이동합니다.
- 예) createBottomTabNavigator는 화면의 하단에 탭을 만듭니다.
-
스택 내비게이션
: 현 화면에서 다른 화면으로 이동합니다. 스택에 있는 이전 화면으로 이동하거나 다음 화면으로 이동할 수 있습니다.
스택 내비겡션은 보통 화면 이동 시 애니메이션도 함께 구현합니다.
- 예) createStackNavigator 함수를 이용해 스택 내비게이션을 만듭니다.
-
드로어 내비게이션
: 화면의 왼쪽 또는 오른쪽에서 나오는 메뉴이며, 옵션 목록을 표시합니다.
옵션을 선택하면 드로어가 닫히고 새 화면으로 이동합니다.- 예) createDrawerNavigarot 함수를 이용해서 드로어 내비게이션을 만듭니다.
→ 어떤 내비게이션 (위의 세가지 혹은 이들의 조합)을 사용하는가에 따라 라우팅이 달라집니다.
-
-
리액트 내비게이션 라이브러리가 관리하는 모든 라우트나 화면은 내비게이션 상태를 제어하기 위해서 navigation 속성을 사용할 수 있습니다.
1. 리액트 네이티브 내비게이션과 웹 내비게이션의 비교
웹에서의 내비게이션과 리액트 네이티브에서의 내비게이션 방법이 상당히 다르므로 내비게이션은 리액트 네이티브를 새로 시작한 개발자들을 힘들게 하는 부분이다.
-
웹에서는 URL을 이용해 내비게이션을 처리한다.
- 새로운 화면으로 이동하는 라우팅은 프레임워크나 개발 환경에 따라서 다양한 방법이 있겠지만, 보통 사용자를 새 URL로 보내는 방법을 사용하며,
필요하다면 URL에 파라미터들을 추가하기도 한다.
- 새로운 화면으로 이동하는 라우팅은 프레임워크나 개발 환경에 따라서 다양한 방법이 있겠지만, 보통 사용자를 새 URL로 보내는 방법을 사용하며,
-
리액트 네이티브에서 라우팅은 컴포넌트가 기준이 된다.
- 내비게이터를 이용해 컴포넌트를 로드하거나 표시한다.
-
라우트 간에 데이터와 state를 유지하고, 앱의 다른 곳에서 정의된 메서드에 접근하는 방법이 필요할 수 있으므로, 데이터와 메서드를 공유할 수 있는 계획을 미리 세워야 한다.
-
데이터와 메서드를 다른 곳에서 사용하기 위해서 내비게이션이 전의되는 앱의 최상위 단계에서 데이터와 메서드를 관리한다.
-
리덕스 또는 MobX와 같은 상태(state) 관리 라이브러리를 이용할 수도 있습니다.
-
2. 내비게이션이 구현된 앱 만들기
-
Cities라는 앱을 만든다.
-
이 앱은 여행 관련 앱으로 여러분이 가봤거나 가보고 싶은 도시를 기록하는 앱이다.
-
또한, 여러분이 방문하고 싶은 도시의 장소를 추가할 수도 있다.
-
-
주 내비게이션은 탭으로 이루어졌고, 탭 중의 하나에 스택 내비게이션이 포함되어 있다.
-
왼쪽 탭에서는 여러분이 만든 도시 목록을 보여주며, 오른쪽 탭에는 새로운 도시를 추가할 수 있는 폼이 포함되어 있다.
-
왼쪽 탭에서 각 도시를 눌러 도시를 확인할 수도 있고, 각 도시 내에 있는 주요 장소를 보거나 추가할 수도 있다.

-
1. 새 리액트 네이티브 앱 설치
(npx) react-native init CitiesApp
- expo의 경우
expo init CitiesApp
2. 라이브러리 설치
-
React Navigation
- 내비게이션을 위한 라이브러리
-
uuid
- 각 도시를 구별하기 위해서 각 도시에 고유 UI를 부여하기 위해 사용
만들어진 프로젝트로 이동해서 다음과 같은 모듈들을 설치한다.
cd CitiesApp
npm install --save react-native-gesture-handler react-native-reanimated
npm install --save uuid react-navigation react-navigation-stack react-navigation-tabs
- react-navigation 모듈은 4버전부터 각 기능별로 모듈이 분리되어 있기 때문에 여러 모듈을 개별적으로 설치하는 방식으로 추가해야만 한다.
3. 컴포넌트 생성
-
앱의 루트 경로에 src라는 새 메인 디렉토리를 만든다.
- 이 src 디렉토리에는 앱에서 사용하는 대부분의 새 코드가 들어간다.
-
src 디렉토리에 Cities, AddCity, components라는 세 개의 하위 디렉토리를 추가한다.
-
앱에서 이용하는 주요 내비게이션은 탭이기 때문에 두 개의 중 컴포넌트 (Cities와 AddCity)로 분리하고 각각의 탭을 갖도록 합니다.
-
AddCity 폴더에는 AddCity.js라는 하나의 컴포넌트만 존재한다.
-
Cities 폴더에는 두 개의 컴포넌트가 있다.
-
Cities.js는 도시 목록을 보여줄 때 사용한다.
-
City.js는 개별 도시를 표시할 때 사용한다.
-
-
-
components 폴더에는 재사용 가능한 컴포넌트를 넣게 된다.
- 이 예제에서는 하나의 컴포넌트만 포함한다.
-
src/index.js와 src/theme.js 파일도 존재한다.
-
index.js 파일에는 모든 내비게이션 설정 정보를 가지도록 할 것이다.
-
theme.js 파일에는 모든 테마 관련 설정을 저장하는데 여기서는 앱의 테마 색상 정보가 들어 있다.
-
<앱의 테마 색상을 정의하는 theme.js 만들기>(src/theme.js)
const colors = {
   primary: '#1976D2'
}

export{
  colors
}- 앱 전체에서 필요에 따라 여기서 정의한 색상(primary color)을 가져올 수 있으며, 색상을 변경할 때도 여기 한 부분만 수정하면 됩니다.
<src/index.js 내비게이션 설정 만들기>
import Cities from './Cities/Cities'
import City from './Cities/City'
import AddCity from './AddCity/AddCity'

import {colors} from './theme'

import {createAppContainer} from 'react-navigation'
import {createStackNavigator} from 'react-navigation-stack'
import {createBottomTabNavigator} from 'react-navigation-tabs'

const CitiesNav = createStackNavigator({
    //두 개의 라우터
    Cities: {screen: Cites},
    City: {screen: City}
},
{
    //options 객체
    navigationOptions:{
       headerStyle:{
        backgroundColor: colors.primary
       },
       headerTintColor: '#fff'
    }
 })

const AppTabs = createBottomTabNavigator({
    Cities: {screen: CitiesNav},
    AddCity: {screen: AddCity}
})


//내비게이션 가능한 컴포넌트
const Tabs = createAppContainer(AppTabs)

export default Tabs
-
options 객체를 생성하면, 스택 내비게이터는 자동으로 각 라우트 상단에 헤더를 만듭니다.
-
헤더에는 보통 현재 라우트의 제목과 뒤로가기 버튼과 같은 버튼이 들어간다.
-
여기서는 options 객체에 배경색과 헤더의 엷은 색을 정의하였다.
-
-
첫 번째 내비게이션 인스턴스를 생성하는 createStackNavigator는 두 개의 인수를 사용한다.
-
하나는 라우트 설정 관련 인수이고, 또 다른 하나는 내비게이션에 적용할 스타일 설정 관련 인수이다.
-
여기서는 첫 번째 인수에 두 개의 라우트를 전달하고, 두 번째 인수에 options 객체를 전달하였다.
-
<내비게이션 설정을 사용하는 App.js 파일 수정하기>
- App.js는 내비게이션 컴포넌트를 렌더링할 뿐 아니라, 앱 전체에서 사용하룻 있는 메서드와 데이터를 포한하고 제어한다.
import { StatusBar } from 'expo-status-bar';
import React, {Component} from 'react';
import { Platform, StyleSheet, Text, View } from 'react-native';

//src.index.js의 내비게이터 가져오기
import Tabs from './src'

export default class App extends Component{
  state = {
    //cities 배열 만들고 초기화하기
    cities: []
  }

  //state에 저장된 cities 도시 목록에 새 도시 추가
  addCity = (city) => {
    const cities = this.state.cities
    cities.push(city)
    this.setState({cities})
  }

  //선택된 도시에 속한 장소 배열에 새 장소를 추가
  addLocation = (location, city) => {
    const index = this.state.cities.findIndex(item => {return item.id === city.id})

    const chosenCity = this.state.cities[index]

    chosenCity.locations.push(location)

    const cities = [
      ...this.state.cities.slice(0, index),
      chosenCity,
      ...this.state.cities.slice(index + 1)
    ]

    this.setState({
      cities
    })
  }

  render(){
    return(
      <Tabs
        screenProps={{
          cities: this.state.cities,
          addCity: this.addCity,
          addLocation: this.addLocaiton
        }}
      />
    );
  }
}
-
App.js의 세가지 주요 기능
-
앱의 초기 state를 지정한다.
-
cities라는 빈 배열을 만든다.
- 각 도시는 객체이며 이름, 나라, I, 장소 배열을 갖는다.
-
addCity 메서드는 state에 저장된 cities 배열에 새 도시를 추가한다.
-
addLocation 메서드는 장소를 추가하려는 도시를 확인해서 도시 정보를 업데이트하고 변경된 데이터로 state를 재지정한다.
-
-
리액트 내비게이션은 내비게이터가 이용하는 모든 라우트에 이 메서드와 state를 전달할 수 있다.
-
참조하려는 모든 정보를 포함하는 screenProps라는 속성을 통해서 이 메서드와 state를 전달한다.
-
이후 모든 라우트에서 this.props.screenProps를 이용해서 이 데이터나 메서드를 참조할 수 있다.
-
<CenterMessage 컴포넌트 만들기> (src/components/CenterMessage.js)
-
이 컴포넌트는 배열이 빈 경우에 메세지를 표시한다.
-
예로, 앱을 처음 실행하면 화면에 표시할 도시 목록이 없으므로 빈화면으로 남겨두지 않고 메시지를 표시한다.
import React from 'react'
import {Text, View, StyleSheet} from 'react-native'
import {colors} from '../theme'
const CenterMessage = ({message}) => {
<View style={styles.emptyContainer}>
<Text style={styles.message}>
{message}
</Text>
</View>
}
const styles = StyleSheet.create({
emptyContainer:{
padding: 10,
borderBottomWidth:2,
borderBottomColor: colors.primary
},
message:{
alignSelf: 'center',
fontSize: 20
}
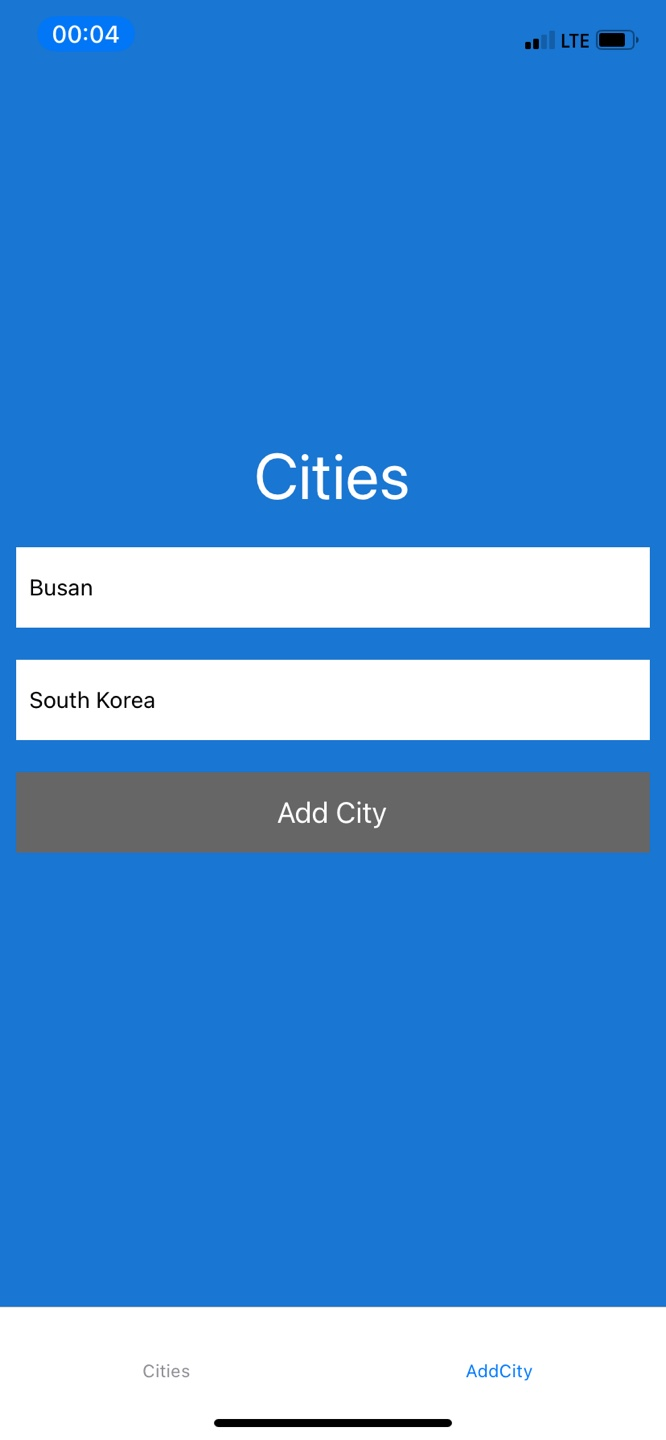
})<AddCity 탭 기능>(src/AddCity/AddCity.js)
-
cities 배열에 새 도시를 추가하는 컴포넌트
-
이 컴포넌트에는 두 개의 텍스트 입력 폼이 있다.
-
한 텍스트 입력에는 도시 이름
-
다른 텍스트 입력에는 나라 이름을 지정한다.
-
-
이 컴포넌트에 있는 submit 버튼을 누르면, App.js에 정의된 addCity 메서드를 호출한다.
import React, {Component} from 'react';
import {
    View,
    Text,
    StyleSheet,
    TextInput,
    TouchableOpacity,
}from 'react-native'

import uuidV4 from 'uuid/v4'

export default class AddCity extends Component{
    //도시 이름과 나라 이름을 저장하는 state
    //초깃값은 빈 문자열
    state = {
        city: '',
        country: ''
    }

    //도시 또는 나라의 이름 값으로 state를 업데이트
    onChangeText = (key, value) => {
        this.setState({[key]: value})
    }

    //이 컴포넌트에서 대부분의 기능을 처리
    submit = () => {
        if(this.state.city === '' || this.state.country === '') alert('please complete form');

        const city = {
            city: this.state.city,
            country: this.state.country,
            id: uuidV4(),
            locations: []
        }
        this.props.screenProps.addCity(city)
        this.setState({
            city: '',
            country: ''
        }, () => {
            this.props.navigation.navigate('Cities')
        })
    }

    render(){
        return(
            <View style={StyleSheet.container}>
                <Text style={StyleSheet.heading}>CIties</Text>

                <TextInput
                    placeholder='City name'
                    onChangeText={val => this.onChangeText('city'. val)}
                    style={styles.input}
                    value={this.state.city}
                />
                <TextInput
                    placeholder='Country name'
                    onChangeText={val => this.onChangeText('country', val)}
                    style={styles.input}
                    value={this.state.country}
                />

                <TouchableOpacity onPress={this.submit}>
                    <View style={styles.button}>
                        <Text style={styles.buttonText}>
                            Add City
                        </Text>
                    </View>
                </TouchableOpacity>
            </View>
        )
    }
}
-
먼저 city나 country가 빈 문자열이 아닌지 확인한다.
- 이 둘 중 하나 또는 둘 다 빈 값이면, 데이터를 저장할 필요가 없으므로 아무 작업도 하지 않는다.
-
다음으로 cities 배열에 추가할 도시를 저장하는 객체를 생성한다.
-
state의 city와 country에 저장된 값에 uuidV4 메서드를 이용해 ID 값을 부여
-
비어 있는 locations 배열을 추가한다.
-
-
this.props.screenProps.addCity를 호출해서 새 도시 정보를 전달한다.
- 이후에 state에 저장된 값을 초기화하기 위해 state를 재지정 한다.
-
마지막으로 this.props.navigation.navigate를 호출하고 이동할 라우트 문자열을 전달해서, 새로 추가된 도시 목록을 표시하는 Cities 탭으로 이동한다.
- 이동할 라우트 문자열은 Cities이다.
-
내비게이터 안에서 동작하는 모든 컴포넌트는 자동으로 두 개의 속성 (screenProps와 navigation)을 참조할 수 있다.
-
submit 메서드는 this.props.screenProps.addCity를 호출해서 App.js에 정의된 addCity 메서드를 호출
-
this.props.navigation.navigate를 호출해서 navigation prop을 참조
-
navigate는 리액트 내비게이션에서 각 라우트 사이를 이동할 때 사용한다.
-
<AddCity 탭 (스타일)>(src/AddCity/AddCity.js)
const styles = StyleSheet.create({
    button:{
        height: 50,
        backgroundColor: '#666',
        justifyContent:'center',
        alignItems: 'center',
        margin: 10
    },
    buttonText:{
        color:'white',
        fontSize:18
    },
    heading:{
        color:'white',
        fontSize:40,
        marginBottom: 10,
        alignSelf: 'center'
    },
    container:{
        backgroundColor: colors.primary,
        flex: 1,
        justifyContent: 'center'
    },
    input: {
        margin: 10,
        backgroundColor:'white',
        paddingHorizontal:8,
        height: 50
    }
})
<Cities 라우트(기능)>
import React from 'react'
import {
    View,
    Text,
    StyleSheet,
    TouchableWithoutFeedback,
    ScrollView,
}from 'react-native'

import CenterMessage from '../components/CenterMessage'

import {colors} from '../theme'

export default class Cities extends React.Component{
    //클래스에 static navigationOptions 속서을 선언
    //이 라우트의 설정
    static navigationOptions = {
        title: 'Cities',
        headerTitleStyle:{
            color:'white',
            fontSize: 20,
            fontWeight: '400'
        }
    }

    //navigation.navigate에 두번째 인수로 도시를 전달
    navigate = (item) => {
        this.props.navigation.navigate('City', {city: item})
    }

    render(){

        //screenProps props를 비구조할당해서 cities 배열 참조
        const {screenProps: {cities}} = this.props

        return (
            <ScrollView contentContainerStyle={[!cities.length && {flex:1}]}>
                <View style={[!cities.length && {justifyContent: 'center', flex:1}]}>
                    {
                        !cities.length && <CenterMessage message='No saved cities!' />
                    }
                    {
                        cities.map((item, index) => (
                            <TouchableWithoutFeedback onPress={() => this.navigate(item)} key={index}>
                                <View style={StyleSheet.cityContainer}>
                                    <Text style={styles.city}>
                                        {item.city}
                                    </Text>
                                    <Text style={styles.country}>
                                        {item.country}
                                    </Text>

                                </View>
                            </TouchableWithoutFeedback>
                        ))
                    }
                </View>
            </ScrollView>
        );
    }
}-
먼저 CenterMessage를 가져온다.
-
리액트 내비게이션에서는 라우트 내에서 내비게이션의 일부 옵션을 조정할 방법이 있다.
-
클래스에 static으로 navigationOptions 속성을 선언하고, 조정할 라우트의 설정을 선언한다.
-
라우트 설정을 조정해서 title과 headerTitleSytle 속성을 선언해서 라우트 제목과 제목 스타일을 지정한다.
-
-
navigation 메서드
-
this.props.navigation.navigate를 호출하고 City 라우트에서 참조할 라우트 이름과 도시 정보 객체를 전달한다.
-
두 번째 인수로 도시 정보 객체를 전달하는데 City 라우트의 props.navigation.state.params에서 전달된 도시 정보 객체를 참조할 수 있게 도니다.
-
-
render 메서드
-
cities 배열을 참조해서 구조 분해 할당 처리한다.
-
cities 배열의 상태를 확인해서 배열이 빈 상태면 도시 목록이 없다는 안내 메시지를 표시한다.
-
배열에 도시 목록이 저장되어 있으면, 배열에 포함된 모든 도시를 매핑해서 도시 이름과 나라 이름을 보여준다.
-
- TouchableWithoutFeedback 컴포넌트에 navigate 메서드를 연결해 선택한 도시로 이동할 수 있게 한다.
<Cities 라우트(스타일)>
const styles = StyleSheet.create({
    cityContainer:{
        padding: 10,
        borderBottomWidth: 2,
        borderBottomColor: colors.primary
    },
    city:{
        fontSize: 20,
    },
    country:{
        color: 'rgba(0, 0, 0, .5)'
    },

})
<City 라우트(기능)>
-
각 도시에 포함된 주요 장소를 저장하고 새 장소를 추가할 수 있는 폼이 들어간다.
-
이 컴포넌트에서는 screenProps에 있는 도시를 참조할 수 있고, screenProps의 addLocation 메서드를 이용해서 도시에 새 장소를 추가한다.
import React from 'react'
import {
    View,
    Text,
    StyleSheet,
    TouchableWithoutFeedback,
    ScrollView,
}from 'react-native'
import CenterMessage from '../components/CenterMessage'
import {colors} from '../theme'
export default class Cities extends React.Component{
    //클래스에 static navigationOptions 속서을 선언
    //이 라우트의 설정
    static navigationOptions = {
        title: 'Cities',
        headerTitleStyle:{
            color:'white',
            fontSize: 20,
            fontWeight: '400'
        }
    }
    //navigation.navigate에 두번째 인수로 도시를 전달
    navigate = (item) => {
        this.props.navigation.navigate('City', {city: item})
    }
    render(){
        //screenProps props를 비구조할당해서 cities 배열 참조
        const {screenProps: {cities}} = this.props
        return (
            <ScrollView contentContainerStyle={[!cities.length && {flex:1}]}>
                <View style={[!cities.length && {justifyContent: 'center', flex:1}]}>
                    {
                        !cities.length && <CenterMessage message='No saved cities!' />
                    }
                    {
                        cities.map((item, index) => (
                            <TouchableWithoutFeedback onPress={() => this.navigate(item)} key={index}>
                                <View style={StyleSheet.cityContainer}>
                                    <Text style={styles.city}>
                                        {item.city}
                                    </Text>
                                    <Text style={styles.country}>
                                        {item.country}
                                    </Text>
                                </View>
                            </TouchableWithoutFeedback>
                        ))
                    }
                </View>
            </ScrollView>
        );
    }
}
const styles = StyleSheet.create({
    cityContainer:{
        padding: 10,
        borderBottomWidth: 2,
        borderBottomColor: colors.primary
    },
    city:{
        fontSize: 20,
    },
    country:{
        color: 'rgba(0, 0, 0, .5)'
    },

})
-
먼저 navigationOptions 속성을 만든다.
- 단순히 객체로 선언하지 않고 객체를 반환하기 위해 콜백 함수를 이용합니다.
navigation이 전달한 도시 정보를 참조할 수 있도록 props를 참조할 수 있어야 하기 때문이다. - 라우트의 제목으로 도시 이름을 쓰기 때문에 도시 이름을 알아야 합니다.
- 단순히 객체로 선언하지 않고 객체를 반환하기 위해 콜백 함수를 이용합니다.
-
addLocation 메서드는 this.props.navigation.state.params에서 전달된 도시 정보 객체를 비구조화해서 나중에 함수에서 사용할 수 있도록 합니다.
-
다음으로는 장소의 이름과 정보를 가지는 location 객체를 생성합니다.
- this.props.screenProps.addLocation을 호출해서 location을 현재 보고 있는 도시 정보에 추가하고 다시 state를 지정합니다.
-
다시 한번 navigation의 state를 비구조 할당합니다.
- 도시 정보에 있는 location 객체들을 매핑하고, 새로운 장소에 도시를 추가할 때 인수로 사용하기 위해서 도시 정보 객체가 필요합니다.
- 최종적으로 도시 정보의 배열을 매핑해서 선택된 도시의 이름과 정보를 표시하는 컴포넌트를 반환하고, 두 개의 텍스트 입려과 버튼으로 만들어진 폼을 생성한다.
3. 데이터 유지하기
앱을 다시 실행하면 지금까지 저장한 도시가 모두 사라지는 것을 알 수 있습니다.
데이터를 메모리에 저장했기 때문입니다.
-
AsyncStorage를 이용해서 state를 유지해서 사용자가 앱을 종료하거나 화면을 새로 고쳐도 앱의 데이터가 계속 남아 있도록 만들어 보겠습니다.
AsyncStorage는 0.60버전에서는 Deprecated 된 상태이므로 'npm install @react-native-community/async-storage' 를 이용한 추가 설치가 필요하다.
-
App.js 파일에서 App 컴포넌트에 다음 내용을 추가한다.
1) 새 도시를 추가할 때마다 AsyncStorage에 cities 배열 저장하기
2) 도시에 새 장소를 추가할 때마다 AsyncStorage에 cities 배열 저장하기
3) 앱을 실행할 때, AsyncStorage를 확인해서 저장된 도시가 있는지 확인하고 저장된 도시가 있을 때 state를 저장된 도시로 업데이트 하기
4) AsyncStorage는 저장할 값으로 문자열만 사용할 수 있다. 따라서 문자열이 아닌 값을 저장할 때, JSON.stringify를 호출해 문자열로 변환해야 한다.
- AsyncStorage에 저장된 값을 사용하기 전에 JSON.parse를 이용해 저장된 값을 파싱해서 사용한다.
<App.js 파일을 다음과 같이 수정한다.>
- AsyncStorage를 가져오고 key 변수를 만든다.
import React, { Component } from 'react';
import {
  Platform,
  StyleSheet,
  Text,
  View,
  AsyncStorage
} from 'react-native';

import Tabs from './src'

const key = 'state'

const initialState = [{
  city: 'Paris',
  country: 'France',
  id: 0,
  locations: []
},
{
  city: 'Tokyo',
  country: 'Japan',
  id: 1,
  locations: []
}]
- AsyncStorage를 확인하고 key 변수에 선언된 값으로 AsyncStorage에 저장된 도시 목록을 가져오는 componentDidMount 함수를 만든다
...

export default class App extends Component {
  state = {
    cities: []
  }
  async componentDidMount() {
    try {
      let cities = await AsyncStorage.getItem(key)
      cities = JSON.parse(cities)
      this.setState({ cities })
    } catch (e) {
      console.log('error from AsyncStorage: ', e)
    }
  }

...
- addCity메서드에서 새 cities 배열을 만든 후에 AsyncStorage에 cities 배열 저장하기
addCity = (city) => {
    const cities = this.state.cities
    cities.push(city)
    this.setState({ cities })
    AsyncStorage.setItem(key, JSON.stringify(cities))
      .then(() => console.log('storage updated!'))
      .catch(e => console.log('e: ', e))
  }
- addLocation 메서드를 수정해서 setState를 호출한 후에 AsyncStorage에 cities 배열에 저장하기
 addLocation = (location, city) => {
    const index = this.state.cities.findIndex(item => {
      return item.id === city.id
    })
    const chosenCity = this.state.cities[index]
    chosenCity.locations.push(location)
    const cities = [
      ...this.state.cities.slice(0, index),
      chosenCity,
      ...this.state.cities.slice(index + 1)
    ]
    this.setState({
      cities
    }, () => {
      AsyncStorage.setItem(key, JSON.stringify(cities))
        .then(() => console.log('storage updated!'))
        .catch(e => console.log('e: ', e))
      })
  }
4. DrawerNavigator를 이요해서 드로어 내비게이션 만들기
-
createDrawerNavigator 함수를 이용해서 드로어 내비게이션을 만들어 봅니다.
-
먼저 사용할 라우트를 정의합니다.
import Page1 from './routeToPage1'
import Page2 from './routeToPage2'
- 다음으로 내비게이터에서 사용할 화면을 정의합니다.
const screens = {
    Page1: {screen: Page1},
    Page2: {screen: Page2}
}- 이제 화면 설정을 이용해서 내비게이터를 정의하고 앱에서 사용할 수 있습니다.
const DrawerNav = createDrawerNavigator(screens)

//somewhere in our app

<DrawerNav />