1. 서비스 (Service) 란?
서비스를 사용하는 목적
-
파드의 IP 주소는 변경된다.
-
파드의 IP 주소를 대표하기 위해 서비스라는 오브젝트가 존재한다.
-
동적으로 변하는 Pod에 고정적으로 접근할 때 사용하는 방법이 Service 이다.
-
-
쿠버네티스의 기본 오브젝트로 수신한 트래픽을 여러 파드로 로드밸런싱(부하 분산)하는 기능을 제공한다.
-
서비스의 4종류
-
ClusterIP
-
NodePort
-
LoadBalancer
-
ExternalName
-
ClusterIP
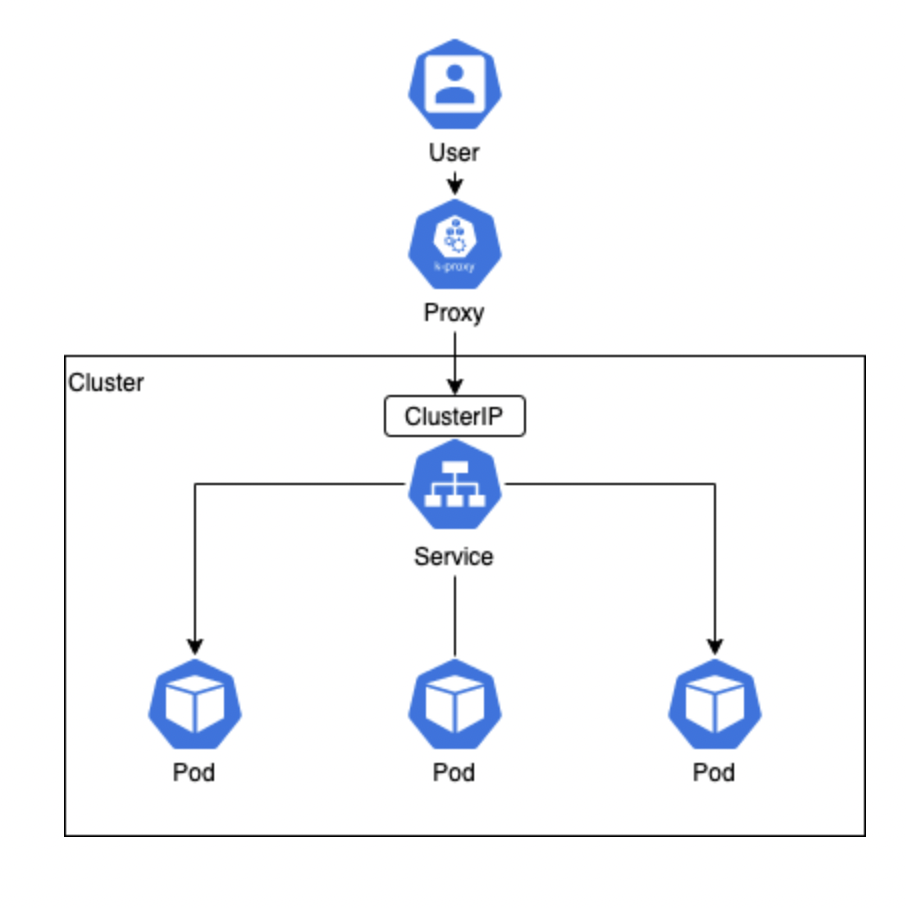
서비스IP = 대표 IP 주소 = ClusterIP
- 클러스터 내부에서 내부 DNS 에 등록한 이름으로 특정 파드 집합에 요청을 전송
-
서비스를 만들 때 서비스 타입을 명시하지 않으면 ClusterIP로 만들어진다.
-
클라이언트는 서비스 이름에 대한 대표 IP를 내부 DNS에 물어서 반환받고, 전달받은 대표 IP로 서비스에 요청한다.
-
서비스에 의해 할당되는 IP 주소에는 Cluster IP와 External IP가 존재한다.
-
Cluster I
- 클러스터 안의 Pod끼리 통신하기 위한 Private IP
-
External IP
- 클러스터 외부에 공개하는 IP 주소
-
-
외부에서는 접근할 수 없으로 port forwarding 또는 proxy를 통해 접근
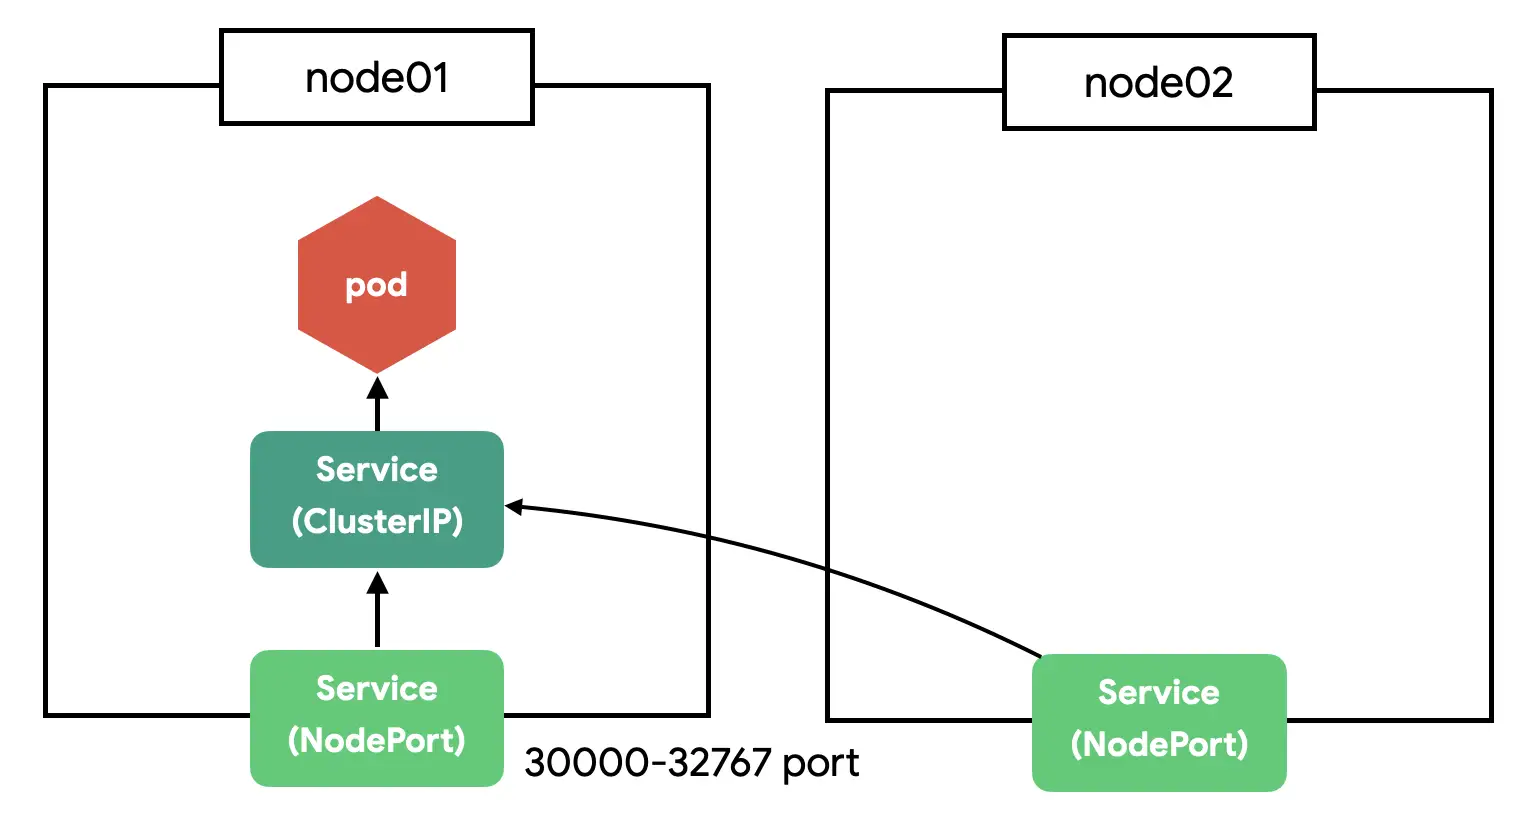
NodePort

노드의 IP 주소에 공개포트가 열린다. 클러스터 외부에서 요청 보낼수있음.
- 각 노드마다 IP 주소 + 포트 번호 가 있다.
-
ClusterIP + 노드의 IP 주소에 공개 포트가 열린다.
- 공개 포트의 범위는 30000 ~ 32767
-
클라이언트가 노드의 IP와 포트로 전송한 요청은 최종적으로 파드에 전달
-
NodePort 타입의 서비스를 생성하면 클러스터의 모든 노드에 지정한 포트가 열린다
-
NodePort는 쉽고 편리하게 설정이 가능하지만 정식 서비스에서 사용하는 것은 추천하지 않는다
LoadBalancer

-
LoadBalancer는 로드밸런서와 연동하여 파드의 애플리케이션을 외부에 공개한다.
-
LoadBalancer는 NodePort를 사용하며 ClusterIP도 자동적으로 생성된다.
NodePort Type Service+ClusterIP Type Service=LoadBalancer Type Service
-
퍼블릭 클라우드에서는 각 업체가 제공하는 로드밸런서가 연동된다.
-
AWS, GCP, Azure 등의 쿠버네티스 플랫폼을 사용할 경우 외부 IP를 지원해주는 플러그인이 설치되어있어 Load Balancer 타입의 서비스를 생성할 경우 외부에서 접속할 IP를 알아서 만들어줍니다.
ExternalName
-
지금까지 살펴본 것들과 반대로, 파드에서 k8s 클러스터 외부의 엔드포인트에 접속하기 위한 이름을 해결해준다.
- ex) 퍼블릭 클라우드의 DB , API 등
-
ExternalName는 서비스의 이름과 외부 DNS 이름의 매핑을 내부 DNS에 설정한다.
-
이를 통해 파드는 서비스의 이름으로 외부 네트워크의 엔드포인트에 접근할 수 있다. 단 포트번호는 지정할 수 없다.
2. 서비스와 파드 연결
- service1deployment.yml
## 디플로이먼트
apiVersion: apps/v1
kind: Deployment
metadata:
  name: web-deploy
spec:
  replicas: 3
  selector:           # deployment - pod 대응용
    matchLabels:
      app: web
  template:           # 여기서부터 파드 템플릿
    metadata:
      labels:
        app: web      # 파드의 라벨
    spec:
      containers:
      - name: nginx
image: nginx:latest- service1.yml
## 서비스
apiVersion: v1
kind: Service
metadata:
  name: web-service # 네임스페이스 내 유일한 이름을 설정. 여기서 설정한 이름은 내부 DNS에 등록, IP 주소 해결에 사용
spec:                 # type을 생략하여 ClusterIP가 적용된다.
  selector:           # service - 백엔드 pod와 연결
    app: web
  ports:
  - protocol: TCP
    port: 80 # 서비스에 의해 공개되는 포트번호.
PS C:\Users\ICTUSER> kubectl get all
NAME                 TYPE        CLUSTER-IP   EXTERNAL-IP   PORT(S)   AGE
service/kubernetes   ClusterIP   00.00.0.0    <none>        443/TCP   2s
PS C:\Users\ICTUSER> kubectl apply -f service1deployment.yml
deployment.apps/web-deploy created
PS C:\Users\ICTUSER> kubectl apply -f service1.yml
service/web-service created
PS C:\Users\ICTUSER> kubectl get all
NAME                              READY   STATUS    RESTARTS   AGE
pod/web-deploy-5d9f7ffff8-hz82f   1/1     Running   0          23s
pod/web-deploy-5d9f7ffff8-r2q7x   1/1     Running   0          23s
pod/web-deploy-5d9f7ffff8-tkjx4   1/1     Running   0          23s

NAME                  TYPE        CLUSTER-IP     EXTERNAL-IP   PORT(S)   AGE
service/kubernetes    ClusterIP   00.00.0.0      <none>        443/TCP   46s
service/web-service   ClusterIP   00.000.0.000   <none>        80/TCP    15s

NAME                         READY   UP-TO-DATE   AVAILABLE   AGE
deployment.apps/web-deploy   3/3     3            3           23s

NAME                                    DESIRED   CURRENT   READY   AGE
replicaset.apps/web-deploy-5d9f7ffff8   3         3         3       23s
서비스 접속과 부하분산 (ClusterIP일 경우)
PS C:\Users\ICTUSER> kubectl run -it busybox --restart=Never --rm --image=busybox sh
If you don't see a command prompt, try pressing enter.
/ #
/ #
/ # env |grep WEB_SERVICE
WEB_SERVICE_SERVICE_PORT=80
WEB_SERVICE_PORT=tcp://10.108.4.193:80
WEB_SERVICE_PORT_80_TCP_ADDR=10.108.4.193
WEB_SERVICE_PORT_80_TCP_PORT=80
WEB_SERVICE_PORT_80_TCP_PROTO=tcp
WEB_SERVICE_PORT_80_TCP=tcp://10.108.4.193:80
WEB_SERVICE_SERVICE_HOST=10.108.4.193
/ # exit
pod "busybox" deleted

\

PS C:\Users\ICTUSER> kubectl run -it busybox --restart=Never --rm --image=busybox sh
If you don't see a command prompt, try pressing enter.
/ #
/ #
/ # for pod in $(kubectl get pods |awk 'NR>1 {print $1}'|grep web-deploy); do kubectl exec $pod -- /bin/
sh -c "hostname>/usr/share/nginx/html/index.html"; done
sh: kubectl: not found
/ #
/ # while true; do wget -q -O - http://web-service; sleep 1; done
<!DOCTYPE html>
<html>
<head>
<title>Welcome to nginx!</title>
<style>
html { color-scheme: light dark; }
body { width: 35em; margin: 0 auto;
font-family: Tahoma, Verdana, Arial, sans-serif; }
</style>
</head>
<body>
<h1>Welcome to nginx!</h1>
<p>If you see this page, the nginx web server is successfully installed and
working. Further configuration is required.</p>

<p>For online documentation and support please refer to
<a href="http://nginx.org/">nginx.org</a>.<br/>
Commercial support is available at
<a href="http://nginx.com/">nginx.com</a>.</p>

<p><em>Thank you for using nginx.</em></p>
</body>
</html>
세션 어피니티
- 클라이언트 IP별로 전송 파드 고정
- service_sa.yml
## 서비스
apiVersion: v1
kind: Service
metadata:
  name: web-service # 네임스페이스 내 유일한 이름을 설정. 여기서 설정한 이름은 내부 DNS에 등록, IP 주소 해결에 사용
spec:                 # type을 생략하여 ClusterIP가 적용된다.
  selector:           # service - 백엔드 pod와 연결
    app: web
  ports:
  - protocol: TCP
    port: 80 # 서비스에 의해 공개되는 포트번호.
	sessionAffinity: ClientIP #클라이언트 IP 주소에 따라 파드 결정.
PS C:\Users\ICTUSER> kubectl apply -f service_sa.yml
service/web-service configured
PS C:\Users\ICTUSER> kubectl get po
NAME                          READY   STATUS    RESTARTS   AGE
web-deploy-5d9f7ffff8-hz82f   1/1     Running   0          34m
web-deploy-5d9f7ffff8-r2q7x   1/1     Running   0          34m
web-deploy-5d9f7ffff8-tkjx4   1/1     Running   0          34m
PS C:\Users\ICTUSER> kubectl run -it busybox --restart=Never --rm --image=busybox sh
If you don't see a command prompt, try pressing enter.
/ #
/ #
/ # while true; do wget -q -O - http://web-service; sleep 1;done
<!DOCTYPE html>
<html>
<head>
<title>Welcome to nginx!</title>
<style>
html { color-scheme: light dark; }
body { width: 35em; margin: 0 auto;
font-family: Tahoma, Verdana, Arial, sans-serif; }
</style>
</head>
<body>
<h1>Welcome to nginx!</h1>
<p>If you see this page, the nginx web server is successfully installed and
working. Further configuration is required.</p>

<p>For online documentation and support please refer to
<a href="http://nginx.org/">nginx.org</a>.<br/>
Commercial support is available at
<a href="http://nginx.com/">nginx.com</a>.</p>

<p><em>Thank you for using nginx.</em></p>
</body>
</html>
NodePort 사용
apiVersion: v1
kind: Service
metadata:
  name: web-service
spec:
  selector:
    app: web
  ports:
    - protocol: TCP
      port: 80
  type: NodePort ##변경 부분
로드밸런서
apiVersion: v1
kind: Service
metadata:
  name: web-service-lb
spec:
  selector:
    app: web
  ports:
  - name: webserver
    protocol: TCP
    port: 80
  type: LoadBalancer ##로드밸런서 지정
ExternalName
apiVersion: v1
kind: Service
metadata:
  name: web-service-lb
spec:
  selector:
    app: web
  ports:
  - name: webserver
    protocol: TCP
    port: 80
  type: LoadBalancer ##로드밸런서 지정