1-10 객체지향언어 (1) 클래스, 인스턴스, 메소드
/ 클래스 (Class)
- 표현하고자 하는 대상의 공통 속성을 한 군데에 정의해 놓은 것
즉, 클래스는 객체의 속성을 정의해 놓은 것
클래스 내부의 정보(변수 매소드 통틀어서)를 '멤버변수(member)' 라고한다
+ 자바는 파일명과 같은 이름의 클래스의 메인메소드를 실행하도록 약속되어있다,
   이 클래스는 접근제어자 public 붙인다 ex) public class Main{}
/ 인스턴스(Instance)
- 클래스로 부터 만들어진 객체를 그 클래스의 인스턴스 라고한다
ex) 붕어빵틀을 클래스 / 붕어빵 틀에서 만들어진 붕어빵을 인스턴스
- 예시
class Phone {
    String model;
    String color;
    int price;
}

public class Main {
    public static void main(String[] args) {
        Phone galaxy = new Phone(); // galaxy 인스턴스 생성
        galaxy.model = "Galaxy10";
        galaxy.color = "Black";
        galaxy.price = 100;

        Phone iphone =new Phone();
        iphone.model = "iPhoneX";
        iphone.color = "Black";
        iphone.price = 200;


        System.out.println("철수는 이번에 " + galaxy.model + galaxy.color + " 색상을 " + galaxy.price + "만원에 샀다.");
        System.out.println("영희는 이번에 " + iphone.model + iphone.color + " 색상을 " + iphone.price + "만원에 샀다.");
    }
}
철수는 이번에 Galaxy10Black 색상을 100만원에 샀다.
영희는 이번에 iPhoneXBlack 색상을 200만원에 샀다.- 결과 : Phone 이라는 class에 멤버변수로 모델, 색깔, 가격이 담겨져 있다.
instance의 멤버 변수에 접근할때는 instance의 이름에 . 을 찍고 멤버변수를 선언해주면, 접근할 수 있다 -> [생성된 인스턴스.멤버변수 = ]
/ 메소드(method)
- 어떠한 작업을 수행하는 코드를 하나로 묶어 놓은 것
/ 메소드가 필요한 이유
재사용성
- 메소드를 만들어 놓으면 이후 반복적으로 재사용이 가능합니다. 물론, 다른 프로그램에서도 사용이 가능하죠.
중복된 코드 제거
- 프로그램을 작성하다보면 같은 코드가 여러번 반복되어 작성되곤 합니다. 이럴 때, 메소드를 활용하면 중복된 부분을 없애므로 보다 효율적인 코드가 됩니다.
프로그램 구조화
- 구조화에 대해서는 아래 예시를 보면서 이해를 할 수 있습니다.
int[] heights = new int[5]; // 키가 들어가 있는 배열

initHeight(heights); // 1. 키에 대한 초기화
sortHeight(heights); // 2. 키를 오름차순으로 정렬
printHeight(heights); // 3. 정렬된 키를 출력
보시다시피 코드가 어떠한 작업을 하느냐에 따라 구분이 되어 구조화가 된 것을 확인할 수 있습니다. 엄청나게 긴 코드를 작성할 때 이러한 방식을 통해 보다 쉽게 수정 및 관리를 할 수 있습니다.
/ 메소드 작성 규칙
반드시는 아니지만 코드의 가독성(readability)의 품질을 위해 두 가지의 약속이 있다
1. 동사로 시작해야 한다
2. camelCase로 작성한다
ex) initHeight / sortHeight / printHeight
/ 메소드 선언과 구현
다음 형식으로 정의한다
반환타입 메소드이름 (타입 변수명,타입 변수명, ...){  // 타입 + 변수이름 을 파라미터(parameter)라 한다
    수행되어야 할 코드
}
int add(int x, int y) {
int result = x + y;
return result;
}- 결과 :
반환타입(return type)은 결과의 자료형을 결정한다 -> return type과 결과의 자료형이 일치해야한다
여기서는 메소드의 반환타입은 int이며 이는 반환되어지는 변수인 result와 일치하여야 한다
메소드 예제
class Calculation {
int add(int x, int y) {
    int result = x + y;
    return result;
}// 두 값을 더한 결과
int subtract(int x, int y) {
int result = x - y;
return result;
}// 두 값을 뺀 결과
}
public class Main {
public static void main(String[] args) {
Calculation calculation = new Calculation();
int addResult = calculation.add(100, 90);
int subResult = calculation.subtract(90, 70);
System.out.println(addResult);
System.out.println(subResult);
}
}190
20- 결과 :
메소드내의 변수는 지역변수로써 매소드 내부에서만 사용됨, 즉 다른 매소드라면 같은 이름의 지역변수 사용해도 상관없다 ( x, y)
알아보기 쉽게 적으며 정리해 보았다, method는 함수처럼 선언해놓은거 갖다쓰는 느낌?
class className {
    int methodName(int a, int b){
        int result = a + b ;
        return result;
    }
    int method2Name(int a, int b){
        int result = a - b ;
        return result;
    }
}

public class Main {
    public static void main(String[] args) {
        // write your code here


        className instanceName = new className();
        className instance2Name = new className();
           int methodResult = instanceName.methodName(10,30);
              int method2Result = instance2Name.method2Name(10,30);
        System.out.println(methodResult);
        System.out.println(method2Result);


    }
}
1-11 객체지향언어 (2) 생성자
/ 생성자( constructor )
메소드의 한 종류, 인스턴스가 생성될때 사용되는 "인스턴스 초기화 메소드"이다
생성자를 이용해서 인스턴스가 생성될 때 수행할 동작을 코드로 짤 수 있는데, 대표적으로
인스턴스 변수를 초기화 하는데 사용한다
className instanceName = new className(); // instanceName 이라는 이름의 인스턴스를 생성하였다즉, 이때 불리는 초기화 메소드 이다
- 생성자의 형식
클래스이름 (타입 변수명, 타입 변수명, ...){ // 매개변수(파라미터)
    인스턴스 생성 될 때에 수행하여할 코드
    변수의 초기화 코드
}- 규칙
Class의 이름과 같게한다 / return 값이 없다 (인스턴스 초기화가 결과)
모든 클래스에는 반드시 하나 이상의 생성자가 있어야 한다 ->
클래스에 생성자가 1개도 작성이 되어있지 않을 경우, 자바 컴파일러가 기본 생성자를 추가해주기 때문에 우리는 기본 생성자를 작성하지 않고도 편리하게 사용할 수 있다
className instanceName = new className(); // instanceName 이라는 이름의 인스턴스를 생성하였다위의 과정에서 생성자가 작성되지 않았지만, 기본생성자가 추가되었기 때문에 ( ) 생성자를 작성하지않고 사용할수 있었다
class Phone {
    String model;
    String color;
    int price;
               //<<< 여기서 alt + insert
    public Phone(String model, String color, int price) {
        this.model = model;
        this.color = color;
        this.price = price;
    }
}

public class Main {
    public static void main(String[] args) {

        Phone galaxy = new Phone("Galaxy10", "Black", 100);

        Phone iphone =new Phone("iPhoneX", "Black", 200);

        System.out.println("철수는 이번에 " + galaxy.model + galaxy.color + " + 색상을 " + galaxy.price + "만원에 샀다.");
        System.out.println("영희는 이번에 " + iphone.model + iphone.color + " + 색상을 " + iphone.price + "만원에 샀다.");
    }
}
생성자에 인스턴스가 생성될 때 수행할 동작을 코드로 작성하였다
생성자에서 사용된 this는 생성된 객체 자신(class의 model)을 가리키며
생성자의 매개변수(파라미터)의 값을 -> 객체(인스턴스)의 해당하는 데이터에 넣어주게 됩니다.
- 팁
생성자를 작성하지 않은 상태에서 Class영역에 커서를 두고 alt+insert 누르면 팝업되는 창에서 constructor 누르고 포함시킬 객체를 선택하고 만들면,
생성자가 자주쓰이는 방식으로 자동으로 생성된다
생성자로 아무값도 세팅하지 않았을때 인스턴스는 멤버변수의 기본값을 같게 된다 ->
- 인스턴스(멤버) 변수의 기본값
class DefaultValueTest {

    byte byteDefaultValue;
    int intDefaultValue;
    short shortDefaultValue;
    long longDefaultValue;
    float floatDefaultValue;
    double doubleDefaultValue;
    boolean booleanDefaultValue;
    String referenceDefaultValue;
}

public class Main {
    public static void main(String[] args) {
        DefaultValueTest defaultValueTest = new DefaultValueTest();

        System.out.println("byte default: " + defaultValueTest.byteDefaultValue);
        System.out.println("short default: " + defaultValueTest.shortDefaultValue);
        System.out.println("int default: " + defaultValueTest.intDefaultValue);
        System.out.println("long default: " + defaultValueTest.longDefaultValue);
        System.out.println("float default: " + defaultValueTest.floatDefaultValue);
        System.out.println("double default: " + defaultValueTest.doubleDefaultValue);
        System.out.println("boolean default: " + defaultValueTest.booleanDefaultValue);
        System.out.println("reference default: " + defaultValueTest.referenceDefaultValue);
    }
}
byte default: 0 // 1byte 를 구성하는 8개의 bit가 모두 0이라는 뜻.
short default: 0
int default: 0
long default: 0
float default: 0.0
double default: 0.0
reference default: null // 아무런 값이없는 레퍼런스타입을 null이라한다1-12 객체지향언어 (3) 상속
/ 상속(inheritance)
기존의 Class를 재사용하는 방법중 하나이다 , 작성된 코드가 재사용이 필요하다면 변경사항만 코드로
작성하므로 상대적으로 적은양의 코드를 사용할 수 있게된다
이렇게 코드를 재사용하면, 클래스와 코드가 많아질때 관리가 용이한다는 장점이 있다
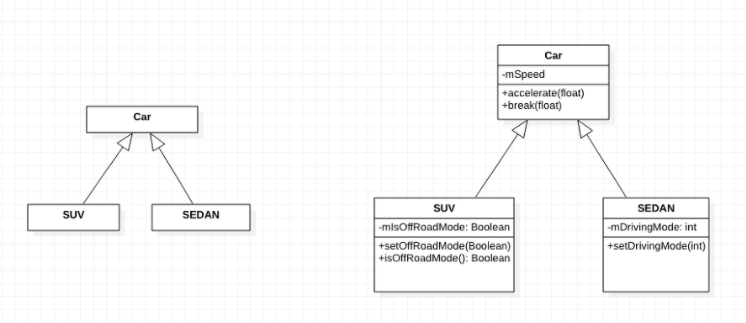
- 상속을 보여주는 UML Class Diagram
- 설명
(부모 class) 자동차가 가지는 속성(속도) 동작(엑셀 브레이크) 그대로 가지고
(자식 class 1) suv 속성(오프로드 모드) 동작(오프로드모드 세팅) 가진다
(자식 class 2) 세단 속성(드라이빙 모드) 동작(드라이빙모드 세팅) 가진다
- 상속의 특징
-
부모클래스에 정의된 필드(속성?)와 메소드(동작?)를 물려받는다
-
새로운 필드와 메소드를 (자식 class에?) 추가할 수 있다
-
부모 class 에서 물려받은 메소드를 수정할 수 있다 (메소드 overriding)
-
상속받을 때 오직 하나의 Class만 상속받을 수 있다
- 상속의 형식

class Animal{}
class Dog extends Animal{}
class Cat extends Animal{}
상속은 extends를 이용해 사용할 수 있다
-> Dog와 Cat은 Animal을 extends를 이용해 상속받는다
상속 예제
class Animal{
    String name;

    public void cry(){
        System.out.println(name + "is crying");
    }
}
class Dog extends Animal{
    Dog(String name){
        this.name = name;
    }
    public void swim(){
        System.out.println(name + "is swimming");
    }
}
public class Main {
    public static void main(String[] args) {
        Dog dog = new Dog("송이");
        dog.cry();
        dog.swim();

        Animal dog2 = new Dog("몽자");//Animal 타입의 dog2라는 변순데, 실제는 Dog 타입으로 생성된 객체이다
        dog2.cry();
//        dog2.swim(); // 컴파일 오류, 실제 객체는 Dog지만 변수를 선언한 타입에는 Animal로 되어있기 때문에
                    // dog2는 Dog타입에 해당하는 내용을 갖고 있지만,
                    //Animal 타입에 있는 기능만 수행할 수 있음

    }
}
송이is crying
송이is swimming
몽자is crying-
결과 :
자식(Dog) 객체는 자식(Dog) 타입으로 선언된 변수에도 할당할 수 있고, 부모(Animal) 타입으로 선언된 변수에도 할당할 수 있습니다단, 위와 같이 변수를 선언한 타입이 부모 타입이라면 실제객체가 자식 타입이라도
부모 타입에 있는 기능만 수행할 수 있다
오버로딩(overloading) vs 오버라이딩(overriding)
/ 오버로딩(overloading)
- 한 클래스 내에 동일한 이름의 메소드를 여러개 정의하는 것
(이름이 같은 매소드라 해서 오버로딩 아님)
/ 오버로딩의 조건
1 메소드 이름 동일해야하고
2 매개변수의 개수나 type이 달라야한다
/ 오버로딩 o
int add(int x, int y, int z) {
    int result = x + y + z;
    return result;
}

long add(int a, int b, int c) {
    long result = a + b + c;
    return result;
}
 int/long 반환타입은 다르지만(상관 x)
 매개변수의 타입과 개수는 같기에 오버로딩이 아닙니다.
/ 오버로딩 x
int add(int x, int y, int z) { // 매소드 이름모두 동일하고
    int result = x + y + z;
    return result;
}

long add(int a, int b, long c) { //매개변수의 타입이 다름
    long result = a + b + c;
    return result;
}

int add(int a, int b) { // 매개변수의 개수가 다름
    int result = a + b;
    return result;
}
오버로딩의 조건에 부합하는 예제/ 오버라이딩(overriding)
- 부모 클래스로부터 상속받은 메소드의 내용을 변경하는 것,
필요에 의해 변경해야할 경우 오버라이딩을 한다
/ 오버라이딩의 조건
1 부모 클래스의 메소드와 이름이 같아야 한다
2 부모 클래스의 메소드와 매개변수가 같아야 한다
3 부모 클래스의 메소드와 반환타입이 같아야 한다
class Animal {
    String name;
    String color;

    public void cry() {
        System.out.println(name + " is crying.");
    }
}

class Dog extends Animal {

    Dog(String name) {
        this.name = name;
    }
	@Override
    public void cry() {
        System.out.println(name + " is barking!");
    }
}

public class Main {
    public static void main(String[] args) {
        Animal dog = new Dog("코코");
        dog.cry();
    }
}
코코 is barking!오버로딩 vs 오버라이딩
오버로딩 : 기존에 없는 새로운 메소드를 정의하는 것
오버라이딩 : 상속받은 메소드의 내용을 변경하는 것
1-15. 객체지향언어 (4) 접근제어자
/ 접근 제어자 (access modifier)
- 접근 제어자는 멤버 변수/함수 혹은 클래스에 사용되며 외부에서의 접근을 제한하는 역할을 한다
→ private : 같은 클래스 내에서만 접근이 가능합니다 ( private -> only class )
→ default(nothing) : 같은 패키지 내에서만 접근이 가능합니다. ( no acces modifer -> package private )
→ protected : 같은 패키지 내에서, 그리고 다른 패키지의 자손클래스에서 접근이 가능합니다.
( protected -> package private + child class in other package )
→ public : 접근 제한이 전혀 없습니다.
접근범위 작음 private → default → protected → public 큼
reference : http://codeinventions.blogspot.com/2014/09/default-access-modifier-in-java-or-no.html
예제를 위해 java 디렉토리에 오른쪽 마우스를 누르고 new → package 를 클릭하고, pkg 라는 이름의 package를 만듭니다.
pkg 디렉토리 내부에 ModiferTest 자바 클래스를 만듭니다.
ModifierTest.java
package pkg;

public class ModifierTest {
    private void messageInside() {
        System.out.println("This is private modifier");
    }

    public void messageOutside() {
        System.out.println("This is public modifier");
        messageInside();
    }

    protected void messageProtected() {
        System.out.println("This is protected modifier");
Main.java
import pkg.ModifierTest; // 아래 Child클래스 선언할때 자동으로 임포트 되었다 주석처리 된다면
						//ModifierTest 컴파일 에러발생한다, 패키지 이름까지 정확해야한다
                        //java는 패키지 이름까지 포함해서 클래스이름을 클래스로 인식하기 때문

class Child extends ModifierTest {
    void callParentProtectedMember() { // 앞에 접근제어자가 안붙엇기 때문에 package private이다
        System.out.println("Call my parent's protected method");
        super.messageProtected();
    }
}

public class Main {
    public static void main(String[] args) {
        ModifierTest modifierTest = new ModifierTest();

        modifierTest.messageOutside();
//        modifierTest.messageInside(); // compile error
//        modifierTest.messageProtected(); // compile error

        Child child = new Child();
        child.callParentProtectedMember();
    }
}
This is public modifer
This is private modifier
call my parent's protected method
This is protected modifer-
결과 1 : messageOutside() 제외한 곳에서, access에 대한 컴파일 오류가 발생한다
이처럼 접근 제어자를 통하여 접근할 수 있는 범위가 제한되곤 합니다.This is private modifier 결과가 나온 이유는 messageOutside() 메소드 작성할때
messageInside() 메소드가 같이 실행되도록 했기 때문 -
결과 2 : child 인스턴스를 만들어 위에작성한 callParentProtectedMember() 메소드를 실행하였을때, Child 클래스가 ModifierTest의 essageProtected() 메소드가 상속되어 있기 때문에 접근이 가능했고, super. 을 통해 부모 클래스의 messageProtected() 메소드를 실행한결과가 아래 두 줄로 나왔다
접근제어자, 이 복잡한걸 왜 사용하는가?
-
객체지향 프로그래밍이란 객체들 간의 상호작용을 코드로 표현하는 것입니다.
-
이때 객체들간의 관계에 따라서 접근 할 수 있는 것과 아닌 것, "권한을 구분할 필요" 가 생깁니다.
-
클래스 내부에 선언된 데이터의 부적절한 사용으로부터 보호하기 위해서!
-> 이런 것을 캡슐화(encapsulation)라고 합니다. -
접근 제어자는 캡슐화가 가능할 수 있도록 돕는 도구입니다.
1-16. 객체지향언어 (5) 추상클래스, 인터페이스
/ 추상클래스(abstract class)
- 추상클래스는 추상메소드를 선언할 수 있는 클래스를 의미한다.
또한, 클래스와 다르게 상속받는 클래스 없이 그 자체로 인스턴스를 생성할 수 없다
abstract class 클래스이름 {...};/ 추상매소드
- 추상매소드는 설계만 되어있고 수행되어야 할 코드에 대해 작성이 안된 매소드 이다
미완성으로 남겨두는 이유는, 상속받는 클래스마다 동작이 달라지는 경우에 상속받는 클래스의
작성자가 반드시 작성하도록 위함이다
abstract 리턴타입 메소드이름(...);추상클래스 예제
abstract class Bird { // 추상클래스 Bird
    private int x, y, z;

    void fly(int x, int y, int z) { // fly() 메소드
        printLocation();
        System.out.println("이동합니다.");
        this.x = x;
        this.y = y;
        if (flyable(z)) {
            this.z = z;
        } else {
            System.out.println("그 높이로는 날 수 없습니다");
        }
        printLocation();
    }

    abstract boolean flyable(int z); // 추상 메소드 flyabale() 설계만 한다!
    								// 새가 날수있는 높이가 다르기 때문에
                                    // 자식클래스(새종류) 마다 오버라이드 하여
                                    // 수행되어야 할 코드를 작성한다

    public void printLocation() {  // 현재위치를 찍는 메소드
        System.out.println("현재 위치 (" + x + ", " + y + ", " + z + ")");
    }
}

class Pigeon extends Bird { // 이까지만 적고 alt + enter 해서 추천해주는거 눌러도됨
    @Override					// 추상메소드 오버라이드되서 수행되어야 할 코드작성
    boolean flyable(int z) {
        return z < 10000;
    }
}

class Peacock extends Bird {
    @Override
    boolean flyable(int z) {
        return false;
    }
}

public class Main {
    public static void main(String[] args) {
        Bird pigeon = new Pigeon();
        Bird peacock = new Peacock();
        System.out.println("-- 비둘기 --");
        pigeon.fly(1, 1, 3);
        System.out.println("-- 공작새 --");
        peacock.fly(1, 1, 3);
        System.out.println("-- 비둘기 --");
        pigeon.fly(3, 3, 30000);
    }
}
---비둘기---
현재위치 {0, 0, 0)
이동합니다.
현재위치 {1, 1, 3)
---공작새---
현재위치 {0, 0, 0)
이동합니다.
그 높이로는 날 수 없습니다.
현재위치 {1, 1, 0)
---비둘기---
현재위치 {1, 1, 3)
이동합니다.
그 높이로는 날 수 없습니다.
현재위치 {1, 1, 3)Tip:
interface의 메소드 또는 abstract class 의 abstract method 처럼 구현하는 클래스에서
직접 구현해야하는 경우 IntelliJ IDEA에서 command + N (window는 alt + insert)을 눌러서
implement methods를 선택하면 자동으로 코드완성이 됩니다.
혹은 class 선언 부분에 빨간줄이 그어진다면 alt + enter 로도 추천이 가능합니다.
이렇게 IDEA의 shortcut과 자동완성 기능을 잘 활용하면 코드를 빠르게 작성할 수 있으니
강의에서 다루지 않는 것이라도 찾아서 활용해보세요.
/ 인터페이스(Interface)
- 객체의 특정 행동의 특징을 정의하는 간단한 문법입니다
인터페이스는 함수의 특징(method signature)인 접근제어자, 리턴타입, 메소드 이름만을 정의합니다
함수의 내용이 존재하지 않기 때문에 ,
인터페이스를 구현하는 클래스는 인터페이스에 존재하는 내용({ } 중괄호 내용)을 반드시 구현해야한다
/ 인터페이스 형식
interface 인터페이스 이름 {
타입 메소드이름(); // 내용없음
}
class 클래스 이름 implements 인터페이스 이름 {
}
접근제어자 타입 (private, public ...) , 리턴 타입 (int string...) 메소드 이름만 정의
메소드 종류 상관없음, 추상메소드, static메소드, default 메소드 모두 허용
- 상속은 하나의 클래스만을 상속받을수 있지만 , 인터페이스는 여러개 가능하다
단, 인터페이스들을 구현하는 클래스가 모든 메소드(함수)의 내용을 작성만 한다면
interface Bird {                        // 인터페이스 멤버변수 가지지 못하고, 동작(mehod)만 정의함
    void fly(int x, int y, int z);
}

class Pigeon implements Bird{  // implements키워드 통해서 인터페이스 Bird를 구현하는  클래스
						// ,이 클래스에 함수의 내용작성

    private int x,y,z;  // 추상클래스의 x y z 없음
    					// 인터페이스는 필드가 없기때문에 인터페이스를 구현하는 클래스에 작성한다

    @Override   // alt +enter
    public void fly(int x, int y, int z) {

        printLocation();
        System.out.println("날아갑니다.");
        this.x = x;
        this.y = y;
        this.z = z;
        printLocation();
    }

    public void printLocation() {
        System.out.println("현재 위치 (" + x + ", " + y + ", " + z + ")");
    }

}

public class Main {

    public static void main(String[] args) {
        Bird bird = new Pigeon();
        bird.fly(1, 2, 3);
//        bird.printLocation(); // compile error
    }
}
현재 위치 (0, 0, 0)
이동합니다.
현재 위치 (1, 2, 3)
- 결과 :
interface인 Bird 타입으로 선언한 bird 변수는 실제로 Pigeon 객체이지만,
interface인 Bird 에 선언되지 않은 printLocation() 이라는 함수는 호출할 수 없습니다.interface type 으로 선언되어있는 부분에서는 실제 객체가 무엇이든지, interface에 정의된 행동만 할 수 있습니다. => " 선언된 class 또는 interface 따른다 "
Bird bird = new Pigeon(); // interface인 Bird 타입으로 선언한 인스턴스 bird
							// 실제는 Class Pigeon의 객체이다
/ 인터페이스 vs 추상클래스
- 인터페이스
- 구현하려는 객체의(class) 동작의 명세(메소드 내용 작성)
- 다중 상속 가능
- implements를 이용하여 구현
- 메소드 시그니처(이름, 파라미터, 리턴 타입)에 대한 선언만 가능
- 추상클래스
- 클래스를 상속받아 이용 및 확장을 위함
- 다중 상속 불가능 , 단일 상속
- extends를 이용하여 구현
- 추상메소드에 대한 구현 가능
1-17. 객체지향 퀴즈
/ 객체지향 퀴즈
- 결과 :