
기능 소개
이번 시간에는 생활지도 내용을 서버로 보내는 기능을 구현해보겠습니다. 일단 서버에 POST API를 만들어야 합니다. 그리고 iOS 앱에서 alamofire를 이용해서 POST 요청을 보내보겠습니다.
그리고 추가적으로 생활지도에 걸린 학생들 목록을 조회하는 API도 함께 구현해보겠습니다. 단순히 생활지도의 이유만 보이는 것이 아니라 학생의 정보도 연계해서 보여주어야 합니다. 지금까지 썼던 SQL문 보다 더 복잡한 SQL문을 필요로 할 겁니다.
계획
3번 API : 생활지도 등록
서버에서 POST API를 만들어 앱과 연결합니다. student와는 다른 도메인이므로 라우터부터 새로 만들어야 할 것 같습니다.
서버에서 API를 먼저 만들고 앱에 연결하도록 하겠습니다.
4번 API : 생활지도 조회
저번에 만들었던 GET API입니다. 하지만 1개의 자료만을 조회했던 지난 API와는 다르게 여러 개의 자료를 조회한다는 차이점이 있겠네요.
마찬가지로 서버에서 API를 먼저 만들고 앱에 연결하도록 하겠습니다.
5번 API: 생활지도 삭제
조회 API를 구현하면서 추가했던 삭제 기능도 구현해야 합니다. 예전에는 메모리에 있던 정보를 삭제했지만 이제는 서버에 있는 데이터를 삭제할 수 있도록 하야합니다.
구현 (생활지도 등록)
서버에서 API 만들기
DB table 설계
id는 auto increment를 사용합니다. studentID는 Student table과 이어주는 foreign key입니다. reason의 경우 앱에서 사용하던 description 속성을 그대로 사용했고 기타의 경우에만 detail을 기록할 수 있습니다.

router
기존에 쓰던 student와 guidance는 서로 다른 도메인이므로 새로 라이터를 만들어줍니다.
const express = require('express');
const controller = require('../controller/guidance.js');

const router = express.Router();

router.post('/', (req, res) => {
    controller.postGuidance(req, res)
});

module.exports = router;
controller
controller의 주요 업무는 client가 보내온 요청을 형식적 검증을 하는 것입니다. client의 input에 대해 철저히 검증을 해야합니다. 다만 지금은 시간 관계상 생략합니다.😅 (원래 절대 이러면 안됩니다ㅠㅠ🙀)
/**
 * API No. 3
 * API Name : 생활지도 등록 API
 * [POST] /guidances
 */

 exports.postGuidance = async function (req, res) {

    const { studentID, reason, detail } = req.body;

    // TODO: body 검증하기!

    const result = await guidanceService.createGuidance(studentID, reason, detail);

    return res.send(response(responses.SUCCESS, result));

};
service
CRUD 중에 R을 담당하는 부분이 지난 두 API를 만들면서 사용했던 provider입니다. service는 나머지 C, U, D를 담당합니다.
- 생활 지도가 등록되고 나면 해당 생활지도의 id를 가져와서 다시 DB에서 검색해서 data를 client에게 보내주는 기능까지 구현 했습니다.
// 생활지도 등록하기
exports.createGuidance = async function (studentID, reason, detail) {
    const connection = await pool.promise().getConnection(async (conn) => conn);
    const params = [ studentID, reason, detail ];
    const insertResult = await guidanceDao.insertGuidance(connection, params);
    const guidanceID = insertResult[0].insertId
    console.log(`추가된 생활지도 : ${guidanceID}`)
    connection.release();

    //1️⃣
    const selectResult = await guidanceProvider.readGuidance(guidanceID)

    return selectResult[0];
};
provider
바로 위 서비스의 1️⃣에서 사용한 함수입니다. id를 가지고 생활지도 데이터를 반환합니다.
// id로 guidance 찾기
exports.readGuidance = async function (guidanceID) {
    const connection = await pool.promise().getConnection(async (conn) => conn);
    const result = await guidanceDao.selectGuidance(connection, guidanceID);
    connection.release();
    return result[0];
};
dao
- Insert문을 사용해서 row를 추가합니다.
- client에 있는 Guidance 구조체를 init하기 위한 모든 정보를 담아야 합니다. 따라서 Guidance 테이블 뿐만 아니라 Student 테이블까지 조인해서 데이터를 가져옵니다.
//1️⃣ guidance 추가
exports.insertGuidance = async function (connection, params) {
    const query = `
        INSERT INTO Guidance(studentID, reason, detail)
        VALUES (?, ?, ?);
    `;
    const row = await connection.query(query, params);
    return row;
};

//2️⃣ guidance 검색
exports.selectGuidance = async function (connection, guidanceID) {
    const query = `
        SELECT
            S.id AS studentID,
            S.grade AS grade,
            S.classNumber AS classNumber,
            S.number AS number,
            S.name AS name,
            S.profileImageURL AS profileImageURL,
            G.id AS guidanceID,
            G.reason AS reason,
            G.detail AS detail
        FROM HSB.Guidance G
        INNER JOIN HSB.Student S ON G.studentID = S.id
        WHERE G.id = ?;
    `;
    const row = await connection.query(query, guidanceID);
    return row;
};
결과
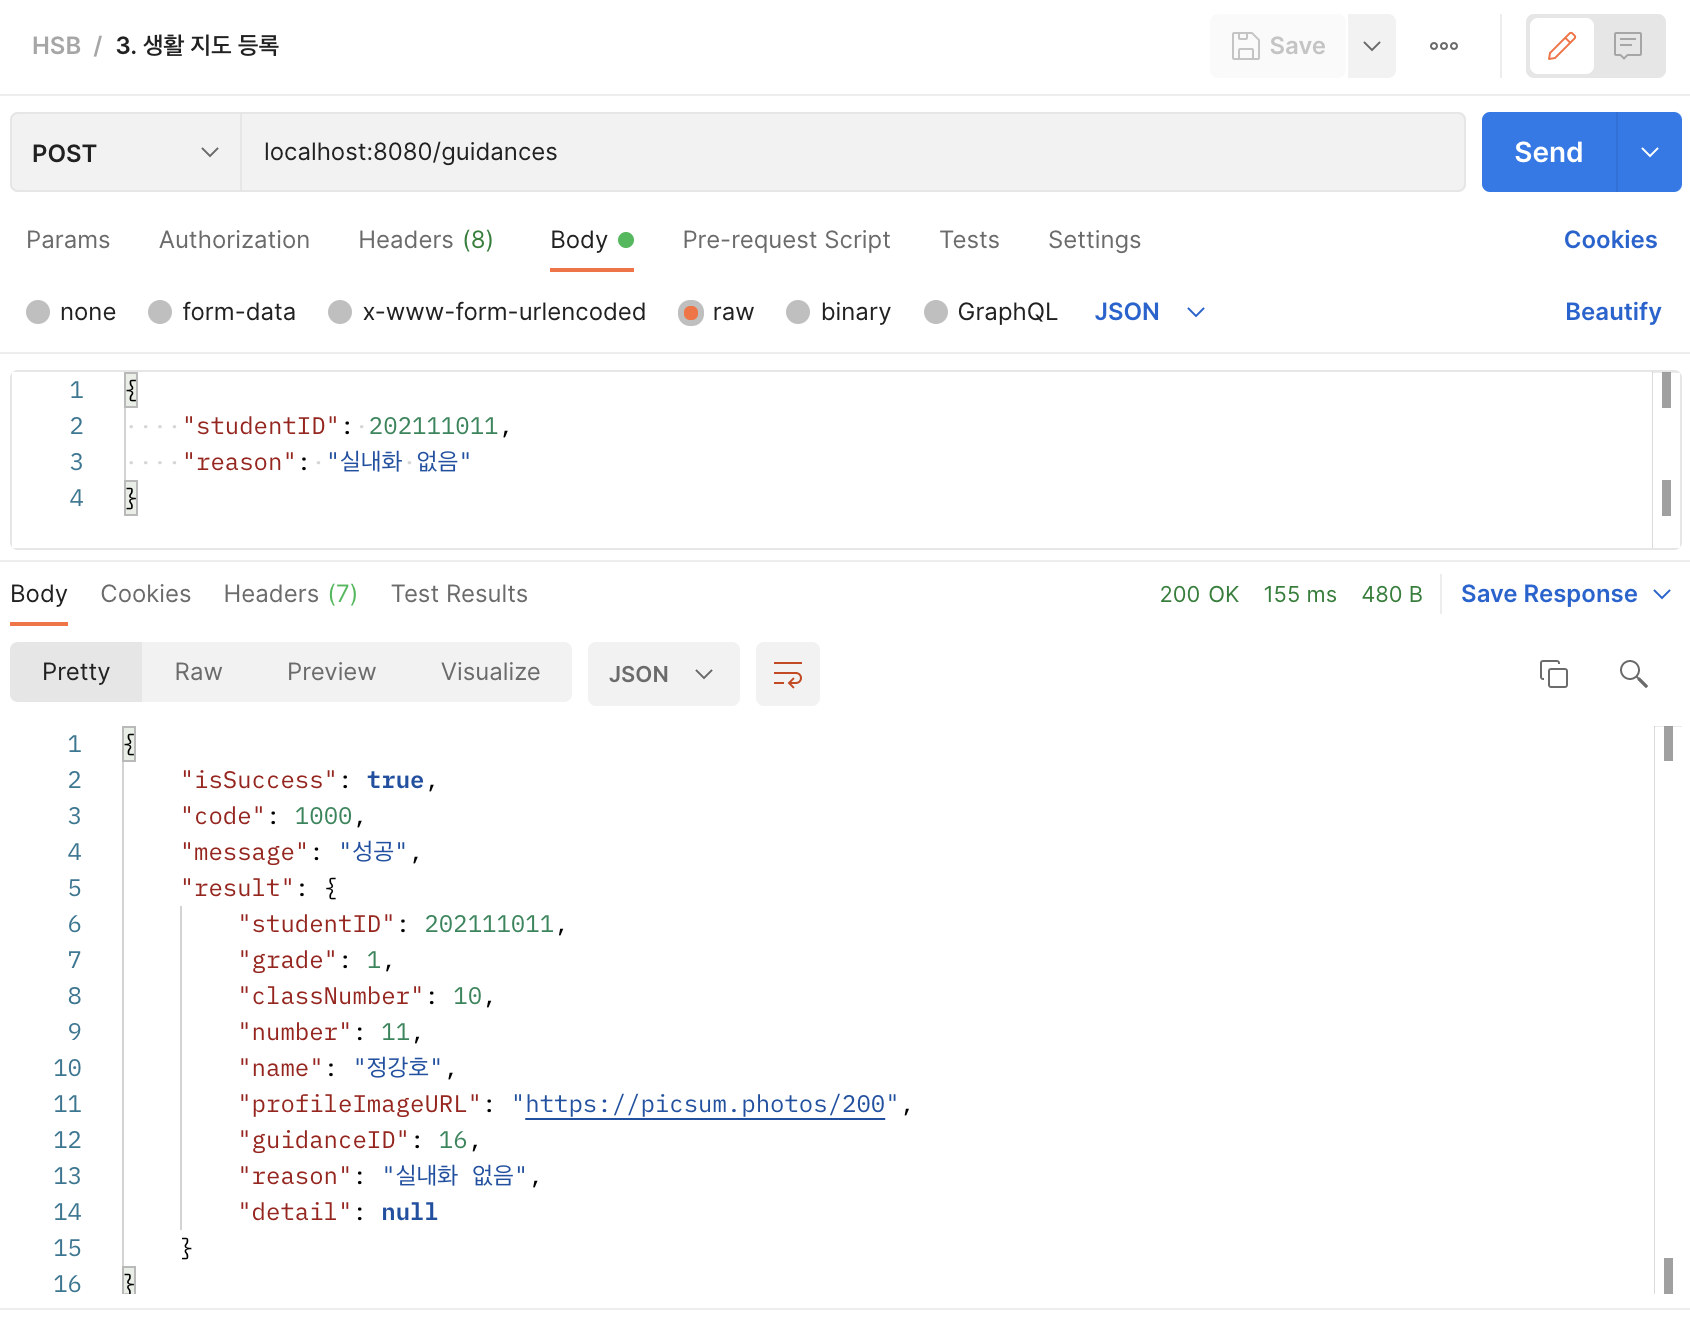
- post이므로 body에 json 형식으로 데이터를 담아보냅니다.
- post가 성공되었다는 메시지 뿐만 아니라고 등록된 생활 지도에 대한 구체적인 정보를 볼 수 있습니다.
앱에서 연결하기
guidance service 만들기
- 3번 API는 POST할 내용을 JSON을 통해 받습니다. 따라서 [String: String]에 JSON 구조와 동일하게 데이터를 담아 alamofire가 JSON을 인코딩할 수 있도록 준비합니다.
- alamorfire의 기본 method는 .get입니다. 이번 요청은 post 이므로 인자로 명시해줍니다. 또한 인코더를 JSON 인코더로 지정해 parameters를 JSON으로 보내도록 합니다.
그리고 보내오는 데이터도 Response 자료형으로 디코딩하도록 했습니다. (GuidanceRawData는 서버에서 보내온 생활 지도 데이터를 담는 자료형입니다. 금방 소개하겠습니다.)
class GuidanceService {
    static let shared = GuidanceService()

    func uploadGuidance(studentID: Int, reason: GuidanceReason, completionHandler: @escaping (Guidance) -> Void) {
	//1️⃣
        var params: [String: String] = ["studentID": "\(studentID)"]
        params["reason"] = reason.description

        if case .others(let detail) = reason {
            if let detail = detail {
                params["detail"] = detail
            }
        }

	//2️⃣
        AF.request("\(SERVER_BASE_URL)/guidances", method: .post, parameters: params, encoder: JSONParameterEncoder.default).responseDecodable(of: Response<GuidanceRawData>.self) { data in
            guard let response = data.value else { return }
            guard response.isSuccess == true else { return }
            guard let guidanceRawData = response.result else { return }
            let guidance = Guidance(rawData: guidanceRawData)
            completionHandler(guidance)
        }
    }
}
Model 수정하기
- 서버에서 보내오는 생활지도 데이터와 동일한 형태로 만든 구조체입니다. 네트워크로 받아오는 JSON 데이터와 앱에서 사용하는 Guidance 구조체 사이에 연결 다리 역할을 합니다.
- Student와 GuidanceReason에 새로운 initializer를 구현합니다. 이 initializer는 GuidanceRawData를 통해서 Student와 Guidance 객체를 init합니다.
- 위에 구현한 두 initializer를 이용해서 Guidance의 initializer를 구현했습니다.
//1️⃣
struct GuidanceRawData: Codable {
    let studentID: Int
    let grade: Int
    let classNumber: Int
    let number: Int
    let name: String
    let profileURLImage: String?
    let guidanceID: Int
    let reason: String
    let detail: String?
}
//2️⃣
struct Student {
let id: Int
let grade: Int
let classNumber: Int
let number: Int
let name: String
let profileImageURL: String?
init(from data: GuidanceRawData) {
self.id = data.studentID
self.grade = data.grade
self.classNumber = data.classNumber
self.number = data.number
self.name = data.name
if let profileImageURL = data.profileURLImage {
self.profileImageURL = profileImageURL
} else {
self.profileImageURL = nil
}
}
}enum GuidanceReason: CaseIterable {
case wrongClothes
case noShoes
case trespassing
case others(detail: String?)
static var allCases: [GuidanceReason] = [.wrongClothes, .noShoes, .trespassing, .others(detail: nil)]
var description: String {
switch self {
case .wrongClothes: return "복장 불량"
case .noShoes: return "실내화 없음"
case .trespassing: return "무단횡단"
case .others: return "기타"
}
}
init(from data: GuidanceRawData) {
let reason = data.reason
switch reason {
case "복장 불량": self = .wrongClothes
case "실내화 없음": self = .noShoes
case "무단횡단": self = .trespassing
default:
let detail = data.detail ?? nil
self = .others(detail: detail)
}
}
}//3️⃣
struct Guidance {
let id: Int
let student: Student
let reason: GuidanceReason
init(rawData: GuidanceRawData) {
self.id = rawData.guidanceID
self.student = Student(from: rawData)
self.reason = GuidanceReason(from: rawData)
}
}VM에서 사용하기
VM의 코드는 크게 바꾼 것이 없습니다. 다만 비동기로 작동하는 네트워크 함수를 사용하므로 completionHandler를 추가했습니다.
// MARK: - registerGuidance
func registerGuidance(reason: GuidanceReason, completionHandler: @escaping (Guidance) -> Void) {
    GuidanceService.shared.uploadGuidance(studentID: student.id, reason: reason) { guidance in
        completionHandler(guidance)
    }
}
VC에서 사용하기
- 등록이 완료되면 alert를 띄우고 서버에서 받아온 데이터를 바탕으로 등록된 데이터를 보여줍니다. 여기서 ok를 누르면 학년을 선택하는 페이지로 돌아갑니다. (🚫 나중에 서버에서 에러를 구현하면 에러 정보도 여기서 보여줄 예정입니다.)
- 기존 더미데이터를 사용하던 함수에 completionHandler만 추가하면 됩니다. 미리 만들어 둔 함수에 Guidance 객체만 전달하도록 합시다!
//1️⃣
func showRegisterResult(guidance: Guidance) {
    let alert = UIAlertController(title: "등록 완료", message: nil, preferredStyle: .alert)
    alert.message = viewModel.guidanceRegistrationMessage(guidance: guidance)
    let ok = UIAlertAction(title: "OK", style: .default) { _ in
        alert.dismiss(animated: true, completion: self.cancelButtonTapped)
    }
    alert.addAction(ok)
    self.present(alert, animated: true, completion: nil)
}
//2️⃣
func actionSheetTapped(reason: GuidanceReason) {
switch reason {
case .others(let detail):
if detail == nil {
self.present(self.otherReasonAlert, animated: true, completion: nil)
return
} else {
self.viewModel.registerGuidance(reason: reason, completionHandler: showRegisterResult(guidance:))
}
default:
self.viewModel.registerGuidance(reason: reason, completionHandler: showRegisterResult(guidance:))
}
}결과
생활지도를 서버에 등록하고 서버에서 보낸 데이터를 다시 alert에 표시하는 것을 볼 수 있습니다.

구현 (생활지도 명단 조회)
서버에서 API 만들기
dao
router, controller, provider 부분은 전에 만들었던 다른 API들과 대동소이합니다. SQL문만 보여드리겠습니다. 전반적으로 id로 조회하는 것과 동일합니다. 다만 where status를 통해 status가 “VALID”인 데이터만 보내주도록 했습니다. 나중에 삭제처리를 할 때 실제 데이터를 삭제하지 않고 status를 “DELETED”로 변경하는 방식으로 할 것이기 때문입니다.
// 모든 guidance 조회
exports.selectAllGuidances = async function (connection) {
    const query = `
        SELECT
            S.id AS studentID,
            S.grade AS grade,
            S.classNumber AS classNumber,
            S.number AS number,
            S.name AS name,
            S.profileImageURL AS profileImageURL,
            G.id AS guidanceID,
            G.reason AS reason,
            G.detail AS detail
        FROM HSB.Guidance G
        INNER JOIN HSB.Student S ON G.studentID = S.id
        WHERE G.status = 'VALID';
    `;
    const row = await connection.query(query);
    return row;
};
결과
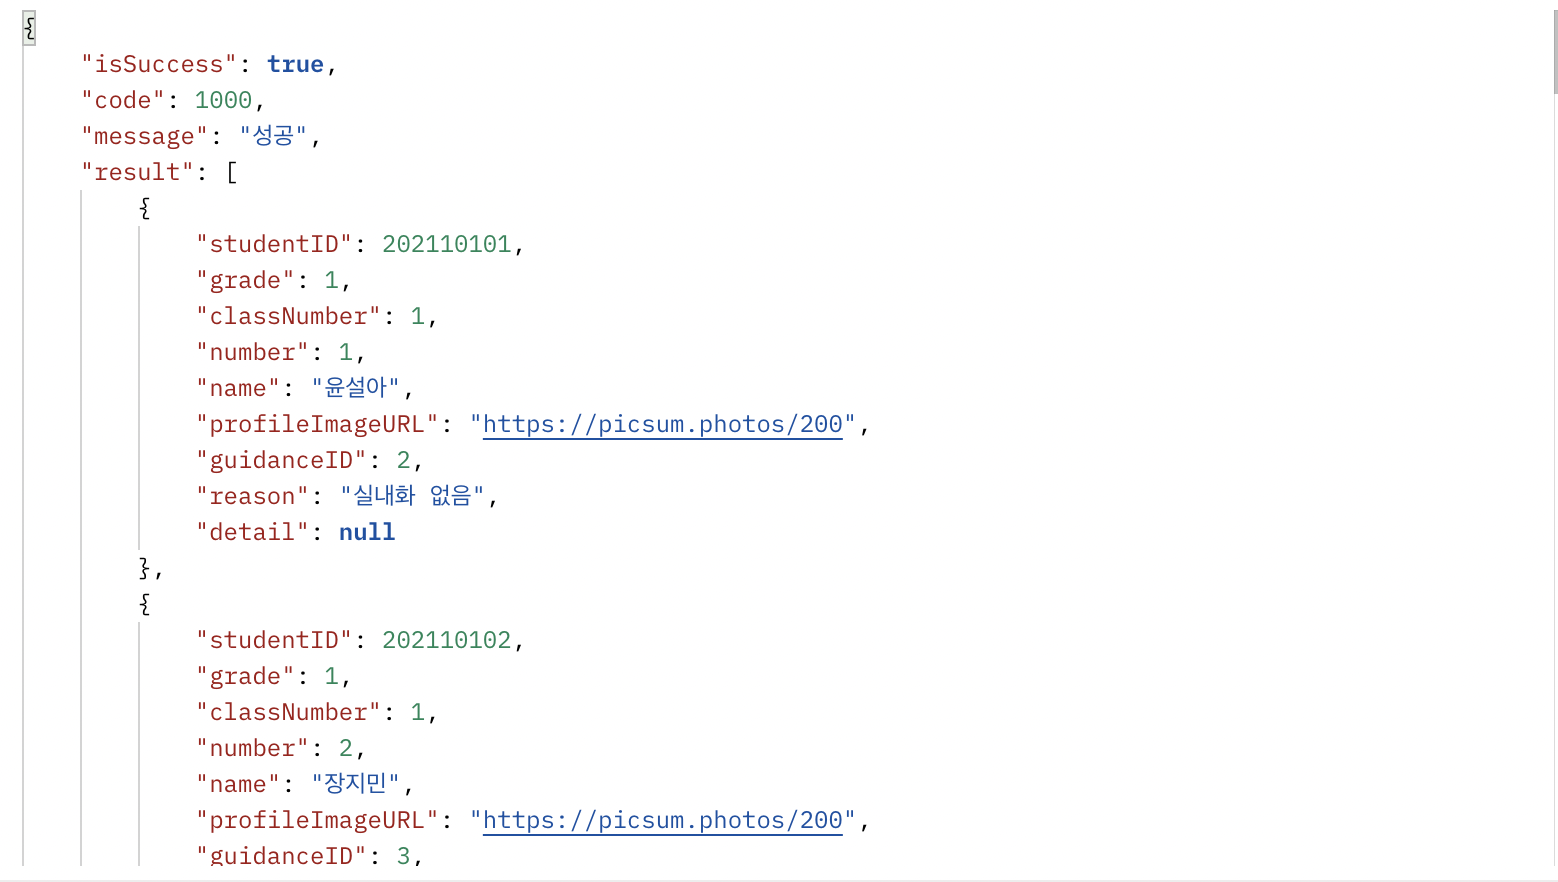
result에 JSON 배열 형태로 생활지도 데이터들이 있는 것을 볼 수 있습니다.
앱에 연결
Guidance Service
3번 API를 호출할 때 생활지도 데이터 1개를 받도록 구현하면서 모든 Model을 구현했습니다. 4번에 연결하면서 할 일을 해당 Model을 Array에 담아내는 것입니다. (Codable을 Array에 담아도 Codable입니다.)
Codable을 통해 Decoding한 GuidanceRawData를 고차함수 map을 통해서 Guidance 객체로 바꾸어 줍시다.
func fetchGuidances(completionHandler: @escaping ([Guidance]) -> Void) {
    AF.request("\(SERVER_BASE_URL)/guidances").responseDecodable(of: Response<[GuidanceRawData]>.self) { data in
        guard let response = data.value else { return }
        guard response.isSuccess == true else { return }
        guard let rawdata = response.result else { return }
        let guidances = rawdata.map { rawData in
            return Guidance(rawData: rawData)
        }
        completionHandler(guidances)
    }
}
VM에서 해당 API 활용
VM를 할 때 위 API를 불러와서 _guidances에 세팅합시다. 그리고 데이터를 삭제한 후 리셋을 위해 실행하는 reset 메소드에도 해당 API를 적용합니다.
VC에는 guidance를 읽어서 데이터를 표시하므로 변경할 것이 하나도 없습니다 😀
class StudentListViewModel {

    private var _guidances: [Guidance]

    lazy var guidances: [Guidance] = _guidances

    init() {
        self._guidances = [Guidance]()
        GuidanceService.shared.fetchGuidances { [weak self] guidances in
            self?._guidances = guidances
        }
    }

    func resetGuidances() {
        GuidanceService.shared.fetchGuidances { [weak self] guidances in
            self?._guidances = guidances
        }
    }
}
잠깐✋ 리팩토링!
원래 filter의 상태 값을 VC가 가지고 있고 VM은 그 상태값을 인자로 받아서 데이터를 변경하는 로직을 사용하고 있었는데요.
논리적으로 보면 filter는 Data에 관한 것이기 때문에 VM이 가지고 있는 것이 맞을 것 같네요. filter의 상태 값을 VM이 가지도록 합니다.
class StudentListViewModel {

    private var _guidances: [Guidance]

    lazy var guidances: [Guidance] = _guidances

    var filter: StudentListFilter = .all {
        didSet {
            switch filter {
            case .all:
                self.guidances = _guidances
            case .myGrade:
                self.guidances = _guidances.filter { guidance in
                    guidance.student.grade == 1
                }
            case .myClass:
                self.guidances = _guidances.filter { guidance in
                    guidance.student.grade == 1 && guidance.student.classNumber == 1
                }
            }
        }
    }
}
결과
이제 더미데이터가 아닌 서버에 있는 데이터를 읽어와서 표시하는 것을 볼 수 있습니다.
구현 (생활지도 삭제)
서버
router
이번에는 guidanceID를 path variable로 받아보겠습니다. path variable은 body나 query string과는 다르게 1개만 받을 수 있고 router에 아래와 같이 변수명을 표시해두어야 합니다.
path variable은 data 딱 1건을 지칭할 때 주로 사용하므로 path variable로 전달되는 인자는 주로 data의 id, DB에서의 Primary Key에 해당하는 것입니다.
router.delete('/:guidanceID', (req, res) => {
    controller.deleteGuidance(req, res)
});
controller
/**
 * API No. 5
 * API Name : 생활지도 삭제 API
 * [DELETE] /guidances/:guidanceID
 */

 exports.deleteGuidance = async function (req, res) {

    /**
     * Path Variable: guidanceID
     */

    const guidanceID = req.params.guidanceID;

		//TODO: 형식적 검증

    const result = await guidanceService.removeGuidance(guidanceID);

    return res.send(response(responses.SUCCESS, result));

};
Service
실제 서버를 만들 때는 유효한 데이터를 삭제하려고 하는 것인지 확인해야합니다. 그리고 삭제가 끝나면 삭제가 반영된 새로운 생활 지도 데이터들을 반환하도록 하겠습니다.
// 생활지도 삭제하기
exports.removeGuidance = async function (guidanceID) {

    //TODO: DB에 있는 guidanceID가 VALID한 데이터인지 확인

    const connection = await pool.promise().getConnection(async (conn) => conn);
    const result = await guidanceDao.deleteGuidance(connection, guidanceID);

    console.log(`삭제된 생활지도 : ${guidanceID}`)

    connection.release();

    const newData = await guidanceProvider.getAllGuidances();

    return newData;
};
dao
삭제는 실제 DELETE문을 이용해서 삭제하지 않고 status 값을 바꿔서 삭제처리하도록 하겠습니다. 이렇게 하면 나중에 잘못 삭제된 데이터를 쉽게 복원할 수 있습니다.
// guidance 삭제
exports.deleteGuidance = async function (connection, guidanceID) {
    const query = `
        UPDATE HSB.Guidance
        SET status = "DELETE"
        WHERE id = ?;
    `;
    const row = await connection.query(query, guidanceID);
    return row;
};
앱에 연결
GuidanceService
alamofire는 path variable 기능을 제공하지 않습니다. 직접 url에 ()를 이용해서 넣어줍니다.
나머지는 fetchGuidance와 동일한 데이터를 받아오기 때문에 동일하게 처리를 해줍니다.
func deleteGuidance(guidanceID: Int, completionHandler: @escaping ([Guidance]) -> Void) {
    AF.request("\(SERVER_BASE_URL)/guidances/\(guidanceID)", method: .delete).responseDecodable(of: Response<[GuidanceRawData]>.self) { data in
        guard let response = data.value else { return }
        guard response.isSuccess == true else { return }
        guard let rawdata = response.result else { return }
        let guidances = rawdata.map { rawData in
            return Guidance(rawData: rawData)
        }
        completionHandler(guidances)
    }
}
VM에서 활용
VM도 마찬가지입니다. fetchGuidance와 동일한 처리를 해주면 됩니다.
func deleteGuidance(_ guidance: Guidance, completionHandler: @escaping () -> Void) {
    GuidanceService.shared.deleteGuidance(guidanceID: guidance.id) { [weak self] guidances in
        self?._guidances = guidances
        completionHandler()
    }
}
삭제 UI 구현
이전에 더미데이터를 삭제할 때는 그냥 휴지통 버튼만 누르면 삭제되도록 했지만 이번에는 서버에서 삭제하는 것이니까 alert를 띄워서 정말 삭제할 것인지 물어보도록 합시다.
cell의 휴지통 버튼을 눌렀을 때 바로 삭제하는 로직을 구현하지 않고 alert를 띄워서 “삭제”를 눌러야지만 삭제되도록 구했습니다.
// MARK: - StudentListCellDelegate

extension StudentListViewController: StudentListCellDelegate {
    func deleteButtonTapped(in cell: StudentListCell) {
        guard let guidance = cell.guidance else { return }
        showDeleteAlert(guidance: guidance)
    }
}
func showDeleteAlert(guidance: Guidance) {
let alert = UIAlertController(title: "정말 삭제하시겠습니까?", message: viewModel.guidanceDeletionMessage(guidance: guidance), preferredStyle: .alert)
let cancel = UIAlertAction(title: "취소", style: .cancel, handler: nil)
let delete = UIAlertAction(title: "삭제", style: .destructive) { _ in
self.viewModel.deleteGuidance(guidance) {
self.tableView.reloadData()
}
}
alert.addAction(cancel)
alert.addAction(delete)
self.present(alert, animated: true, completion: nil)
}_guidances로 guidances 업데이트
위에 작성한 코드를 보면 문제없이 삭제기능이 작동할 것 같지만 삭제를 해도 table view에서 삭제되지 않는 것을 볼 수 있습니다. 왜냐하면 _guidances는 업데이트가 되었지만 아직 실제로 table view가 참조하는 guidances는 업데이트 되지 않은 것이죠. 따라서 reloadData()를 해도 소용이 없습니다.
따라서 _guidances에 didSet으로 현재 filter에 맞추어 guidances를 다시 세팅하는 로직을 넣겠습니다. filter의 didSet에 있는 로직과 동일한 로직입니다. 따라서 함수로 따로 빼서 구현하겠습니다.
// before
class StudentListViewModel {

		private var _guidances: [Guidance] {
        didSet {
            filterGuidances()
        }
    }

    lazy var guidances: [Guidance] = _guidances

    var filter: GuidanceListFilter = .all {
        didSet {
            filterGuidances()
        }
    }

		private func filterGuidances() {
        switch filter {
        case .all:
            self.guidances = _guidances
        case .myGrade:
            self.guidances = _guidances.filter { guidance in
                guidance.student.grade == 1
            }
        case .myClass:
            self.guidances = _guidances.filter { guidance in
                guidance.student.grade == 1 && guidance.student.classNumber == 1
            }
        }
    }
}
결과
삭제 버튼을 누르면 alert가 나오고 삭제를 누르면 서버에서 삭제된 후에 다시 table view가 리로드 되는 것을 볼 수 있습니다.
마치며...
- 이제 기존에 구현한 모든 기능을 서버와 연동했군요.
- 이전에 만들었던 코드가 지금 만들고자 하는 코드와 충돌할 때 어떻게 방향성을 잡아야 할지 고민이 되더군요. 경험이 더 필요한 것 같습니다.
- 다음 시간 부터는 기능 하나하나 클라이언트와 서버를 동시에 만들어서 포스팅해보겠습니다.
