
기능 소개
앞선 포스팅에서 학년-반-번호를 통해서 학생을 조회하는 기능을 구현해봤습니다. 오늘 구현할 기능은 이전 기능을 통해 조회한 학생의 사진과 이름을 보여주고 해당 학생을 봉사활동 명단에 올리는 기능까지 구현해보겠습니다.
계획
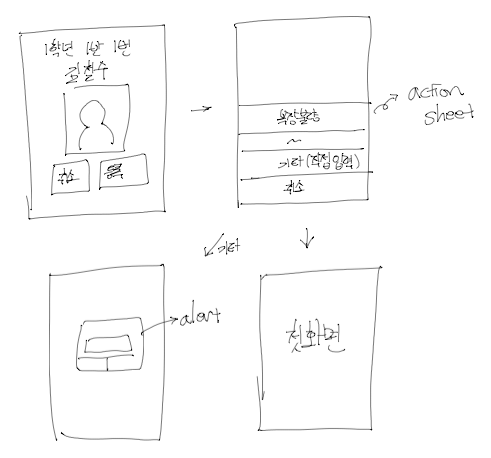
큰 그림
- 학년, 반, 번호를 입력하면 새로운 VC로 이동해서 학년-반-번호-이름-사진과 취소, 등록 버튼을 보여줍니다.
- 위 화면에서 봉사 명단에 등록할지 아닐지 결정합니다.
- 등록을 누르면 action sheet로 지도 사유 선택지를 보여줍니다.
- 다른 사유를 누르면 그대로 등록이 되고 기타를 누르면 alert에 textfield를 통해 직접 입력하도록 합니다.
어떻게 구현할 것인가?
- 네비게이션 컨트롤러가 등장할 차례인 것 같습니다. 저번에 만든 학생 선택 화면과 앞으로 만들 학생 조회 화면은 논리적으로 선후관계를 가집니다. 네비게이션 컨트롤러로 연결할 수 있도록 해보겠습니다.
- 계획 단계에서 이미 어떤 객체를 사용할지 다 정해 놓았군요. 나머지는 계획대로 하면 될 것 같습니다. 일단 시작해볼까요?
구현
기존 VC을 네비게이션 컨트롤러에 넣기
네비게이션 컨트롤러를 통해서 새로운 VC를 보여주기 위해서는 기존의 VC를 네비게이션 컨트롤러 안에 넣어야 합니다.
SceneDelegate 수정
저번에는 FaceCheckViewController() 그 자체가 rootViewController의 역할을 했다면 이번에는 FaceCheckViewController를 품은 UINavigationController가 그 역할을 합니다.
class SceneDelegate: UIResponder, UIWindowSceneDelegate {

  var window: UIWindow?

  func scene(_ scene: UIScene, willConnectTo session: UISceneSession, options connectionOptions: UIScene.ConnectionOptions) {
      guard let scene = (scene as? UIWindowScene) else { return }
      window = UIWindow(windowScene: scene)
      window?.rootViewController = UINavigationController(rootViewController: FaceCheckViewController())
      window?.makeKeyAndVisible()
  }
}
navigation bar 설정하기
기존 FaceCheckViewController에 navigation bar가 생겼습니다. 간단하게 설정해보겠습니다.
- navigationBar의 설정은 UINavigationBarAppearance() 객체에 세부 설정을 하고 해당 객체를 navigationBar의 standardAppearance 속성에 대입하는 방식을 취합니다.
- titleText의 속성을 NSAttributedString의 속성들을 사용해서 설정할 수 있습니다.
- navigationBar의 색을 엹은 회색으로 했으니 status bar에 표시되는 부분 (시간, 배터리 등)을 흰색으로 했으면 좋겠네요. navigationBar에만 다크모드를 적용하는 방식으로 합니다. (🙀 복잡한 개념인데 설명하기는 너무 어렵네요...)
func configureNavigationBar() {
//1️⃣
let appearance = UINavigationBarAppearance()
appearance.configureWithDefaultBackground()
appearance.backgroundColor = .lightGray
//2️⃣
appearance.titleTextAttributes = [NSAttributedString.Key.foregroundColor : UIColor.white, NSAttributedString.Key.font : UIFont.systemFont(ofSize: 25)]
let bar = navigationController?.navigationBar
bar?.standardAppearance = appearance
bar?.compactAppearance = appearance
bar?.scrollEdgeAppearance = appearance
//3️⃣
bar?.overrideUserInterfaceStyle = .dark
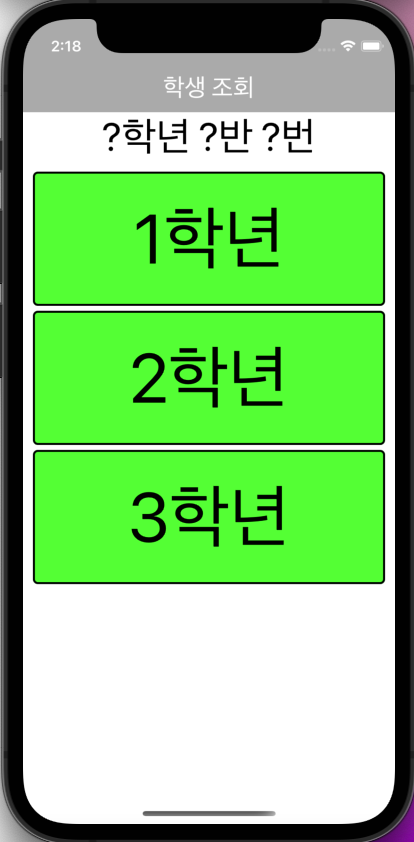
navigationItem.title = "학생 조회"
}해당 설정을 적용하면 아래와 같은 navigationBar를 얻을 수 있습니다.
(🚫 시뮬레이터에 버그가 있는 것 같네요. 처음에는 bar에 다크모드가 적용되지 않는데 홈화면 다녀오면 적용되어 있습니다. 발견하는데 2시간 걸렸습니다. 고쳐줘요 애플...)
Student 객체
Model 부분
MVVM 패턴에서 Model을 만들 차례입니다. 나중에 서버와 통신하는 부분을 만들면서 아마 좀 수정해야하겠지만 일단 당장에 필요한 항목으로만 만들어 봅시다.
- id는 DB에서 primary key 역할을 할 예정입니다.
- 사용자가 입력한 학년-반-번호와 해당 정보로 조회한 이름과 프로필 사진을 property로 가지고 있습니다.
- 나중에 아마 좀 수정할 필요가 있을 겁니다. 일단 과감하게 만들어 보고 수정해가면서 합시다.☺️
struct Student {
    let id: Int
    let grade: Int
    let classNumber: Int
    let number: Int
    let name: String
    let profilePicture: UIImage?
}
viewModel 부분
VM에서 입력된 정보를 바탕으로 Student의 인스턴스를 만들어서 반환하는 computed property를 하나 만들었습니다. 학년-반-번호 중 하나의 정보라도 없다면 nil을 반환하게 했습니다. 그리고 서버가 없으니 😭 대부분은 더미 데이터입니다.
// MARK: - Student 객체 더미데이터

var student: Student? {
    guard let grade = grade else { return nil }
    guard let classNumber = classNumber else { return nil }
    guard let number = number else { return nil }

    let dummyID = 1
    let dummyName = "김철수"
    let dummyImage = UIImage(systemName: "person")

    let student = Student(id: dummyID, grade: grade, classNumber: classNumber, number: number, name: dummyName, profilePicture: dummyImage)

    return student
}
두 VC 연결하기
StudentProfileController 구현
두 컨트롤러를 연결해야 하는데 아직 한 쪽이 없습니다. 일단은 형태만 만들어 봅시다.
잘 연결되었는지 확인하기 위해서 배경색과 navigation title만 변경했습니다.
❗️ MVVM 모델에서는 View가 데이터를 가지기 보다는 ViewModel이 전부 가지고 있도록 하는 것이 좋습니다. 따라서 FaceCheckViewController에서 받은 student를 직접 가지고 있지말고 viewModel을 init해서 가지고 있읍시다!
class StudentProfileViewController: UIViewController {

    // MARK: - Properties

    let viewModel: StudentProfileViewModel

    // MARK: - Lifecycle

    init(student: Student) {
        self.viewModel = StudentProfileViewModel(student: student)
        super.init(nibName: nil, bundle: nil)
    }

    required init?(coder: NSCoder) {
        fatalError("init(coder:) has not been implemented")
    }

    override func viewDidLoad() {
        configureUI()
    }

    // MARK: - Helper

    func configureUI() {
        view.backgroundColor = .blue
        navigationItem.title = "학생 정보"
    }
}
연결하기
계획에 따르면 학년-반-번호를 입력하면 그 순간 StudentProfileViewController로 넘어가야 합니다. 그렇다면 어디에 VC를 전환하는 코드를 넣어야 할까요?
정답은 collectionView의 didSelect 메소드입니다. 더 정확히 말하면 currentInputCellType이 .number일 때 입니다.
마지막 번호까지 선택하면 해당 정보로 VM에서 Student객체를 가져다가 StudentProfileViewController를 init한 후에 navigationController에 푸시하면 됩니다!
extension FaceCheckViewController: UICollectionViewDelegate {
    func collectionView(_ collectionView: UICollectionView, didSelectItemAt indexPath: IndexPath) {
        switch currentInputCellType {
        case .grade:
            viewModel.grade = indexPath.row + 1
            studentInfoLabel.text = viewModel.studentInfoLabelText
            currentInputCellType = .classNumber
        case .classNumber:
            viewModel.classNumber = indexPath.row + 1
            studentInfoLabel.text = viewModel.studentInfoLabelText
            currentInputCellType = .number
	    //⭐️ 화면 전환 타이밍!
        case .number:
            viewModel.number = indexPath.row + 1
            guard let student = viewModel.student else { return }
            let vc = StudentProfileViewController(student: student)
            navigationController?.pushViewController(vc, animated: true)
        }
    }
}
연결 점검
연결이 잘 되었군요. 한 가지 짚고 넘어가지면 navigationBar의 설정이 유지되는 것을 볼 수 있습니다.
navigationBar의 속성들은 UINavigationController에 속해있습니다. 따라서 같은 네비게이션 컨트롤러 안에 있는 두 VC가 모두 같은 navigationBar 속성을 가집니다.
반면에 button과 title 같은 barItem은 각각의 VC 소속입니다. 따라서 만약 title을 변경하지 않았다고 해도 title이 유지되지는 않습니다.
StudentProfileController 구현
UI 구현
자 넘어가는 것을 확인했으니 본격적으로 VC를 구현해봅시다. 계획에 따르면 label 2개와 imageView 1개, 2개의 버튼을 만들어야 합니다. UI 코드는 어려운 부분은 없으니 설명은 생략하고 결과물만 보여드리겠습니다.
import UIKit

class StudentProfileViewController: UIViewController {

    // MARK: - Properties

    let viewModel: StudentProfileViewModel

    lazy var viewModel = StudentProfileViewModel(student: student)

    let infoLabel: UILabel = {
        let label = UILabel()
        label.font = .systemFont(ofSize: 40)
        label.textAlignment = .center
        return label
    }()

    let nameLabel: UILabel = {
        let label = UILabel()
        label.font = .systemFont(ofSize: 40)
        label.textAlignment = .center
        return label
    }()

    let profileImageView: UIImageView = {
        let iv = UIImageView()
        iv.contentMode = .scaleToFill
        return iv
    }()

    let registerButton: UIButton = {
        let button = UIButton()
        button.setTitle("등록", for: .normal)
        button.titleLabel?.font = .systemFont(ofSize: 50)
        button.backgroundColor = .green
        button.layer.borderColor = UIColor.black.cgColor
        button.layer.borderWidth = 1
        button.layer.cornerRadius = 10
        return button
    }()

    let cancelButton: UIButton = {
        let button = UIButton()
        button.setTitle("취소", for: .normal)
        button.titleLabel?.font = .systemFont(ofSize: 50)
        button.backgroundColor = .red
        button.layer.borderColor = UIColor.black.cgColor
        button.layer.borderWidth = 1
        button.layer.cornerRadius = 10
        return button
    }()

    // MARK: - Lifecycle

		init(student: Student) {
        self.viewModel = StudentProfileViewModel(student: student)
        super.init(nibName: nil, bundle: nil)
    }

    required init?(coder: NSCoder) {
        fatalError("init(coder:) has not been implemented")
    }

    override func viewDidLoad() {
        configureUI()
        configure()
    }

    // MARK: - Helper

    func configureUI() {
        view.backgroundColor = .white
        navigationItem.title = "학생 정보"

        view.addSubview(infoLabel)
        infoLabel.translatesAutoresizingMaskIntoConstraints = false
        infoLabel.topAnchor.constraint(equalTo: view.safeAreaLayoutGuide.topAnchor).isActive = true
        infoLabel.leftAnchor.constraint(equalTo: view.leftAnchor).isActive = true
        infoLabel.rightAnchor.constraint(equalTo: view.rightAnchor).isActive = true

        view.addSubview(nameLabel)
        nameLabel.translatesAutoresizingMaskIntoConstraints = false
        nameLabel.topAnchor.constraint(equalTo: infoLabel.bottomAnchor).isActive = true
        nameLabel.leftAnchor.constraint(equalTo: view.leftAnchor).isActive = true
        nameLabel.rightAnchor.constraint(equalTo: view.rightAnchor).isActive = true

        view.addSubview(profileImageView)
        profileImageView.translatesAutoresizingMaskIntoConstraints = false
        let imageViewWidth = view.frame.width - 40
        profileImageView.widthAnchor.constraint(equalToConstant: imageViewWidth).isActive = true
        profileImageView.heightAnchor.constraint(equalToConstant: imageViewWidth).isActive = true
        profileImageView.topAnchor.constraint(equalTo: nameLabel.bottomAnchor).isActive = true
        profileImageView.leftAnchor.constraint(equalTo: view.leftAnchor, constant: 20).isActive = true
        profileImageView.rightAnchor.constraint(equalTo: view.rightAnchor, constant: -20).isActive = true

        let buttonWidth = (view.frame.width - 30) / 2

        view.addSubview(registerButton)
        registerButton.translatesAutoresizingMaskIntoConstraints = false
        registerButton.widthAnchor.constraint(equalToConstant: buttonWidth).isActive = true
        registerButton.heightAnchor.constraint(equalToConstant: buttonWidth).isActive = true
        registerButton.topAnchor.constraint(equalTo: profileImageView.bottomAnchor).isActive = true
        registerButton.rightAnchor.constraint(equalTo: view.rightAnchor, constant: -10).isActive = true

        view.addSubview(cancelButton)
        cancelButton.translatesAutoresizingMaskIntoConstraints = false
        cancelButton.widthAnchor.constraint(equalToConstant: buttonWidth).isActive = true
        cancelButton.heightAnchor.constraint(equalToConstant: buttonWidth).isActive = true
        cancelButton.topAnchor.constraint(equalTo: profileImageView.bottomAnchor).isActive = true
        cancelButton.leftAnchor.constraint(equalTo: view.leftAnchor, constant: 10).isActive = true
    }

    func configure() {
        infoLabel.text = viewModel.infoLabelText
        nameLabel.text = viewModel.nameLabelText
        profileImageView.image = viewModel.profileImage
    }
}
(😅 디자인이 점점 구려지는군요 하하하...)
뷰 모델 구현
위 UI 구현하는 코드에서 student객체로 viewModel을 init하고 학년, 반, 번호, 이름과 사진을 viewModel에서 가지고 왔습니다. 미리 구현한 뷰모델 코드는 아래와 같습니다.
- Model부분을 보시면 아시겠지만 프로필 사진은 없을 수도 있습니다. (🤔 전학생 같은 케이스가 있을 수 있지요) 그래서 만약에 프로필 사진이 없다면 디폴트 이미지를 반환하도록 했습니다. (이미지가 없다는 기호입니다.)
import Foundation
import UIKit

struct StudentProfileViewModel {

    // MARK: - Properties

    let student: Student

    // MARK: - labelText

    var infoLabelText: String {
        return "\(student.grade)학년 \(student.classNumber)반 \(student.number)번"
    }

    var nameLabelText: String {
        return "\(student.name)"
    }

    // MARK: - profileImage

    //1️⃣ 이미지
    var profileImage: UIImage {
        if let profileImage = student.profilePicture {
            return profileImage
        } else {
            return UIImage(systemName: "person.fill.xmark")!
        }
    }
}
버튼 구현
자 이제 버튼 기능을 구현할 차례입니다. 아마 가장 복잡한 부분이 되지 않을까 합니다.
등록 actionSheet UI 구현
일단 등록 버튼은 교문지도에서 걸린 사유들을 기록합니다. 계획대로 action sheet를 사용할 생각입니다. 일단 몇가지 대표적인 사유와 기타 버튼을 껍데기만 구현 해놓겠습니다.
@objc func registerButtonTapped() {
    let actionSheet = UIAlertController(title: nil, message: nil, preferredStyle: .actionSheet)

    let wrongClothes = UIAlertAction(title: "복장 불량", style: .default) { _ in
        return
    }

    let noShoes = UIAlertAction(title: "실내화 없음", style: .default) { _ in
        return
    }

    let trespassing = UIAlertAction(title: "무단횡단", style: .default) { _ in
        return
    }

    let others = UIAlertAction(title: "기타", style: .default) { _ in
        return
    }

    let cancel = UIAlertAction(title: "취소", style: .cancel)

    actionSheet.addAction(wrongClothes)
    actionSheet.addAction(noShoes)
    actionSheet.addAction(trespassing)
    actionSheet.addAction(cancel)
    actionSheet.addAction(others)

    self.present(actionSheet, animated: true, completion: nil)
}
구현 해놓고 보니 selector 안이 너무 복잡하네요. actionSheet를 별도의 멤버변수로 만들어 가지고 있겠습니다.
let actionSheet: UIAlertController = {
    let actionSheet = UIAlertController(title: nil, message: nil, preferredStyle: .actionSheet)

    let wrongClothes = UIAlertAction(title: "복장 불량", style: .default) { _ in
        return
    }

    let noShoes = UIAlertAction(title: "실내화 없음", style: .default) { _ in
        return
    }

    let trespassing = UIAlertAction(title: "무단횡단", style: .default) { _ in
        return
    }

    let others = UIAlertAction(title: "기타", style: .default) { _ in
        return
    }

    let cancel = UIAlertAction(title: "취소", style: .cancel)

    actionSheet.addAction(wrongClothes)
    actionSheet.addAction(noShoes)
    actionSheet.addAction(trespassing)
    actionSheet.addAction(cancel)
    actionSheet.addAction(others)

    return actionSheet
}()
@objc func registerButtonTapped() {
self.present(actionSheet, animated: true, completion: nil)
}더 깔끔한 코드가 된 것 같아서 기분이 좋습니다 ☺️ 완성본은 아래와 같습니다.

취소 버튼 기능 구현
취소 버튼의 기능에 대해서 조금 고민거리가 있습니다. 일단은 취소를 누르면 바로 전 (학년, 반은 선택되어 있고 번호를 선택하기 전)으로 가야할지 아니면 완전히 처음으로 (학년부터 선택) 가야할지에 대한 고민입니다.
제 선택은 후자입니다. 일단은 전자의 경우 네비게이션바에 있는 뒤로 버튼이 같은 기능을 합니다. 그렇다면 버튼의 이름도 "처음으로"로 바꾸고 네비게이션 바에 있는 뒤로 버튼도 기능에 맞게 이름을 바꿔보도록 하겠습니다.
- \n을 통해서 줄바꿈을 했습니다. 그리고 UIButton의 title은 기본적으로 한줄이므로 2줄을 표시할 수 있도록 해주어야 합니다.
- 취소 버튼에 연결된 셀렉터 함수입니다. navigationController를 통해서 FaceCheckViewController의 인스턴스를 받아오고 해당 VC에 구현된 모든 input을 초기화하는 함수를 실행하고 pop을 통해서 현재 VC를 제거합니다. (clearInputs는 뷰모델에 저장된 값을 초기화하고 학년 선택으로 돌아가는 메소드입니다. 설명은 생략하겠습니다.)
- 자동으로 생성되는 barbutton 대신에 뒤로라는 이름을 가진 바버튼을 새로 만들어서 넣어주었습니다. 연결된 클로저는 단순히 현재 VC를 pop하는 코드입니다.
let cancelButton: UIButton = {
    let button = UIButton()

    //1️⃣
    button.setTitle("처음\n으로", for: .normal)
    button.titleLabel?.numberOfLines = 2

    button.titleLabel?.font = .systemFont(ofSize: 50)
    button.backgroundColor = .red
    button.layer.borderColor = UIColor.black.cgColor
    button.layer.borderWidth = 1
    button.layer.cornerRadius = 10
		button.addTarget(self, action: #selector(cancelTapped), for: .touchUpInside)
    return button
}()
//2️⃣
@objc func cancelButtonTapped() {
guard let vc = navigationController?.viewControllers[0] as? FaceCheckViewController else { return }
vc.clearInputs()
navigationController?.popViewController(animated: true)
}//3️⃣
func configureUI() {
view.backgroundColor = .white
navigationItem.title = "학생 정보"
let backButton = UIBarButtonItem(title: "뒤로", style: .plain, target: self, action: #selector(backButtonTapped))
navigationItem.leftBarButtonItem = backButton
//... 후략 ...
}완성된 기능을 테스트한 모습입니다.
actionSheet 기능 구현
생활지도 이유 열거형 만들기
코드를 짜다보니 생활지도 이유를 열거형으로 만드는 것이 좋겠네요. 일단 viewModel과 소통을 할 때도 편리하고 (안 그러면 이유 하나하나 메소드를 만들어야 합니다.) 코드를 짤 때도 실수할 확률도 적습니다.
- 기왕이면 description이라는 계산 프로퍼티를 만들어서 action sheet의 label과 나중에 DB와 소통할 때도 사용하면 좋겠습니다.
- 더불어 기타를 의미하는 others에는 정확한 설명을 String 연관값으로 가지도록 하겠습니다.
- 또한 caseIterable을 통해서 actionSheet를 구현할 때 활용하겠습니다. (이렇게 하면 나중에 이유를 수정할 때 해당 열거형만 수정하면 자동으로 actionSheet에도 추가되게 할 수 있습니다 👍 )
- ❗️ 원래는 CaseIterable은 자동으로 allCases를 컴파일 단계에서 구현되는데 연관값을 가지는 case가 있는 것은 수동으로 구현해야하나봅니다. 수동으로 구현해줍니다.
- 뷰모델에 임시로 학생을 명단에 등록하는 메소드를 만들어 두겠습니다. (구체적인 구현은 나중에!)
enum GuidanceReason: CaseIterable { //3️⃣
    case wrongClothes
    case noShoes
    case trespassing
    case others(detail: String) //2️⃣

    //4️⃣
    static var allCases: [GuidanceReason] = [.wrongClothes, .noShoes, .trespassing, .others(detail: "")]

    //1️⃣
    var description: String {
        switch self {
        case .wrongClothes: return "복장 불량"
        case .noShoes: return "실내화 없음"
        case .trespassing: return "무단횡단"
        case .others: return "기타"
        }
    }
}
//5️⃣
func registerGuidance(reason: GuidanceReason) {
if case .others(let detail) = reason {
print("\(self.infoLabelText) \(nameLabelText)이(가) \(reason.description)을(를) 했습니다. 기타사유 \(String(describing: detail))")
} else {
print("\(self.infoLabelText) \(nameLabelText)이(가) \(reason.description)을(를) 했습니다.")
}
}열거형 활용해서 actionSheet 리팩토링하기
CaseIterable를 준수하는 열거형을 활용해서 actionSheet를 다시 만들어 봅시다. 이렇게 하면 나중에 enum만 수정하면 자동적으로 actionSheet도 수정되어 유지보수를 더 쉽게 할 수 있습니다.
lazy var로 선언한 이유는 내부에서 self에 접근해야 하기 때문입니다. 기존 처럼 let으로 선언하면 self가 완전히 init되기 전에 실행되므로 컴파일 에러가 발생합니다!
lazy var actionSheet: UIAlertController = {
    let actionSheet = UIAlertController(title: nil, message: nil, preferredStyle: .actionSheet)
    GuidanceReason.allCases.forEach { reason in
        let action = UIAlertAction(title: reason.description, style: .default) { _ in
            self.actionSheetTapped(reason: reason)
        }
        actionSheet.addAction(action)
    }

    let cancel = UIAlertAction(title: "취소", style: .cancel)
    actionSheet.addAction(cancel)

    return actionSheet
}()
기타 이유의 detail 입력 alert 띄우기
reason이 .others라면 연관 값인 detail에 값이 있는지 확인하고 없으면 alert를 띄웁시다. 나머지 경우에는 전부 viewModel에서 명단에 등록하는 메소드를 사용하면 됩니다.
func actionSheetTapped(reason: GuidanceReason) {
    switch reason {
    case .others(let detail):
        if detail == nil {
            self.present(self.otherReasonAlert, animated: true, completion: nil)
        } else {
            self.viewModel.registerGuidance(reason: reason)
        }
    default:
        self.viewModel.registerGuidance(reason: reason)
    }
}
기타 이유의 detail 입력 alert 구현
textField 1개와 등록, 취소 버튼을 가진 alert창을 구현합니다. 해당 alert는 위의 코드에서 보듯이 .other이고 detail이 nil일 때만 작동합니다.
textfield에 입력한 이유를 가지고 새로 GuidanceReason객체를 만들어 actionSheetTapped을 한번 더 실행합니다.
lazy var otherReasonAlert: UIAlertController = {
    let alert = UIAlertController(title: "기타 사유 입력", message: nil, preferredStyle: .alert)
    alert.addTextField { tf in
        tf.placeholder = "직접 입력하세요."
    }
    let register = UIAlertAction(title: "등록", style: .default) { _ in
        let detail = alert.textFields?[0].text
        let reason = GuidanceReason.others(detail: detail)
        self.actionSheetTapped(reason: reason)
    }
    let cancel = UIAlertAction(title: "취소", style: .cancel, handler: nil)
    alert.addAction(register)
    alert.addAction(cancel)
    return alert
}()
결과
한번 실행해보겠습니다. 의도된 대로 되는 것 같군요. (시뮬레이터 밑에 검은 화면은 콘솔입니다.)
- 선택한 학년-반-번호로 이름과 사진을 조회합니다.
- 등록 버튼을 통해 생활지도를 받는 이유를 등록합니다.
- 기타 사유의 경우는 직접 입력을 받도록 했습니다.

마치며
- MVVM 패턴에 대해 추가적으로 공부를 좀 더 해야겠네요. 어떤 것을 View에서 하고 어떤 것을 VM에서 해야하는지 헷갈리는 경우가 많네요ㅠ
- 역시 인강을 보고 공부하는 것과 직접 생각해서 만드는 것의 차이는 크네요. 열심히 연습해야겠습니다.
