YOLO v8 객체감지모델 학습하기
0. 학습 참고자료 및 진행방향
0.1 학습 참고자료
- 링크 : 로보플로우의 YOLO v8 소개 원문
0.2 학습 진행방향
문서에서 제시하는 방법은 Colab에서 제공한 노트북 파일을 베이스로 한다고 적혀있어 노트북 파일을 활용하고 또 개인적으로 설치한 Pytorch 환경에서 설치가 가능한지, mps를 활용할 때 어떻게 되는지도 볼 계획...
이었으나 아직 MPS는 테스트 해보지 않았다는 슬픈 소식을 쉽게 찾을 수 있어서 단념했다
1. How to install YOLOv8
pip install ultralytics
추천하는 설치방식은 pip라고 하니 그대로 따라한다
2. The New YOLOv8 API
The developers of YOLOv8 decided to break away from the standard YOLO project design : separate train.py, detect.py, val.py, and export.py scripts. In the short term it will probably cause some confusion while in the long term, it is a fantastic decision!
This pattern has been around since YOLOv3, and every YOLO iteration has replicated it. It was relatively simple to understand but notoriously challenging to deploy especially in real-time processing and tracking scenarios.
The new approach is much more flexible because it allows YOLOv8 to be used independently through the terminal, as well as being part of a complex computer vision application.
정리하면, 기존의 API 제공방식에서 벗어나 분리된 파일을 통해 제공하는 방법을 선택했고 좋은 성능을 보여줄 것이라고 한다
3. The YOLOv8 CLI
YOLOv8 comes with a command line interface that lets you train, validate or infer models on various tasks and versions. The CLI requires no customization or code. You can run all tasks from the terminal. Usage is fairly similar to the scripts we are familiar with. The example below shows how to leverage the CLI to detect objects in a given image.
CLI로 접근이 가능해 코드를 짤 필요가 없다고 하고 예시 코드를 첨부하였다
CLI로 접근해보니, 동작은 하는 것 같은데 커멘드라인으로 결과가 나오고 이미지에 적용돼서 나오진 않았다
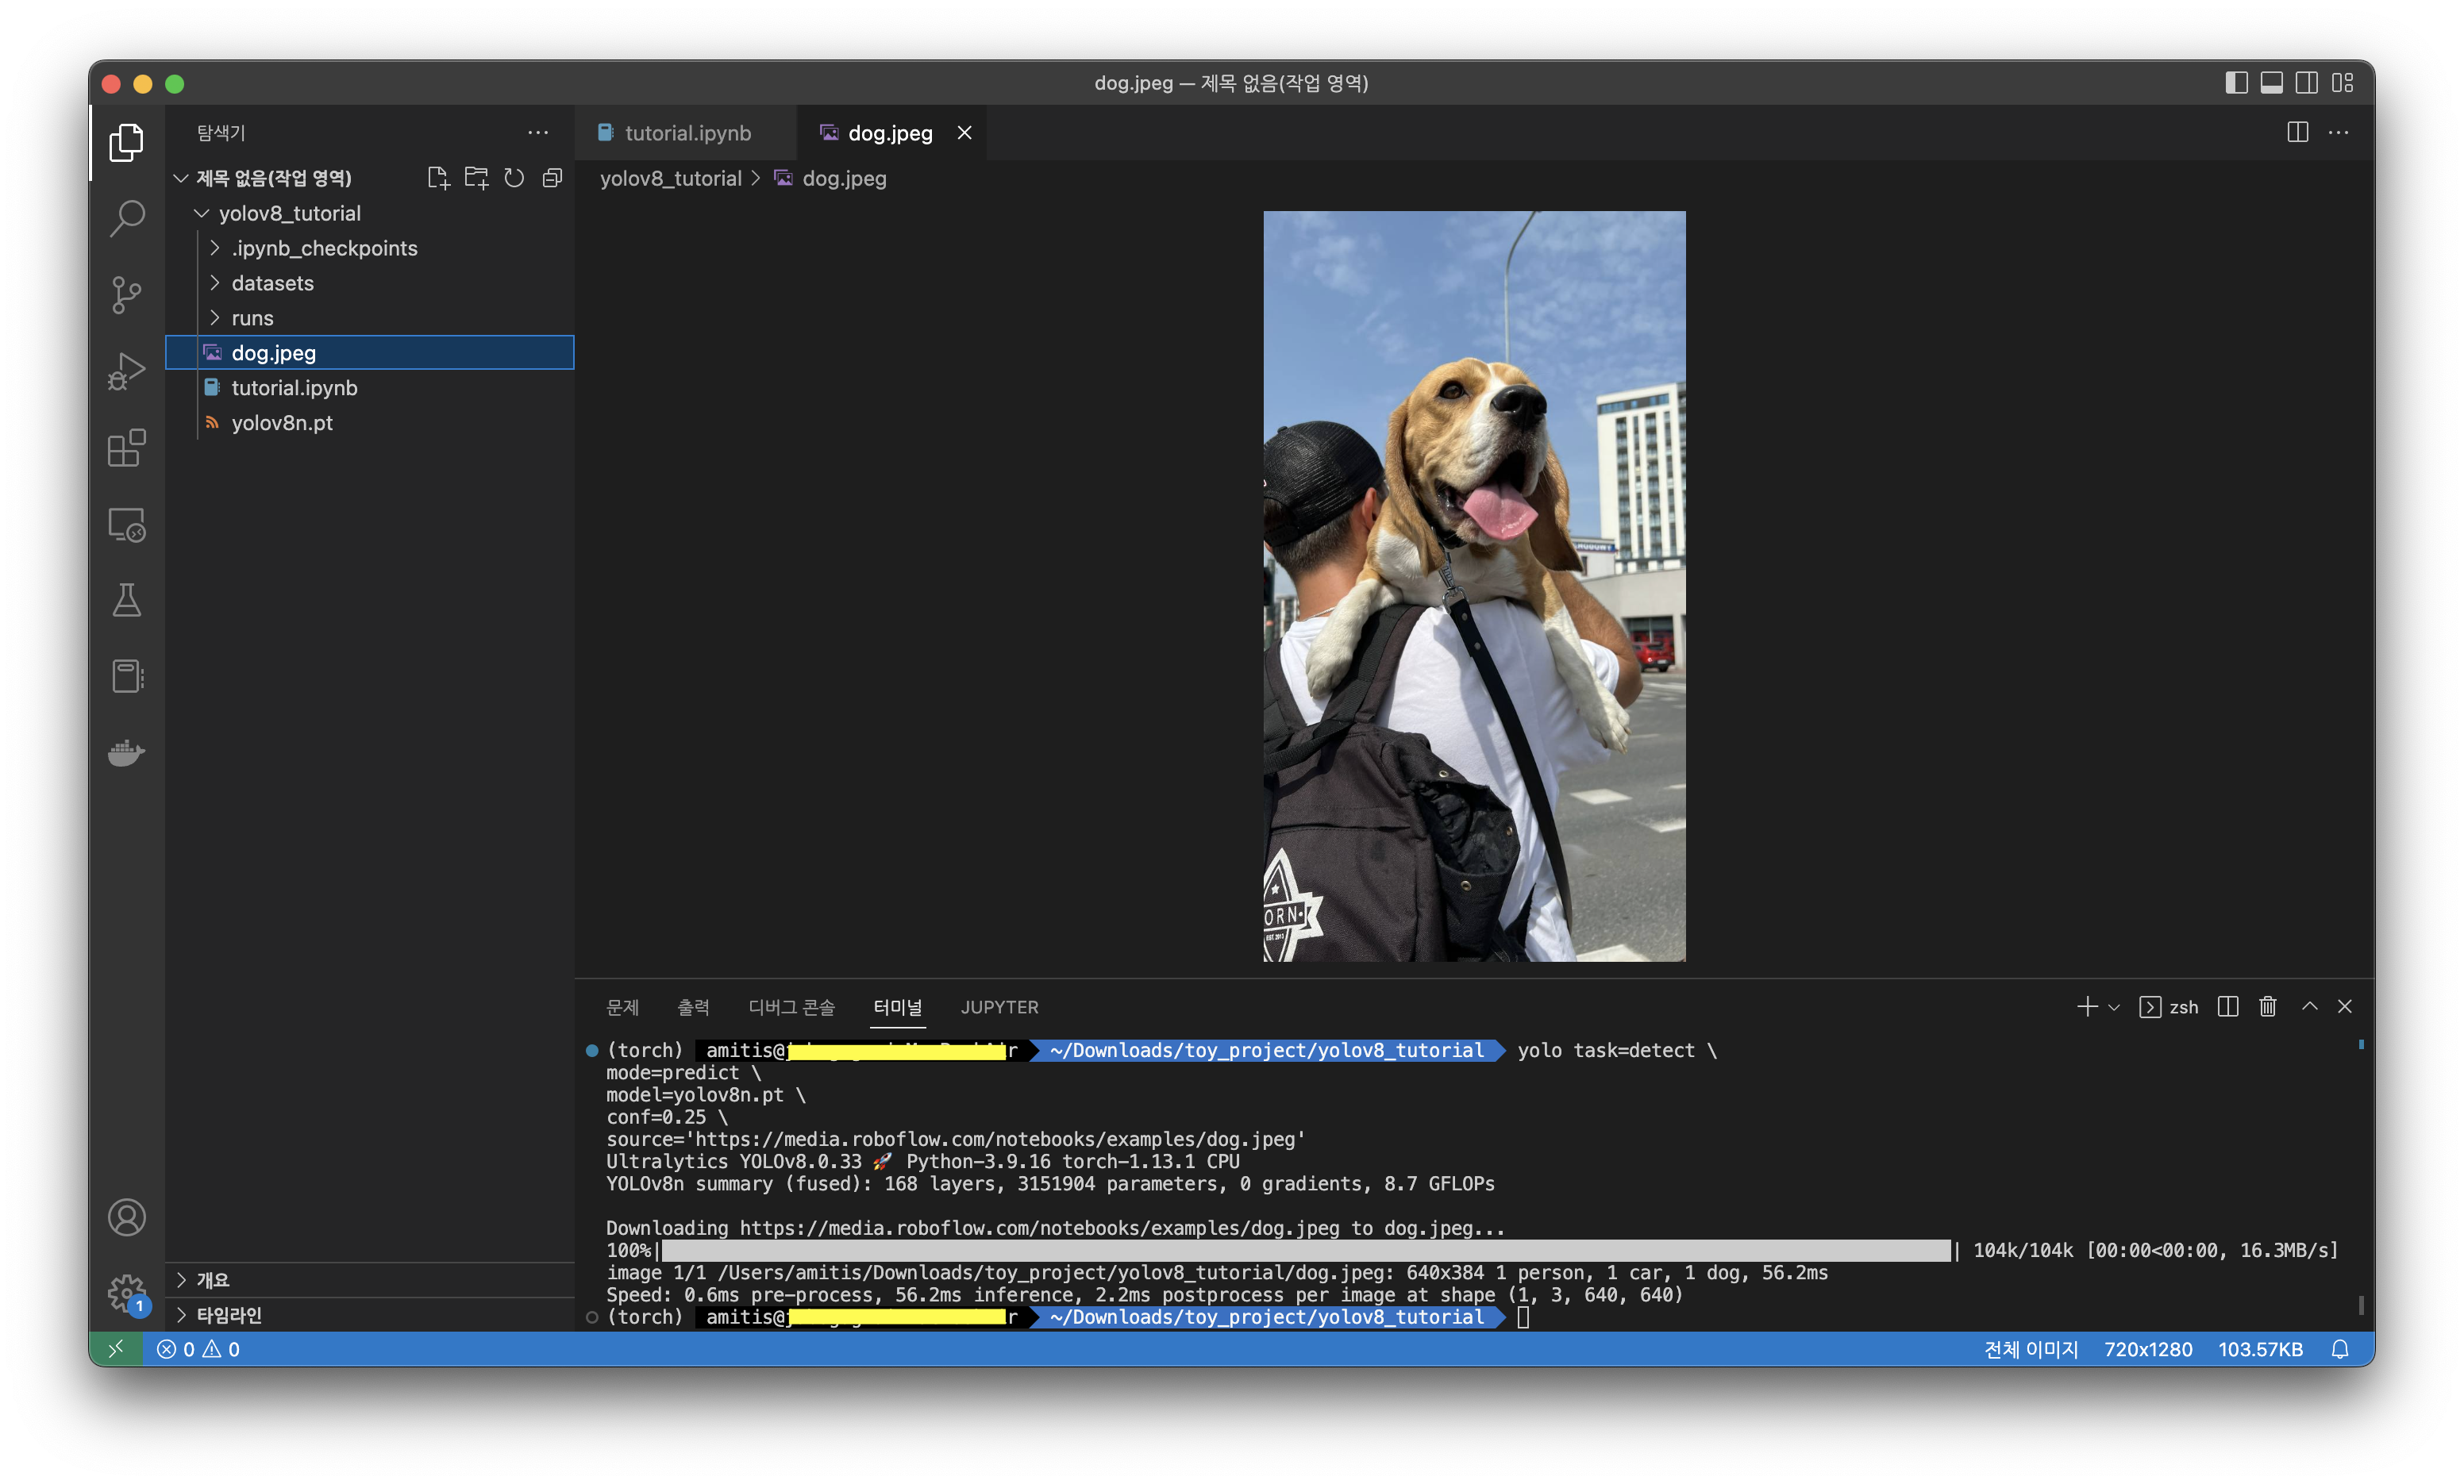
노트북 파일로 제공해준 커멘드라인명령어를 그대로 따라서 가져오니까 성공했다! 아마save=True 옵션이 필요한 듯 싶다
yolo task=detect mode=predict model=yolov8n.pt conf=0.25 source='https://media.roboflow.com/notebooks/examples/dog.jpeg' save=True
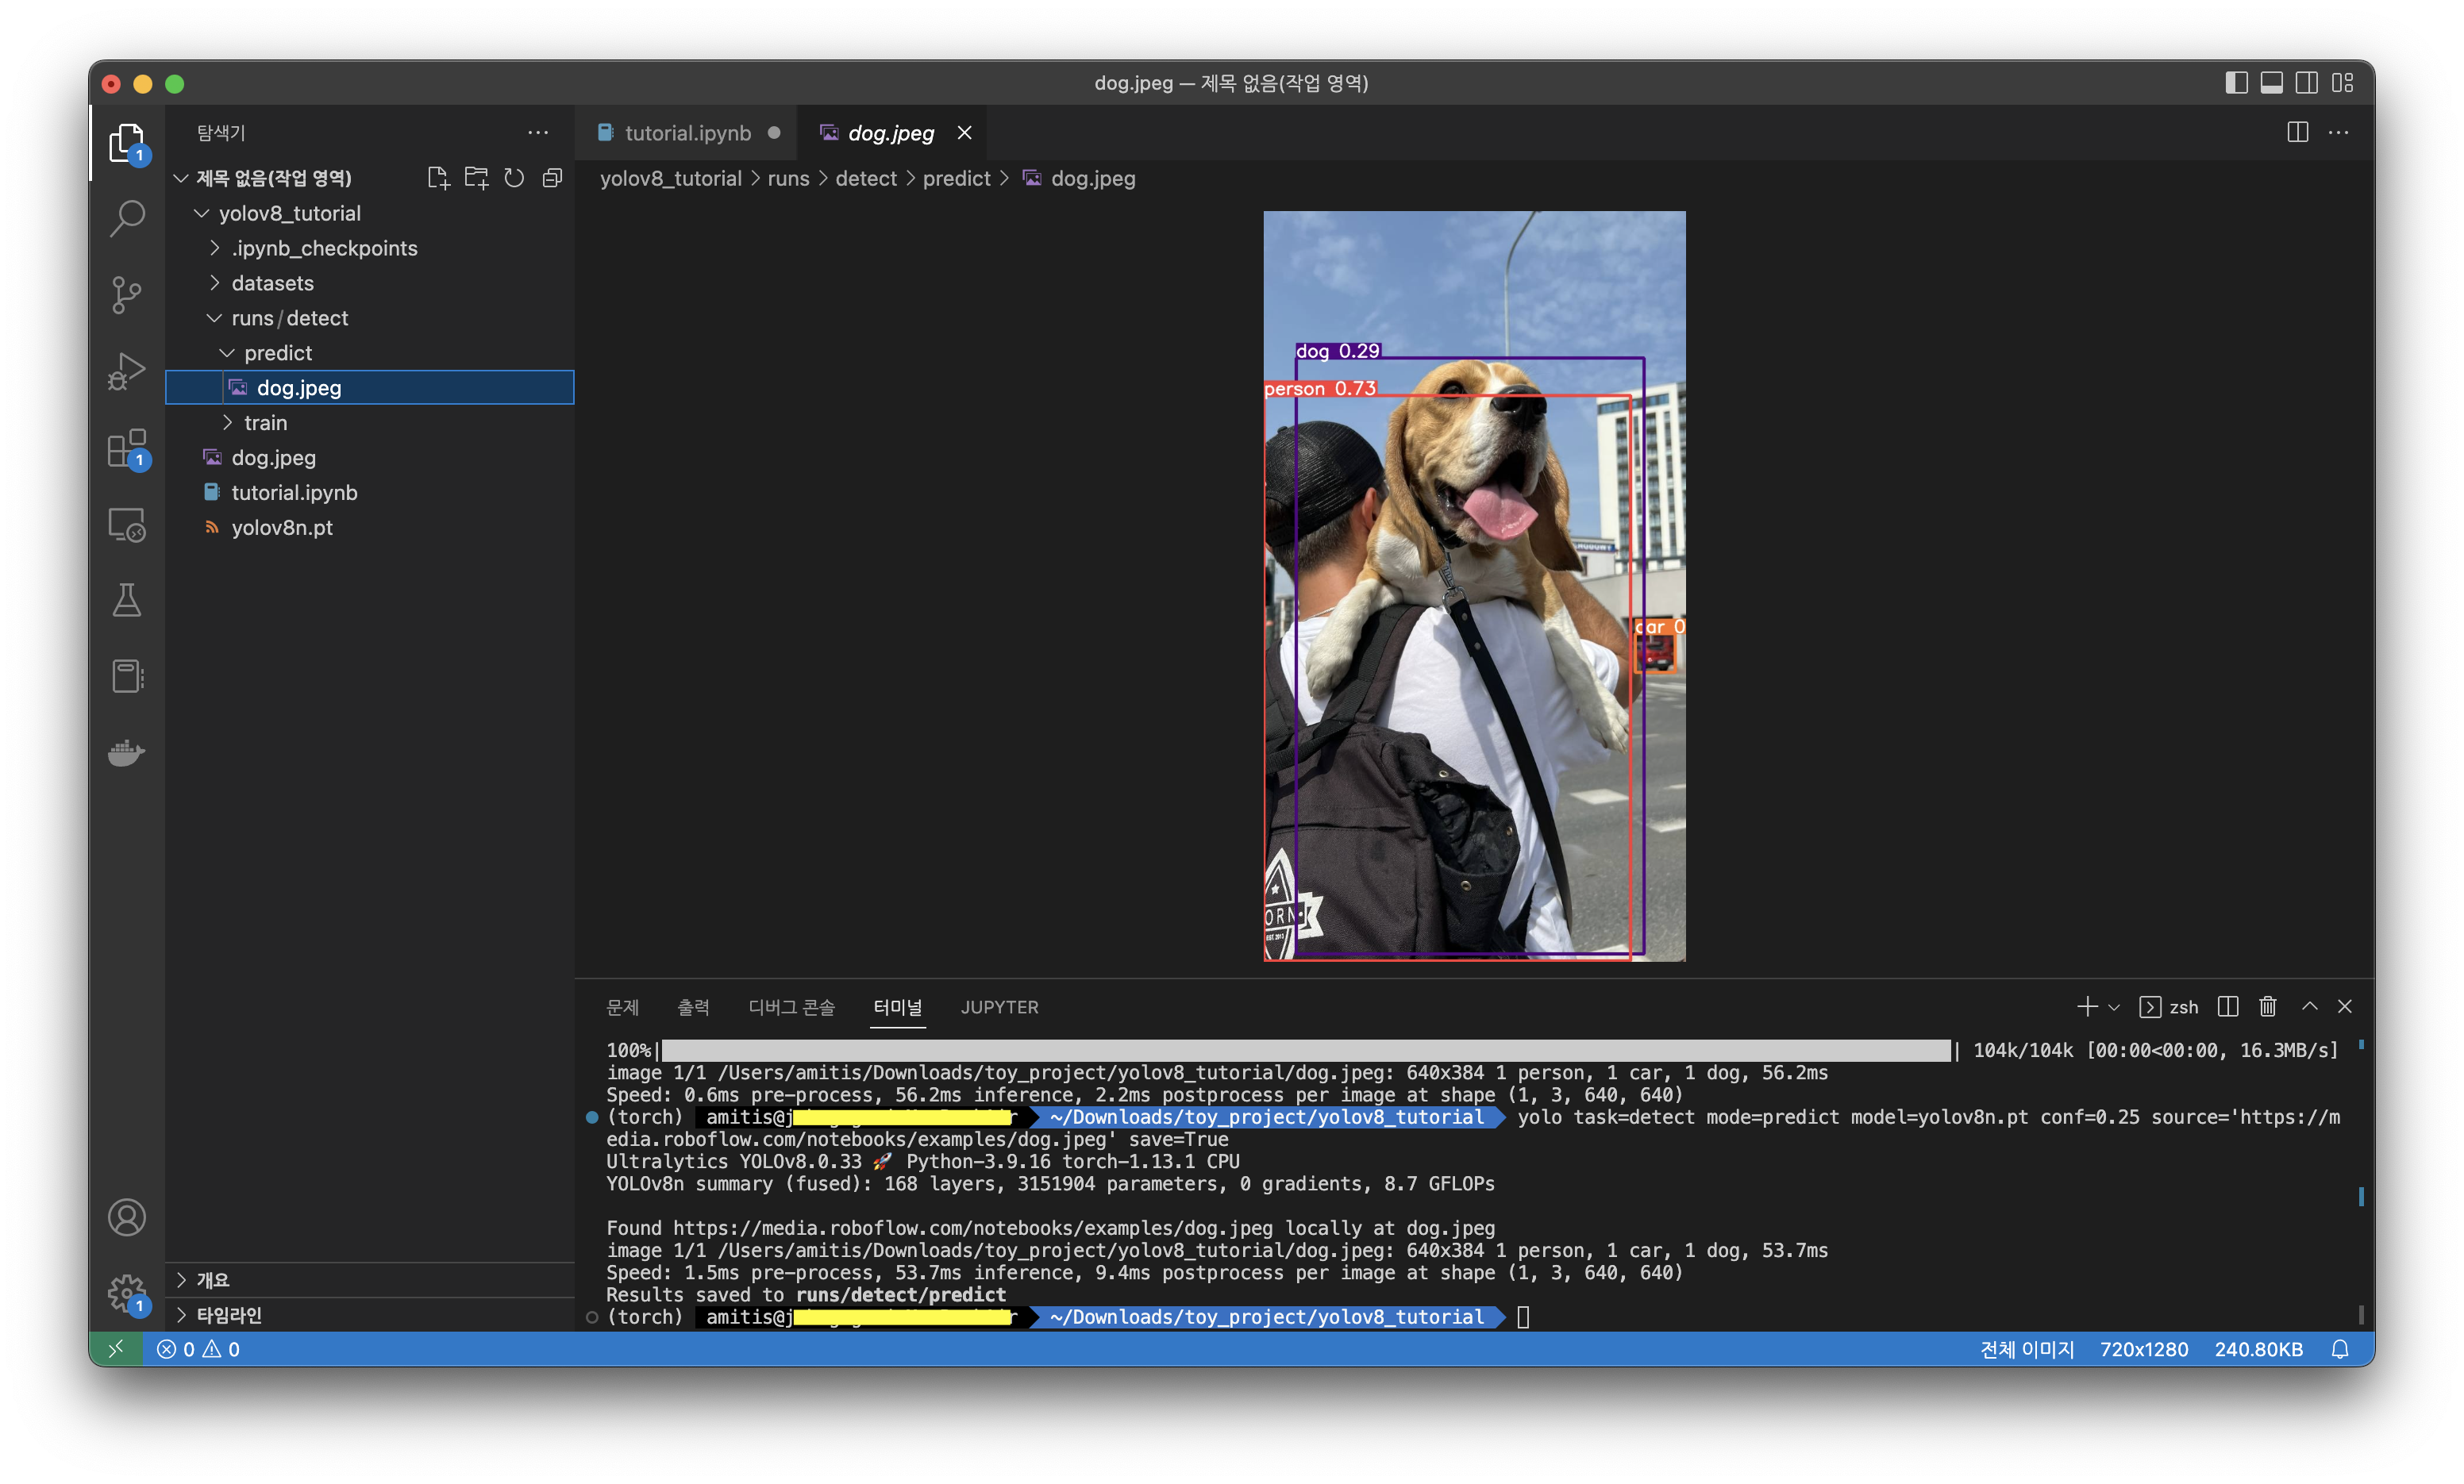
테두리가 생기니 편안해진다
3.1 The YOLOv8 Python SDK
Ultralytics YOLO comes with a pythonic Model and Trainer interface. This finally allows us to use the YOLO model inside a custom Python script in only a few lines of code. Something like this has been impossible until now without doing a repository fork and making your own changes to the code.
파이썬으로도 돌려볼 수 있다
from ultralytics import YOLO

model = YOLO('yolov8n.pt')
model.predict(
   source='https://media.roboflow.com/notebooks/examples/dog.jpeg',
   conf=0.25
)
이 방식도 CLI와 마찬가지로 출력 결과로만 분류한 내용을 보여줬고 뒤에 아까처럼 옵션을 추가하면 구분된 사진을 볼 수 있다
4. Preparing a custom dataset for YOLOv8
Building a custom dataset can be a painful process. It might take dozens or even hundreds of hours to collect images, label them, and export them in the proper format. Fortunately, Roboflow makes this process straightforward. Let me show you how!
roboflow를 안 쓰면 데이터 수집과 라벨링 과정이 지옥이라고 한다.. 그래서 roboflow를 활용해 지옥에서 꺼내주는 방법을 알려주고자 한다
4.1 Create a project
Before you start, you need to create a Roboflow account. Once you do that, you can create a new project in the Roboflow dashboard. Keep in mind to choose the right project type. In this case choose, "Object Detection".
먼저 가입하고 따라해라
4.2 Upload your images
Next, add data to your newly created project. You can do it via API or through our web interface. If you don’t have a dataset, you can grab one from Roboflow Universe or use the football-players-detection dataset which we will be showing later in this tutorial.
나는 데이터셋이 없으니 Roboflow Universe에 있는 football-players-detection을 활용하겠다
원문에서 보면 football-players-detection을 클릭할 수 있는데 기존에 원문을 읽던 창을 복사해 새로 열고 클릭해보자
4.2.1 Get football-players-detection images
해당 내용은 원문에서 소개하고 있지 않아서 추가했다

링크를 클릭했으면 위와 같은 사이트가 등장한다. 왼쪽에 있는 Images를 클릭
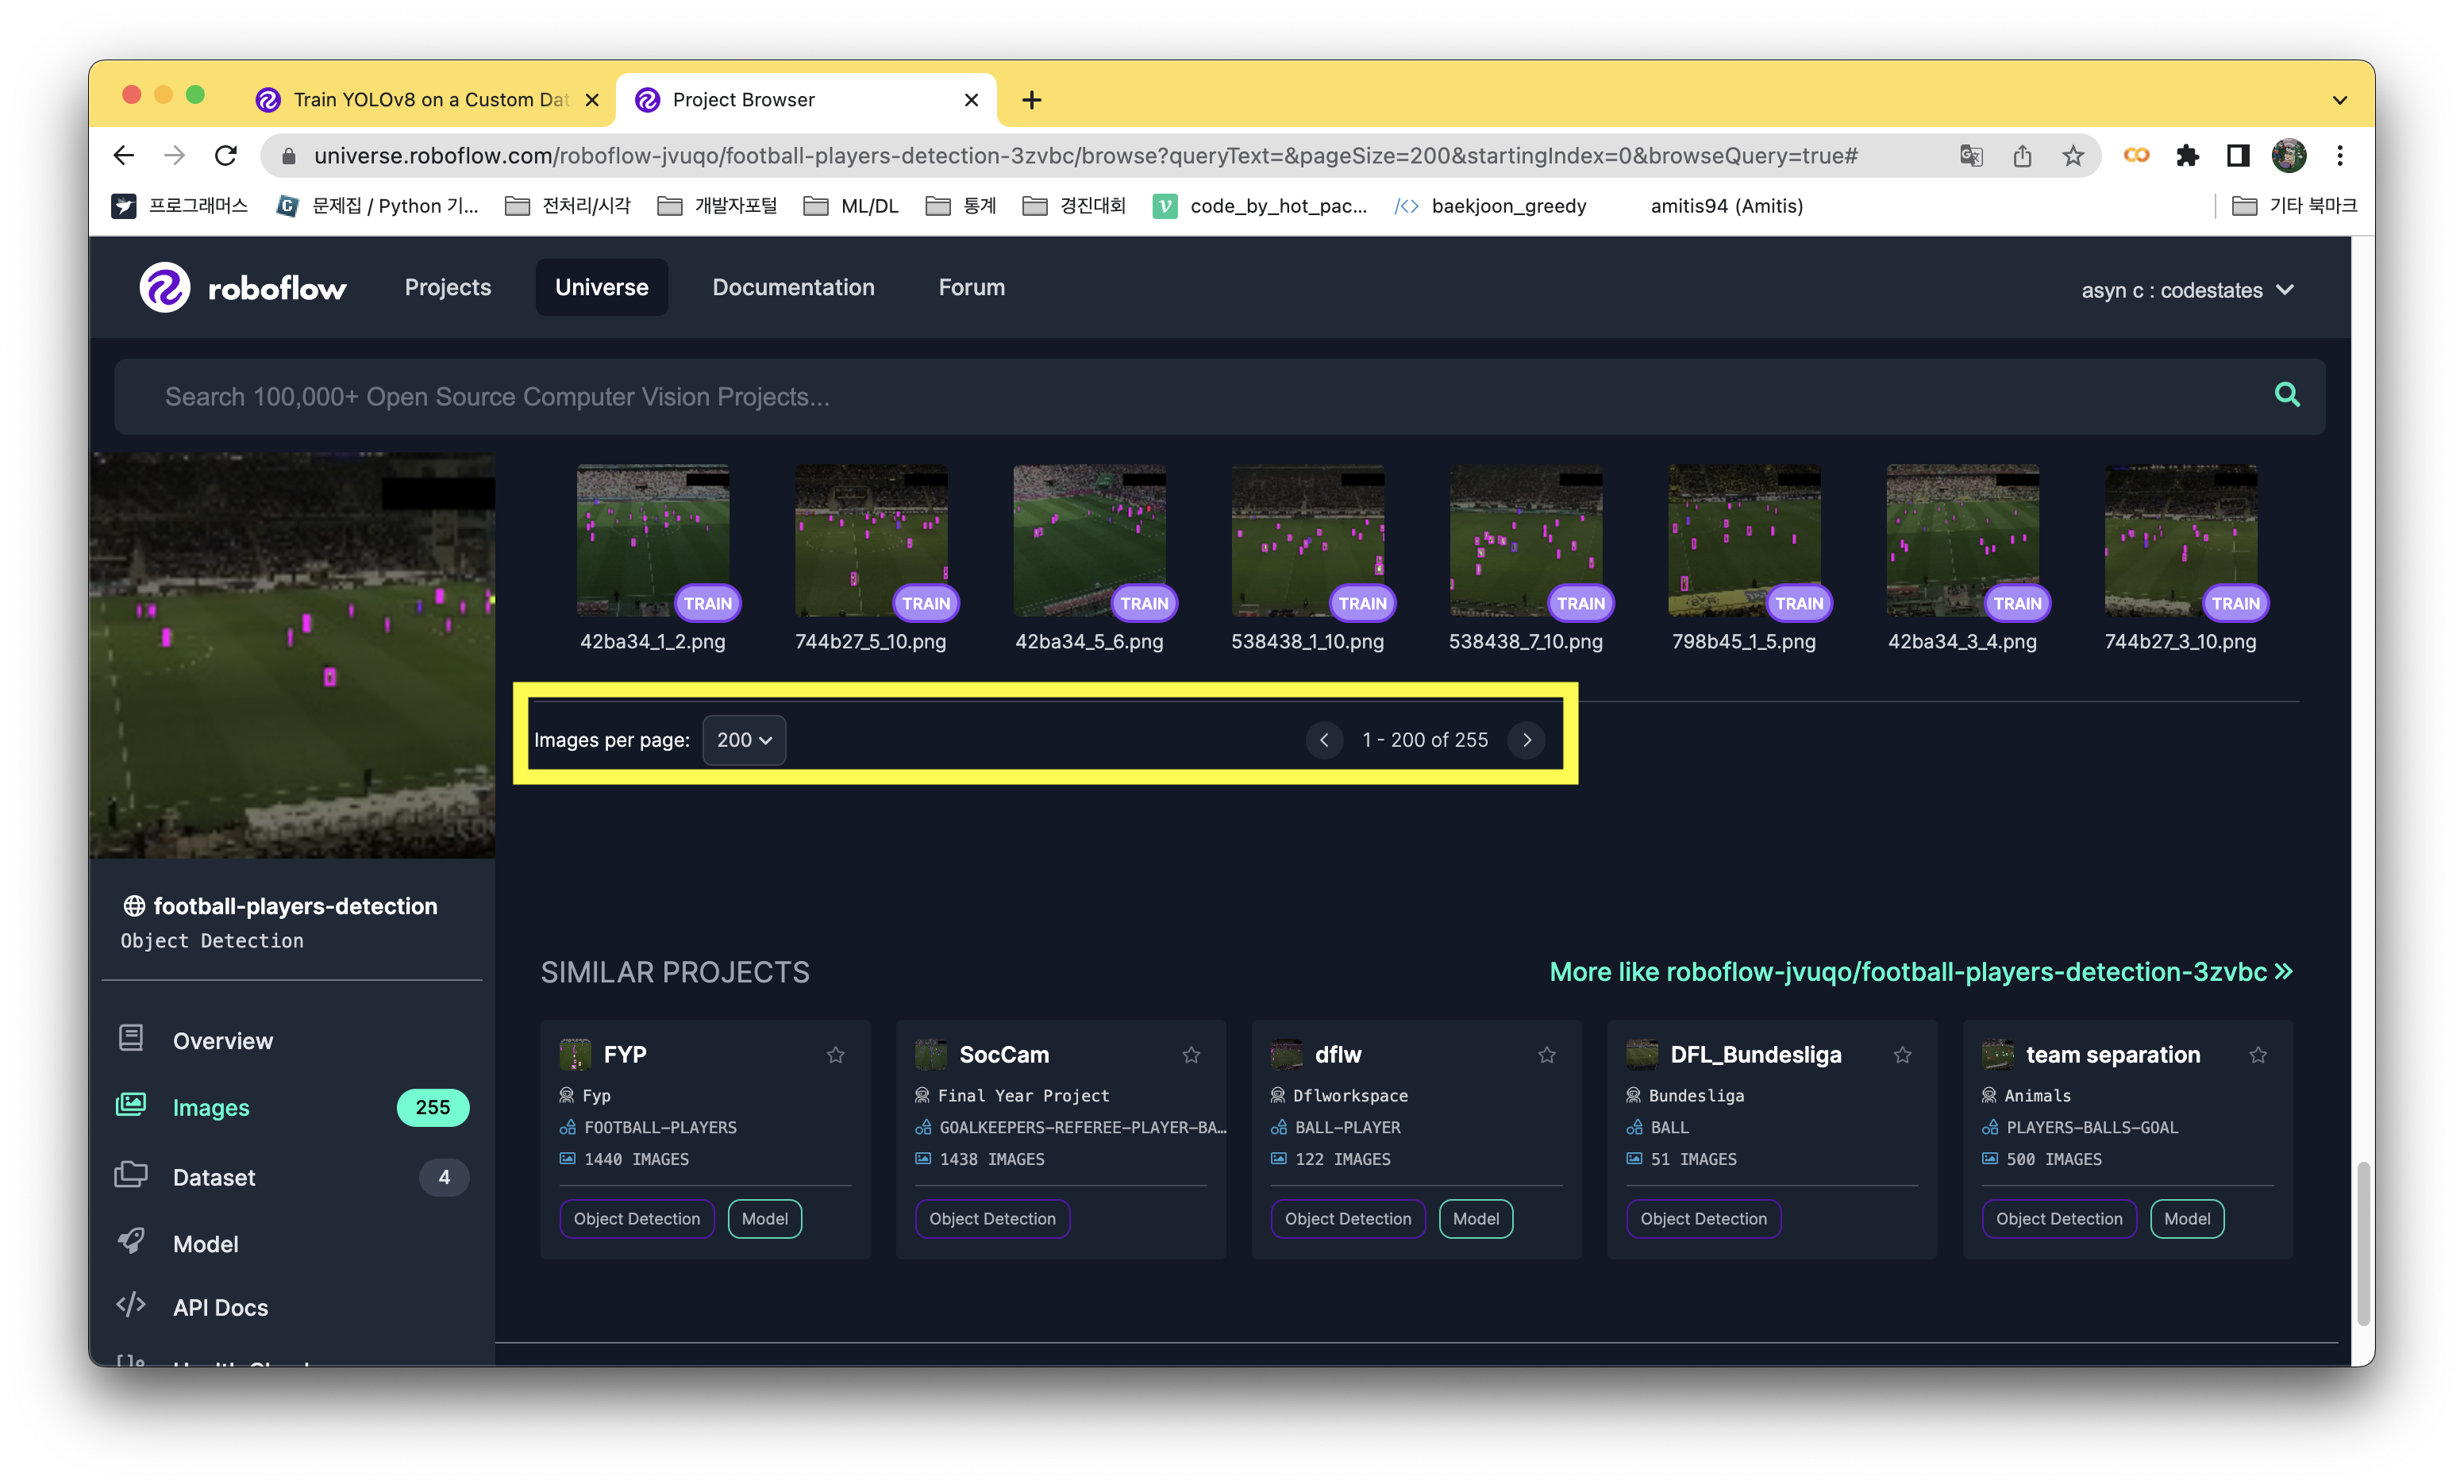
사진을 볼 수 있는 개수를 200개로 늘리고 진행했다. 다른 블로그를 참고해보니 전이학습을 베이스로 하는 딥러닝의 경우 100개의 데이터만으로도 성능이 꽤 나온다고하니 취향에 맞게 볼 수 있는 사진의 갯수를 정해보자
다른 방법으로 선택할 수 있는 사진의 개수를 늘리는 것이 있는지 모르겠지만 일단 이렇게 진행했다
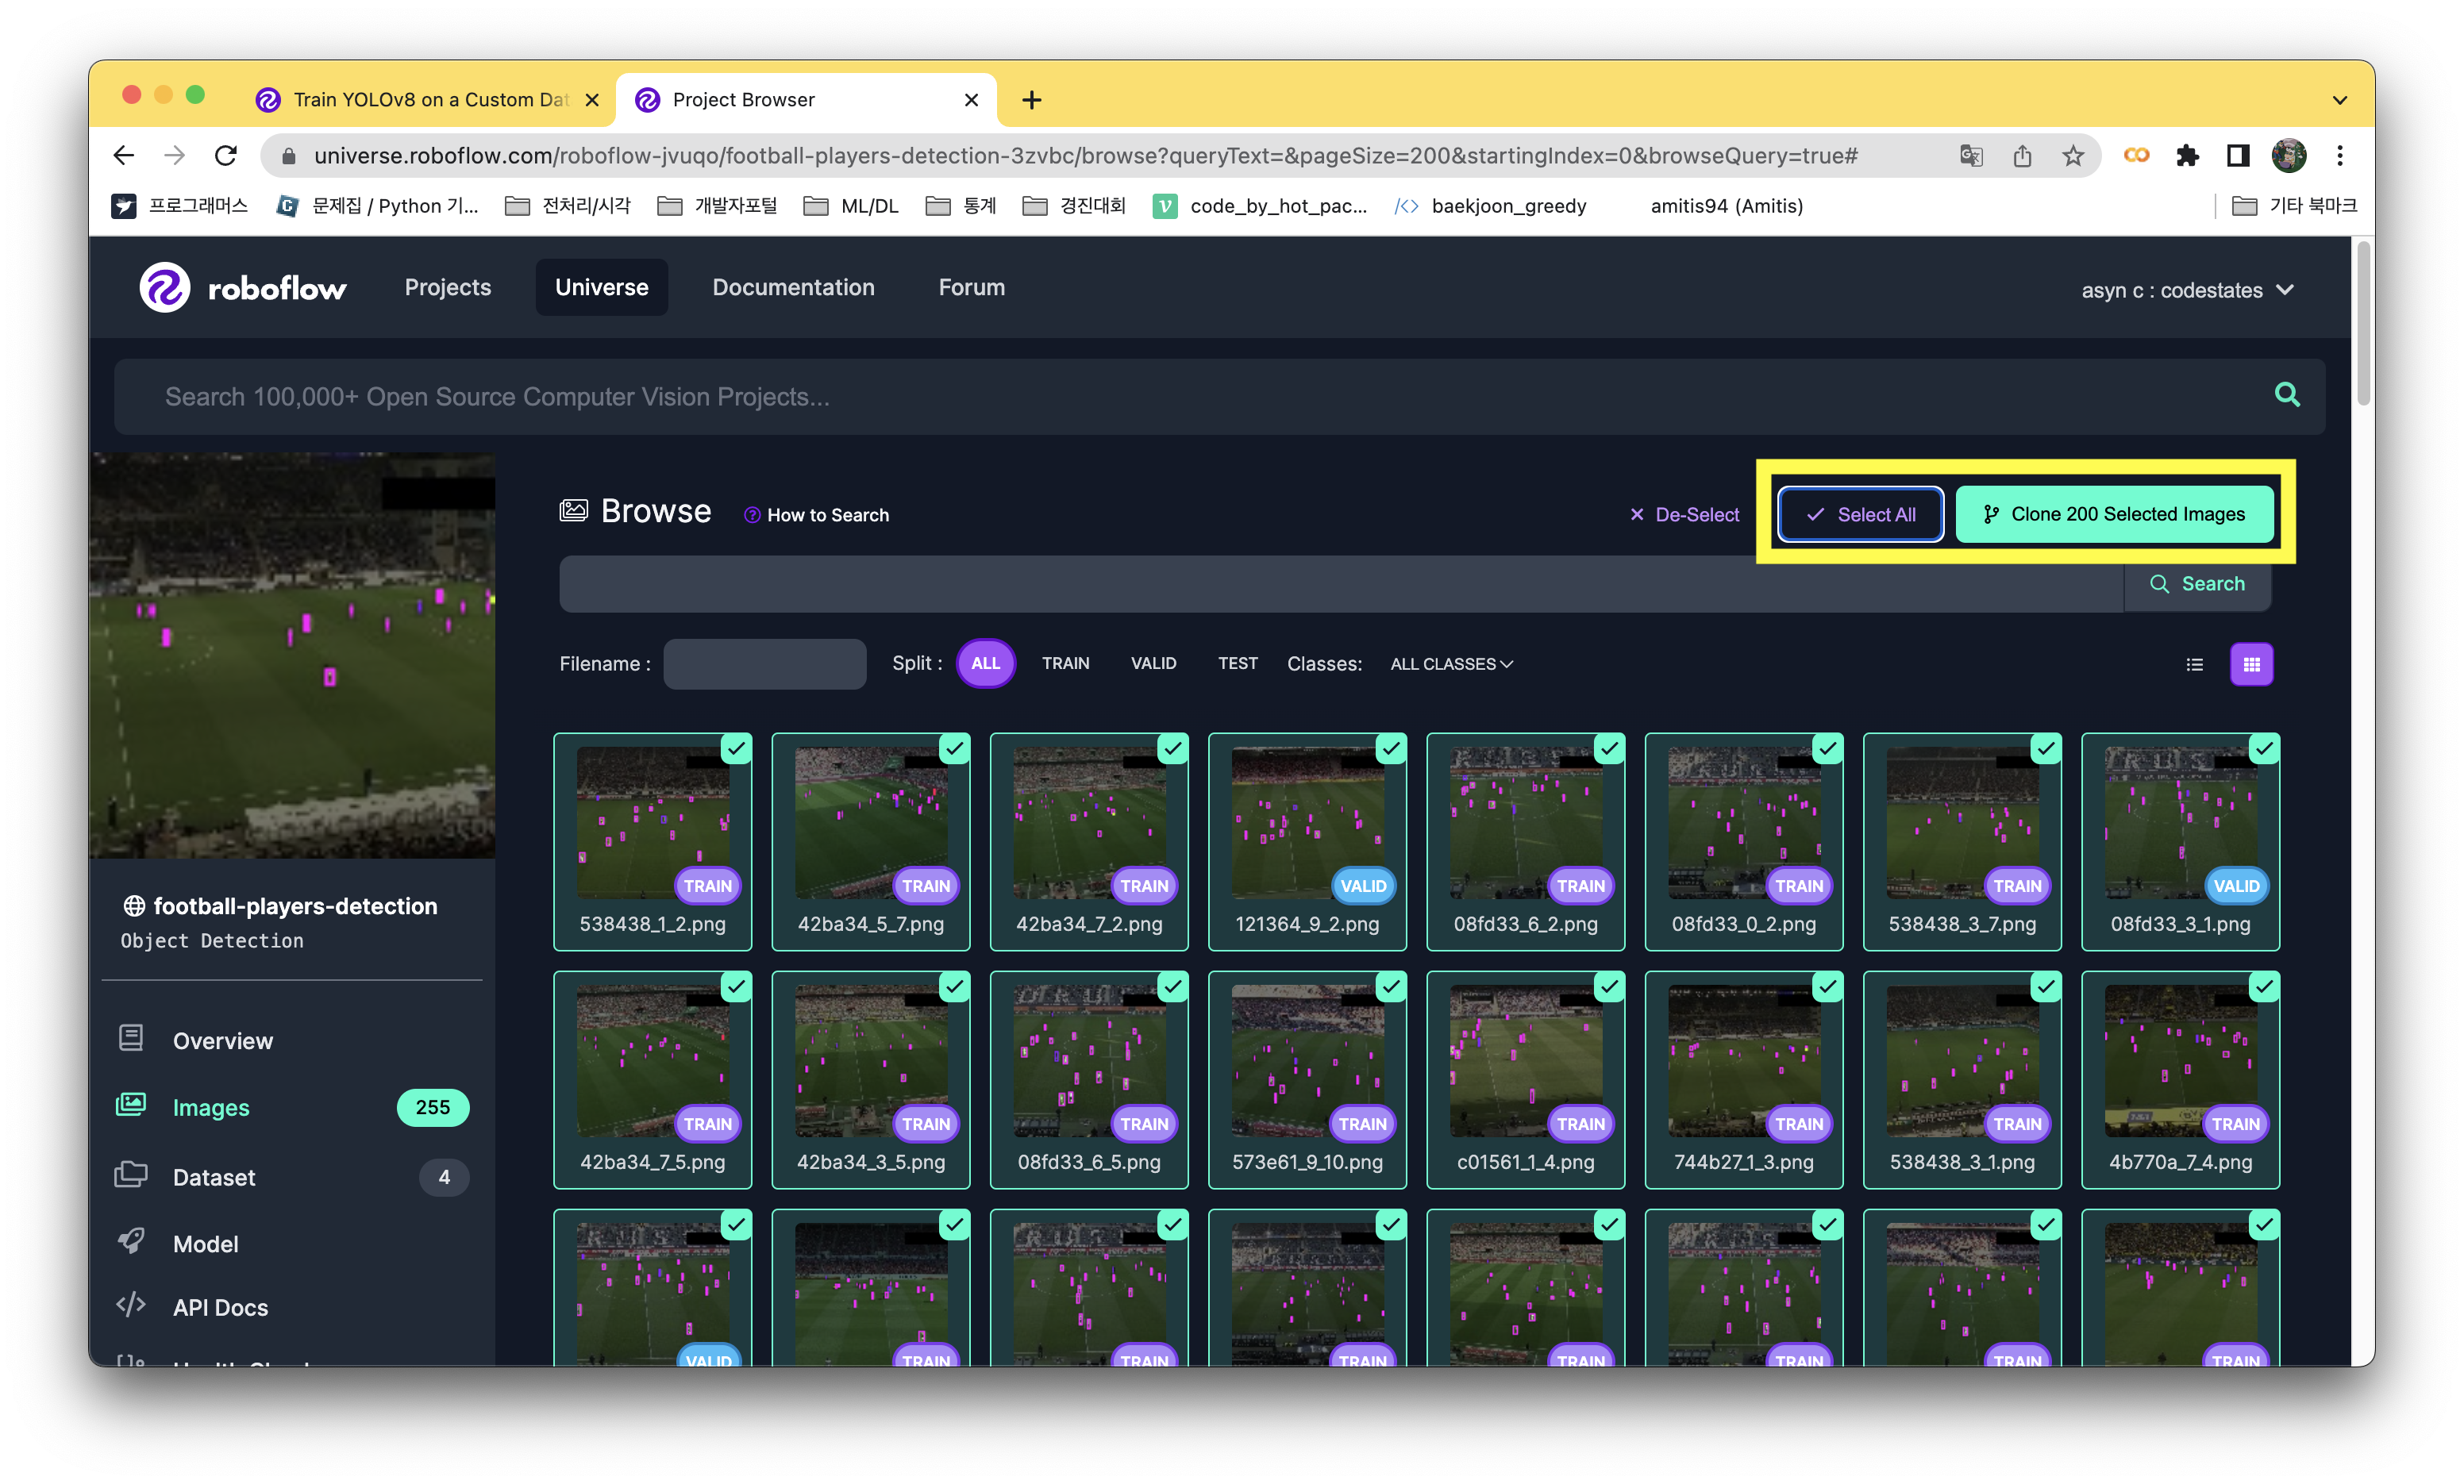
그 다음 모든 사진을 구분없이 선택하고 선택한 사진의 개수만큼 복사하기를 클릭
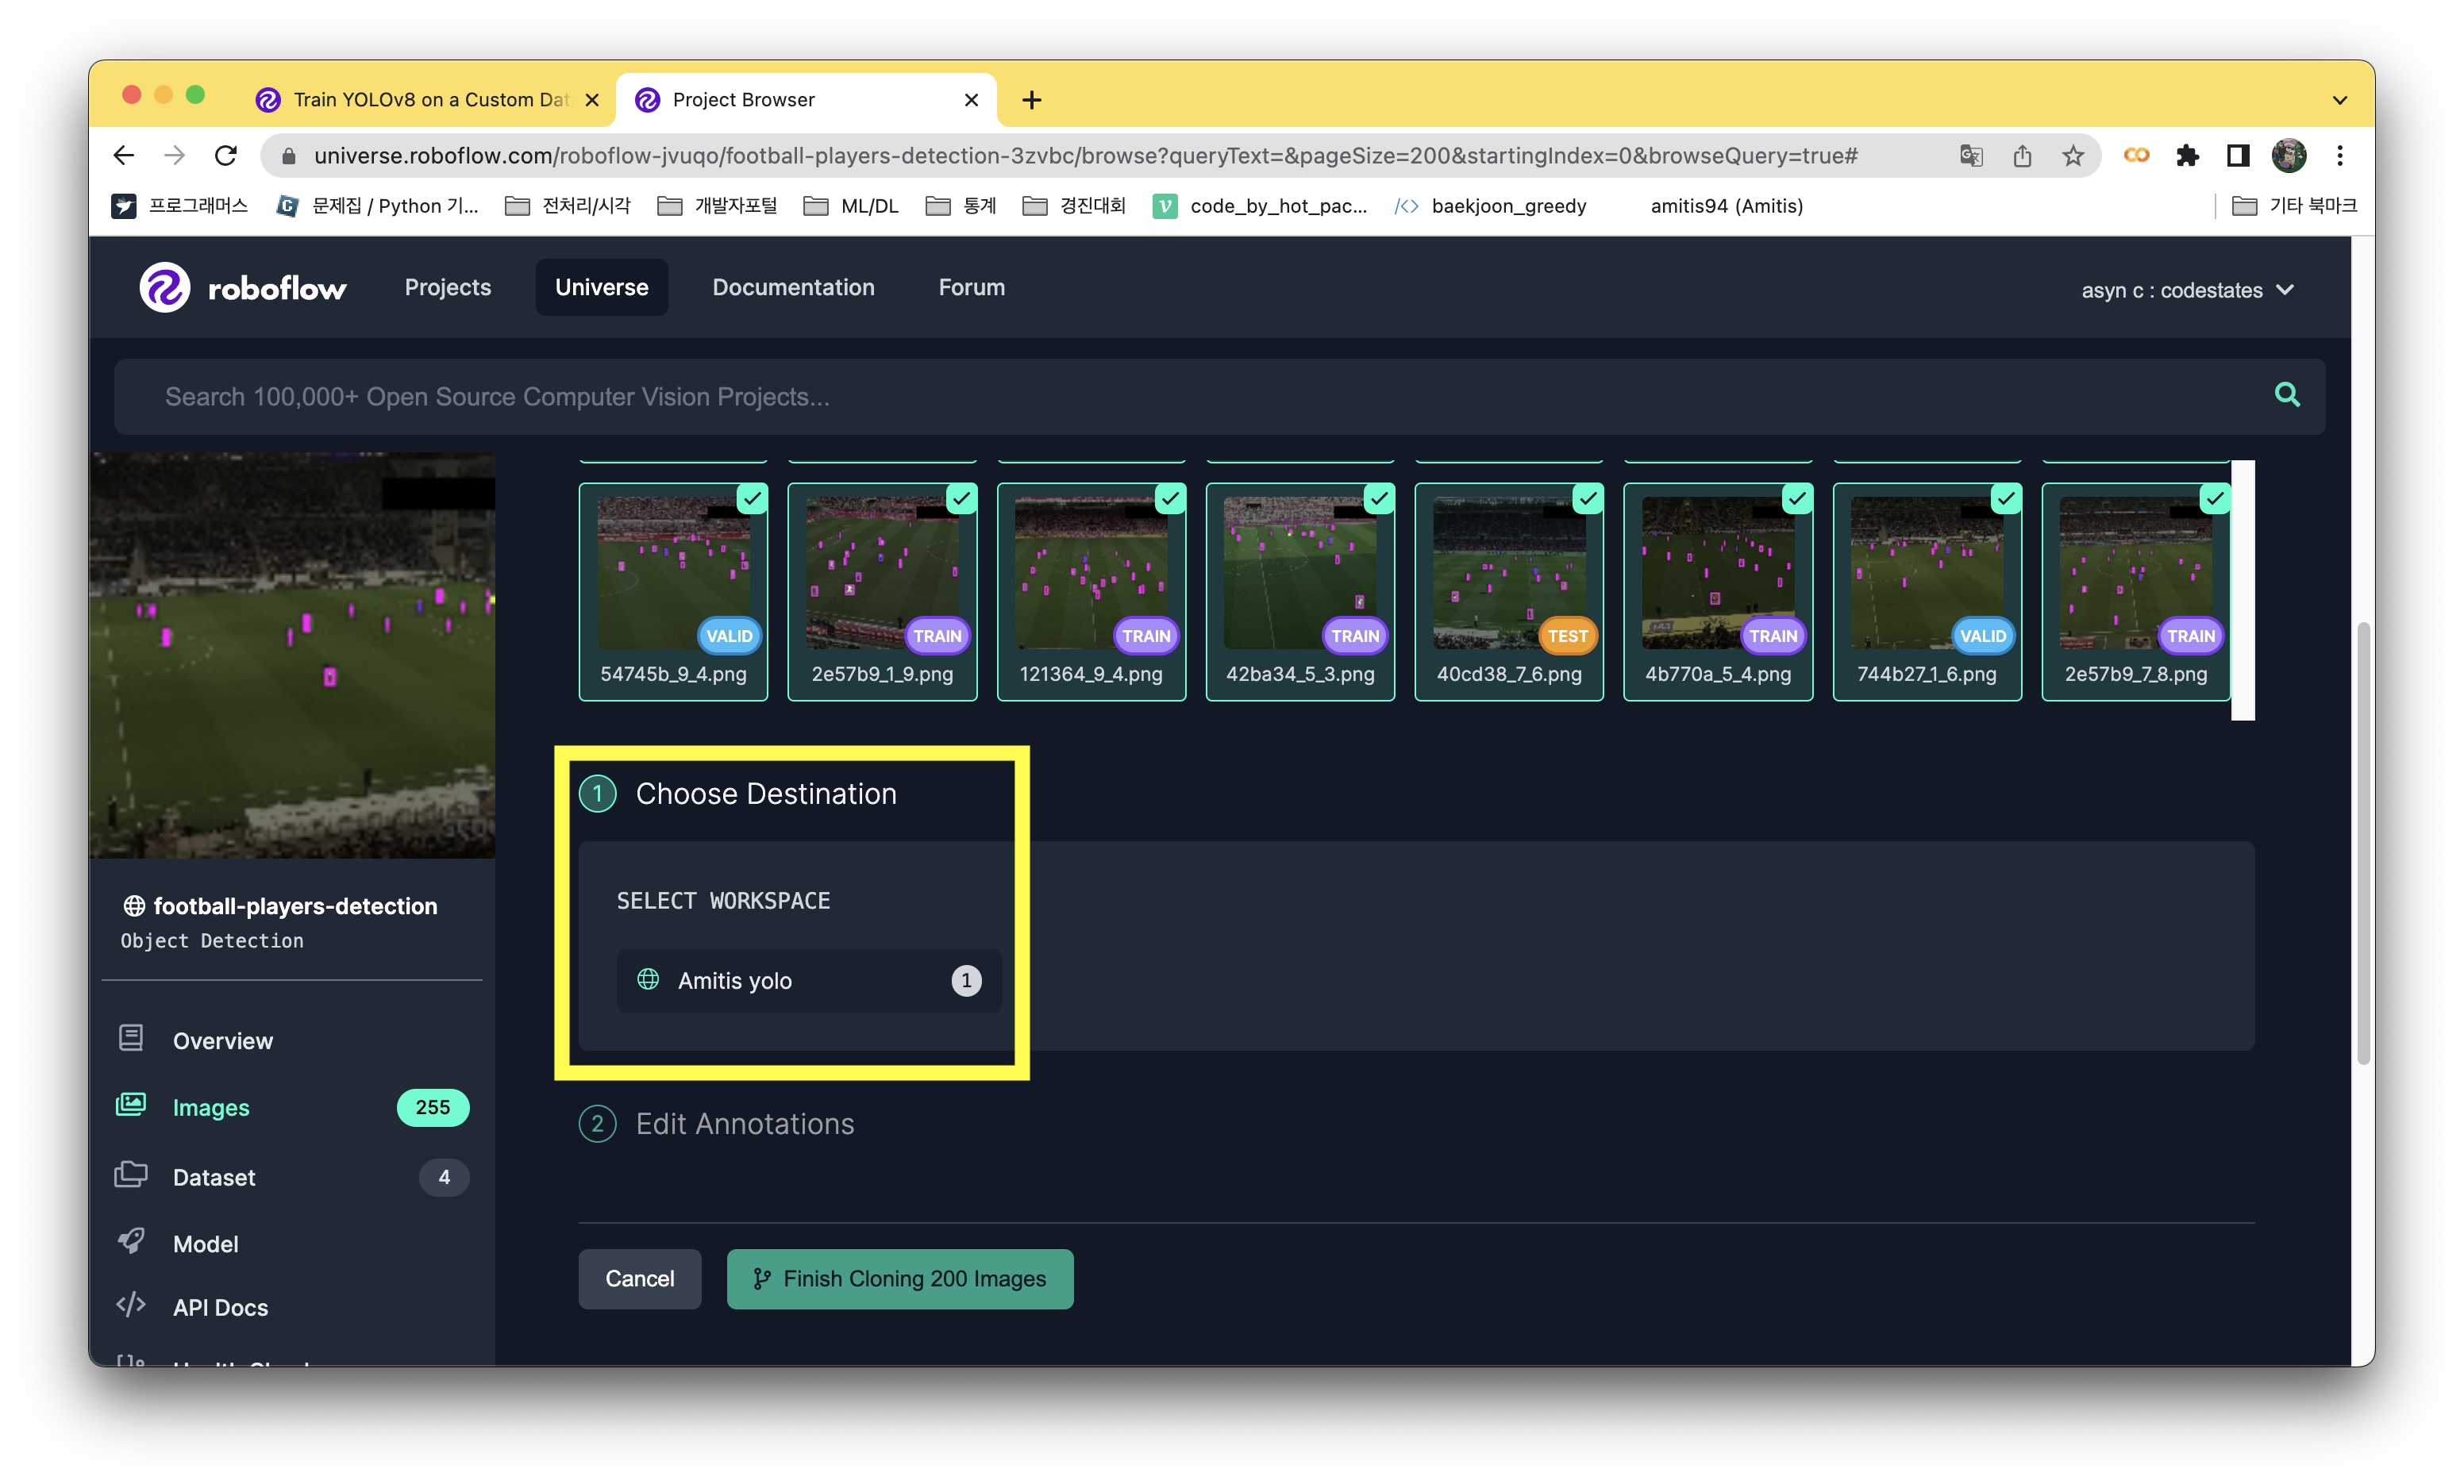
아래로 내려오면 앞 단계에서 생성했던 프로젝트를 선택할 수 있다
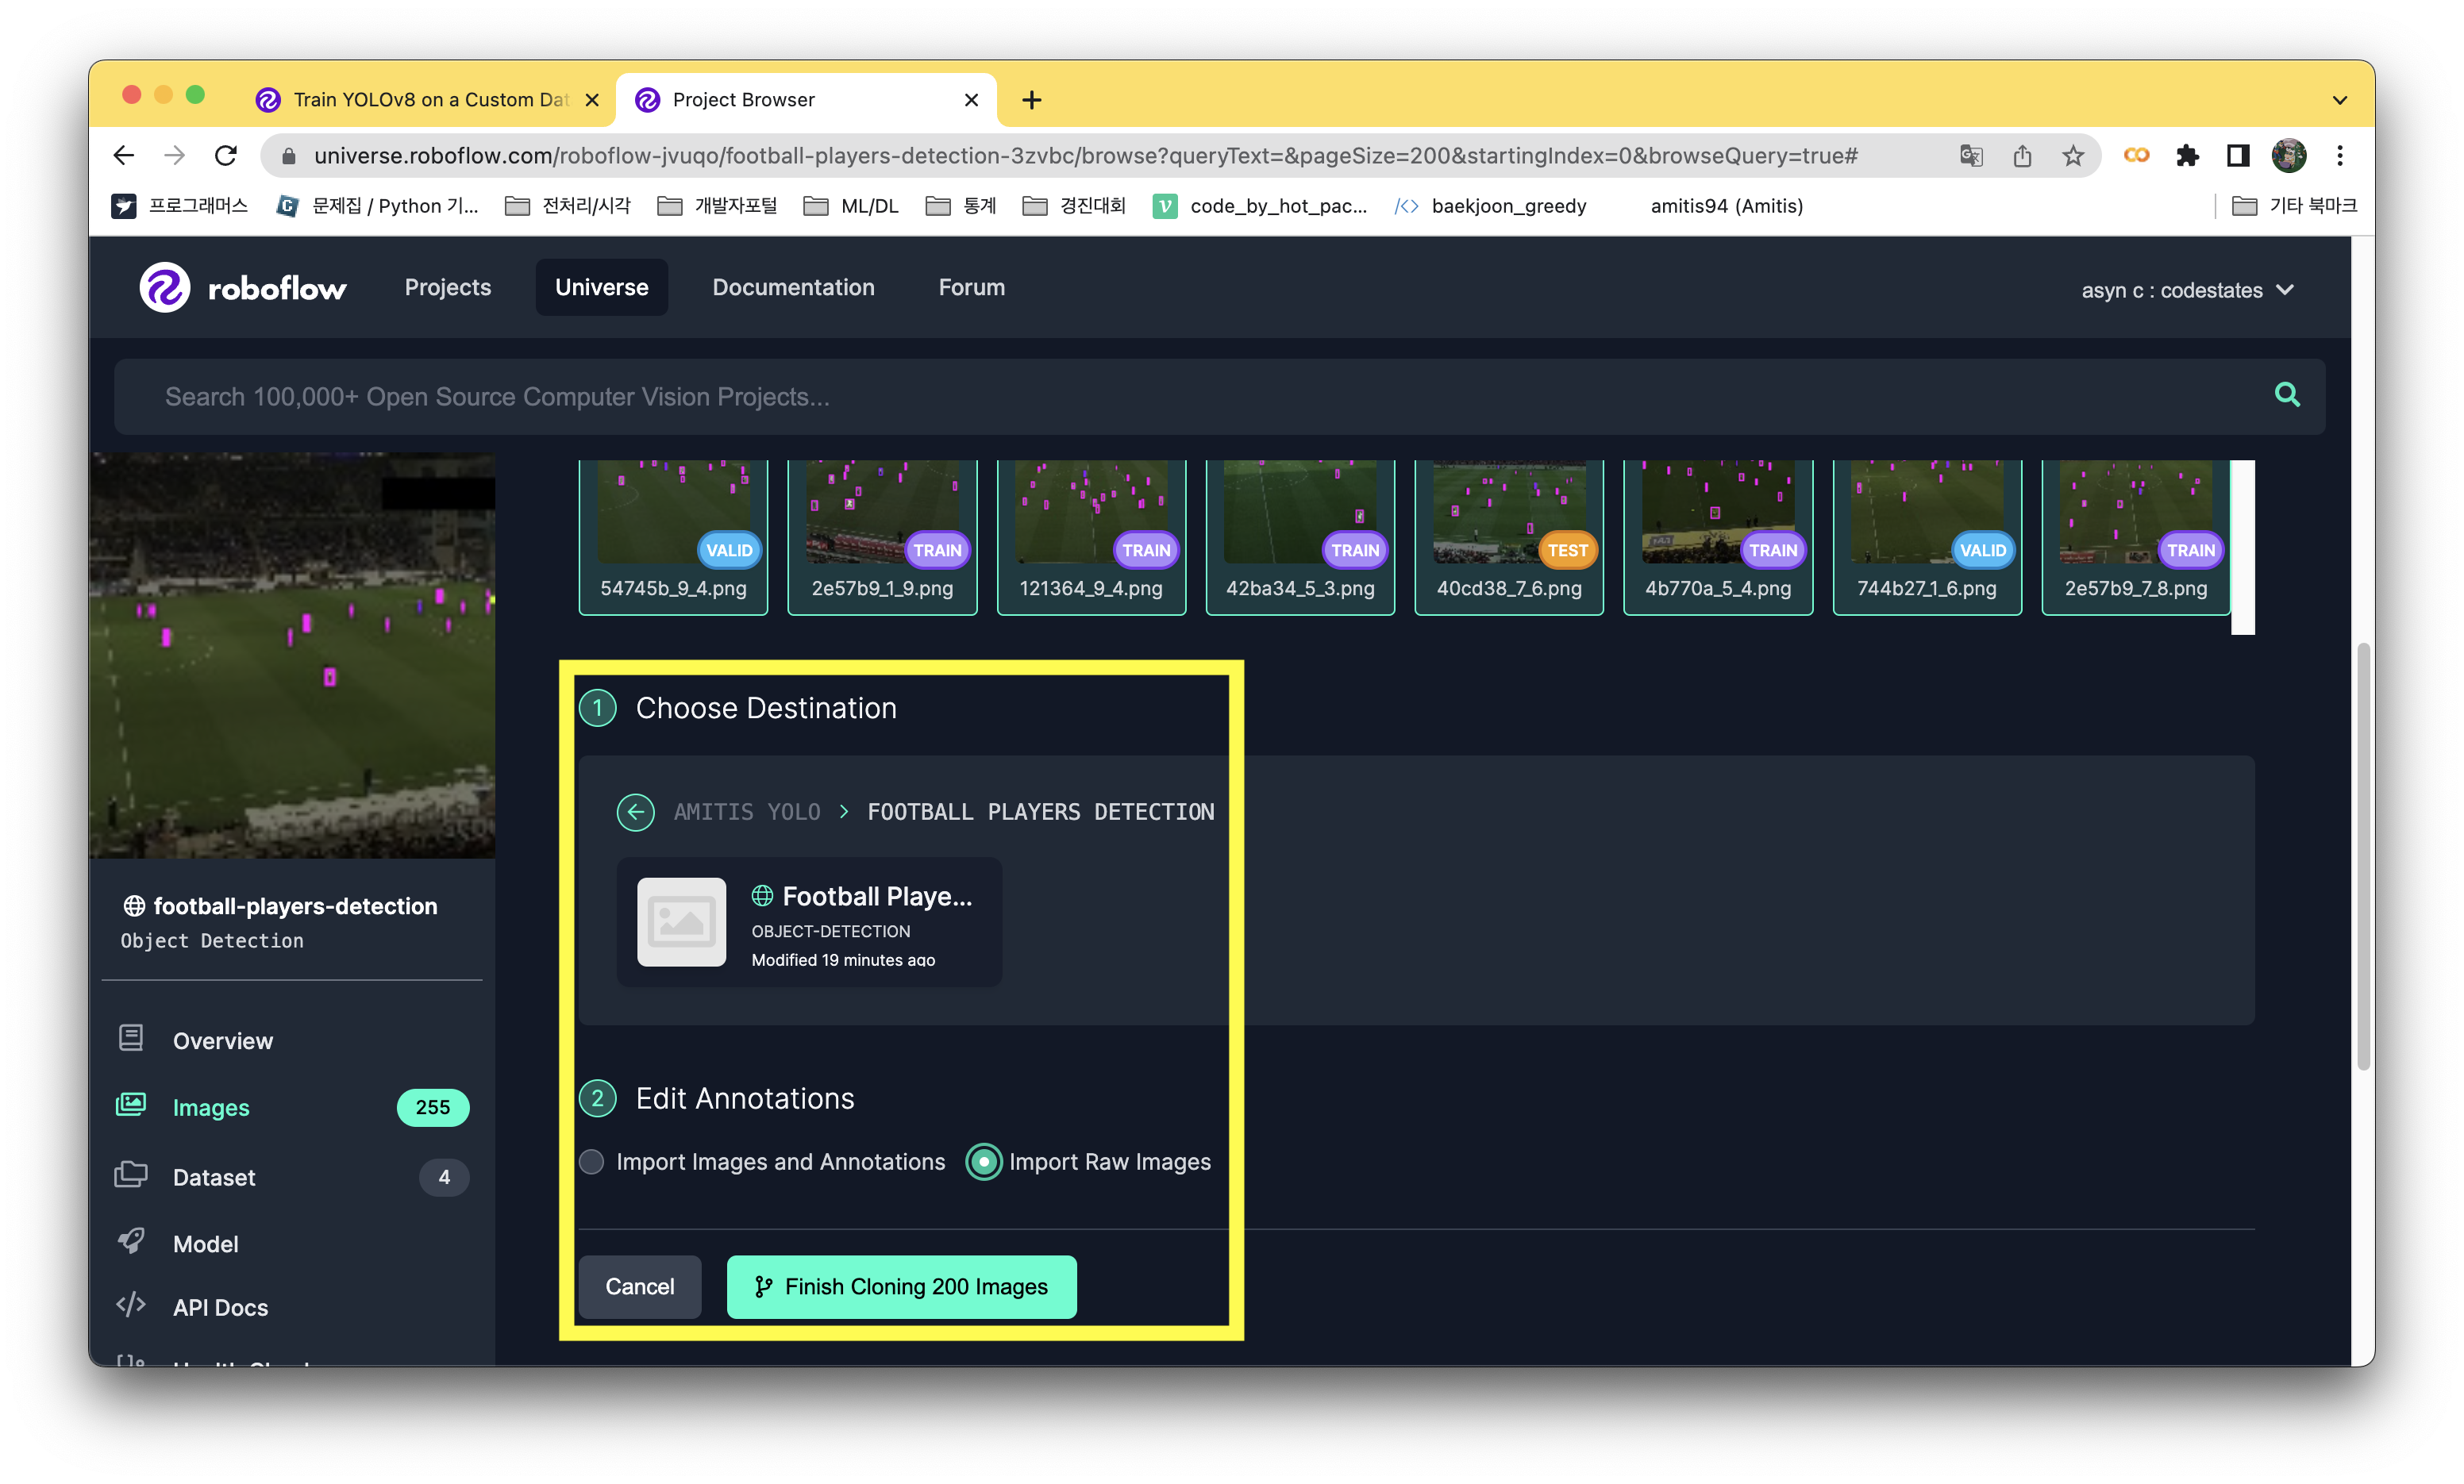
나는 소개하고 있는 블로그를 그대로 따라해서 해볼 생각이기 때문에 원본 이미지로 가져왔다
4.3 Label your images
If you only have images, you can label them in Roboflow Annotate. When starting from scratch, consider annotating large batches of images via API or use the model-assisted labeling tool to speed things up.
혹시 이미지만 있다면? Annotate를 활용해서 레이블링을 하세요! 로보플로우의 도움을 구하면 빠르게 처리할 수도 있답니다
라고 쓰여있긴하나, 가져온 이미지를 테스트로 레이블링해보니 하나도 구분하지 못했다.. 즉, 200장의 사진을 직접 하니씩 테두리를 만들어야 한다..!
혼자서 하기엔 너무 가혹하여 annotate된 이미지를 가져오기로 했다
4.4 Generate a new version of your dataset
Now that we have our images and annotations added, we can Generate a Dataset Version. When Generating a Version, you may elect to add preprocessing and augmentations. This step is entirely optional, however, it can allow you to improve the robustness of your model significantly.
주석을 달아준 이미지데이터세트의 버전을 만들어 전처리 등의 기능을 향상시킬 수 있다. 이는 모델의 견고함을 살려주는 작업이다(선택적인 요소라는 말)
4.5 Export your dataset
Once the dataset version is generated, we have a hosted dataset we can load directly into our notebook for easy training.
One way to download a dataset from Roboflow Universe is to use our pip package. You can generate the appropriate code snippet directly in our UI. On a dataset’s Universe home page, click the Download this Dataset button and select YOLO v5 PyTorch export format.
After a few seconds, you will see a code similar to the one below, except with all the necessary parameters filled in. You can copy and paste it into your Jupyter Notebook or a similar environment. When you execute it, the dataset will be downloaded to your machine in the appropriate format. Magic!
버전을 생성했으면 export 기능을 찾을 수 있고 YOLOv5 Pytorch 형태로 내보내기를 고르자. 그러면 커멘드가 나오고 이를 따라하고 있는 개발환경에 적용시켜보면 마법이 일어난다
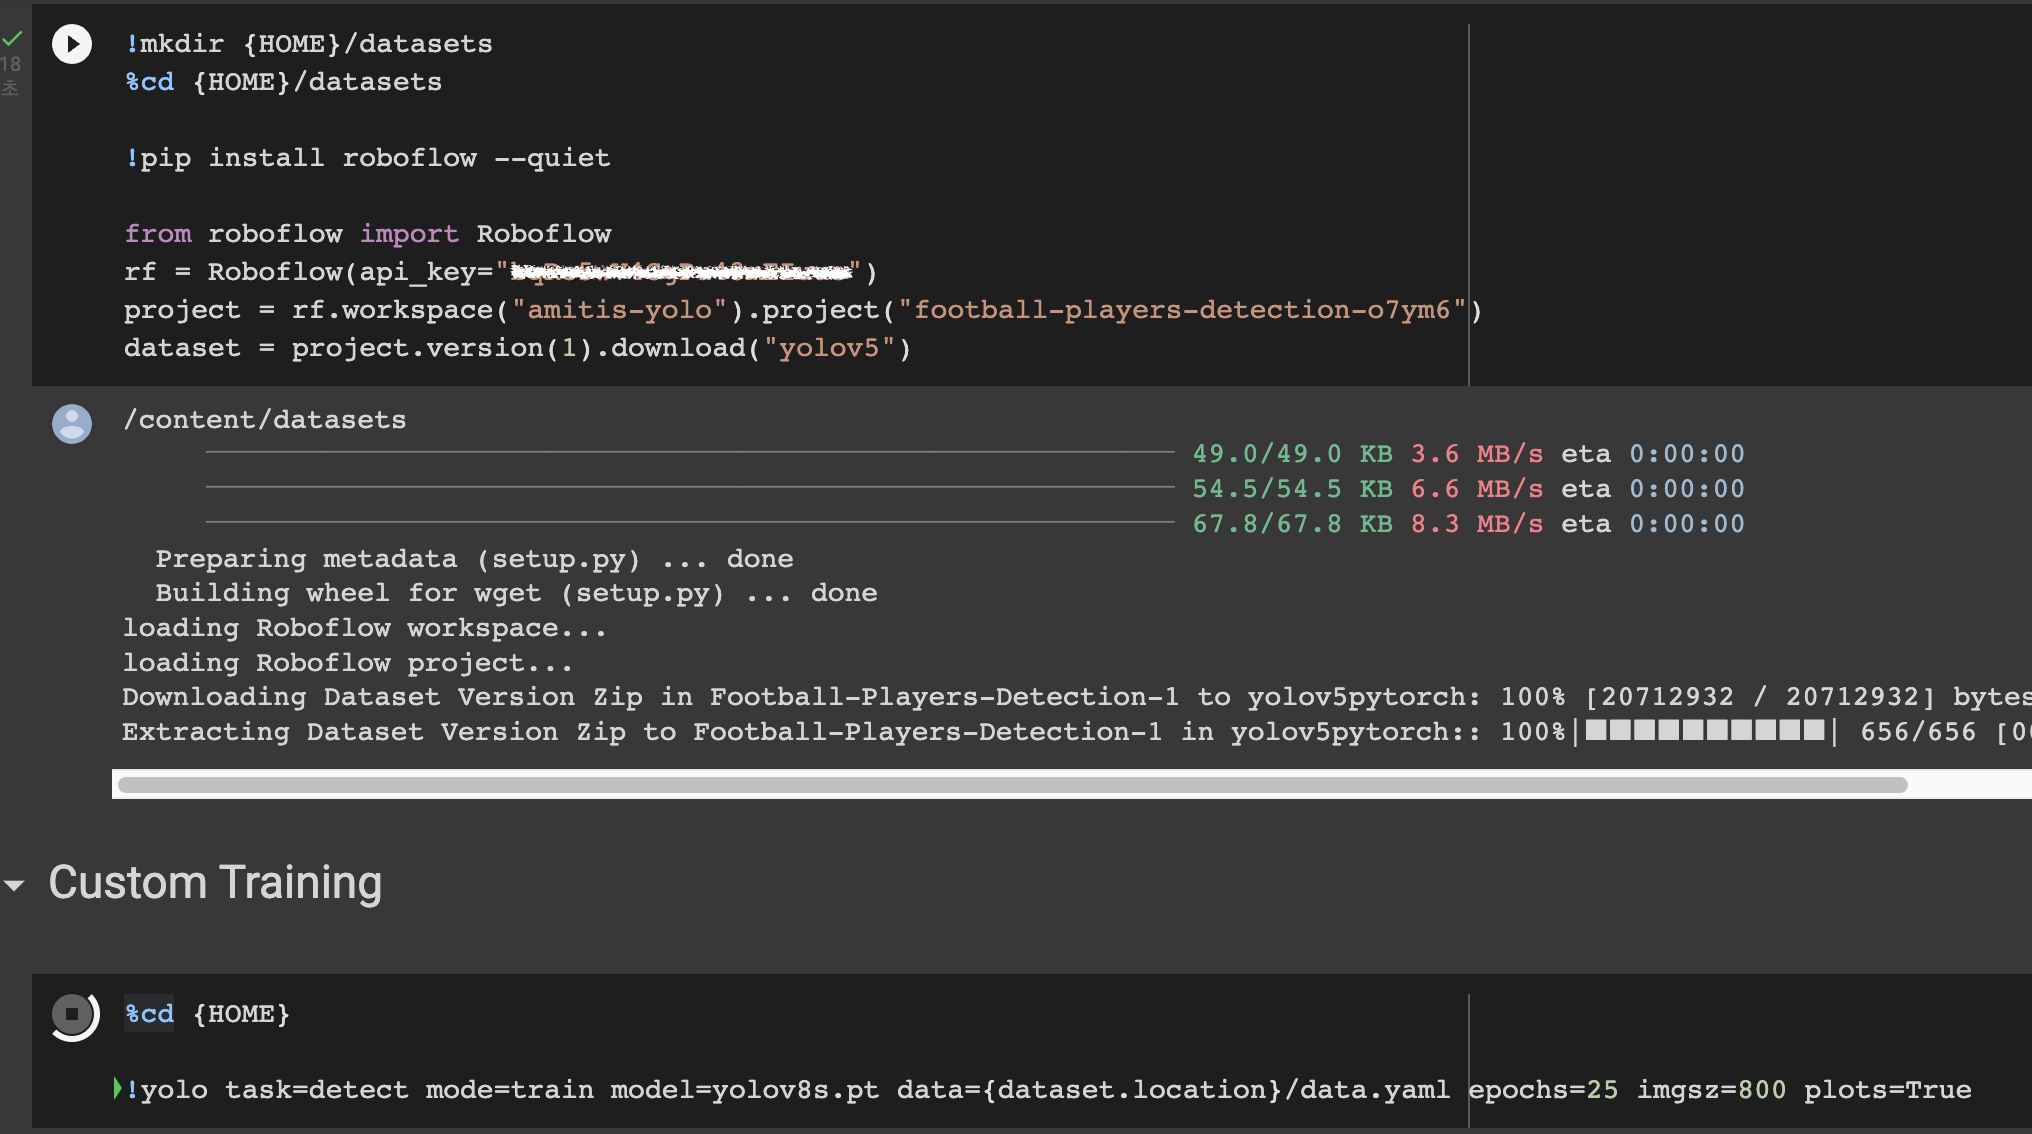
!pip install roboflow

from roboflow import Roboflow
rf = Roboflow(api_key="공유금지라 가림")
project = rf.workspace("amitis-yolo").project("football-players-detection-o7ym6")
dataset = project.version(1).download("yolov5")
export하면 위와 같은 코드가 출력되고 가끔 오류가 있으니 코드에 빈 공간이 없는지 확인해야한다
4.6 Train YOLOv8 on a custom dataset
yolo task=detect mode=train model=yolov8s.pt data={dataset.location}/data.yaml epochs=100 imgsz=640
커멘드를 실행해 가져온 데이터로 학습을 진행한다
이 구간부터 내가 돌려본 환경에서 돌아가지 않아 제공한 노트북 파일에서 내꺼에 맞춰 돌려본다
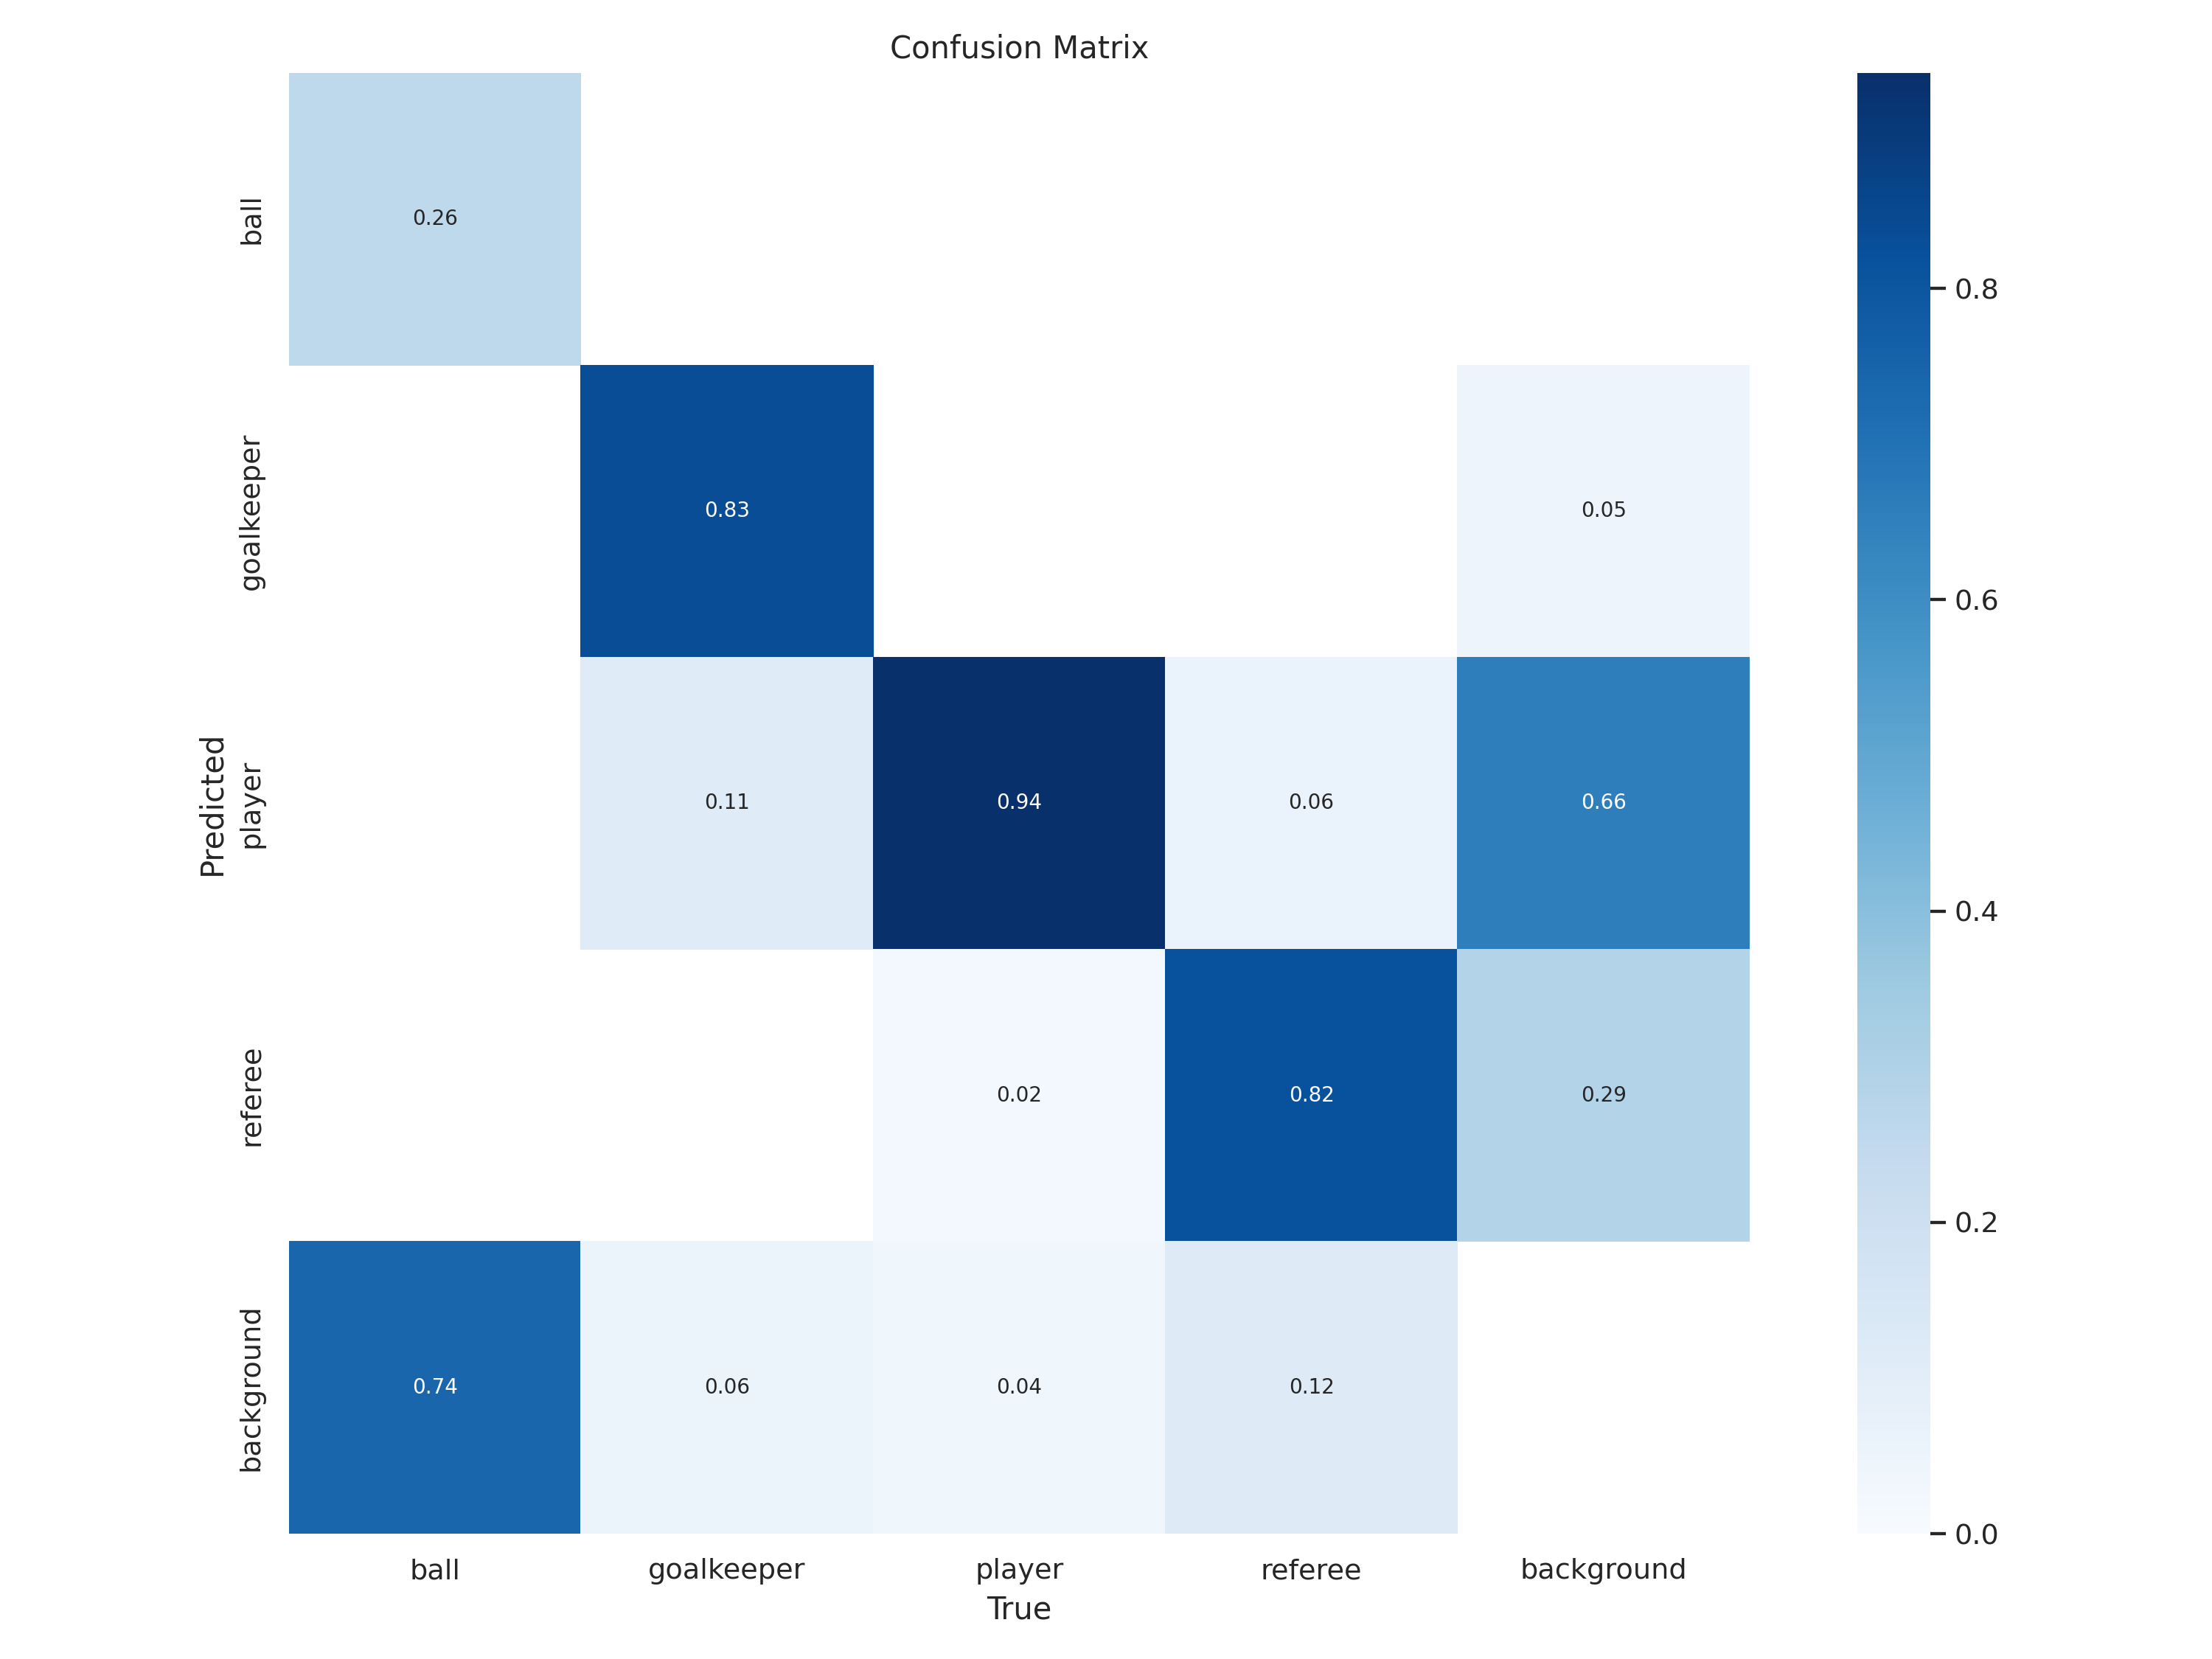
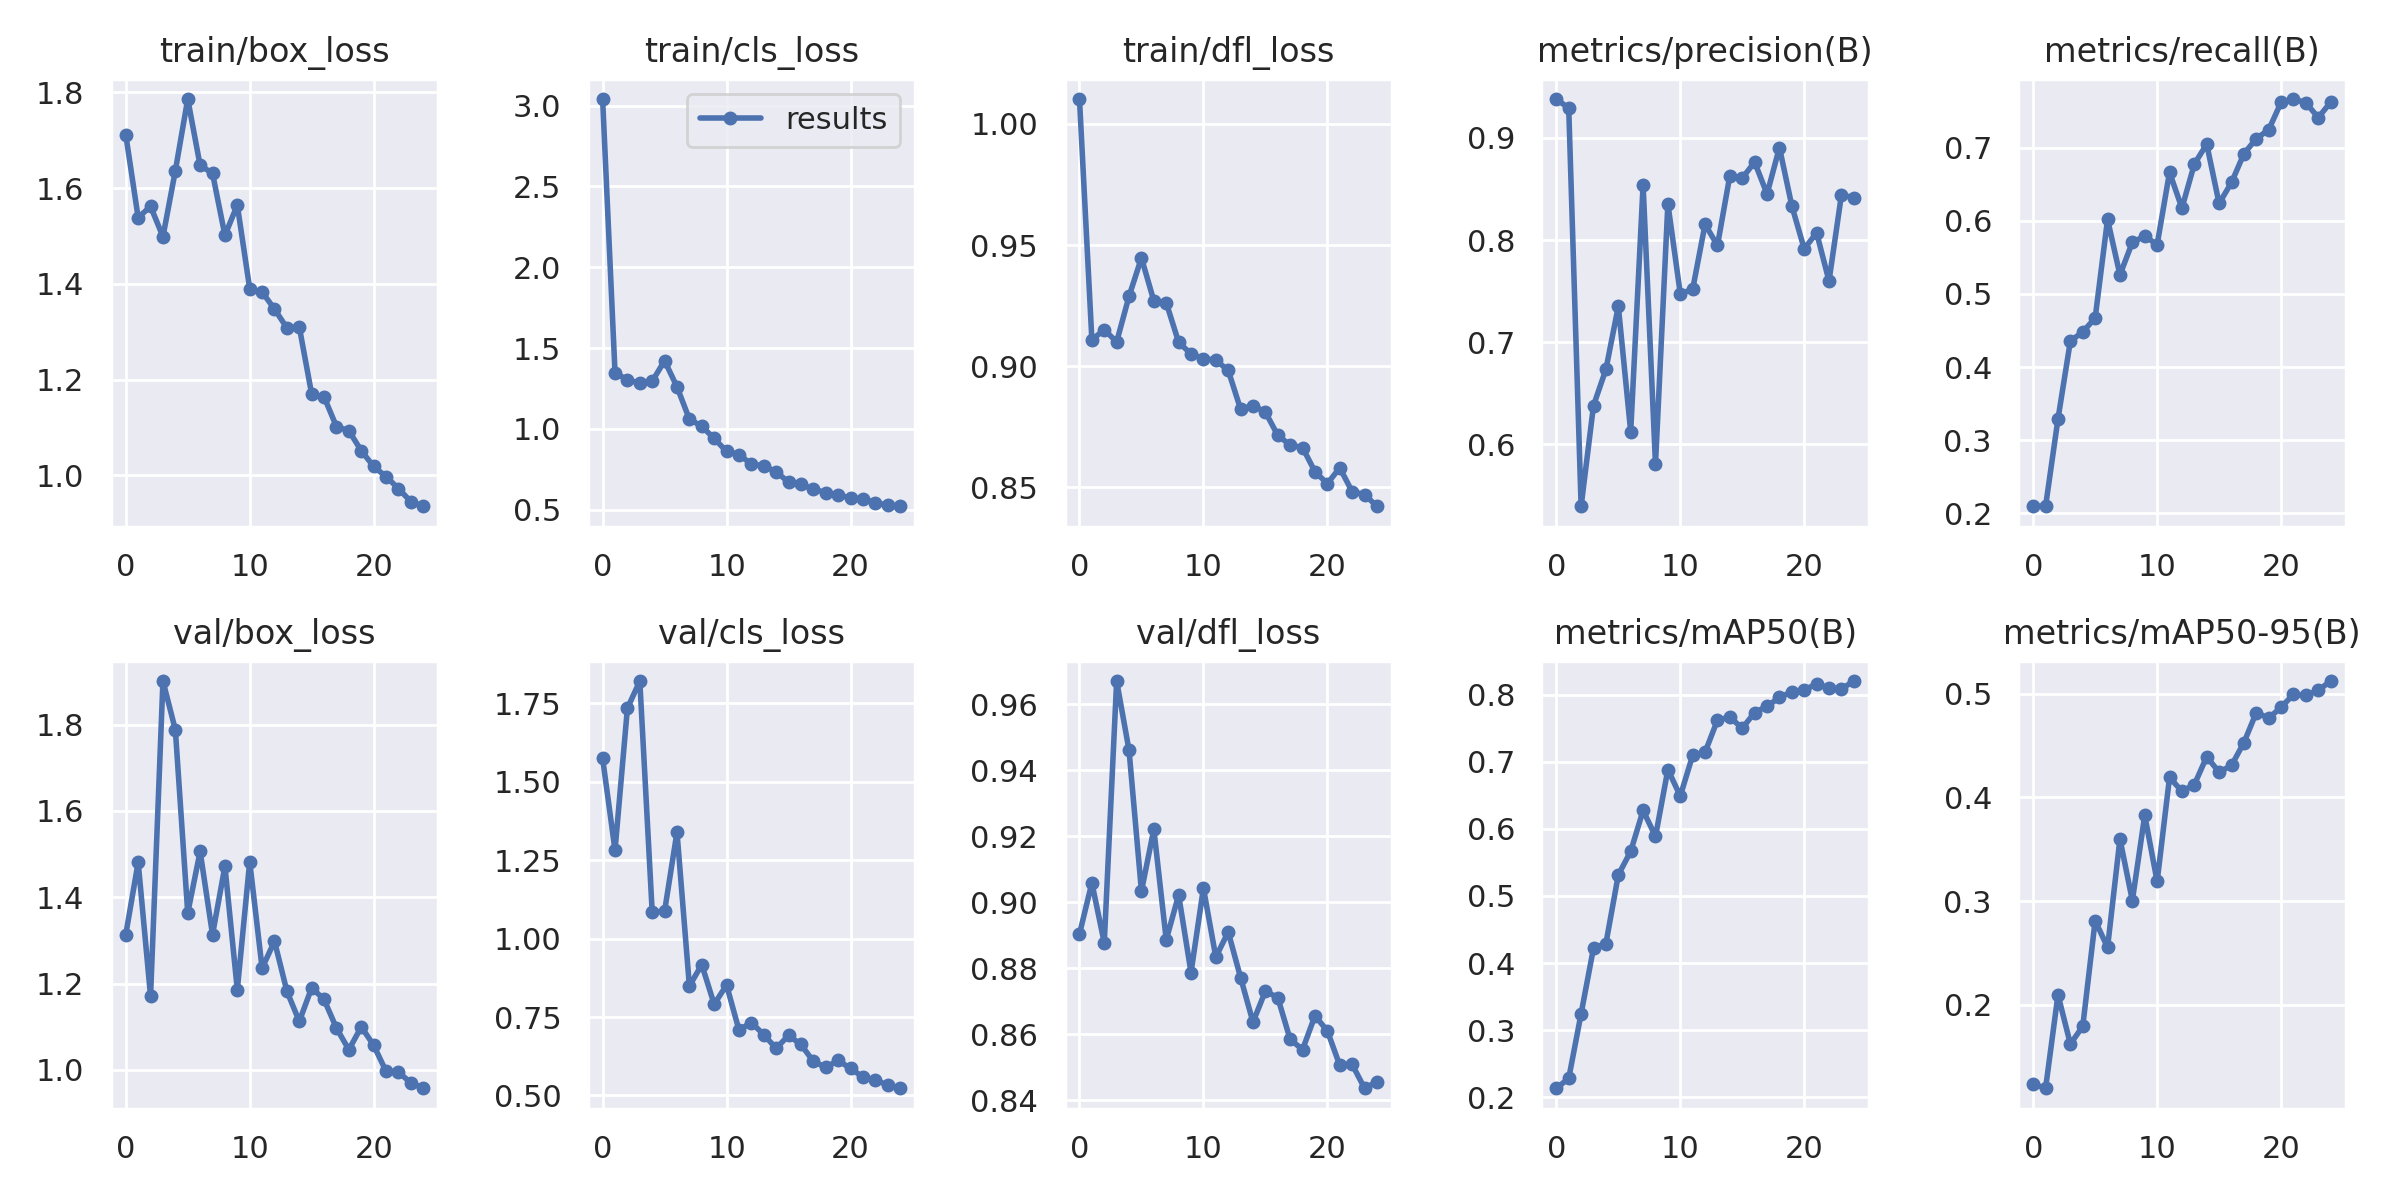
200장으로 따라해본 학습은 이렇게 나왔다
이런 식으로 학습하고 구분한다는 느낌을 가져가면 좋을 것 같다
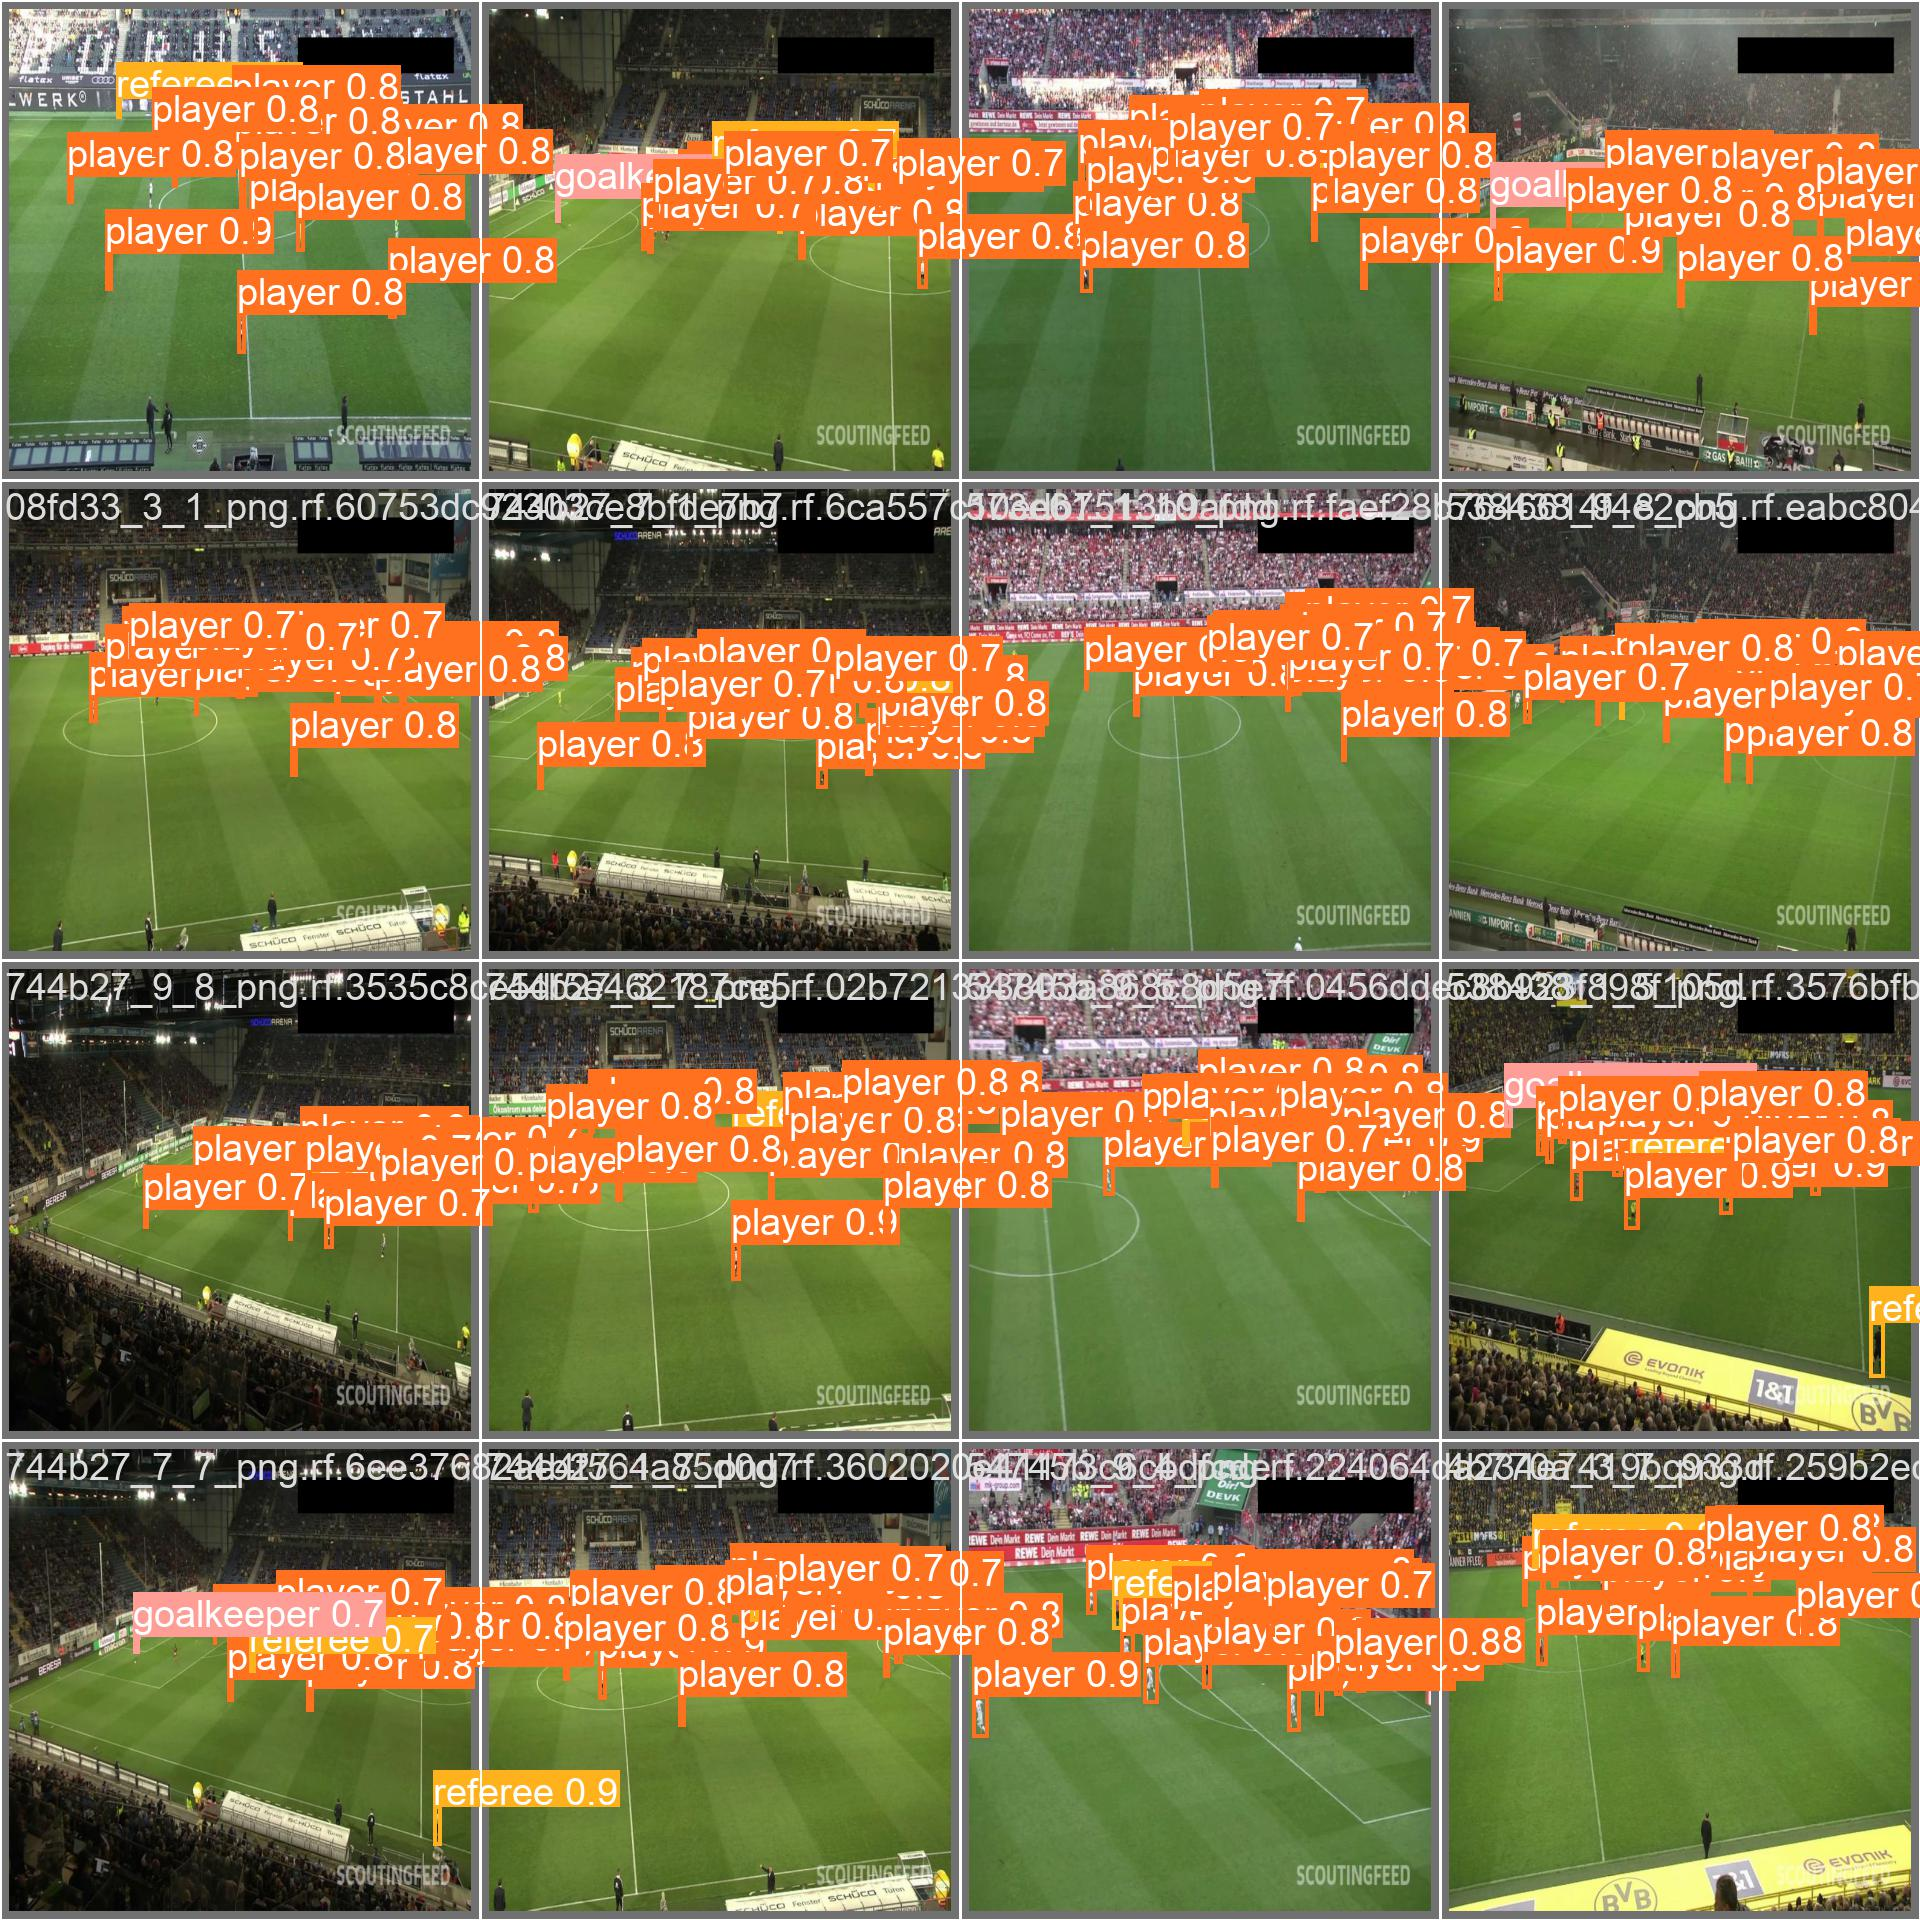
4.7 Validate with a new model
When the training is over, it is good practice to validate the new model on images it has not seen before. Therefore, when creating a dataset, we divide it into three parts, and one of them that we will use now as a test dataset.
머신러닝할 때 학습용,평가용,테스트용으로 분류하는 것처럼 이미지 파일도 그렇게 분류해뒀으니 새로운 모델을 평가해보자
5. Export and Upload Weights
이 부분은 원문에서 짤로 설명하는 것이 더 적절하다고 보여서 생략
6. Conclusion
성능이 향상된 YOLOv8 많은 이용 부탁드린다
한글화를 진행하면서 느낀점
느낌으로 알겠다는 것과 직접 해보고 알겠다는 것에는 많은 차이가 있다
직접 해봐야 아는 것이 많아지고 어떤 부분을 모르는지 잘 파악할 수 있다
조만간 또 다른 블로그를 한글화로 해봐야 겠다
많은 도움이 되었습니다! 감사합니다:)