작성하게 된 계기
여지껏 내가 진행한 react 토이 프로젝트는 상태 관리를 위해 react-redux 라이브러리를 사용해왔었다.
그 이유는
- 글로벌 상태를 사용하기 위해서
- 미들웨어를 통해 비동기적인 작업(특히 API 요청)을 용이하게 하기 위해서
두 가지 정도이다.
그러다가 useReducer와 useContext에 대해서 알게 되었다. 짧게나마 배우고 나서, 좀 더 정확하게 알아보고자 포스팅 주제로 선택하게 되었다.
- react-redux의 기능을 일정 부분 대체 가능하다고 생각해서
- reducer라는 개념에 대해 잘 이해하게 된다면 react-redux에 대한 이해도도 높아질 것이기에
useReducer
우선 useRedcuer에 대해서 알아보자.
보통 react 웹에서의 상태 관리는 useState에 의해 이루어지는데, useState를 사용했을 때 간혹 생기는 불편함을 해소하기 위해 useReducer가 등장했다.
바로 복잡한 state update이다.
복잡한 state update
useState는 state와 state setter함수를 반환하고, 이 setter함수를 통해 state를 업데이트 할 수 있다. 간단한 컴포넌트라면 setState를 한 두 개 정도만으로 상태 관리를 할 수 있겠지만, 관리해야할 상태가 늘어나면 늘어날수록 코드는 길어지며 복잡해진다.
또한 상태를 업데이트하는 로직이 복잡해지면 복잡해질수록 코드는 기하급수적으로 가독성이 떨어진다.
그럴 때에 사용해 마땅한 Hook이 바로 useReducer다.
사용법
React 공식문서에 용례가 나와있다.
const initialState = {count: 0};

function reducer(state, action) {
  switch (action.type) {
    case 'increment':
      return {count: state.count + 1};
    case 'decrement':
      return {count: state.count - 1};
    default:
      throw new Error();
  }
}

function Counter() {
  const [state, dispatch] = useReducer(reducer, initialState);
  return (
    <>
      Count: {state.count}
      <button onClick={() => dispatch({type: 'decrement'})}>-</button>
      <button onClick={() => dispatch({type: 'increment'})}>+</button>
    </>
  );
}
const [state, dispatch] = useReducer(reducer, initialState, initializer?);useRedcuer는 1. reducer라고 불리는 콜백함수 와 2. initialState 인자, 3. initializer 이라고 불리는 콜백함수를 받고, state와 dispatch를 반환한다. 마지막 인자인 initializer는 optional한 인자이다.
reducer 함수는 state(현재 상태)와 action을 인자로 받는다. action 객체가 dispatch되면 redcuer 함수에 state와 action객체를 매개변수로 실행되고, switch문으로 action.type을 기준으로 분기해서 현재 상태를 업데이트한 후 반환한다.
또한 action 객체에 type 이외에 다른 key도 설정하여 reducer에서 사용할 수 있다.
initialState는 초기 상태인데, 어떤 자료형이라도 올 수 있다.
initializer는 initialState를 인자로 받고 initialState를 반환한다. 정확히는 initializer가 반환한 값이 initialState가 된다. React 공식문서에서 initializer에 대해 설명하기로는 "초기화 지연" 이라고 한다.
initialState에 추가적인 가공이 필요할 때에 사용할만한 옵션이라고 생각한다.
위에 나와있는 예시는 간단한 예시이나, 구조가 복잡한 객체를 상태로 가지고 있고 setter 함수의 내용이 복잡하다면 useState보다는 useReducer를 추천하는 바이다.
useContext
다음으로 알아볼 것은 useContext이다. React 공식문서의 Hook API 참고서를 보면 useContext는 추가 Hooks가 아니라 기본 Hooks에 포함되어 있다. 다른 기본 Hooks로는 useState와 useEffect가 있다. 그만큼 중요도가 높은 Hook이라고 생각된다.
useContext는 prop drilling을 해결하기 위해 사용한다.
prop drilling
prop drilling은 상위 컴포넌트에서 하위 컴포넌트까지 prop를 전달할 때에, 거쳐야하는 컴포넌트가 많은 경우 생기는 현상이다.
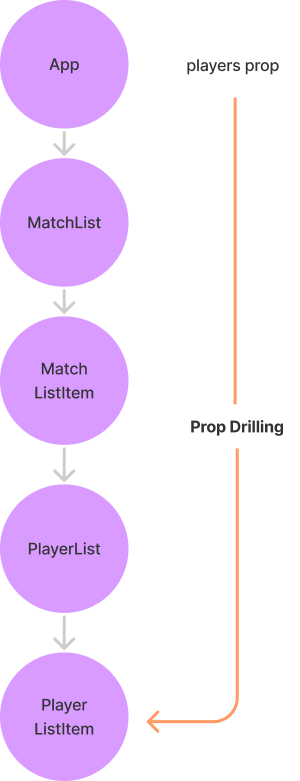
위 그림을 예시로 들면, 사용자가 App 컴포넌트에 접근했을 때 useEffect를 사용해서 players API를 요청한 뒤, players data를 PlayerListItem에게 전달해야 한다고 가정해보자. 그럼 PlayerListItem에게 players data를 전달하기 위해 중간에 있는 3개의 컴포넌트는 사용하지도 않는 prop을 받아야한다.
이런 현상을 두고 마치 prop이 드릴으로 컴포넌트를 뚫고 가는 것 처럼 보인다 하여 prop drilling이라고 부른다.
그리고 useContext를 사용해서 이같은 불편함을 해소할 수 있다.
사용법
여기 React 공식문서에 나온 예제 코드가 있다.
const themes = {
  light: {
    foreground: "#000000",
    background: "#eeeeee"
  },
  dark: {
    foreground: "#ffffff",
    background: "#222222"
  }
};

const ThemeContext = React.createContext(themes.light);

function App() {
  return (
    <ThemeContext.Provider value={themes.dark}>
      <Toolbar />
    </ThemeContext.Provider>
  );
}

function Toolbar(props) {
  return (
    <div>
      <ThemedButton />
    </div>
  );
}

function ThemedButton() {
  const theme = useContext(ThemeContext);
  return (
    <button style={{ background: theme.background, color: theme.foreground }}>
      I am styled by theme context!
    </button>
  );
}
useContext는 React.createContext가 반환한 context 객체를 인자로 받는다. 그 후 useContext가 호출된 컴포넌트로부터 가장 가까이 있는 해당 context의 Provider를 찾아서 그 Provider의 value를 반환한다.
만일 해당 context의 Provider를 찾지 못 했다면 createContext의 인자로 넘겨준 값을 반환한다.
최상위 컴포넌트를 context.Provider로 감싸준다면 코드 전역에서 해당 context를 참조할 수 있다라는 것이다.
또한 useContext를 호출한 컴포넌트는 해당 context의 값이 변경되면 항상 리렌더링 된다.
하지만 context에 담긴 값을 하위 컴포넌트에서 수정할 수는 없다.
useReducer + useContext
useReducer와 useContext를 조합하여 사용하면 redux 패턴을 흉내낼 수 있다. 어떤 depth에 위치한 컴포넌트든 useContext와 action dispatch로 state를 읽어오고 수정할 수 있다.
// App.tsx

import React, { useReducer, createContext, Dispatch } from 'react';
import Count from './components/Count';

type CountStateT = {
  "count": number
}
type CountActionT = {
  type: "INCREASE"
}

const initialState: CountStateT = {
  "count": 0
}

const countReducer = (state: CountStateT, action: CountActionT): CountStateT => {
  switch (action.type) {
    case 'INCREASE':
      return { count: state.count + 1 };
    default:
      throw new Error("invalid action type");
  }
} // 1

export const countStateContext = createContext(0); // 3
export const countDispatchContext = createContext<Dispatch<CountActionT> | null>(null); // 3

const App = () => {
  const [state, dispatch] = useReducer(countReducer, initialState); // 2

  return (
    <countDispatchContext.Provider value={dispatch}> // 4
      <countStateContext.Provider value={state.count}>
        <Count />
      </countStateContext.Provider>
    </countDispatchContext.Provider>
  );
};

export default App;
// Count.tsx
import React, { useContext } from 'react'
import { countDispatchContext, countStateContext } from '../App'
const Count = () => {
const count = useContext(countStateContext); // 5
const dispatch = useContext(countDispatchContext);
if(!dispatch) throw new Error("dispatch is null");
return (
<div>
<p>Test count: {count}</p>
<button onClick={() => {dispatch({type: 'INCREASE'})}}>+</button>
</div>
)
}
export default Count언뜻 보면 어려워보이지만, 차근차근 살펴보면 쉬운 코드이다. 주석에 표시된 숫자를 순서대로 읽어보자.
- countReducer를 만든다. action.type이 "INCREASE"라면 state.count를 1 증가시키는 reducer이다.
- useRedcuer의 첫 번째 인자로 countRedcuer를 넘겨주고 state와 dispatch를 받는다.
여기까지가 useReducer의 역할이다. - useContext를 사용하여 countStateContext와 countDispatchContext를 만든다. state context와 dispatch context를 따로 만든 것은 dispatch만 사용하는 컴포넌트가 있을 수 있고, state만 사용하는 컴포넌트가 있을 수 있기 때문이다.
- 3에서 만든 각 context의 Provider로 App의 하위 컴포넌트들을 감싼다. 이제 App의 하위 컴포넌트라면 어디에서든 countState와 countDispatch를 사용할 수 있게 되었다.
- App의 하위 컴포넌트에서 useContext의 인자로 countStateContext와 countDispatchContext를 넘겨준다. 이제 해당 컴포넌트는 countState의 최신 상태를 보장받고, countDispatch를 이용해 countState를 바꿀 수 있다.
이게 끝이다.
쉽게 설명하자면 useRedcuer로 만든 state와 dispatch를 useContext를 이용해 하위 컴포넌트들이 사용할 수 있게끔 만드는 것이다.
어떤가? react-redux의 기능과 매우 닮아있지 않은가?
🥝
여기까지가 useReducer + useContext를 사용한 redux 패턴의 기본이다.
다음 포스팅에서는 이렇게 만든 redux 패턴에서 비동기 작업(API 요청)을 하는 방법에 대해 배워볼 것이다.
글을 쓰면서 react-redux를 쓰면서 확실하게 알지 못 했던 부분, 어렴풋이 알고 있던 부분들이 밝혀져서 굉장히 좋았다.
근래에 사이드 프로젝트와 이력서 작성을 하면서 포스팅을 오랫동안 안 했는데, 역시 배움에 있어서는 포스팅을 하는 게 최고라고 생각한다. 주에 한 두 번은 프로젝트를 잠시 쉬고 포스팅만 하는 날을 만들어야 겠다.