
Raycast
레이캐스터라는 시각적으로 보이지 않는 광선(ray)을 이용(cast)해 광선을 지나오는 메쉬들의 정보를 가져올 수 있다. 또한, 정보를 가져오는 것 뿐만이 아니라 메쉬들의 정보도 바꿀 수 있다.
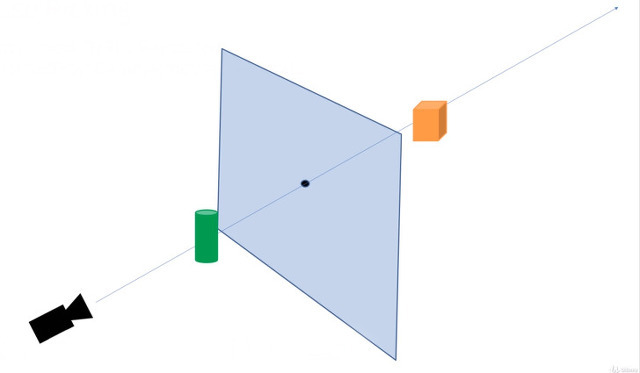
다시말해, 레이캐스트는 광선에 부딪히는 오브젝트들(원기둥,사면체)과 광원 사이의 거리를 통해 z축을 계산한다. 이로부터 카메라에서 오브젝트들간의 거리(z축)를 알 수 있다.
const raycaster = new THREE.Raycaster();위와 같이 Raycaster 메서드를 호출한다.
특정 광선을 지나는 메쉬 체크하기
레이캐스터는 비가시적이므로, 레이캐스터와 같은 방향의 가시광선을 draw한다.
이 때, 특정 메쉬를 지나는지 체크하는 함수는 raycaster의 intersectObjects를 이용한다.
가시광선을 먼저 그려보자.
	const lineMaterial = new THREE.LineBasicMaterial({ color: 'yellow' });
	const points = [];
	points.push(new THREE.Vector3(0, 0, 100));
	points.push(new THREE.Vector3(0, 0, -100));
	const lineGeometry = new THREE.BufferGeometry().setFromPoints(points);
	const guide = new THREE.Line(lineGeometry, lineMaterial);
	scene.add(guide);
광선이 그려진 것을 볼 수 있다.
이 때 보여지는 광선과 레이캐스터의 광선은 같은 위치와 같은 방향이다.
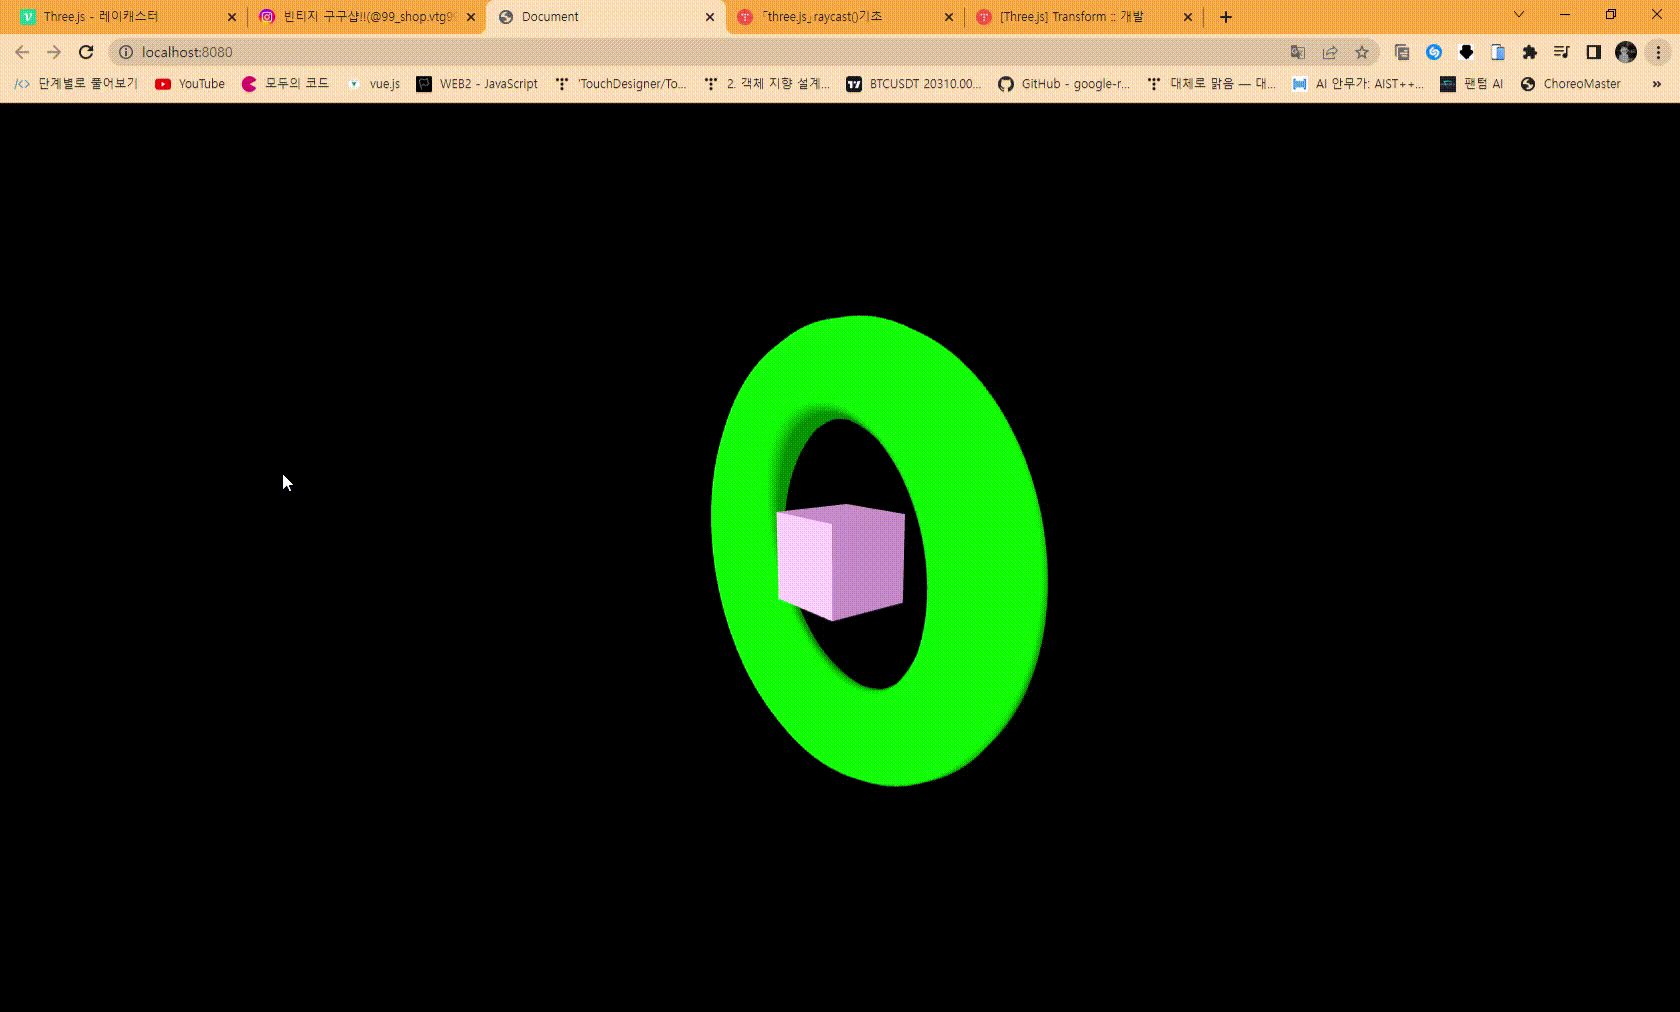
다음으로,광선에 메쉬가 닿는다면 메쉬의 색상을 바꾸어주는 코드를 짜보자.
intersectobject를 이용한다.
//...박스메쉬, 투로스 메쉬 생성 후 씬 추가

const meshes = [boxMesh,tourMesh];
const raycaster = new THREE.Raycaster();
function draw() {
		// const delta = clock.getDelta();
		const time = clock.getElapsedTime();

		boxMesh.position.y = Math.sin(time) * 2; //임의로 위아래로 이동
		torusMesh.position.y = Math.cos(time) * 2;//임의로 위아래로 이동
  //광선에 닿아 색상이 바뀔 경우 다음 프레임 메쉬 색상 초기화
		boxMesh.material.color.set('plum');
		torusMesh.material.color.set('lime');

		const origin = new THREE.Vector3(0, 0, 100);
		const direction = new THREE.Vector3(0, 0, -100);

  //벡터의 크기가 1이 되어야 정상작동하므로, 정규화를 진행한다.
		direction.normalize();
		raycaster.set(origin, direction);

		const intersects = raycaster.intersectObjects(meshes);
		intersects.forEach(item => {
			// console.log(item.object.name);
			item.object.material.color.set('red');
		});

		renderer.render(scene, camera);
		renderer.setAnimationLoop(draw);
	}
클릭감지
위에서 설명한 것 처럼 래이캐스트는 z값을 알아낼 수 있는데, 이 때 setFromCamera를 이용한다.
function checkIntersects() {
		console.log(preventDragClick.mouseMoved);
		if (preventDragClick.mouseMoved) return;

		raycaster.setFromCamera(mouse, camera);

		const intersects = raycaster.intersectObjects(meshes);
		for (const item of intersects) {
			console.log(item.object.name);
			item.object.material.color.set('red');
			break;
		}
		// if (intersects[0]) {
		// 	intersects[0].object.material.color.set('blue');
		// }
	}

	canvas.addEventListener('click', e => {
		mouse.x = e.clientX / canvas.clientWidth * 2 - 1;
		mouse.y = -(e.clientY / canvas.clientHeight * 2 - 1);
      //마우스 좌표를 -1~1 사이로 만들기 위함
		// console.log(mouse);
		checkIntersects();
	});
클릭 이벤트를 통해 mouse의 x,y값을 화면 비율에 맞추어 -1~1사이로 만들고,
raycaster의 origin을 마우스로, direction을 카메라로 설정해주면, 마우스를 기준으로 ray를 cast해주게 되고 ray에 닿은 오브젝트의 색상을 변경한다.
풀스택 호소인