AWS Cognito in SpringBoot
안녕하세요, 귀찮은걸 딱 싫어하는 데브옵스 엔지니어 최정민입니다.
많은 분들이 Java/Springboot 생태계에서 서비스 혹은 개인 프로젝트를 개발을 진행하고 계실 거라고 생각합니다.
이때 생각보다 많은 시간을 잡아먹는게 로그인, 회원가입이라 생각합니다.
개발자라면 다들 로그인, 회원 가입 기능 개발과 운영자라면 사용자 데이터 관리에 애를 먹었던 경험이 있을 것 같습니다. 오늘은 Amazon Cognito를 활용해 빠르고 간단하게 로그인/회원 가입/사용자 데이터 관리를 구현하는 방법을 알려드리겠습니다.
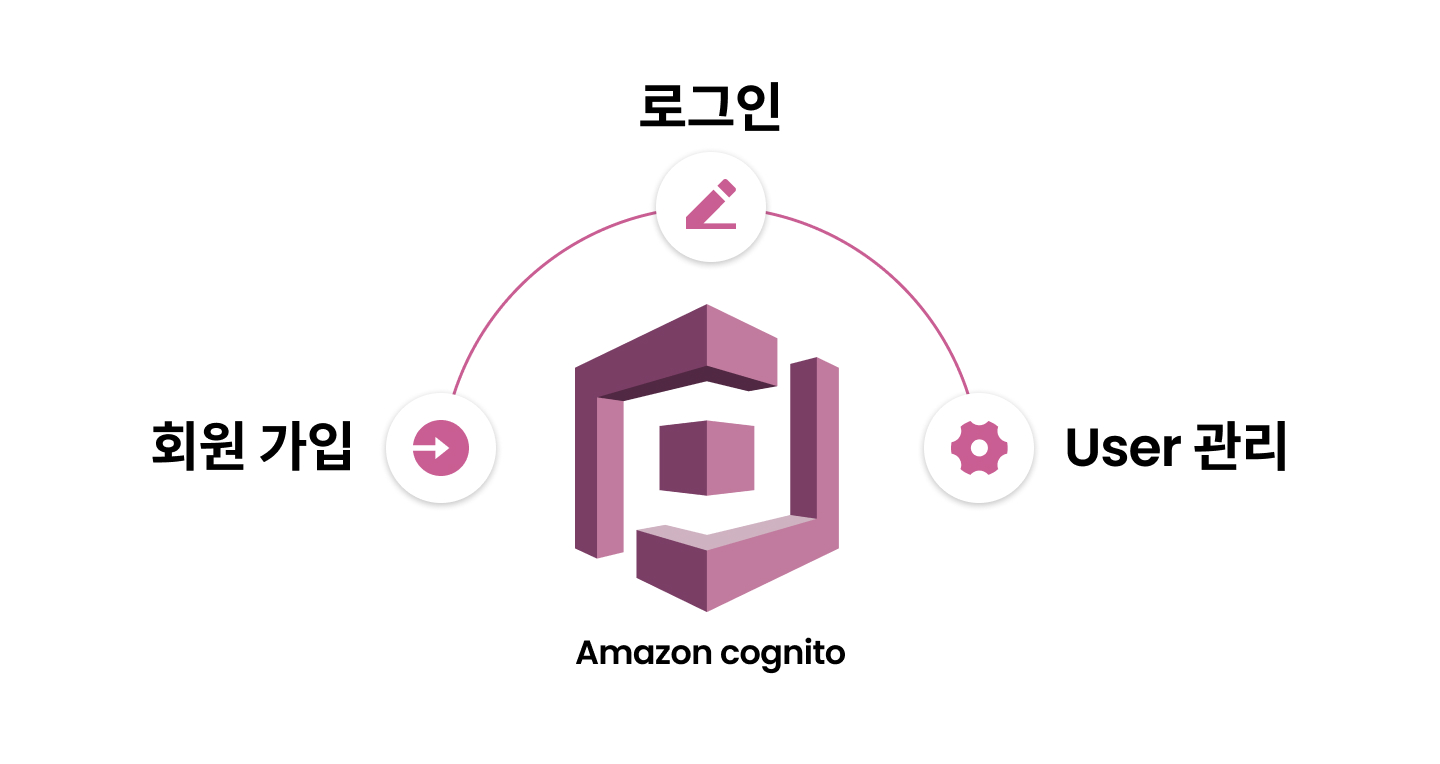
1. Amazon Cognito란?
Amazon Cognito는 웹과 모바일 앱에 대한 인증, 권한 부여 및 사용자 관리를 제공하는 서비스입니다.
Amazon Cognito는 크게 두 가지 구성 요소로 나뉘어집니다.
- 사용자 풀 사용자 풀은 앱 사용자의 가입 및 로그인 옵션을 제공하는 사용자 디렉터리, 즉 회원 가입, 로그인, USER에 대한 관리를 제공합니다.
- 자격 증명 풀 사용자에게 다른 AWS 서비스에 권한을 부여할 수 있습니다. 사용자 풀과 별도로 사용 가능하며, 사용자 풀과 함께 사용되었을 때 진가를 발휘합니다.
2. Amazon Cognito, 왜 추천하나요?
- 개발자는 로그인/회원 가입에 드는 노력을 줄일 수 있습니다.
- 운영자는 데이터 보관에 대해서 신경을 쓸 필요가 없습니다.
- 로그인 시 Amazon S3, DynamoDB등 다양한 AWS 서비스에 액세스 할 수 있습니다.
- Google, Facebook등 소셜 로그인과 간편히 연동할 수 있습니다.
3. Amazon Cognito를 쓰는 방법
💡 Amazone Cognito 사용자 풀을 이용해, SpringBoot 상에서 간단한 로그인 기능을 구현해보도록 하겠습니다.3-1 Amazon Cognito 사용자 풀을 생성합니다
- AWS Console로 이동해 Amazone Cognito Service Page로 이동한 뒤 사용자 풀 생성을 클릭합니다.

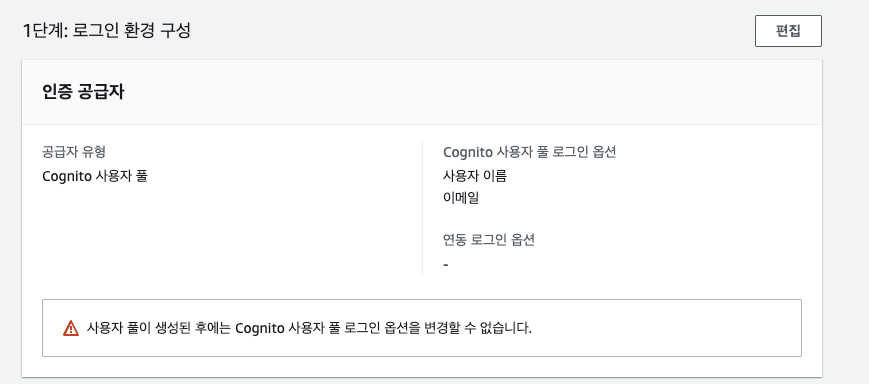
- 사용자 풀 구성
- 먼저 로그인 환경을 구성합니다.
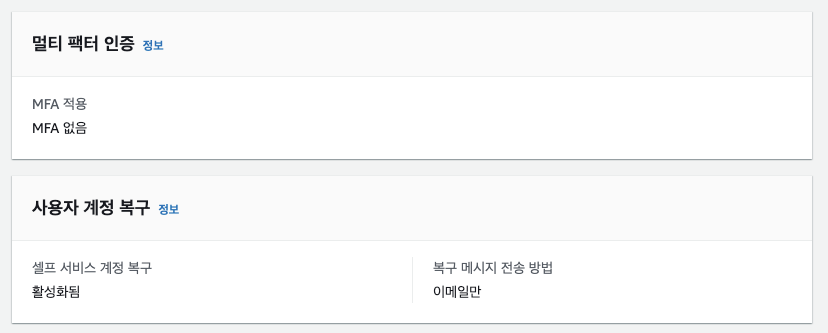
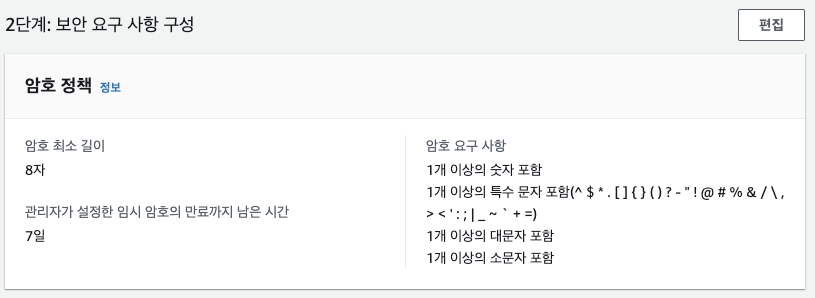
- 다음으로 보안 요구 사항을 구성합니다.
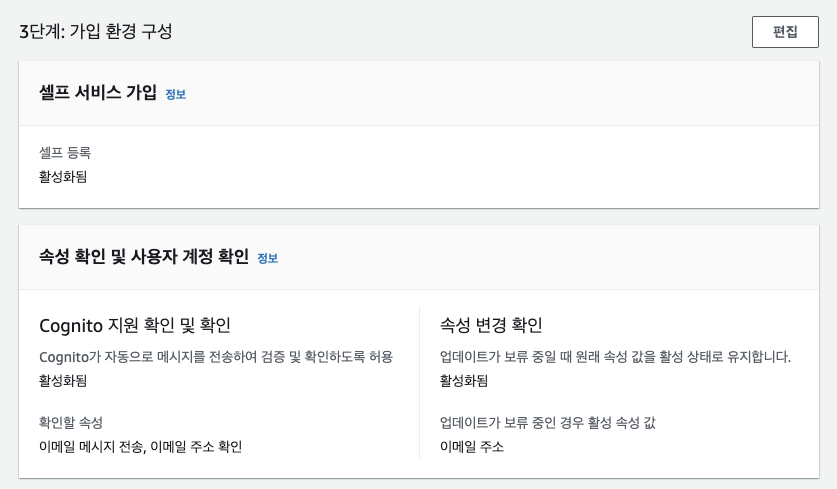
- 가입 환경을 구성합니다.
- 4단계에서는 메시지 전송 구성을 설정합니다.

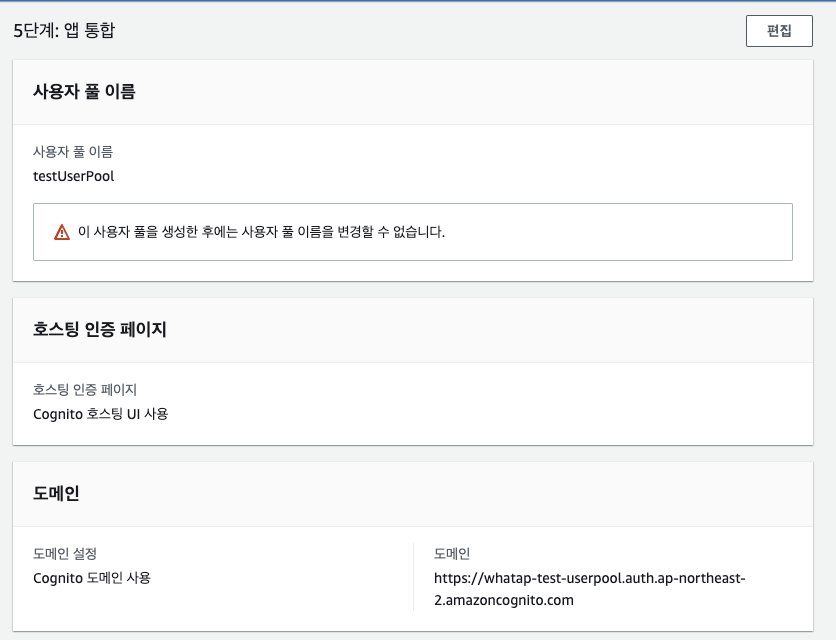
- 마지막으로 앱 통합 단계를 설정하면 모든 과정을 마쳤습니다.

3-2 SpringBoot Application에 적용
💡 Amazon Cognito를 이용해 로그인/회원 가입하고, 로그인 시 이메일을 보여주는 아주 간단한 예제 애플리케이션입니다. 아래 GitHub에서 다운 받으실 수 있습니다. GitHub에서 코드 확인도 가능합니다.https://github.com/cjm2021401/CognitoExample
- 중요 설정
- build.gradle 필요의존성
dependencies { implementation 'org.springframework.boot:spring-boot-starter-oauth2-client' implementation 'org.springframework.security:spring-security-oauth2-jose' implementation 'org.springframework.boot:spring-boot-starter-security' implementation 'org.springframework.boot:spring-boot-starter-thymeleaf' implementation 'org.springframework.boot:spring-boot-starter-web' implementation 'org.thymeleaf.extras:thymeleaf-extras-springsecurity5' testImplementation 'org.springframework.boot:spring-boot-starter-test' testImplementation 'org.springframework.security:spring-security-test' } - application.properties
spring.security.oauth2.client.registration.cognito.clientId=${Amazon Cognito AppClient-Id} spring.security.oauth2.client.registration.cognito.clientSecret=${Amazon Cognito AppClient-Secret} spring.security.oauth2.client.registration.cognito.scope=openid, email, phone spring.security.oauth2.client.registration.cognito.redirect-uri=${Callback URL} spring.security.oauth2.client.registration.cognito.clientName=${Amazon Congnito AppClientClient} spring.security.oauth2.client.registration.cognito.authorization-grant-type=authorization_code spring.security.oauth2.client.provider.cognito.issueUri=https://cognito-idp.ap-northeast-2.amazonaws.com/${Amazon Cognito UserPool-Id} spring.security.oauth2.client.provider.cognito.authorization-uri=${Amazon Cognito Domain}/oauth2/authorize spring.security.oauth2.client.provider.cognito.token-uri=${Amazon Cognito Domain}/oauth2/token spring.security.oauth2.client.provider.cognito.jwk-set-uri=https://cognito-idp.ap-northeast-2.amazonaws.com/${Amazon Cognito UserPool-Id}/.well-known/jwks.json spring.security.oauth2.client.provider.cognito.user-name-attribute= cognito:username- SecurityConfig
@EnableWebSecurity @EnableGlobalMethodSecurity(prePostEnabled = true) public class SecurityConfig { @Bean public SecurityFilterChain filterChain(HttpSecurity http) throws Exception { http.csrf() .and() .authorizeRequests(authz -> authz.mvcMatchers("/") .permitAll() .anyRequest() .authenticated()) .oauth2Login() .and() .logout() .logoutSuccessUrl("/"); return http.build(); } } - Controller
@GetMapping("/")
    public String Home(Model model, Authentication authentication){
        if (authentication != null && authentication.isAuthenticated()) {
            String email = makeEmail(authentication);
            model.addAttribute("email", email);
            return "result";
        }
        return "home";
    }
- SecurityConfig
- build.gradle 필요의존성
결과 및 적용
-
**http://localhost:8080** 로 접속 시

-
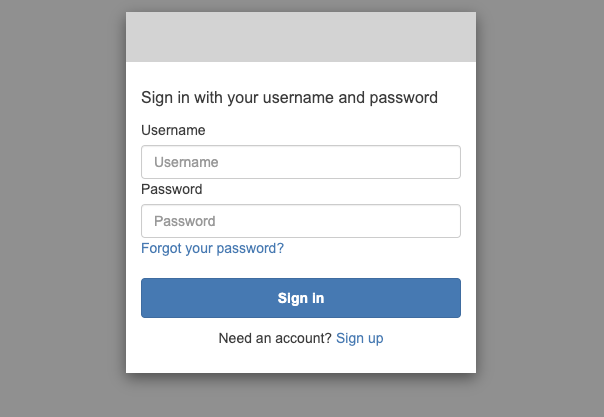
로그인 버튼 클릭
설정했던 Amazon Cognito 로 이동해 로그인 또는 회원 가입 창이 뜨게 됩니다.
-
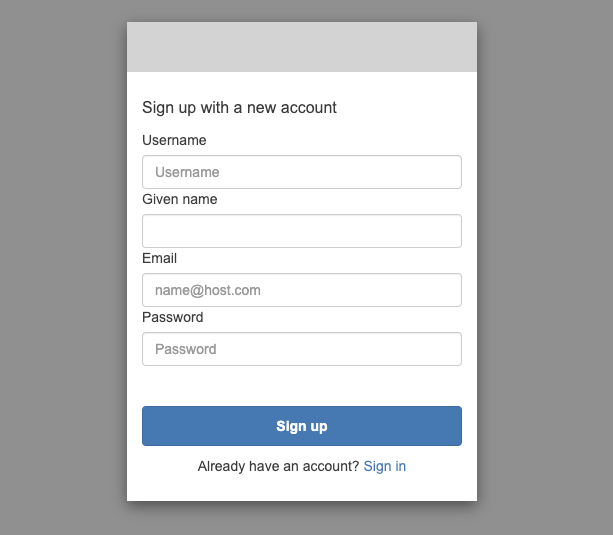
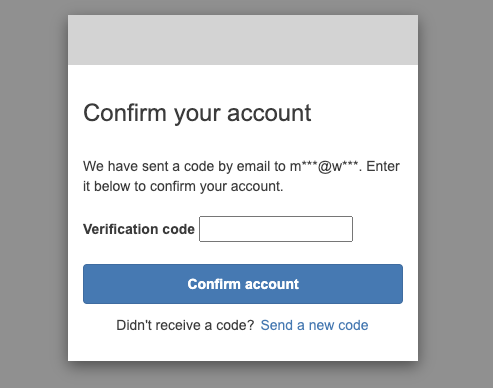
회원 가입(Sign up)
회원 가입(Sign up) 버튼을 클릭하면 Amazon Cognito에서 설정했던 가입 경험을 토대로 사용자에게 정보를 받아 가입을 요청하는 페이지가 나옵니다.
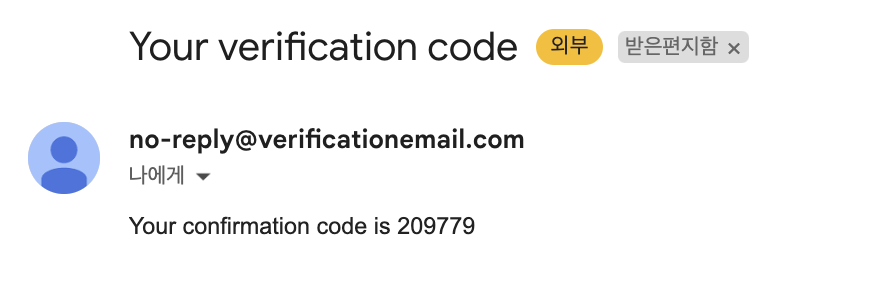
필요한 정보를 넣고 메일을 보낼 시 다음과 같은 메일이 전송이 되게 되고, 해당 코드를 입력하면 로그인이 됩니다.
- 가입 확인 Amazon Cognito 콘솔에서도 가입된 내역을 확인 가능합니다.

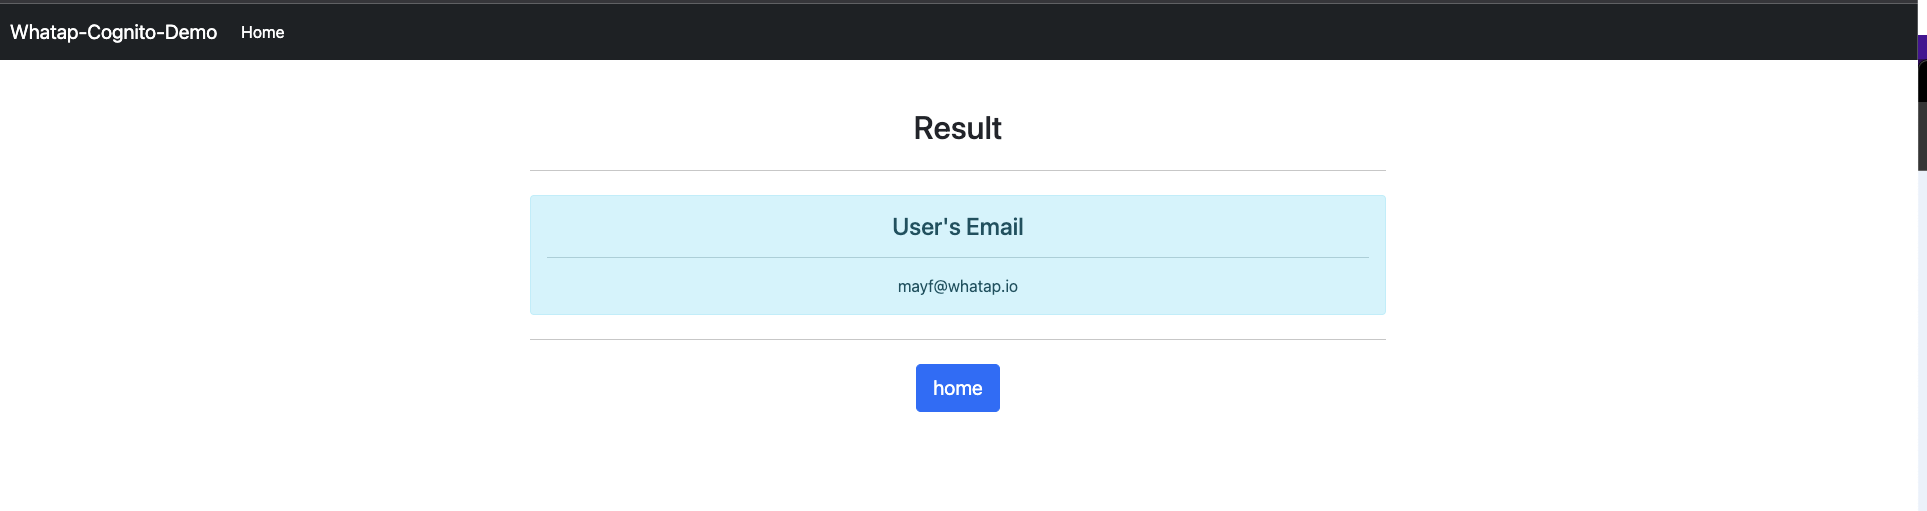
- 로그인할 때 이전 단계에서 만든 계정으로 로그인할 때 로그인 정보에서 이메일을 파싱(Parshing)해 로그인 된 유저의 이메일을 보여주는 화면이 나오게 됩니다.
4. Amazon Cognito, 이런 분에게 추천합니다
Amazon Cognito는 10분 내외 정도 소요되는 간단한 설정으로 로그인, 회원 가입, 유저 관리까지 할 수 있어 개발자가 부족하거나, 개발자가 기능 개발에 집중해야 하는 기업들에게 매우 매력적인 카드가 될 것이라고 생각합니다.
또한, Cognito 사용자 풀에 직접 로그인하는 50,000명, AML 2.0 기반 자격 증명 공급자를 통해 연동되는 사용자의 경우 50명을 프리 티어(Free Tier)로 제공하기 때문에 개발자 뿐만 아니라 개발을 공부하는 분들도 다양하게 사용할 수 있다고 생각합니다.
마치며
저 또한 데브옵스 엔지니어로 크고 작은 사내 시스템을 개발할 때 기존의 로그인 방식을 걷어내고, Amazon Cognito를 적용하였습니다. 사용하시는 분들도 만족하시고, 저 또한 관리 포인트가 적어지면서 굉장히 만족을 느끼고 있습니다. 새로운 인프라를 도입하는 것에 도전하세요!