딥러닝을 이용한 자연어 처리 입문 교재를 바탕으로 작성되었습니다.
09-01 워드 임베딩(Word Embedding)
- 단어를 벡터로 표현하는 방법이다.
1. 희소 표현(Sparse Representation)
- 앞서 살펴보았던 원-핫 인코딩을 거친 원-핫 벡터는 단 하나의 값이 1이고 나머지는 모드 0이로 표현된다. 이렇게 대부분의 행렬값이 0으로 표현되는 방법을 희소 표현이라고 하며, 이러한 벡터를 희소 벡터라고 한다.
- 원핫 벡터가 아니더라도 이러한 희소 표현은 많은 공간적 낭비를 일으키고, 단어의 의미를 표현하지 못한다는 단점이 있다.
2. 밀집 표현(Dense Representation)
- 희소 표현과 반대되는 개념으로, 행렬의 값이 실수값을 갖게 된다.
- 모든 단어의 벡터 표현의 차원을 맞춘다. 예를들어 128차원으로 단어를 표기하면
누렁이 = [0.2, 1.5, -3.1, ..., 5.1, 3.9] => 벡터의 차원이 128- 만약 위 누렁이 벡터값중 하나라도 바뀌면 이는 더이상 '누렁이'를 가리키지 않는다.
3. 워드 임베딩(Word Embedding)
- 단어를 밀집 벡터로 표현하는 방법을 워드 임베딩이라 한다.
- 워드 임베딩을 통해 나온 밀집 벡터를 임베딩 벡터라고 한다.
- 워드 임베딩에는 다양한 방법론이 있다. (Word2Vec, LSA, FastText, Glove 등)
이들은 훈련 데이터로부터 학습하여 표현 방법을 결정한다.
09-02 워드투벡터(Word2Vec)
- 워드 임베딩을 위해 사용하는 대표적인 방법이다.
2. 분산 표현(Distributed Representation)
- 희소 표현은 각 단어 벡터간 유사성을 표현할 수 없다는 단점이 있는데, 단어의 의미를 다차원 공간에 벡터화하는 방법을 이용할 수 있다(밀집 벡터). 이러한 표현을 분산 표현이라 한다.
- 0, 1 대신 무한한 실수 표현을 사용할 수 있으므로, 희소 표현에 비해 필요한 차원이 적다.
- 분산 표현은 분포 가설이라는 가정 하에 만들어진 방법이다.
- 분포 가설 : 비슷한 문맥에서 등장하는 단어들은 비슷한 의미를 가진다.
- 가령
밥을 먹는다에서 ‘밥’과 ‘먹는다’는 비슷한 문맥에서 등장하므로 유사한 벡터값을 갖는다. - 이런 원리로 분산 표현을 사용하면 단어 벡터 간의 유사도를 계산할 수 있다.
- 이를 구현하기 위한 대표적인 학습방법이 Word2Vec이다.
3. CBOW(Continuous Bag Of Words)
- CBOW는 Word2Vec의 학습 방식 중 하나로, 주변에 있는 단어들을 입력으로 하여 중간의 단어를 예측하는 방법이다.
예시
The fat cat sat on the mat- 여기서 ‘sat’을 예측해야한다고 했을 때, 예측 해야하는 단어 sat을 중심 단어(center word)라고 하고, 예측에 사용되는 단어들을 주변 단어(context word)라고 한다.
- 이때 중심 단어를 중심으로 앞, 뒤 몇개 까지의 단어를 볼지를 결정해야하는데, 이 범위를 윈도우라고 한다. 윈도우가 n일 때 앞 뒤로 n개씩 총 2n개의 주변 단어가 있다.
- 윈도우 크기가 정해지면 ‘The’, ‘fat’, ‘cat’… 이렇게 순차적으로 단어 하나를 중심 단어로 선정하고, 주변 단어를 선택해가변서 데이터 셋을 만든다. 이 방법을 슬라이딩 윈도우(Sliding Window)라고 한다.
- CBOW의 인공 신경망을 도식화 하면 Input이 주변 단어(원-핫 벡터), Output이 중심 단어(원-핫 벡터)가 되는 구조를 갖는다.
- 이 사이에 학습을 위한 히든 레이어가 들어가는데, Word2Vec에서는 이 히든 레이어가 단 1개인 얕은 신경망을 사용하며, 활성화 함수가 존재하지 않는다.
동작 메커니즘
- 단어의 개수(단어 집합 크기)가 V개, 히든레이어의 노드 수가 M개라면,
- 입력층과 히든 레이어 사이의 가중치 행렬(W)은
V x M행렬이 된다. - 히든 레이어와 출력층 사이의 가중치 행렬(W’)은
M x V행렬이 된다. - CBOW는 주변 단어로 중심 단어를 맞추기 위해 W와 W’를 계속 학습해 나가는 과정이다.
- 입력층과 히든 레이어 사이의 가중치 행렬(W)은
- 히든 레이어의 결과 벡터들은 각각의 Input 원 핫 벡터에 가중치 W를 곱한 것을 평균 낸 것 과 같다.
- 이렇게 구한 평균 벡터를 W’ 가중치와 곱하고, softmax로 0~1의 값을 갖도록 한다.
최종적으로 원-핫 벡터와 동일한 차원의, 확률을 나타내는 벡터를 출력한다. - 원-핫 벡터에서 정답에 해당하는 단어는 1, 이외의 단어는 0일 것이므로, 이것과 출력 벡터와의 loss를 줄이는 방향으로 학습(가중치 업데이트)이 이루어진다.
- 이렇게 구한 평균 벡터를 W’ 가중치와 곱하고, softmax로 0~1의 값을 갖도록 한다.
4. Skip-gram
- Word2Vec의 다른 학습 방식으로, 중심 단어를 바탕으로 주변 단어를 예측한다.
- 즉 중심 단어 하나가 입력층이 되고, 2n개의 주변 단어가 출력층이 된다.
- 중심 단어 하나만 있기 때문에 출력층에서 평균을 구하는 과정이 없다.
- 여러 논문에서 성능 비교를 한 결과 Skip-gram이 CBOW보다 성능이 좋다고 알려져 있다.
09-04 네거티브 샘플링을 이용한 Word2Vec 구현
1. 네거티브 샘플링(Negative Sampling)
- Word2Vec에서 출력층의 차원은 원-핫 벡터의 차원과 같아야 하므로, 단어 집합의 크기가 매우 크다면 무거운 모델이 될 수 있다.
- 이때 이러한 단어 집합에서 주변 단어를 제외한 나머지 단어 벡터들은 중심 단어와 별 연관이 없을 확률이 높아, 이들까지 레이어에 넣어 업데이트하는 것은 비효율적인 방식이다.
- 네거티브 샘플링은 전체 단어 집합에서, 주변 단어 + 무작위로 선택된 단어를 샘플링하여 보다 작은 단어 집합을 만들어 사용한다. 그리고 주변 단어를 Positive, 무작위 단어를 Negative로 라벨링하여 주변 단어인지 아닌지를 분류하는 이진 분류 문제로 변환한다.
- 이렇게하면 차원도 크고, 다중 분류 문제를 풀어야하던 기존 Word2Vec과 달리 보다 작은 차원에서 이진 분류 문제를 풀게 되므로 연산량이 효율적이다.
2. 네거티브 샘플링 Skip-Gram (SGNS)
- 네거티브 샘플링을 사용하는 Skip-Gram은 기존 Skip-gram과는 다른 접근 방식을 취한다. Input에 중심 단어 하나만 입력되는 대신, 주변 단어가 함께 모두 입력이 되며 이 두단어가 실제로 중심 단어-주변 단어 관계인지 확률을 예측하는 문제를 풀어낸다.
예시
- 기존방법
The fat cat sat on the mat: 중심단어 cat, window 범위 2 x → y- cat → The
- cat → fat
- cat → sat
- cat → on
- SGNS
The fat cat sat on the mat: 중심단어 cat, window 범위 2 x → y-
cat + The → 1
-
cat + fat → 1
-
cat + sat → 1
-
cat + on → 1
-
cat + tissue → 0
-
cat + computer → 0
…
-
- 여기서 레이블 0 값을 갖는 단어가 바로 주변 단어가 아닌 단어 중 랜덤으로 뽑은 것이다.
업데이트 과정
- 중심 단어를 룩업하는 임베딩 테이블, 주변 단어 및 무작위 선택된 단어를 룩업하는 임베딩 테이블을 각각 준비한다. 두 임베딩 테이블은 크기가 같다 (훈련 데이터의 단어집합)
- 각 임베딩 테이블을 통해 테이블을 룩업하여 임베딩 벡터로 변환한다.
- 중심 단어 벡터와 주변 단어 벡터의 내적값을 예측값으로 하여 레이블과의 오차를 구한다. → 임베딩 벡터를 업데이트 하는데 사용
09-05. 글로브(GloVe)
- 글로브는 카운트 기반(LSA)과 예측 기반(Word2Vec)을 모두 사용하여 단어 임베딩을 하는 방법론이다.
- 현재까지 연구에 따르면 Word2Vec과 GloVe의 성능은 비슷한 수준으로, 둘 다 사용해보고 성능이 더 좋은 것을 사용하는 것이 바람직하다.
1. 기존 방법론에 대한 비판
- 카운트 기반 임베딩 방법은 코퍼스 전체의 통계 정보를 반영할 수 있지만, 단어 간 관계는 잘 예측하지 못한다.
- 예측 기반 임베딩 방법은 단어 간 관계를 잘 나타내지만, 주변 단어만을 고려하기 때문에 코퍼즈 전체의 통계 정보를 반영하지 못한다.
- GloVe는 두 가지를 모두 사용하여 이러한 한계를 극복하려 하였다.
2. 윈도우 기반 동시 등장 행렬(Window based Co-occurrence Matrix)
- 단어의 동시 등장 행렬 : 행과 열을 전체 단어 집합으로 구성하고, i 단어를 중심으로 좌, 우 윈도우 크기 내에서 k 단어가 등장한 횟수를 i행 k열에 기재한 행렬을 말한다.
-
아버지가 방에 들어가신다.
-
아버지 가방에 들어가신다.
-
방에 아버지의 가방이 있다.
-
윈도우 크기가 1이라고 할 때,
아버지 방 가방 들어가신다 있다 아버지 0 2 2 0 0 방 2 0 0 1 0 가방 2 0 0 1 1 들어가신다 0 1 1 0 0 있다 0 0 1 0 0
-
- 이러한 행렬을 구할 수 있다. 이는 전치를 해도 동일한 구조를 갖는다.
3. 동시 등장 확률(Co-occurrence Probability)
- 동시 등장 확률이란, 동시 등장 행렬을 기반으로, 특정 단어 i가 등장했을 때, 어떤 단어 k가 등장한 횟수를 카운트하여 계산한 조건부 확률이다.
P(k|i) = ( i행 k열의 값) / (i행 값의 합계)P(아버지|가방) = ( 2 / 4 ) = 0.5P(있다|가방) = ( 1/ 4 ) = 0.25- 여기서
P(아버지|가방)/P(있다|가방)= 2 라는 값을 얻을 수 있다. 이를 이용해 loss를 도출한다.
09-06. 패스트텍스트 (FastText)
- FastText는 페이스북에서 개발한 것으로, Word2Vec에서 확장한 개념을 사용한다.
- Word2Vec과의 가장 큰 차이점은, FastText는 단어를 쪼개어 하나의 단어 안에서도 여러개의 단어, 즉 서브워드(subword)를 고려하여 학습한다.
1. 내부 단어(subword)의 학습
- FastText는 하나의 단어를 n-gram 구성으로 취급하여, n개의 서브워드로 분리하고 이들을 벡터로 만든다.
-
n=5일 때 apple은
<ap, app, ppl, ple, le>가 될 수 있다. 여기서 꺽쇠는 시작과 끝을 의미한다. -
여기에 기존 단어 앞뒤로 <, >를 붙인 토큰을 특별 토큰으로 벡터화 한다.
<apple># n=5일 때 apple에 대한 토큰 벡터화 <ap, app, ppl, ple, le>, <apple>
-
- 여기에 더해 실제 사용할 때는 n의 최소값과 최대값을 모두 지정하여 각 범위 별 내부 단어들을 모두 벡터화하여 사용한다.
# n = 3 ~ 6인 경우 <ap, app, ppl, ppl, le>, <app, appl, pple, ple>, <appl, pple>, ..., <apple> - 이제 단어 apple의 벡터 값은 위 벡터값의 총 합으로 하여, Word2Vec을 수행한다.
2. 강점 1 : 모르는 단어(OOV)에 대한 대응
- 이런 내부 단어를 이용하면 OOV에 대해서도 다른 단어와의 유사도를 계산할 수 있다는 강점을 갖는다.
- 가령
penpineappleapplepen이라는 학습하지 않은 데이터가 존재할 때,apple이라는 서브 단어가 있었다면penpineappleapplepen의 벡터 역시 얻을 수 있다.- Word2Vec과 GloVe는 이러한 단어에 제대로 대처할 수 없다.
3. 강점 2 : 단어 집합 내 빈도 수가 적었던 단어(Rare word)에 대한 대응
- FastText는 희귀 단어에 대해서도, n-gram이 다른 단어의 n-gram과 겹치는 경우라면 Word2Vec에 비해 높은 임베딩 벡터값을 얻을 수 있다.
- 이와 같은 이유로 오타나 맞춤법이 틀린 단어, 즉 노이즈가 많은 코퍼스에도 강점을 갖는다.
09-08 사전 훈련된 워드 임베딩
- 케라스의 임베딩 층과 사전 훈련된 임베딩을 가져와서 사용하는 것을 실습해보자
1. 케라스 임베딩 층(Keras Embedding layer)
- 케라스는 훈련 데이터 단어로 워드 임베딩을 수행하는 도구
Embedding()을 제공한다.
1) 임베딩 층은 룩업 테이블이다.
- 입력 시퀀스의 각 단어들은 모두 정수 인코딩이 되어있어야 한다. (임베딩 층의 Input으로 사용하기 위해)
- 임베딩 층은 입력 정수를 밀집 벡터로 맵핑하고, 이 밀집 벡터는 신경망에서 가중치가 학습되는 것과 같은 방식으로 모델이 풀고자 하는 문제에 맞는 값으로 업데이트 된다. 이렇게 업데이트 된 밀집 벡터를 임베딩 벡터라고 한다.
- 즉 이러한 과정을 통해 정수 인덱스를 바탕으로 테이블로부터 임베딩 벡터 값을 가져올 수 있게 된다. 이러한 과정을 룩업이라 한다.
# 케라스 임베딩 층 구현

vocab_size = 20000 # input의 차원 (원-핫 벡터 - 단어 집합 크기)
output_dim = 128 # ouput의 차원 (임베딩 후 임베딩 벡터의 차원)
input_length = 500 # 입력 시퀀스의 길이

v = Embedding(input_dim=vocab_size,
							output_dim=output_dim,
							input_length=input_length)
2) 임베딩 층 사용하기
- 문장의 긍정과 부정을 분류하는 예제이다.
- 긍정 문장은 레이블 1, 부정 문장은 레이블 0
# 1. 문장과 레이블 만들기

sentences = ['nice great best amazing', 'stop lies', 'pitiful nerd', 'excellent work', 'supreme quality', 'bad', 'highly respectable']
y_train = np.array([1, 0, 0, 1, 1, 0, 1])
# 2. 케라스 토크나이저를 통해 단어 집합을 만들기
tokenizer = Tokenizer()
tokenizer.fit_on_texts(sentences)
vocab_size = len(tokenizer.word_index) + 1 # 패딩을 고려해서 +1
print('단어 집합의 크기:', vocab_size)
>>> 16# 3. 정수 인코딩
x_encoded = tokenizer.texts_to_sequences(sentences)
print('정수 인코딩 결과:', x_encoded)
>>> [[1, 2, 3, 4], [5, 6], [7, 8], [9, 10], [11, 12], [13], [14, 15]]# 4. 전체 문장 중 최대길이로 패딩
x_train = pad_sequences(x_encoded, max(len(length) for length in x_encoded), padding='post')
print('패딩 결과: \n', x_train)
"""
패딩 결과:
[[ 1 2 3 4]
[ 5 6 0 0]
[ 7 8 0 0]
[ 9 10 0 0]
[11 12 0 0]
[13 0 0 0]
[14 15 0 0]]
"""# 5. 모델링
from tensorflow.keras.backend import clear_session
from tensorflow.keras.models import Sequential
from tensorflow.keras.layers import Input, Dense, Flatten
output_dim = 4
# 1. 세션 클리어
clear_session()
# 2. 모델 선언
model = Sequential()
# 3. 모델 층 쌓기
model.add( Embedding(input_dim=vocab_size,
output_dim=output_dim,
input_length=max_len) )
model.add( Flatten() )
model.add( Dense( 1, activation='sigmoid') ) # 이진분류
# 4. 컴파일
model.compile(loss='binary_crossentropy',
metrics=['accuracy'],
optimizer='adam')
# 요약
model.summary()
"""
Model: "sequential"
_________________________________________________________________
Layer (type) Output Shape Param #
=================================================================
embedding (Embedding) (None, 4, 4) 64
flatten (Flatten) (None, 16) 0
dense (Dense) (None, 1) 17
=================================================================
Total params: 81
Trainable params: 81
Non-trainable params: 0
_________________________________________________________________
"""# 6. 학습
model.fit(x_train, y_train, epochs=100, verbose=1)2. 사전 훈련된 워드 임베딩 사용하기
- 처음부터 임베딩 벡터값을 학습하는 방법 외에, 이미 훈련된 워드 임베딩을 가져와서 임베딩 벡터로 사용하기도 한다.
- 주로 훈련 데이터의 양이 적을 경우, Embedding 만으로는 임베딩 벡터값을 어얻는 것이 쉽지 않기 때문이다.
- 예시는 직접 임베딩 층을 만들었을 때와 동일하게 사용한다.
1) 사전 훈련된 GloVe 사용하기
💡 GloVe 다운로드 링크 : http://nlp.stanford.edu/data/glove.6B.zip
# 1. GloVe 임베딩 벡터 파일 불러오기

from urllib.request import urlretrieve, urlopen
import gzip
import zipfile

urlretrieve("http://nlp.stanford.edu/data/glove.6B.zip", filename="glove.6B.zip")
zf = zipfile.ZipFile('glove.6B.zip')
zf.extractall()
zf.close()
# 2. 여러 파일 중 GloVe.6B.100d 임베딩 벡터 불러오기
embedding_dict = dict()
f = open('glove.6B.100d.txt', encoding="utf8")
for line in f:
word_vector = line.split()
word = word_vector[0] # 0번째 열이 단어
# 100개의 값을 가지는 array로 변환
word_vector_arr = np.asarray(word_vector[1:], dtype='float32') # 1번째 이후 값이 임베딩 벡터
embedding_dict[word] = word_vector_arr
f.close()
print('임베딩 벡터 수 :', len(embedding_dict))
>>> - 벡터의 차원수는 100이므로 임베딩 벡터의 크기는 (16, 100)이 된다.
- 해당 벡터에는 40만개의 단어가 있으며, 예제의 단어도 포함되어있다.
# 3. 예제 단어 확인
print('단어 great의 벡터 값 \n', embedding_dict['great'])

"""
단어 great의 벡터 값
[-0.013786   0.38216    0.53236    0.15261   -0.29694   -0.20558
... 중략 ...
-0.69183   -1.0426     0.28855    0.63056  ]
"""

print('단어 supreme의 벡터 값 \n', embedding_dict['supreme']

"""
단어 supreme의 벡터 값
[ 0.85622   -0.30057    0.98826    0.42044    0.54632    0.18236
... 중략 ...
0.31196   -0.54905    0.18415    0.017116 ]
"""
# 4. 임베딩 벡터 행렬 선언 및 맵핑
embedding_matrix = np.zeros((vocab_size, 100))
for word, index in tokenizer.word_index.items():
# 단어와 맵핑되는 사전 훈련된 임베딩 벡터값
vector_value = embedding_dict.get(word)
if vector_value is not None:
embedding_matrix[index] = vector_value- 이제 임베딩 벡터를 얻었으므로, 모델링 층을 구성하면 된다.
단, 이미 Embedding 층에 사용할 가중치를 갖고 있기 때문에, 이를 별도로 지정해주어야 한다는 차이점이 있다.
# 5. 맵핑된 행렬을 통해 학습 (임베딩 학습 X)

model.add( Embedding(input_dim=vocab_size,
		   output_dim=output_dim,
		   weights=[embedding_matrix], # 사용할 워드 임베딩 초기값
		   input_length=max_len,
		   trainable=False) # Embedding 벡터를 학습하지 않음 (가져온 것 그대로 사용)
)- 만약 학습 중 워드 임베딩 가중치도 업데이트하고 싶다면, trainable을 True로 지정하면 된다.
09-09 엘모(Embeddings from Language Model ELMo)
- ELMo는 2018년에 제안된 새로운 임베딩 방법으로, 해석하면 언어 모델로 하는 임베딩을 말한다.
- ELMo의 가장 큰 특징은 사전 훈련된 언어 모델을 사용한다는 것이다.
1. ELMo
- Word2Vec과 GloVe의 단점은 같은 단어가 서로 다른 의미로 쓰일 때를 반영하지 못한다는 것이다.
- 즉 같은 표기의 단어라도 문맥에 따라 다르게 워드 임베딩을 할 수 있다면, 자연어 처리의 성능을 올릴 수 있을 것이다. 이 아이디어를 문맥을 반영한 워드 임베딩이라 한다.
2. biLM(Bidirectional Languande Model)의 사전 훈련
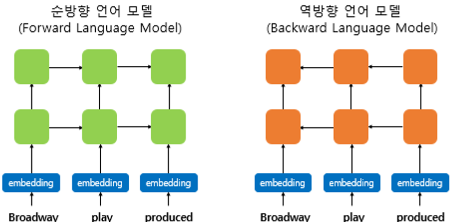
- 일반적인 단방향 RNN 언어모델에서, RNN내부의 은닉상태(h_t)는 시점(t)이 지날수록 점점 업데이트 된다. 이는 h_t값이 문장의 문맥 정보를 점차 반영한다고 할 수 있다.
- 이 때 ELMo는 순방향 RNN 뿐만 아니라, 반대 방향으로 문장을 스캔하는 역방향 RNN도 활용한다. 즉 양쪽 방향의 언어 모델을 둘다 활용하여 이를 biLM이라 부른다.
- 유의할 점은 biLM이 입력받는 단어 벡터는 임베딩 층을 통해 얻은 것이 아니라, Character Embedding이란 방법을 사용해 얻은 단어 벡터이다. 우선은 단어 벡터를 얻는 또다른 방식이 있다는 정도로만 짚고 넘어가자
- 또한 양방향 RNN과 ELMo는 다르다.
- 양방향 RNN은 순방향, 역방향의 h_t를 연결(concatenate)하여 다음층의 입력으로 사용
- ELMo는 순방향, 역방향을 서로 별개의 모델로 보고 학습
3. biLM의 활용
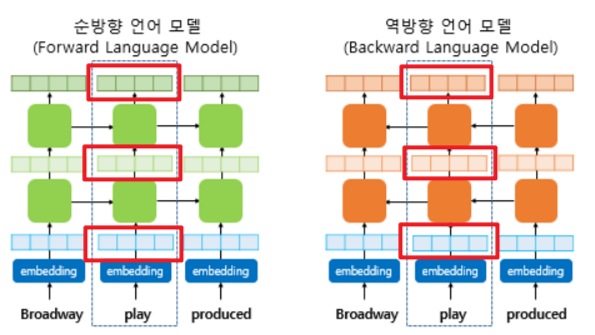
- 위와 같이 히든 레이어가 2층인 언어 모델이 있다고 할 때, 하나의 단어에 대해서는 총 3가지 층이 존재한다.
-
입력값의 임베딩 층
-
첫번째 히든레이어
-
두번째 히든레이어
이러한 층이 순방향, 역방향에 각각 하나씩 존재한다고 할 수 있다.
-
1) 각 층의 출력값을 연결(concatenate)한다.
- 순방향 층과 역방향 층을 연결한다.
2) 각 층의 출력값 별로 가중치를 준다.
3) 각 층의 출력값을 모두 더한 가중합을 구한다.
4) 벡터의 크기를 결정하는 스칼라 매개변수(γ)를 곱한다.
- 이렇게 완정된 벡터를 ELMo 표현이라고 한다.
- ELMo 표현은 기존의 임베딩 벡터와 함께 사용할 수 있는데, 기존 방법(GloVe, Word2Vec)으로 얻은 임베딩 벡터와 ELMo 표현을 연결(concatenate)하여 새로운 입력으로 사용할 수 있다.
- 이때 앞서 ELMo 표현을 구하기 위해 사용한 층별 가중치(s)과 스칼라 매개변수(γ)는 훈련과정에서 학습이 이루어진다.
09-11 실습. 문서 벡터를 이용한 추천 시스템
1. 필요 라이브러리 로딩
# 필요 라이브러리 로딩

import urllib.request
import pandas as pd
import numpy as np
import matplotlib.pyplot as plt
import requests
import re
from PIL import Image
from nltk.tokenize import RegexpTokenizer
import nltk
from gensim.models import Word2Vec, KeyedVectors
from nltk.corpus import stopwords
from sklearn.metrics.pairwise import cosine_similarity

nltk.download('stopwords')
2. 데이터 로드
- 튜토리얼이 제공하는 책 제목과 줄거리 등이 담겨있는 데이터이다.
# 데이터 다운로드 및 확인

urllib.request.urlretrieve("https://raw.githubusercontent.com/ukairia777/tensorflow-nlp-tutorial/main/09.%20Word%20Embedding/dataset/data.csv", filename="data.csv")
df = pd.read_csv("data.csv")
- 여기서 자연어 처리가 필요한 것은 줄거리 뿐이다.
- 줄거리를 토큰화 한 것을 별도의 컬럼에 저장하는 작업을 거칠 것이다.
3. 데이터 전처리
- ASCII에 해당하지 않는 문자를 제거한다.
- 대문자를 소문자로 변환한다.
- 불용어(stopwords)를 제거한다.
- HTML 태그를 제거한다.
- 마침표 등 기호 및 특수문자를 제거한다.
# 필요한 정보인 Desc (줄거리) 열에 대한 전처리
def _removeNonAscii(s):
    return "".join(i for i in s if  ord(i)<128) # 아스키코드에 해당하는 문자만 추출하고, 나머지 제거

def make_lower_case(text):
    return text.lower() # 모든 대문자를 소문자로

def remove_stop_words(text):
    text = text.split()
    stops = set(stopwords.words("english")) # 불용어 집합 불러오기
    text = [w for w in text if not w in stops] # 불용어가 아닌 단어만 저장
    text = " ".join(text) # 띄어쓰기로 구분한 문자열로 출력
    return text

def remove_html(text):
    html_pattern = re.compile('<.*?>') # html 태그를 전부 제거
    return html_pattern.sub(r'', text)

def remove_punctuation(text):
    tokenizer = RegexpTokenizer(r'[a-zA-Z]+') # 마침표 등 기호 및 특수문자 제거 (영어 알파벤만 남김)
    text = tokenizer.tokenize(text)
    text = " ".join(text)
    return text

df['cleaned'] = df['Desc'].apply(_removeNonAscii)
df['cleaned'] = df.cleaned.apply(make_lower_case)
df['cleaned'] = df.cleaned.apply(remove_stop_words)
df['cleaned'] = df.cleaned.apply(remove_punctuation)
df['cleaned'] = df.cleaned.apply(remove_html)- 그 외에 결측치가 존재하는지 확인해 주는데 이곳에서는 없었다.
# nan 확인 (교재에는 하나가 존재하는 걸로 나왔는데 여기서는 없다.)
df['cleaned'].isna().sum()
>>> 0
4. 사전 훈련된 워드 임베딩 로드(GloVe)
#사전 훈련된 GloVe 로드

import gzip
import zipfile

# urllib.request.urlretrieve("http://nlp.stanford.edu/data/glove.6B.zip", filename="glove.6B.zip")

zf = zipfile.ZipFile('glove.6B.zip')
zf.extractall()
zf.close()

embedding_dict = dict()

f = open('glove.6B.100d.txt', encoding="utf8")

for line in f:
    word_vector = line.split()
    word = word_vector[0] # 0번째 열이 단어

    # 100개의 값을 가지는 array로 변환
    word_vector_arr = np.asarray(word_vector[1:], dtype='float32') # 1번째 이후 값이 임베딩 벡터
    embedding_dict[word] = word_vector_arr

f.close()

print('임베딩 벡터 수 :', len(embedding_dict))
5. 단어 벡터의 평균으로 문서 벡터 구하기
- 문서 벡터를 구하는 별도의 알고리즘이 존재하지만, 문서 내의 단어 벡터들을 더해 모두 평균을 내는 방법으로도 문서 벡터를 표현할 수 있다.
def get_document_vectors(document_list):
    document_embedding_list = []

    # 각 문서에 대해서
    for line in document_list:
        doc2vec = None
        count = 0
        for word in line.split():
            if word in embedding_dict:
                count += 1
                # 해당 문서에 있는 모든 단어들의 벡터값을 더한다.
                if doc2vec is None:
                    doc2vec = embedding_dict[word]
                else:
                    doc2vec = doc2vec + embedding_dict[word]

        if doc2vec is not None:
            # 단어 벡터를 모두 더한 벡터의 값을 문서 길이로 나눠준다.
            doc2vec = doc2vec / count
            document_embedding_list.append(doc2vec)

    # 각 문서에 대한 문서 벡터 리스트를 리턴
    return document_embedding_list
6. 추천 시스템 구현하기
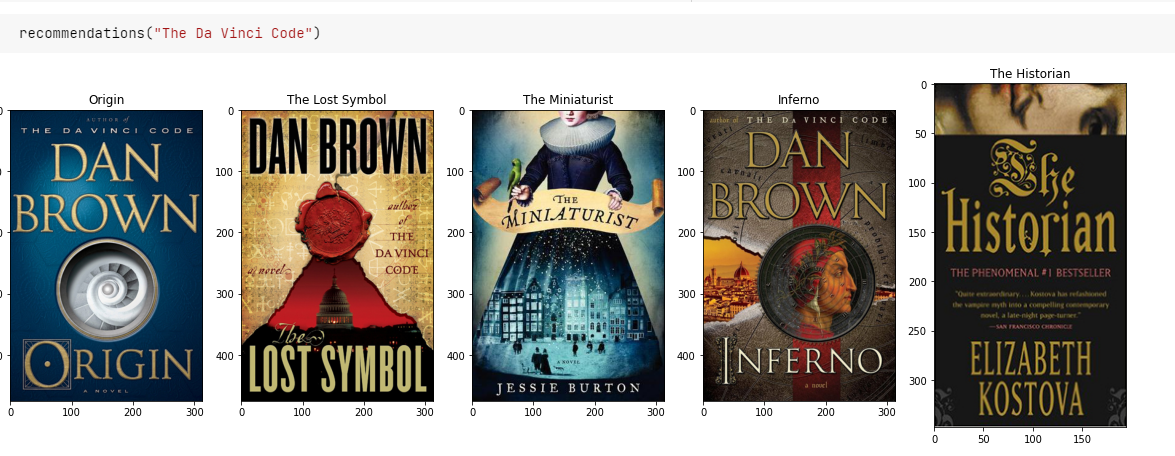
- 코사인 유사도를 바탕으로, 내가 입력한 책과 가장 코사인유사도가 높은 5권의 책을 추천받아보자.
# 유사도 매트릭스 구하기

cosine_similarities = cosine_similarity(document_embedding_list, document_embedding_list)
def recommendations(title):
books = df[['title', 'image_link']]
# 책의 제목을 입력하면 해당 제목의 인덱스를 리턴받아 idx에 저장.
indices = pd.Series(df.index, index = df['title']).drop_duplicates()
idx = indices[title]
# 입력된 책과 줄거리(document embedding)가 유사한 책 5개 선정.
sim_scores = list(enumerate(cosine_similarities[idx]))
sim_scores = sorted(sim_scores, key = lambda x: x[1], reverse = True) # 유사도가 높은 순으로 인덱스 정렬
sim_scores = sim_scores[1:6] # 상위 5개 추출 (0번째는 자기 자신이므로)
# 가장 유사한 책 5권의 인덱스
book_indices = [i[0] for i in sim_scores]
# 전체 데이터프레임에서 해당 인덱스의 행만 추출. 5개의 행을 가진다.
recommend = books.iloc[book_indices].reset_index(drop=True)
fig = plt.figure(figsize=(20, 30))
# 데이터프레임으로부터 순차적으로 이미지를 출력
for index, row in recommend.iterrows():
response = requests.get(row['image_link'])
img = Image.open(io.BytesIO(response.content))
fig.add_subplot(1, 5, index + 1)
plt.imshow(img)
plt.title(row['title'])