minikube 설치 및 실행 불가 (ventura)
맥 os 업데이트가 새로 있길래 이번에는 한 번 최신 업데이트를 해봤다.
그런데 터미널을 키면 [oh-my-zsh] Can't update: not a git repository. 이 에러가 나오고, brew install 명령어가 먹히지 않았다.
warning: you are using macos 13. we do not provide support for this pre-release version. you will encounter build failures with some formulae. please create pull requests instead of asking for help on homebrew's github, twitter or any other official channels. you are responsible for resolving any issues you experience while you are running this pre-release version.이렇게 떠서 찾아봤는데, https://developer.apple.com/download/all/?q=command%20line 여기서 xcode를 다운받으라는 글도 있고
xcode-select --install 하라는 글도 있어서 둘다 했다.
그리고 brew update를 해야되는데, 시간이 오래걸려서 멈춘걸로도 보일수있으나 그냥 놔둬야한다.
그 후 minikube를 설치하고 minikube start --driver=hyperkit 명령어로 minikube 를 키려고 했는데 다음과 같은 에러가 떳다.
😄  minikube v1.28.0 on Darwin 13.0.1 (arm64)
✨  Using the hyperkit driver based on user configuration

❌  Exiting due to DRV_UNSUPPORTED_OS: The driver 'hyperkit' is not supported on darwin/arm64
그래서 찾아보니 hyperkit이 arm 칩셋을 지원하지 않아서 docker 타입으로 실행하면 정상구동된다.
메모리 문제
활성 상태 보기에서 minikube를 실행하고 나니 qemu-system-aarch64가 7기가를 혼자 먹고 있었다.
내 맥북 램이 8기가 모델인데;
그래서 검색해봤는데 docker 설정에서 리소스를 조절할 수 있었다.
https://github.com/docker/for-mac/issues/5812#issuecomment-1005613368
Experimental Features에 Use the new Virtualization framework 옵션도 있었는데, 이걸 키니까 램 1.9기가를 먹어서 뭔가 하고 검색해봤더니 램은 적게먹지만 디스크 성능이 좋지 않다고 해서 다시 껏다. 그랬더니 2.9기가로 늘어났지만 그래도 7기가보단 나아서 이걸로 설정했다.
https://www.reddit.com/r/docker/comments/nha68s/macos_what_impact_does_use_new_virtualization/
시작하기
- k8s 설정파일 yml을 생성한다.
- 다음 명령어를 입력한다.
kubectl apply -f 파일명.yml
-f 는 yml file을 적용한다는 의미이다.
그럼 다음과 같은게 뜬다.
deployment.apps/wordpress-mysql created
service/wordpress-mysql created
deployment.apps/wordpress created
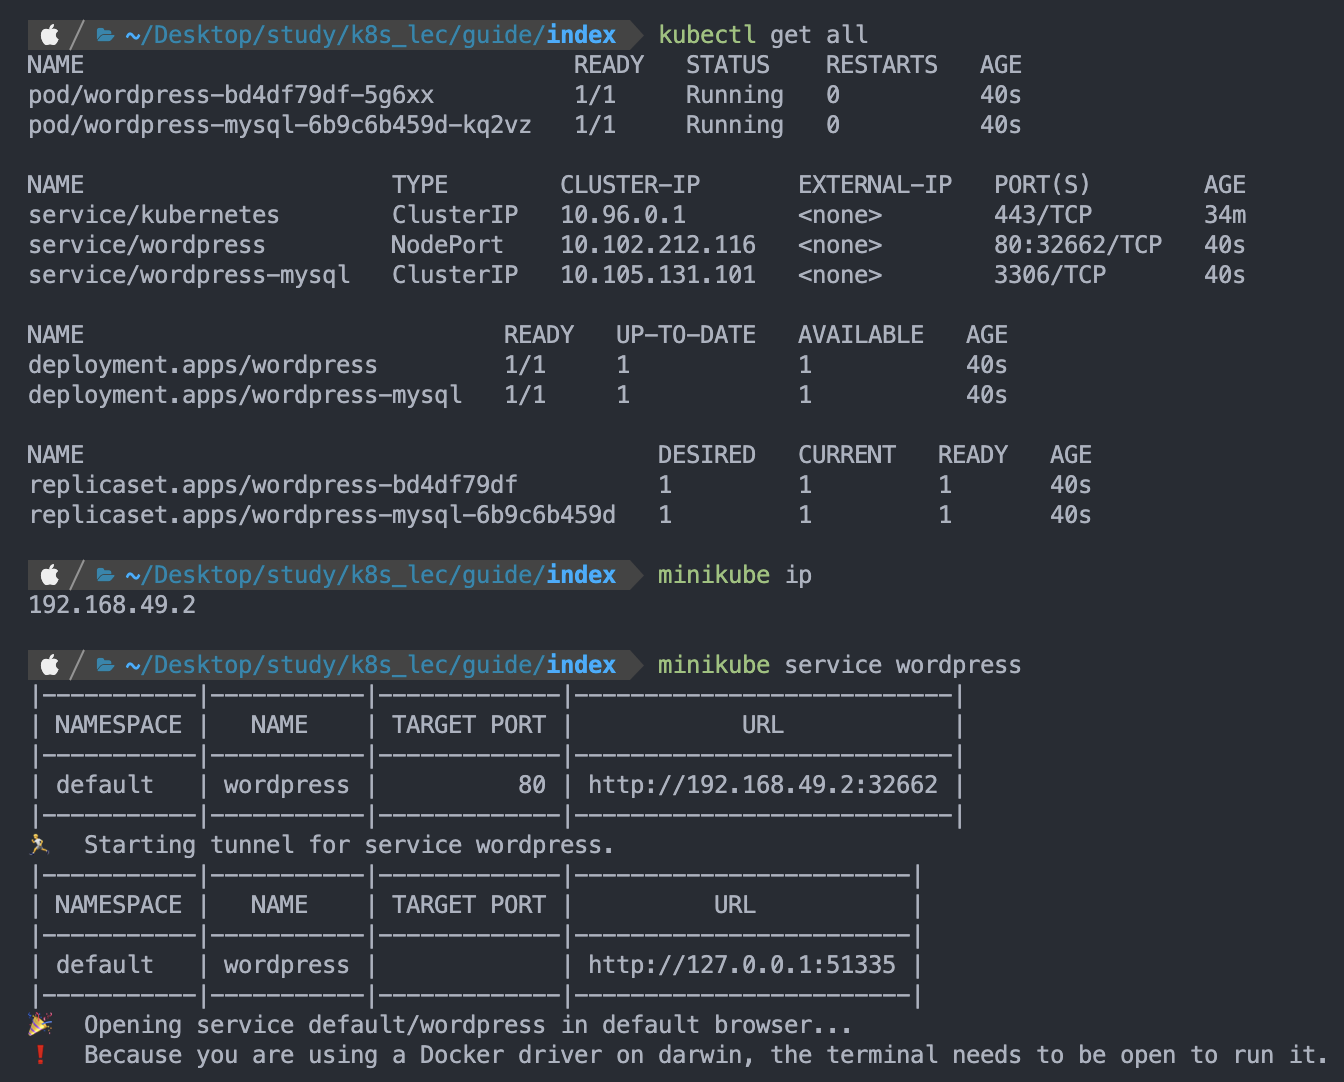
service/wordpress created그 후 kubectl get all을 입력하면 실행되고 있는 pod, service, deployment, replicaset 정보가 나온다.
띄운 pod에 접속하기
minikube ip를 입력하면 192.168.49.2같은 아이피가 나오고, kubectl get all을 했을때 service/서비스명 에서 PORT에 80:32662/TCP이런식으로 나온것을 보고 http://192.168.49.2:32662에 접속하면 된다.
그런데 m1 맥북에서는 그렇게 하면 접속이 안되고, minikube service wordpress를 입력하여 서비스를 터널링해야 접속이 가능하다고 한다. url도 새로 나오는데 localhost:새로운 포트로 나와서 거기로 접속하면 된다.
띄운 pod 죽이기
kubectl get all에서 나온 정보들 중, NAME을 복사해서 다음과 같이 작성한다.
kubectl delete pod/wordpress-bd4df79df-5g6xx
그러면 순식간에 새로운 pod을 만들어서 띄워준다.
replica set 만들기
yml 파일에서 spec: 아래에 replicas: 2 이렇게 하면 replica set이 2개로 된다.
띄운 서비스 죽이기
kubectl delete -f 파일명.yml하면 서비스가 죽는다.
alias 설정
<# alias 설정
alias k='kubectl'

# shell 설정 추가
echo "alias k='kubectl'" >> ~/.bashrc
source ~/.bashrc
참고
https://velog.io/@galmaru/TIL-M8W4
https://void2017.tistory.com/m/416
