byte를 JSON에 추가
public class Test911 {
	public static void main(String[] args) {
		JSONObject image = new JSONObject();
		image.put("format", "gif");

		byte[] buf = new byte[4];
		buf[0] = (byte)100;
		buf[1] = (byte)110;
		buf[2] = (byte)120;
		buf[3] = (byte)130;
		image.put("data", buf);

		String jt = image.toString();
		System.out.println( jt ); // {"data":[100,110,120,-126],"format":"gif"}
	}
}
byte[] 가 json 에서 배열형태로 들어간 것을 확인 가능
파일을 읽어서 byte 형태로 JSON에 추가
File file = new File("img\\tomcat.gif");
// DataInputStream 과 readFully 함수는 한꺼번에 통째로 읽어서 buf 를 채울때 전형적으로 사용한다.
byte[] buf = new byte[(int)file.length()];	// 파일을 통째로 넣을 수 있는 크기의 buf
DataInputStream din = new DataInputStream( new FileInputStream( file ) );
din.readFully( buf ); 	// 한번에 끝까지 읽어서 한번에 buf 안에 집어넣기
din.close();

JSONObject image = new JSONObject();
image.put("format", "gif");
image.put("data", buf);

String jt = image.toString();
System.out.println( jt );
JSON 안의 byte[] 정보로 파일 만들기
JSONObject jo = new JSONObject( jt );
JSONArray data = jo.getJSONArray("data");
int len = data.length();
//
byte[] buf2 = new byte[len];
for( int i = 0; i < len; i++ ) {
	buf2[i] = (byte)data.getInt( i );
}
//
String fsn = Util.upload() + System.currentTimeMillis() + ".gif";
OutputStream out2 = new FileOutputStream( fsn );
out2.write( buf2 );
out2.close();
getJSONArray 로 byte 배열을 가져와 (byte)data.getInt( i ) 로 배열의 요소를 얻어 buf2 에 대입한다.

지정 경로에 저장된 것 확인 가능
java.net.URL 와 Servlet 연동
public class Test913 {
	public static void main(String[] args) throws Exception {
		String loc = "http://localhost:8080/p0125_2/test913_1";
		URL url = new URL( loc );
		HttpURLConnection con = (HttpURLConnection)url.openConnection();

		con.setUseCaches(false);
		con.setDoInput(true);
		con.setDoOutput(true);
		con.setRequestMethod("POST");

		// 서블릿과 연동되는 형태. 서블릿으로 정보를 전달한다.
		OutputStream out = con.getOutputStream();
		out.write(100);
		out.flush();
		out.close();

		// 응답형태로 서버에서 정보가 들어온다.
		InputStream in = con.getInputStream();
		int r = in.read();
		in.close();

		System.out.println( r ); // 101
	}
}
con.setUseCaches(false); : 서버의 캐시메모리에 저장된 것을 가져오지 마라
con.setDoInput(true); : 응답으로 들어오는 정보 허용
con.setDoOutput(true); : 요청으로 내보내는 정보 허용
con.setRequestMethod("POST"); : POST 방법으로 보낼것
Test913에서는 Test913_1 에서 보내는 101 을 받고 Test913_1 은 Test913에서 보내는 100을 받는다. 결과를 통해 잘 연동된 것을 확인할 수 있다.
public class Test913_1 extends HttpServlet {
	@Override
	public void service(HttpServletRequest request,
			HttpServletResponse response) throws ServletException, IOException
	{
		String method = request.getMethod();
		System.out.println( method );

		InputStream in = request.getInputStream();
		int r = in.read();
		in.close();
		System.out.println( r ); // 100

		OutputStream out = response.getOutputStream();
		out.write(101);
		out.flush();
		out.close();
	}
}
CLOVA OCR API 예제
public class 예제 {
	public static void main(String[] args) {
		String apiURL = "...";
		String secretKey = "...";

		try {
			URL url = new URL(apiURL);
			HttpURLConnection con = (HttpURLConnection)url.openConnection();

			// 이 부분이 파악이 필요할 듯 엽서/GET , 택배/POST
			// 클라이언트에서 서버로 대량의 정보를 전달하기 위해 POST 방식으로 요청하는 코드??
			con.setUseCaches(false);
			con.setDoInput(true);
			con.setDoOutput(true);
			con.setRequestMethod("POST");

			// 요청의 헤더부분에 포함시키는 정보 : json 형태의 문서를 내용에 넣는것??
			con.setRequestProperty("Content-Type", "application/json; charset=utf-8");
			con.setRequestProperty("X-OCR-SECRET", secretKey);

			JSONObject json = new JSONObject();
			json.put("version", "V2");
			json.put("requestId", UUID.randomUUID().toString());
			json.put("timestamp", System.currentTimeMillis());

			// 파일에서 읽어들여서 > byte[] 에 넣어주고 > 그걸 json 안에 포함시킨다??
			// 우리가 지금 쓰려는게 서류의 사진을 전송하면 그 안의 글자를 추출하는 기술이라면??
			// 아마도 서류의 사진에 해당하는 파일을 json 안에 넣어서 전송하는듯
			JSONObject image = new JSONObject();
			image.put("format", "jpg");
			// image.put("url", "https://kr.object.ncloudstorage.com/ocr-ci-test/sample/1.jpg"); // image should be public, otherwise, should use data

			FileInputStream inputStream = new FileInputStream("img\\001.jpg");
			byte[] buffer = new byte[inputStream.available()];
			inputStream.read(buffer);
			inputStream.close();
			image.put("data", buffer);

			image.put("name", "demo");
			JSONArray images = new JSONArray();
			images.put(image);
			json.put("images", images);

			// json 형태의 정보를 POST 방식으로 요청하면서 내용에 포함시켜 전송하는 코드
			String postParams = json.toString();
			DataOutputStream wr = new DataOutputStream(con.getOutputStream());
			wr.writeBytes(postParams);
			wr.flush();
			wr.close();

			// 200이면 잘 전송되고 응답이 잘 도착했다.
			int responseCode = con.getResponseCode();
			BufferedReader br;
			if (responseCode == 200) {
				br = new BufferedReader(new InputStreamReader(con.getInputStream(), "utf-8"));
			} else {
				br = new BufferedReader(new InputStreamReader(con.getErrorStream()));
			}

			// 요청에 대해 서버에서 응답이 넘어왔다. 그것을 확인하는 코드
			String inputLine;
			StringBuffer response = new StringBuffer();
			while ((inputLine = br.readLine()) != null) {
				response.append(inputLine);
			}
			br.close();

			System.out.println(response);
		} catch (Exception e) {
			System.out.println(e);
		}
	}
}
사용한 이미지 파일
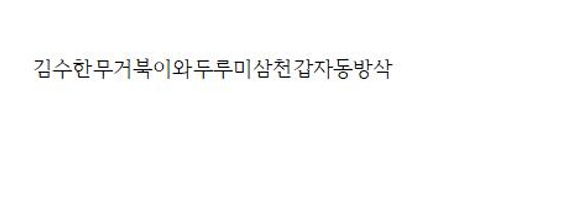
결과
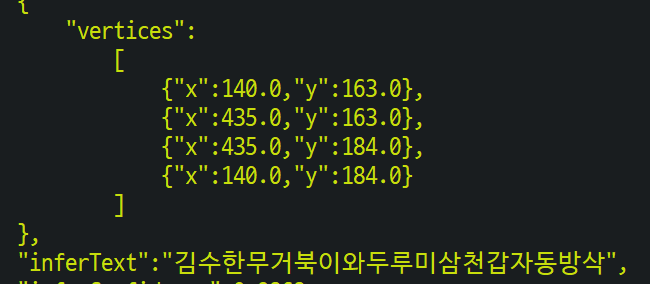

vertices : 글자가 위치하고 있는 박스의 좌표값
inferText : 이미지 속의 글자
잘 인식되는 것을 확인할 수 있었다.
inferText 뽑아내기
JSONObject jo = new JSONObject( response.toString() );
JSONArray images = jo.getJSONArray("images");
JSONObject image = images.getJSONObject(0);
JSONArray fields = image.getJSONArray("fields");

int len = fields.length();
for(int i = 0; i < len; i++) {
	String inferText = fields.getJSONObject(i).getString("inferText");
	System.out.println( inferText );
}
URL url = new URL(apiURL);
혹시 이부분에 apiURL을 어떤걸 넣어주셨나요? invokeURL인가요 ? 감사합니다 :)