📕 DI(Dependency Injection)
✏️ 스프링 컨테이너와 빈

스프링 컨테이너를 말할 때 ApplicationContext가 상속하고 있는 BeanFactory와 구분해서 사용하지만, BeanFactory를 직접 사용하는 경우는 거의 없기 때문에 일반적으로 ApplicationContext를 스프링 컨테이너라 한다.
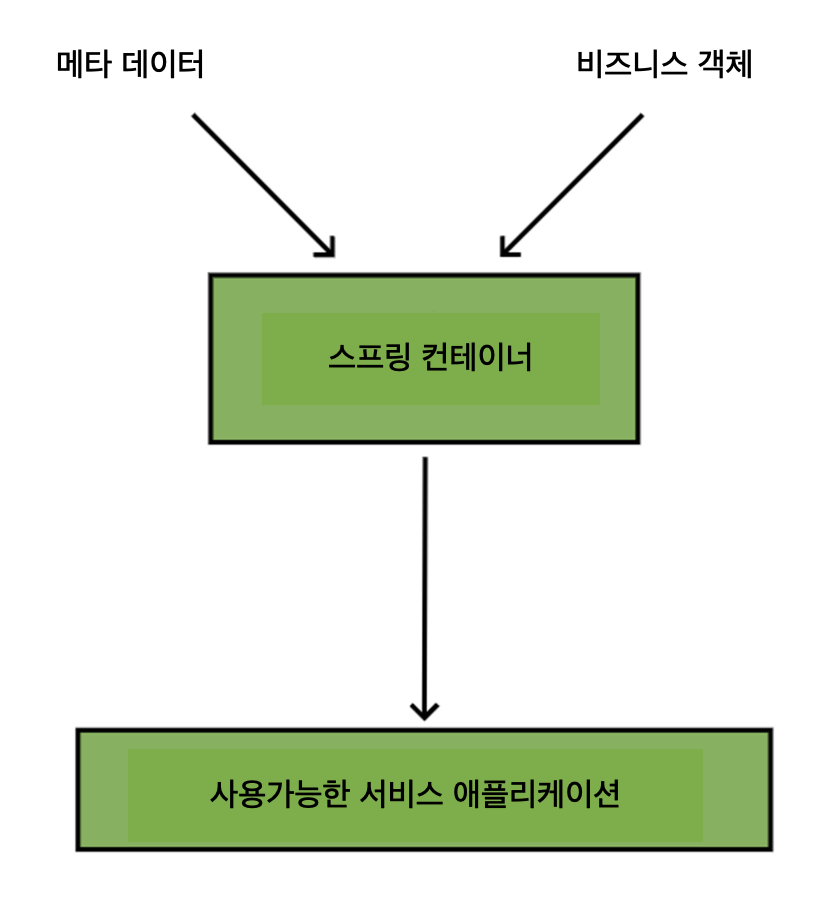
스프링 컨테이너가 관리하는 자바 객체를 스프링 빈(Bean)이라 한다.
빈은 클래스의 등록 정보, getter/setter 메서드를 포함하며, 구성 정보(설정 메타 정보)를 통해 생성된다.
✏️ 테스트 케이스 작성 기초
import org.assertj.core.api.Assertions;
import org.junit.jupiter.api.Test;
import org.springframework.context.annotation.AnnotationConfigApplicationContext;

class MainTest {

// 스프링 컨테이너 생성
    AnnotationConfigApplicationContext applicationContext = new AnnotationConfigApplicationContext(AppConfigurer.class);

    // 빈 조회 테스트케이스
    @Test
    void findBean() {

	// (1) given => 초기화 또는 테스트에 필요한 입력 데이터
        AnnotationConfigApplicationContext applicationContext = new AnnotationConfigApplicationContext(AppConfigurer.class);

        // (2) when => 테스트 할 동작
        Cart cart = applicationContext.getBean("cart", Cart.class);

        // (3) then => 검증
        Assertions.assertThat(cart).isInstanceOf(Cart.class);
    }
}
(1) given: 입력 데이터
테스트에 필요한 초기화 값 또는 입력 데이터를 의미
(2) when: 실행 동작
테스트할 실행 동작을 지정
(3) then: 결과 검증
테스트의 결과를 최종적으로 검증하는 단계
✏️ 스프링 컨테이너 = 싱글톤 컨테이너

싱글톤 패턴은 이처럼 특정 클래스의 인스턴스가 단 하나만 생성되도록 보장하는 디자인 패턴을 의미
✏️ 빈 생명주기와 범위
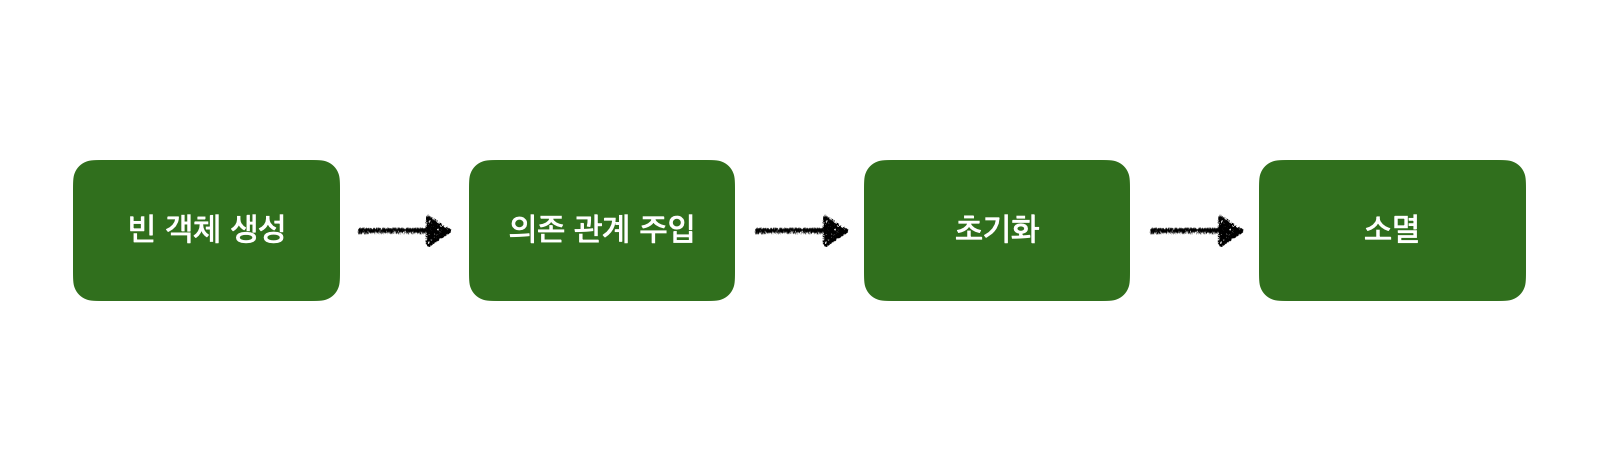
생명 주기에 대한 이해가 있더라도 그 적절한 시점을 어떻게 알 수 있을까?
결론적으로, 스프링은 의존 관계 설정이 완료된 시점과 스프링 컨테이너의 종료 직전의 시점에 지정된 메서드를 호출하여 개발자로 각각의 시점에 필요한 작업을 수행할 수 있도록 지원

스프링 빈이 스프링 컨테이너와 운명을 같이하게 된 것은 해당 빈 객체가 별도의 설정이 없는 경우 싱글톤 범위(scope)를 가지기 때문이다. 여기서 빈 객체의 스코프란 이름 그대로 빈 객체가 존재할 수 있는 범위를 의미
✏️ 컴포넌트 스캔과 의존성 자동 주입
스프링 프레임워크는 수동으로 클래스 구성 정보를 일일이 작성하지 않고, 자동으로 스프링 빈을 등록하는 컴포넌트 스캔(Component Scan) 기능을 지원, 더 나아가, 컴포넌트 스캔만으로는 앞에서 우리가 봤던 것과 같은 구체적인 의존 관계 설정이 불가능하기 때문에 @Autowired 애너테이션을 통해 빈을 자동으로 등록함과 동시에 의존 관계가 설정될 수 있도록 편리한 기능을 제공
구성 정보 클래스의 위치를 프로젝트 최상단에 두어 자동으로 디렉토리 전체가 스캔의 대상이 되도록 하는 방법이 일반적으로 널리 사용되는 방법이다. 만약 범위를 변경하고 싶다면, @ComponentScan(basePackages = “”) 에서 “” 부분에 패키지 이름을 표시하는 방법으로 스캔의 범위 지정을 바꿀 수 있다.
생성자가 단 하나만 존재하는 경우에는 @Autowired 애너테이션을 붙이지 않아도 자동으로 의존 관계가 연결
✏️ @Autowired
빈의 타입이 2개 이상인 경우 스프링의 입장에서는 어떤 구현 객체가 들어와야 하는지 알 수 있는 방법이 없어 오류가 발생한다.
스프링은 크게 3가지의 해결 방법을 제공하고 있다.
1. @Autowired 필드명 매칭
@Component
public class CozDiscountCondition implements DiscountCondition {

    private boolean isSatisfied;

    @Autowired
    private DiscountPolicy fixedRateDiscountPolicy;

//    public CozDiscountCondition(DiscountPolicy discountPolicy) {
//        this.fixedRatediscountPolicy = discountPolicy;
//    }

    --- 생략 ---

		// 필드명 변경
		public int applyDiscount(int price) {
        return fixedRateDiscountPolicy.calculateDiscountedPrice(price);
    }
}
위의 코드를 보면, 먼저 기존의 생성자를 주석처리 한 후, 필드(참조변수)의 이름을 discountPolicy → fixedRateDiscountPolicy로 바꾸었습니다. KidDiscountPolicy에도 동일하게 필드명을 fixedAmountDiscountPolicy로 변경 후에 프로그램을 동작시켜 보면, 이전과 같이 프로그램이 잘 작동하는 모습을 확인할 수 있습니다.

정리하면, 먼저 타입으로 빈을 조회하고 여러 개의 빈이 있는 경우 필드명 또는 매개변수명으로 매칭을 시도하는 @Autowired의 조회 방식을 사용하여 의도한 객체와의 의존 관계를 연결시켜 줄 수 있습니다.- @Qualifier 사용
추가적인 구분자를 통해 의존 관계를 연결하는 방식
@Component
@Qualifier("fixedAmount")
public class FixedAmountDiscountPolicy implements DiscountPolicy {

	--- 생략 ---

}
@Component
@Qualifier("fixedRate")
public class FixedRateDiscountPolicy implements DiscountPolicy {
--- 생략 ---
}@Component
public class CozDiscountCondition implements DiscountCondition {
private boolean isSatisfied;
private DiscountPolicy discountPolicy;
public CozDiscountCondition(@Qualifier("fixedRate") DiscountPolicy discountPolicy) {
this.discountPolicy = discountPolicy;
}
--- 생략 ---
}@Component
public class KidDiscountCondition implements DiscountCondition {
private boolean isSatisfied;
private DiscountPolicy discountPolicy;
public KidDiscountCondition(@Qualifier("fixedAmount") DiscountPolicy discountPolicy) {
this.discountPolicy = discountPolicy;
}
--- 생략 ---
}@Qualifier 애너테이션은, 먼저 @Qualifier이 붙여진 추가 구분자를 통해 매칭되는 빈이 있는지 탐색하고, 매칭되는 빈이 없다면 빈의 이름으로 조회를 진행
- @Primary 사용
가장 빈번하게 사용되는 방식인 @Primary 애너테이션을 사용하여 여러 개의 빈이 들어올 수 있는 경우 빈 객체들 간 우선순위를 설정
@Component
@Primary
public class FixedRateDiscountPolicy implements DiscountPolicy {

    private int discountRate = 10;

    public int calculateDiscountedPrice(int price) {
        return price - (price * discountRate / 100);
    }
}
📕 AOP(Aspect Oriented Programming)
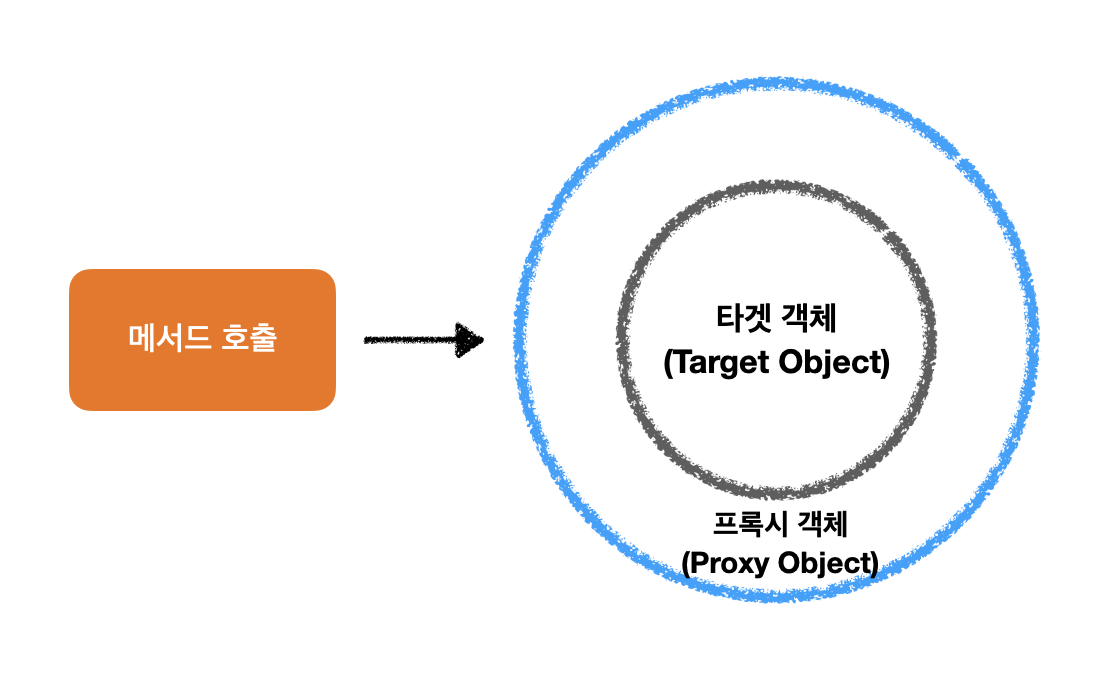
✏️ AOP와 프록시 객체
스프링 프레임워크가 제공하는 AOP방식은 런타임 시에 프록시(Proxy) 객체를 생성해서 공통 관심 기능을 적용하는 방식을 사용. 영어로 프록시는 “대리”라는 뜻을 가지고 있다. 즉, 어떤 대상의 역할을 대리해서 처리하는 객체라고 이해할 수 있다.
public class GugudanProxy implements Gugudan {

    private Gugudan delegator;

    public GugudanProxy(Gugudan delegator) {
        this.delegator = delegator;
    }

    @Override
    public void calculate(int level, int count) {
        long start = System.nanoTime();
        delegator.calculate(2,1);
        long end = System.nanoTime();
        System.out.printf("클래스명: = %s\n", delegator.getClass().getSimpleName());
        System.out.printf("실행 시간 = %d ms\n", (end - start));
        System.out.println("-------------------------------");
    }
}

해당 클래스는 자체적으로 핵심 기능 로직을 가지고 있는 것이 아니라, 생성자로 전달받은 객체에게 핵심 기능의 실행을 다른 객체에게 위임하고 있습니다. 동시에, 실행 시간을 측정하는 것과 같은 부가적인 기능에 대한 로직을 정의하고 있습니다.
즉, AOP는 핵심 기능의 코드의 변경 없이 공통 기능의 구현을 가능하게 합니다.
✏️ AOP의 핵심 개념
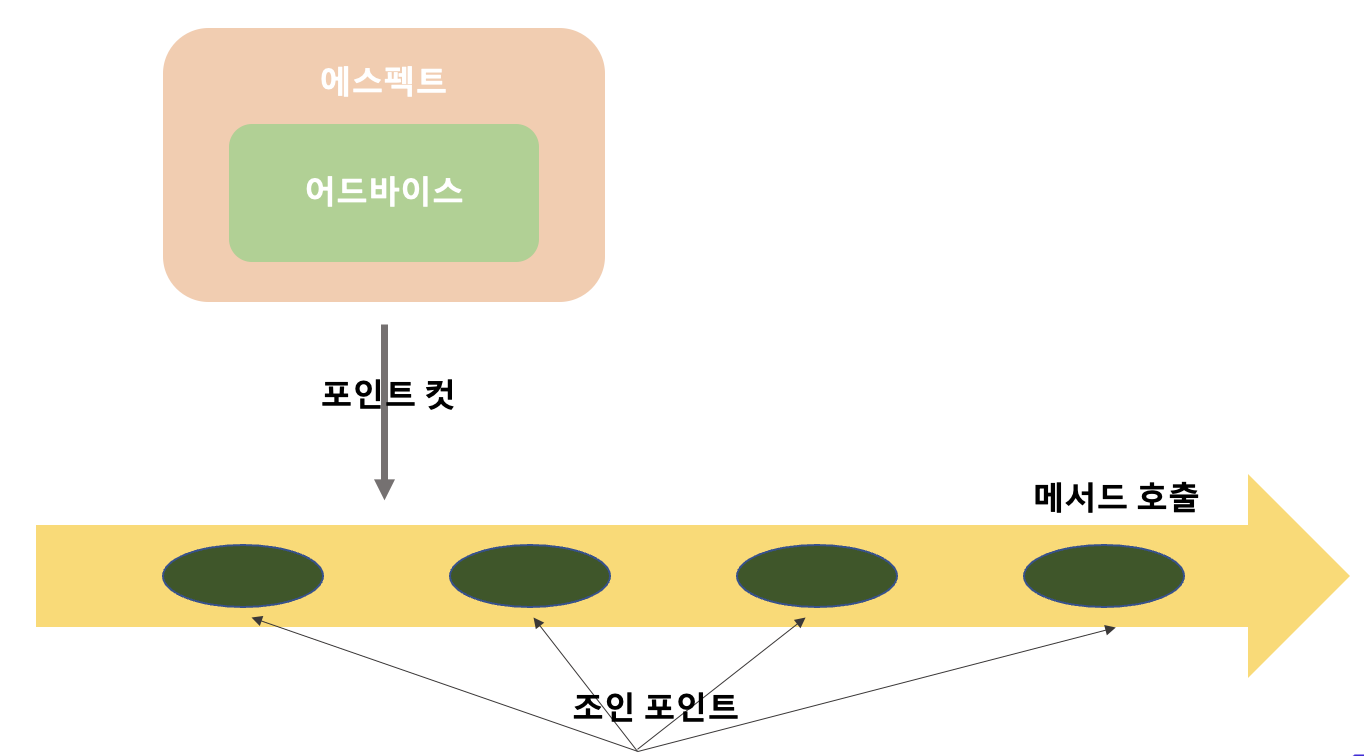
- AOP란 공통 관심 사항과 핵심 관심 사항을 분리시켜 코드의 중복을 제거하고, 코드의 재사용성을 높이는 프로그래밍 방법론을 의미한다.
- AOP은 핵심 기능에 공통기능을 삽입하는 것으로, 이를 통해 핵심 관심 사항 코드의 변경 없이 공통 기능의 구현을 추가 또는 변경하는 것이 가능하다.
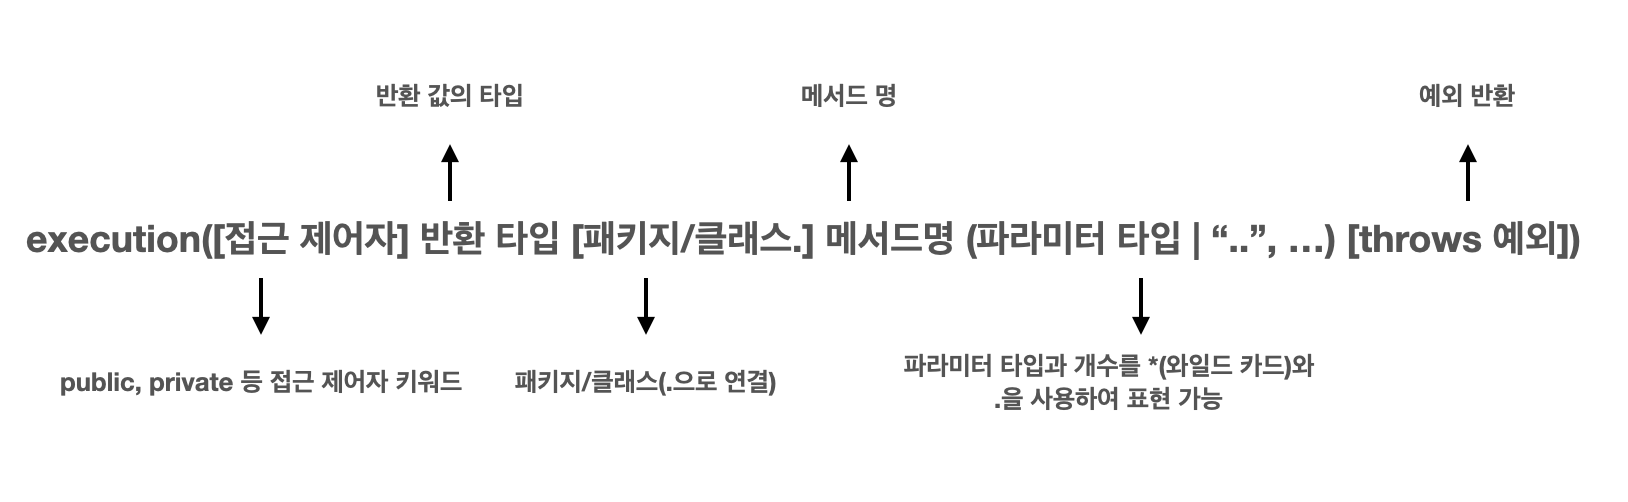
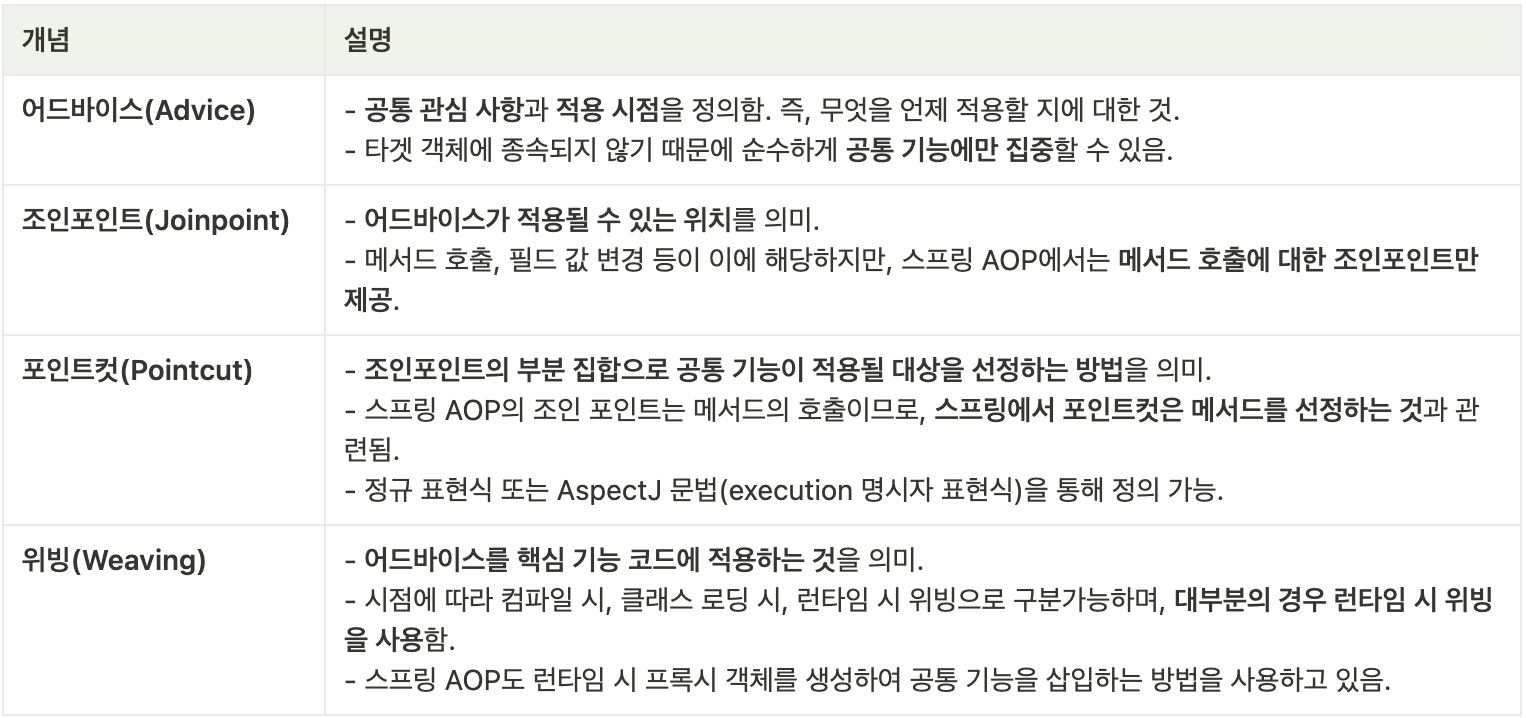
공통 기능과 적용 시점을 정의한 어드바이스(Advice)와 어드바이스가 적용될 지점을 정의하는 포인트컷(Pointcut)의 조합으로 구성된다. 트랜잭션이나 보안 등이 애스펙트의 대표적인 예시
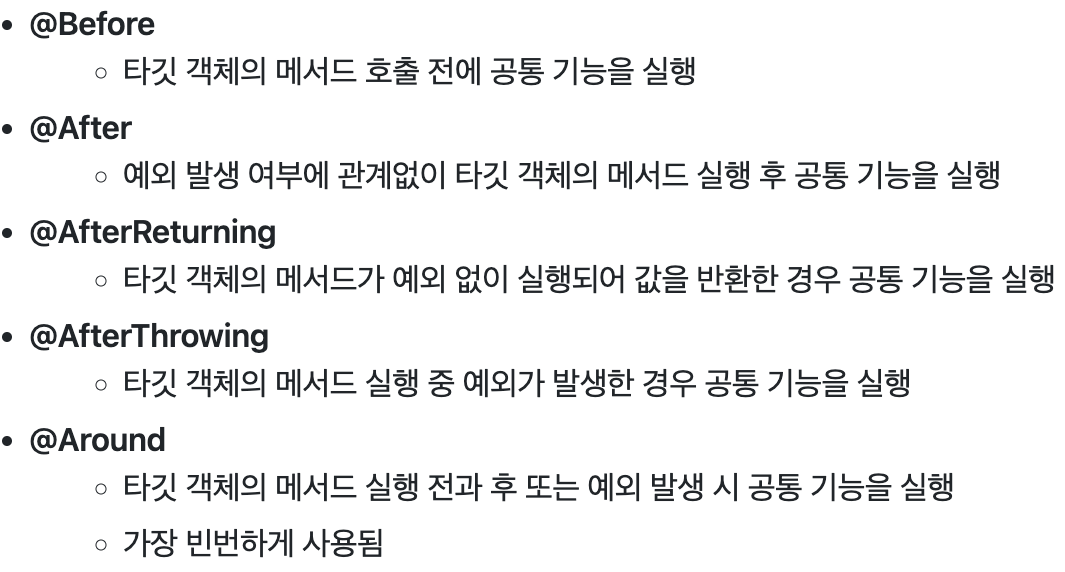
👉스프링에서 구현 가능한 어드바이스의 종류
import org.aspectj.lang.ProceedingJoinPoint;
import org.aspectj.lang.Signature;
import org.aspectj.lang.annotation.Around;
import org.aspectj.lang.annotation.Aspect;
import org.aspectj.lang.annotation.Pointcut;

/*
공통 관심 사항을 정의하는 Aspect 구현 클래스
 */

// (1) @Aspect
@Aspect
public class GugudanAspect {

    // (2) @PointCut
//    @Pointcut("execution(public void cal*(..))")
    @Pointcut("execution(public void com..calculate(..))")
    private void targetMethod() {}

    // (3) @Around
    @Around("targetMethod()")
    public Object measureTime(ProceedingJoinPoint joinPoint) throws Throwable {

        long start = System.nanoTime();

        try {
            Object result = joinPoint.proceed();
            return result;
        } finally {
            long end = System.nanoTime();
            Signature signature = joinPoint.getSignature();
            System.out.printf("%s.%s 메서드 호출!\n", joinPoint.getTarget().getClass().getSimpleName(), signature.getName());
            System.out.printf("실행 시간: %d ns", (end-start));
        }
    }
}
👉Pointcut