
✅ 스프링 시큐리티
- 스프링 기반 웹 애플리케이션의 보안(인증, 인가, 권한관리) 를 담당하는 프레임워크
쉽게말해 "누가? 로그인하고" "사용자의 기능에 대한 접근 관리"
등을 자동으로 관리해주는 보안 시스템
✅ 주 기능
-
보안의 표준화와 자동화
->로그인로그아웃권한체크세션관리CSRF 방지등 웹 보안의 필수 기능 제공 -
인증 과 인가
-> 인증 : 사용자가누구인지 확인 (로그인)
-> 인가 : 인증된 사용자가 어떤 기능을 사용할 수 있는지 권한을 확인 (관리자 페이지) -
다양한 인증 / 권한 부여 방식
-> 폼 로그인, 소셜 로그인(OAuth2), JWT, API 토큰 등 다양한 인증 방식 지원
-> 역할(Role) 기반 접근 제어, URL/메소드별 권한 제어
-
강력한 보안 필터 체인
-> 모든 요청은보안 필터 체인을 통해 검증됨
✅ 시큐리티 로그인 과정
- 사용자 로그인 폼에서 /processLogin으로 POST 요청
->사용자 요청이 서버로 들어옴
// Config 파일
.formLogin(form -> form
		.loginPage("/login") // 우리가 만든 로그인 페이지 사용
		.loginProcessingUrl("/processLogin") // 로그인 처리 URL (아래 action 값)
		.usernameParameter("loginId") // input type name 값
		.passwordParameter("password") // input type name 값
		.defaultSuccessUrl("/user/main",true) // 로그인 성공 후 이동할 페이지
		.failureHandler(customAuthFailureHandler) // 로그인실패시 수행할 것
		.permitAll())
<!-- 로그인 페이지 -->
<form id="loginfrm" action="${pageContext.request.contextPath}/processLogin" method="post">
<h2>로그인</h2>
<ul>
<li><input type="text" id="loginUserId" name="loginId"
placeholder="아이디" title="아이디입력"></li>
<li><input type="password" name="password" placeholder="비밀번호"
title="비밀번호입력"></li>
<!-- <li><input type="submit" value="로그인"></li> -->
<li><button>로그인</button></li>
</ul>
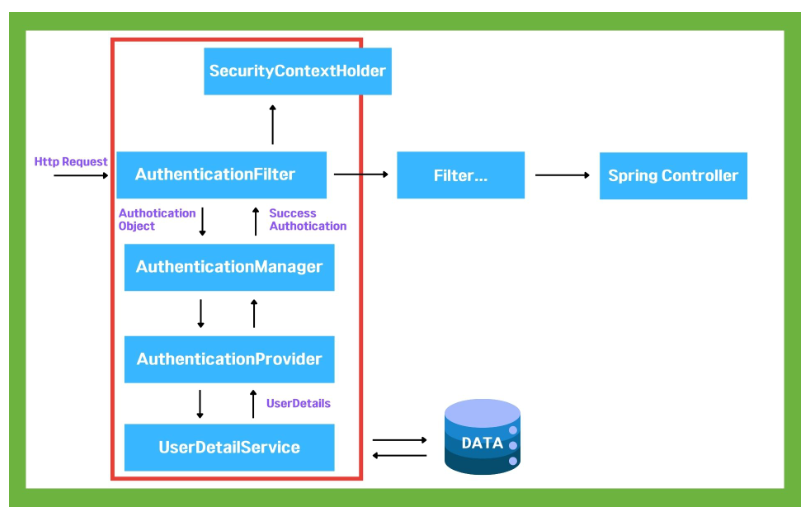
</form>AuthenticationFilter에서 요청을 가로챈 뒤,UsernamePasswordAuthenticationFilter의 인증용 객체를 생성
->보안 필터 체인이 요청을 가로채서 로그인(인증) 여부, 권한(인가), 각종 보안 검사 확인
->new UsernamePasswordAuthenticationToken(loginId, password);
-> 이 토큰은 아직 인증이 안된 상태로, 인증시도를 위해AuthenticationManager로 넘김
-
AuthenticationManger의 구현체인ProviderManager가AuthenticationProvider에게 인증요청
->AuthenticationProvider.authenticate(Authentication authentication)
-> 여기서 우리가 등록해놓은CustomUserDetailsService를 이용해서 DB에 접근 -
CustomUserDetailsService가 로그인 ID로 사용자 정보를 DB에서 조회
-> 결과를 사용자가 만든 UserVO 형태로 만든 후UserDetails타입으로 반환
->return new CustomUserDetails(user);
@Service
public class CustomUserDetailsService implements UserDetailsService {

    private final UserService userService;

    @Autowired
    public CustomUserDetailsService(UserService userService) {
        this.userService = userService;
    }

	@Override
	public UserDetails loadUserByUsername(String loginId) throws UsernameNotFoundException {
		UserVO user = userService.findByUserId(loginId);
        if (user == null) {
            throw new UsernameNotFoundException("User not found: " + loginId);
        }
        return new CustomUserDetails(user);
	}
}-
AuthenticationProvider가 DB에서 가져온UserDetails와 입력한 비밀번호를 비교
->Spring Security가 내부적으로PasswordEncoder.matches()를 이용해 비교
->matches(입력한비번, DB에저장된 암호화된 비번) -
비밀번호가 일치하면 인증성공
->Authentication객체 생성해서 반환
-> 위에서 인증이 안된UsernamePasswordAuthenticationToken가 이제는 인증된 상태임
->SecurityContextHolder에 저장됨
->SecurityContextHolder.getContext().setAuthentication(authentication); -
성공시 설정된 URL로 리다이렉트
-> 로그인 성공 시 설정해둔 /user/main으로 이동
-> 이 시점부터SecurityContext에 로그인 사용자 정보가 저장되있음
->Principal이나@AuthenticationPrincipal을 통해 유저 정보 사용 가능
Authentication authentication = SecurityContextHolder.getContext().getAuthentication();
Object principal = SecurityContextHolder.getContext().getAuthentication().getPrincipal();
@AuthenticationPrincipal CustomUserDetails userDetails