[구디아카데미]
✅ DOM
- HTML에 있는 태그를 객체화하여 자바스크립트에서
다룰 수 있게 한 것으로 모든 노드 객체에 접근할 수 있는 요소와 메소드 제공 - 노드 -> 요소노드와 텍스트 노드로 나뉨
요소 노드: 태그 그 자체 의미 (Elements)
텍스트 노드: 태그에 기록되어 있는 문자 (Text)
✅ 텍스트 노드 있는 문서 객체 작성법
<script>
1. 요소노드 생성 -> const tag = document.createElement(태그명)
2. 텍스트노드 생성 -> const text = document.createTextNode(내용)
3. 1번에서 생성한 태그에 자손으로 2번 텍스트 노드 추가 -> tag.appendChild(text)
4. body객체에 요소 노드 추가 -> document.getElementById(body객체id).appendChild(tag);
</script> <button onclick="addElement();">태그 추가하기</button><br>
<input type="text" id="tagName" size="5">
<input type="text" id="tagContent">
<button onclick="myTag()">태그생성</button>
<div id="addTag"></div>
<script>
const myTag=()=>{
const tagName = document.getElementById("tagName").value; // 입력한 값이 tagName으로 들어감
const text = document.getElementById("tagContent").value; // 입력한 값이 text로 들어감
const tag = document.createElement(tagName); // 입력한 태그가 생성됨
const textNode = document.createTextNode(text); // 입력한 문구가 생성됨
tag.appendChild(textNode); // 태그 안에 문구가 있으므로, 문구가 자식임
document.getElementById("addTag").appendChild(tag);
// const tname = document.createElement(document.getElementById("tagName").value);
// const tcont = document.createTextNode(document.getElementById("tagContent").value);
}
const addElement = ()=>{
const btn = document.createElement("button"); // 태그 생성하기 (인수에는 태그 이름 넣음)
// console.log(btn);
// console.dir(btn);
// 텍스트 노드 생성하기
const btnText = document.createTextNode("점심먹자"); // 텍스트 노트 생성
console.log(btnText);
// 생성된 태그와 텍스트 합치기
// 부모객체명.appendChild(자식으로 들어갈 객체);
btn.appendChild(btnText);
console.log(btn);
const $container = document.getElementById("addTag");
$container.appendChild(btn);
}
</script>
<h2>textNode가 없는 태그 생성하기</h2>
<p>
img, input, audio, video, br
</p>
<button onclick="addImg();">이미지 추가하기</button>
<div id="imgcontainer"></div>
<script>
const addImg=()=>{
const img = document.createElement("img");
console.log(img);
// 속성값을 설정
// 속성값을 설정하는 방법
// 1. 생성된 객체에서 직접 속성명으로 접근해서 값을 대입
// 2. 생성된 객체가 제공하는 setAttribute("속성명","속성값")메소드를 이용
// console.dir(img);
img.src="https://image.xportsnews.com/contents/images/upload/article/2022/0828/mb_1661666419641562.jpg";
// console.log(img);
img.setAttribute("width","200");
img.setAttribute("height","200");
document.getElementById("imgcontainer").appendChild(img);
}
</script>
<!--
이미지 주소를 입력받아 img태그를 출력하는 기능을 구현
크기 300*300크기로 출력, div.imgContainer에 출력
-->
<div class="imgContainer">
</div>
<input type="text" name="img" id="src">
<button onclick="openImg();">입력</button>
<script>
const openImg=()=>{
const $img = document.createElement("img");
const src = document.getElementById("src").value;
$img.src = src;
$img.width = 300;
$img.height = 300;
document.querySelector("div.imgContainer").appendChild($img);
}
</script>
<h2>구조가 있는 태그 만들기</h2>
<p>
table, 리스트(ul,ol,dl), fieldset, div안에 div
</p>
<h3>리스트 태그 만들기</h3>
<button onclick="makeList();">리스트만들기</button>
<!-- - html
- css
- javascript
- jquery
- servelet/jsp
-->
<div class="listTarget"></div>
<script>
const ul = document.createElement("ul");
const data = ["html","css","javascript","jquery","servlet/jsp"];
const makeList = ()=>{
data.forEach(e=>{
const li = document.createElement("li");
const liText = document.createTextNode(e);
ul.appendChild(li);
li.appendChild(liText);
});
document.getElementsByClassName("listTarget")[0].appendChild(ul);
}
</script>
<!--
사용자에게 ,구분된 문자열을 입력받아 ol 태그로 출력하기
-->
<div id="listContainer2"></div>
<input type="text" id="text" placeholder=",로 여러값 입력">
<button onclick="gooboon();">리스트추가</button>
<script>
const gooboon = ()=>{
const ol = document.createElement("ol");
// const gab = document.getElementById("text").value;
// const data1 = gab.split(",");
// data1.forEach(e=>{
// const li = document.createElement("li");
// const liText = document.createTextNode(e);
// ol.appendChild(li);
// li.appendChild(liText);
// });
document.getElementById("text").value.split(",").forEach(e=>{
const li = document.createElement("li");
const liText = document.createTextNode(e);
// $li.innerText = e; (위 문장과 동일함) = 이렇게 하면 굳이 li.appendChild(liText) 안해도됨
ol.appendChild(li);
li.appendChild(liText);
})
document.getElementById("listContainer2").appendChild(ol);
}
</script>
<h3>테이블 생성하기</h3>
<div id="tableContainer"></div>
<button onclick="addTable();">3*3 테이블추가하기</button><br>
<input type="text" class="row" size="3">
<input type="text" class="row" size="3">
<input type="text" class="row" size="3">
<button onclick="addTr();">행추가하기</button><br>
<input type="text" class="cnt" placeholder="행의갯수">
<input type="text" class="cnt" placeholder="열의갯수">
<button onclick="add();">추가</button>
<!-- table -> tr -> td td td-->
<!-- tr -> td td td -->
<!-- tr -> td td td -->
<script>
const add = ()=>{
const $inputs = document.querySelectorAll(".cnt");
for(let i=0; i<$inputs[0].value; i++){
const tr = document.createElement("tr");
for(let j=0; j<$inputs[1].value; j++){
const td = document.createElement("td");
const text = document.createTextNode(0);
tr.appendChild(td);
td.appendChild(text);
}
document.querySelector("div#tableContainer>table").appendChild(tr);
}
}
const addTr=()=>{
const $inputs = document.querySelectorAll(".row");
console.log($inputs);
const tr= document.createElement("tr");
$inputs.forEach(e=>{
const td= document.createElement("td");
td.innerText=e.value;
tr.appendChild(td);
});
document.querySelector("div#tableContainer>table").appendChild(tr);
}
// const addTr = ()=>{
// const t = document.getElementById("tableContainer");
// const tr = document.createElement("tr");
// const arr = document.querySelectorAll("input[size='3']")[0].value;
// console.log(arr);
// for(let i=0; i<3; i++){
// document.querySelectorAll("input[size='3']")[0].value;
// const td = document.createElement("td");
// const text = document.createTextNode(++cnt);
// tr.appendChild(td);
// td.appendChild(text);
// }
// }
const addTable = ()=>{
const table = document.createElement("table");
const t = document.getElementById("tableContainer");
let cnt = 0;
for(let i=0; i<3; i++){
const tr = document.createElement("tr");
for(let j=0; j<3; j++){
const td = document.createElement("td");
const text = document.createTextNode(++cnt);
tr.appendChild(td);
td.appendChild(text);
}
table.appendChild(tr);
}
t.appendChild(table);
}
</script>✅ 생성된 태그를 원하는 위치에 넣기
- Element.insertAdjacentElement("지정된예약어",element);
지정된 예약어종류
- beforebegin : 지정한 태그의 앞에 (같은레벨에서 위에 위치하게 하는 것)
- afterend : 지정한 태그의 뒤에 (같은레벨에서 아래 위치하게 하는 것)
- beforeend : 지정한 태그의 맨 밑 자식으로 추가 == appendChild() 이용한것과 동일
- afterbegin : 지정한 태그의 맨 위 자식으로 추가
	<p>
        Element.insertAdjacentElement("지정된예약어",element);<br>
    </p>

    <div id="target">
        <h1 style="color: lime; background-color: magenta;">기준태그</h1>
    </div>
    <button onclick="beforebeginTest();">beforebeginTest</button>
    <button onclick="afterendTest();">afterendTest</button>
    <button onclick="beforeendTest();">beforeendTest</button>
    <button onclick="afterbeginTest();">afterbeginTest</button>

    <style>
        div#target{
            width: 400px;
            height: 300px;
            border:1px solid red;
        }
    </style>

    <script>
        let count=0;
        const beforebeginTest = ()=>{
            const $h3 = document.createElement("h3");
            $h3.innerText="새로추가한것"+(count++);
            const $divContainer = document.querySelector("#target");

            $divContainer.insertAdjacentElement("beforebegin",$h3); // 객체의 같은레벨의 바로 앞에다 추가
        }

        const afterendTest=()=>{
            const $h3 = document.createElement("h3");
            $h3.innerText="afterlike -아이브-"+(count++);
            const $divContainer = document.querySelector("#target");
            $divContainer.insertAdjacentElement("afterend",$h3); // 객체의 같은레벨의 바로 뒤에다 추가
        }

        const beforeendTest=()=>{
            const $h4=document.createElement("h4");
            $h4.innerText="childEnd add";
            const $divContainer=document.querySelector("#target");
            $divContainer.insertAdjacentElement("beforeend",$h4);  // 지정한 태그의 맨 밑 자식으로 추가
        }

        const afterbeginTest=()=>{
            const $h4=document.createElement("h4");
            $h4.innerText="childfirst add";
            const $divContainer=document.querySelector('#target');
            $divContainer.insertAdjacentElement("afterbegin",$h4);  // 지정한 태그의 맨 위 자식으로 추가
        }
    </script>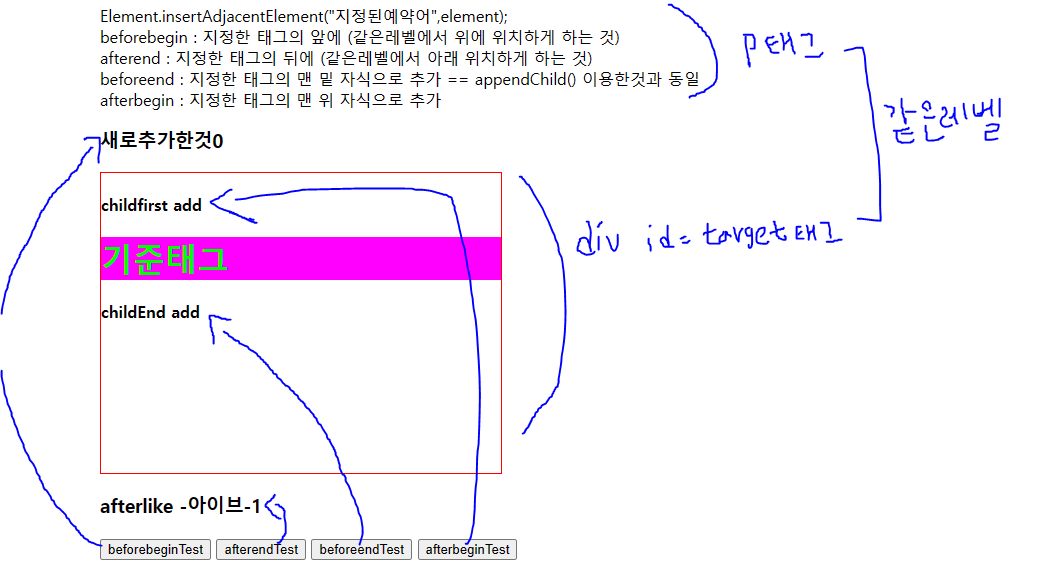
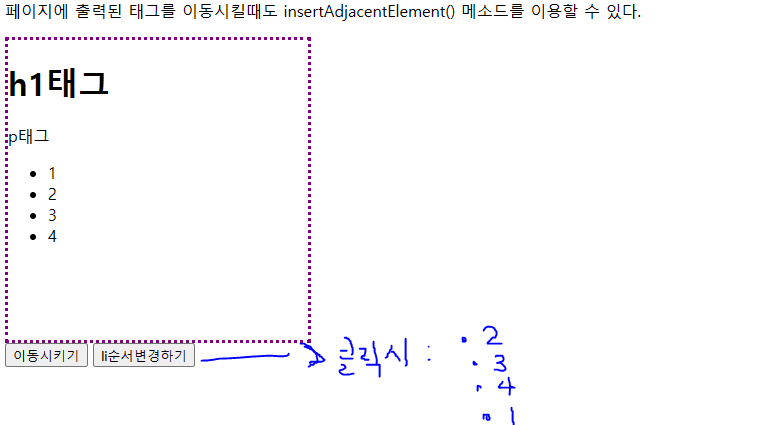
    <div id="moveTest">
        <h1>h1태그</h1>
        <p>p태그</p>
        <ul>
            <li>1</li>
            <li>2</li>
            <li>3</li>
            <li>4</li>
        </ul>
    </div>
    <button onclick="moveTest();">이동시키기</button>
    <button onclick="moveTest2();">li순서변경하기</button>
    <style>
        div#moveTest{
            width: 300px;
            height: 300px;
            border:3px dotted purple;
        }
    </style>
    <script>
        const moveTest=()=>{
            const $h1 = document.querySelector("#moveTest>h1");
            const $container=document.querySelector("#moveTest");
            $container.insertAdjacentElement("afterend",$h1);
        }
        const moveTest2=()=>{
            // const $li = document.querySelector("#moveTest>ul>li:first-child");
            // const $ul = document.querySelector("#moveTest>ul");
            // $ul.appendChild($li);
            // $ul.insertAdjacentElement("beforeend",$li);
            const $firstLi = document.querySelector("#moveTest>ul>li:first-child");
            const $lastLI = document.querySelector("#moveTest>ul>li:last-child");
            $lastLI.insertAdjacentElement("afterend",$firstLi);
        }
    </script>
✅ 태그를 삭제하는 방법
- 자기자신을 삭제 : 삭제할Element.remove()
- 자식태그를 삭제 : 부모Element.removeChild(자식element)
    <fieldset>
        <legend>첨부파일<samll>* 최대 5개</samll></legend>
        <div>
            <button onclick="add1();">추가</button>
            <button onclick="remove1();">삭제</button>
        </div>
        <div>
            <input type="file" name="upfile">
        </div>
    </fieldset>
    <script>

        const add1 =()=>{ // 추가버튼 누르면 파일창 추가 (최대 5개까지)

            const length = document.querySelectorAll("fieldset input").length;

            if(length < 5){
                const file = document.createElement("input");
                const f = document.querySelector("fieldset");
                file.type="file";
                file.name="upfile";
                f.insertAdjacentElement("beforeend",file);
            }else{
                alert("5개까지만 가능하다")
            }
        }


        const remove1=()=>{ // 삭제버튼 누르면 파일창삭제 (최소 1개는 있어야함)
            const fileList = document.querySelectorAll("fieldset input");
            console.log(fileList);

            if(fileList.length > 1)fileList[fileList.length-1].remove();
            else alert("더 이상 삭제할 수 없습니다.");
        }
   </script>
✅ class 속성
- className = 클래스가 문자열로 저장됨
- classList = 클래스가 배열로 저장됨
    <h2>class 속성 다루기</h2>
    <div id="container">
        <p class="test font">속성</p>
        <ul>
            <li>html</li>
            <li class="a">css</li>
            <li>javascript</li>
        </ul>
        <h2 class="a">h2 태그</h2>
        <p class="test">p 태그</p>
        <!--
            className = 클래스가 문자열로 저장됨
            classList = 클래스가 배열로 저장됨
         -->
    </div>
    <button onclick="classChange();">변경하기</button>
    <button onclick="classRemove();">삭제하게</button>
    <button onclick="addAclass();">a클래스 적용하기</button> <!-- 버튼누르면 a클래스 스타일 적용된것들은 없애고, 적용되지않는것들은 적용되게 -->
    <script>
        const addAclass=()=>{
            const allchild = document.querySelectorAll("#container>*");
            allchild.forEach(e=>{
                if(e.className.includes("a")){
                    e.classList.remove("a"); // 해당 객체의 클래스리스트에서 a클래스 스타일 삭제
                }else{
                    e.classList.add("a"); // 해당 객체의 클래스리스트에 a클래스 스타일 추가
                }
            })
        }

        const testElement = document.querySelector("#container>p");
        console.dir(testElement);
        const classChange=()=>{
            const $p = document.querySelector("#container>p");
            // className 변경하기  // 기존에 설정된 test와 font 클래스가 사라지며 a클래스로 바뀜
            // $p.className="a";
            // className 추가하기
            // $p.className+=" a";  // 기존에 있던 클래스와 별개로 또 클래스를 추가할경우 공백을 포함해야한다
            $p.classList.add("a"); //
        }

        const classRemove=()=>{
            const $p=document.querySelector("#container>p");
            $p.classList.remove("test");
        }
    </script>

     <button onclick="loadingClick();">클릭</button>
     <div id="loading"></div>
     <script>
        const loadingClick=()=>{
            document.querySelector("#loading").classList.add("spinner-border");
            setTimeout(() => {
                document.querySelector("#loading").classList.remove("spinner-border")
            }, 5000);
        }
     </script>
✅ tagName 속성
- 태그 이름을 저장하는 속성, 대문자로 저장
     <button onclick="tagNameTest();">태그 분리하기</button>
     <script>
        const tagNameTest=()=>{
            const container=document.querySelectorAll("body *");
            console.log(container); // 모든 태그 객체들이 나옴
            container.forEach(e=>{
                console.log(e.tagName); // 모든 태그들이 나옴 (대문자로) ex) BUTTON, H2, P
                if(e.tagName == "P" || e.tagName == "H2")e.classList.add("text-success");
            })
        }
     </script>
✅ style 속성을 이용해서 태그스타일 변경
- element의 style 속성안에는 CSS 스타일 객체가 저장
- style 객체에 속성은 css명과 동일하나 -를 생략하고 낙타봉 표기법을 사용
예) font-size -> fontSize
예) text-decoration -> textDecoration
<button onclick="changeStyle();">스타일 변경하기</button>
<button onclick="removeStyle();">스타일 변경하기</button>
<script>
const changeStyle =()=>{
const $p = document.querySelector("#stylecontainer>p");
console.dir($p); // p태그의 속성이 다나옴
$p.style.fontSize = "20px";
$p.style.textDecoration = "overline";
$p.style.backgroundColor = "magenta";
$p.style.color="lime";
}
const removeStyle =()=>{
const $p = document.querySelector("#stylecontainer>p");
$p.style.backgroundColor=""; // "" 로 두면 값이 없는상태로 변한다
}
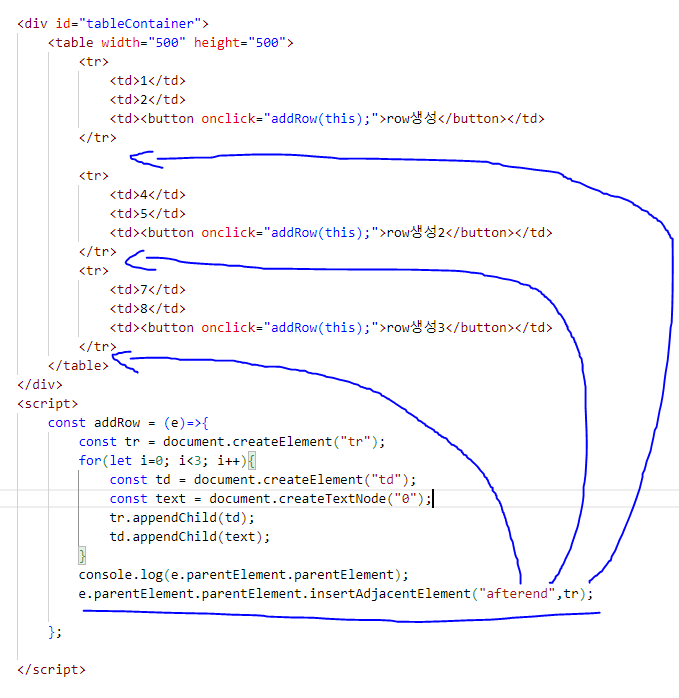
</script>✅ 특정태그의 주변태그
- 특정태그를 기준으로 원하는 태그를 가져올 때 사용
- 이벤트 객체와 연결해서 많이 사용
children : 자손태그들을 저장하고 있는 속성
parentElement : 바로위에 있는 부모태그를 저장한 속성
previousElementSibling : 같은 레벨에 있는 앞(위)에 있는 태그를 저장한 속성
nextElementSibling : 같은레벨에 있는 뒤(밑)에 있는 태그를 저장한 속성<div id="tableContainer"> <table width="500" height="500"> <tr> <td>1</td> <td>2</td> <td><button onclick="addRow(this);">row생성</button></td> </tr> <tr> <td>4</td> <td>5</td> <td><button onclick="addRow(this);">row생성2</button></td> </tr> <tr> <td>7</td> <td>8</td> <td><button onclick="addRow(this);">row생성3</button></td> </tr> </table> </div> <script> const addRow = (e)=>{ const tr = document.createElement("tr"); for(let i=0; i<3; i++){ const td = document.createElement("td"); const text = document.createTextNode("0"); tr.appendChild(td); td.appendChild(text); } console.log(e.parentElement.parentElement); e.parentElement.parentElement.insertAdjacentElement("afterend",tr); }; </script>
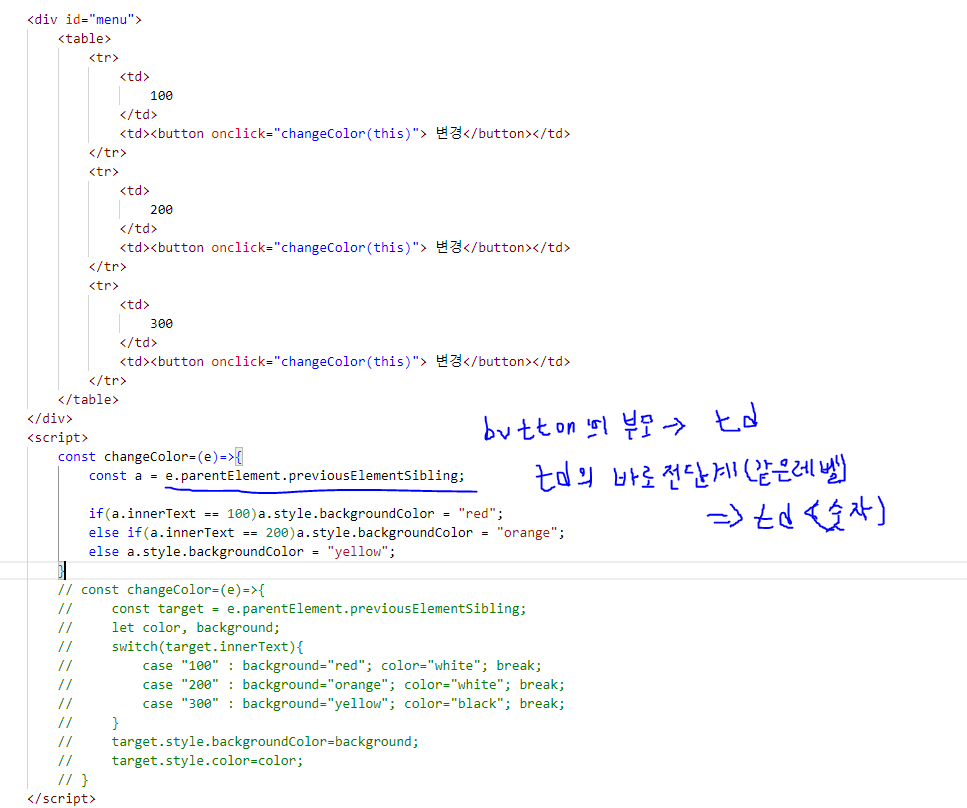
    <div id="menu">
        <table>
            <tr>
                <td>
                    100
                </td>
                <td><button onclick="changeColor(this)"> 변경</button></td>
            </tr>
            <tr>
                <td>
                    200
                </td>
                <td><button onclick="changeColor(this)"> 변경</button></td>
            </tr>
            <tr>
                <td>
                    300
                </td>
                <td><button onclick="changeColor(this)"> 변경</button></td>
            </tr>
        </table>
    </div>
    <script>
        const changeColor=(e)=>{
            const a = e.parentElement.previousElementSibling;
            if(a.innerText == 100)a.style.backgroundColor = "red";
            else if(a.innerText == 200)a.style.backgroundColor = "orange";
            else a.style.backgroundColor = "yellow";
        }
        // const changeColor=(e)=>{
        //     const target = e.parentElement.previousElementSibling;
        //     let color, background;
        //     switch(target.innerText){
        //         case "100" : background="red"; color="white"; break;
        //         case "200" : background="orange"; color="white"; break;
        //         case "300" : background="yellow"; color="black"; break;
        //     }
        //     target.style.backgroundColor=background;
        //     target.style.color=color;
        // }
    </script>

우측 상단 햇님모양 클릭하셔서 무조건 야간모드로 봐주세요!!