
react-native-vector-icons
리액트네이티브에서 탭메뉴, 헤더에서 아이콘을 사용할 일이 많은데 아이콘 이미지를 따로 저장할 필요없어 편리하게 아이콘을 사용할 수 있는 라이브러리이다.
설치하기
npm install react-native-vector-icons
npm install -D @types/react-native-vector-icons      *for TypeScript
보통 라이브러리를 설치하고 아래와 같이 Icon 컴포넌트에 아이콘 이름을 넣어서 사용하면 끝일 줄 알았지만, 이대로 사용하면 node_mule에서 module을 찾지 못한다는 에러가 난다. 아이콘을 사용하기전에 iOS와 안드로이드에 맞게 설정을 해줘야한다.
   <Container>
      <Icon name={iconName} color={color} onPress={onPress} size={20} />
   </Container>
iOS 설정
📌 시작하기에 앞서 pod 실행을 해줘야한다.(파일 변화 감지)
프로젝트의 ios 디렉터리로 이동해 pod install 명령어를 사용한다.$ cd ios $ pod install
- Xcode로 현재 프로젝트의 ios폴더를 연다.

./FirstApp/FirstApp디렉토리에서New Group클릭하여 새 그룹을 Fonts로 생성한다.

- 해당 프로젝트의 디렉토리로 돌아가
node_modules/react-native-vector-icons/Fonts의 모든 or 사용할 ttf 파일을 복사해 Xcode의./FirstApp/FirstApp/Fonts안에 붙여넣기한다.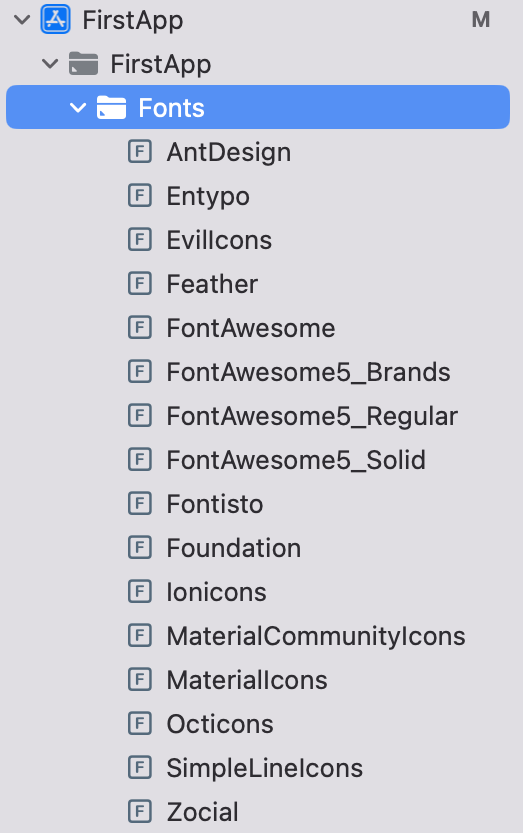
Info.plist파일을 아래와 같이 설정한다.
+ 버튼을 눌러서 Fonts provided ...를 선택하고, 아이템에 Fonts폴더에 넣은 ttf 파일명은 넣는다.

plist 파일은 iOS 앱의 프로퍼티 리스트(property list) 파일로 앱의 이름, 아이콘, 버전 등 앱에서 필요한 설정값을 지니고 있다.
이 방법이 번거롭다면 해당 프로젝트의
ios/[프로젝트명]/info.plist로 이동해 아래 코드를 하단에 복사해서 붙여넣기 해도 된다.<dict> (...) <key>UIAppFonts</key> <array> <string>AntDesign.ttf</string> <string>Entypo.ttf</string> <string>EvilIcons.ttf</string> <string>Feather.ttf</string> <string>FontAwesome.ttf</string> <string>FontAwesome5_Brands.ttf</string> <string>FontAwesome5_Regular.ttf</string> <string>FontAwesome5_Solid.ttf</string> <string>Foundation.ttf</string> <string>Ionicons.ttf</string> <string>MaterialCommunityIcons.ttf</string> <string>MaterialIcons.ttf</string> <string>SimpleLineIcons.ttf</string> <string>Octicons.ttf</string> <string>Zocial.ttf</string> <string>Fontisto.ttf</string> </array> </dict>
- Xcode 빌드하기
cmd + shift + k 를 눌러서 clean build 해주고,
cmd + R 눌러서 다시 빌드해준다.

빌드에 성공했다면 위와 같은 결과가 나올 것이다. (pod install 명령어를 실행하지 않았다면 빌드에 실패할수도 있으니 실행 필수!)
여기까지 했다면 metro가 실행되어 시뮬레이터가 작동할 것이다. 자동으로 뜨지 않는다면 해당 프로젝트로 이동해 npm run ios 실행
루트에
react-native.config.js를 생성해 아래와 같이 작성해준다.module.exports = { dependencies: { "react-native-vector-icons": { platforms: { ios: null, }, }, }, };
Icon 사용하기
import Icon from 'react-native-vector-icons/MaterialIcons';

return (
  ...
  <Icon name="delete" size={32} color="red" />
);
아이콘은 react-native-vector-icons에서 찾아서 쓰면 된다.
안드로이드 설정
android/app/build.gradle 파일 하단에 아래 코드를 작성한다.
apply from: "../../node_modules/react-native-vector-icons/fonts.gradle"특정 ttf만 사용한다면 아래 코드를 추가해준다.
project.ext.vectoricons = [
    iconFontNames: [ 'MaterialIcons.ttf', 'EvilIcons.ttf' ] // Name of the font files you want to copy
]
npm run android 하면 끝!

도움 많이 됐어요 감사합니다!