들어가기에 앞서...
지금까지 MVVM이라는 말만 들으면 깜짝 놀라면서 무리무리..를 외쳤던 것 같아서... 과거의 날들을 반성하며 회피하지 않고 직접 부딪혀야겠다는 생각이 확 들어서 MVVM 공부를 시작하기로 마음먹었다!
MVC 패턴
아주아주 이전에... (약 1년전.. MVVM이라는 말을 듣고) MVC 패턴에 대해서 대~강 찾아봤었는데, 지금은 알고 있는 지식이 많이 늘어났기 때문에 더 이해가 쉬울듯 하여 한번 다시 정리해보고자 한다.
Model + View + Controller
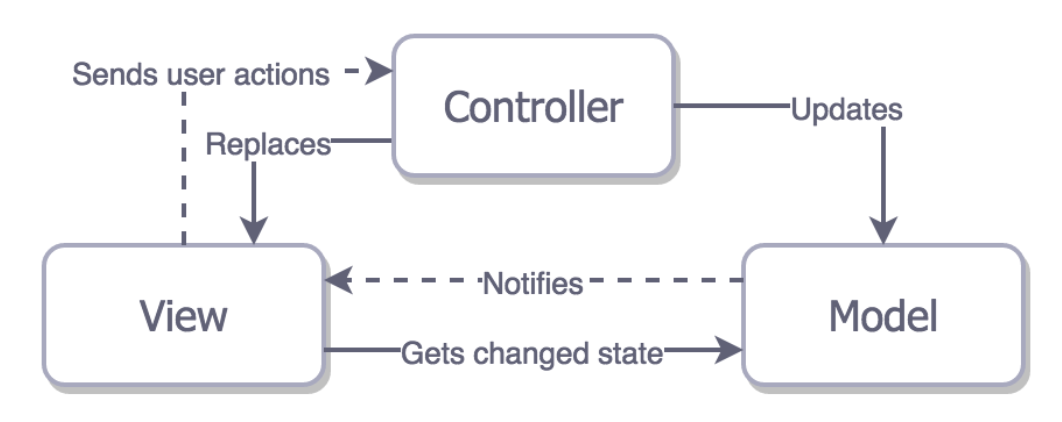
위의 사진과 같이
Model - 데이터 구조를 담음
View - 사용자에게 보여줄 View를 보여줌
Controller - 사용자의 Action을 받음
와 같은 역할들을 맡게 된다.
그러나 MVC 패턴의 경우, Model, View, Controller가 긴밀하게 연결되어 있고 독립성이 없기 때문에 재사용성이 낮아지게 된다.
이런 전통적인 MVC구조는 iOS 개발에 적합하지 않기 때문에
Apple의 CocoaMVC
Apple이 새로운 CocoaMVC 구조를 제시한다.
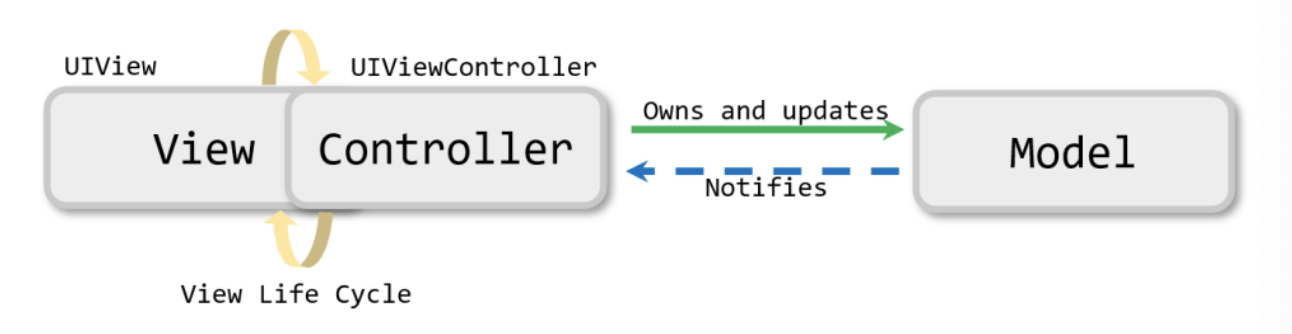
CocoaMVC에서는 Controller 역할을 UIViewController가 담당하게 된다. View와 Model에 독립성을 주었으나 UIViewController가 Controller에 View가 포함되면서 VC 분리가 어려워지기 때문에 파일이 무거워지게 된다.
또한 UIViewController가 Life Cycle까지 관리하며 View/Controller 분리가 어렵고 재사용 또한 어렵게 된다.
실제로 느끼기에 UIViewController 안에 UI에 대한 코드와 네트워킹 등에 관련된 코드가 함께 포함되어 있기 때문에 관리가 불편할 뿐더러 가독성도 떨어지게 된다.
MVVM 패턴
이런 단점들을 극복해줄 수 있는 패턴이 바로 MVVM 패턴이다!
Model + View + ViewModel
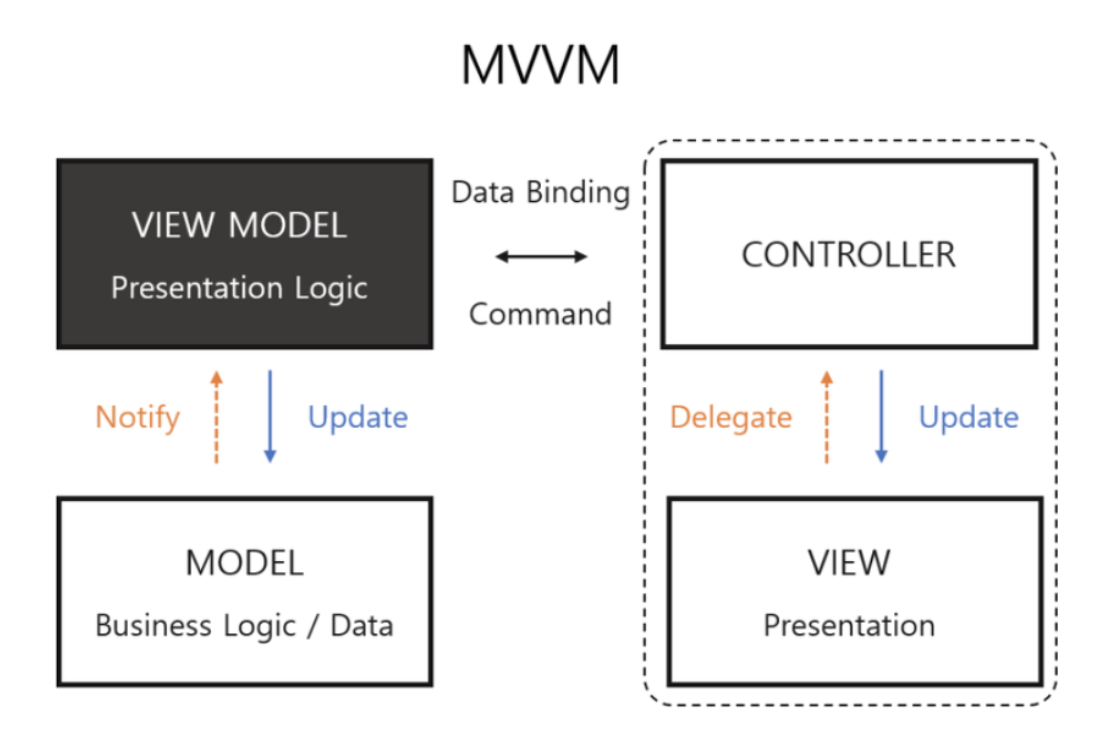
MVC와의 차이점은 Controller가 사라지고 ViewModel이 생겨났다는 점이다. MVVM은
Model - 데이터 구조를 정의하고 ViewModel에게 결과를 전달함, Model과 View는 이어지지 않음
View - 사용자에게 Action을 받아 이벤트가 발생했을 때 ViewModel에게 전달함, ViewModel이 요청한 데이터를 사용자에게 보여줌
ViewModel - 데이터에 대한 업데이트를 보여줌
왜 MVVM을 써야해요??
Apple에서 SwiftUI를 밀어주고 있다는 사실은 알고 있을 것이다. 이 SwiftUI가 MVVM 패턴을 기반으로 하고 있기 때문에 MVVM으로 바뀌는 추세라고 할 수 있다.
UIKit에서 UIViewController가 거의 모든 역할을 맡는데 SwiftUI는 View가 ViewModel을 소유, ViewModel이 Model을 소유하는 방식이다. 비즈니스 로직을 UIKit에서처럼 모두 Controller에 구현해주지 않고 ViewModel에서 가져올 수 있다는 특징이 있다.
MVVM 예제
가장 간단하게 데이터 전달과 네트워크 통신 등을 해보기 위해서 Random User API를 이용해서 랜덤 유저를 불러와주는 화면을 MVVM으로 구현해보았다.
 이런식으로!
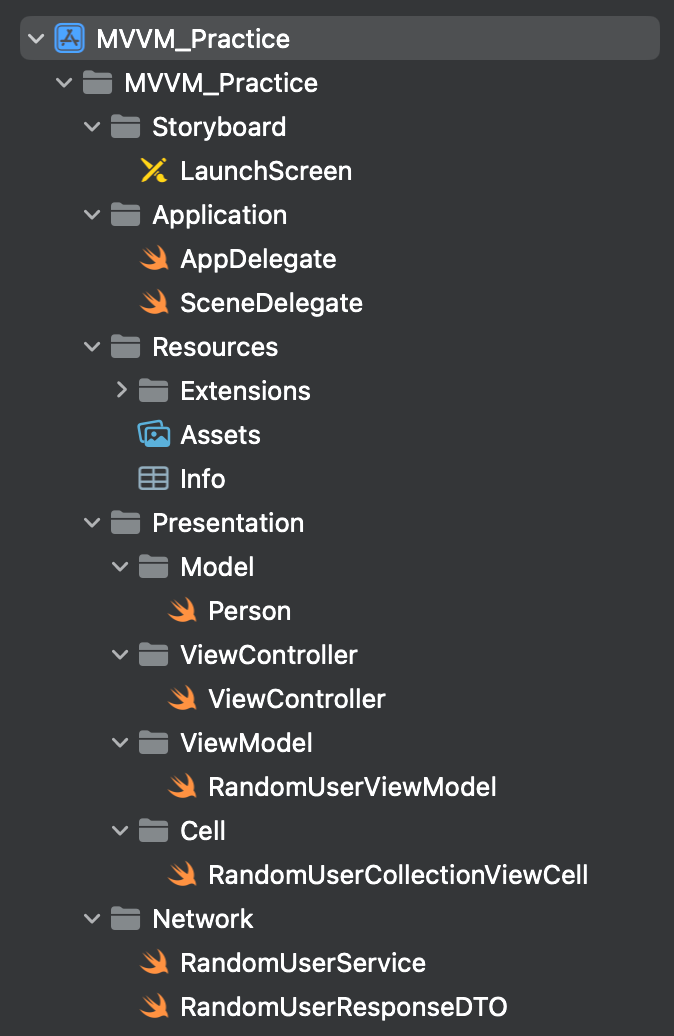
폴더링은 위와 같이 해줬다. 우리가 여기서 핵심적으로 봐야할 것은 Model 역할의 Person.swift, View 역할의 ViewController.swift, 그리고 ViewModel 역할의 RandomUserViewModel.swift이다.
우선 화면에서 보여주고자 하는 데이터의 Model을 정의한다.
//  Person.swift

import UIKit

struct Person: Codable {
    let name: String
    let profileImage: String
    let emailAddress: String
}
그리고 사용자에게 보여질 ViewController의 UI 요소들을 구현한다.
//  ViewController.swift

import UIKit

import SnapKit
import Then

final class ViewController: UIViewController {

    let homeTitleLabel = UILabel()
    lazy var randomUserCollectionView = UICollectionView(frame: .zero, collectionViewLayout: randomUserFlowLayout)
    let randomUserFlowLayout = UICollectionViewFlowLayout()
    let randomButton = UIButton()

    let paddingValue: Double = 30

    override func viewDidLoad() {
        super.viewDidLoad()
        setUI()
        setCollectionView()
    }

    private func setCollectionView() {
        self.randomUserCollectionView.delegate = self
        self.randomUserCollectionView.dataSource = self
        self.randomUserCollectionView.register(RandomUserCollectionViewCell.self, forCellWithReuseIdentifier: RandomUserCollectionViewCell.identifier)
    }

    private func setUI() {
        setStyle()
        setLayout()
    }

    private func setStyle() {
        view.backgroundColor = .white

        homeTitleLabel.do {
            $0.text = "Random User"
            $0.textColor = .black
            $0.font = .boldSystemFont(ofSize: 30)
        }

        randomUserFlowLayout.do {
            $0.scrollDirection = .vertical
            $0.itemSize = CGSize(width: UIScreen.main.bounds.width - CGFloat(paddingValue * 2), height: 80)
            $0.minimumLineSpacing = 2
        }

        randomButton.do {
            $0.clipsToBounds = true
            $0.setImage(UIImage(systemName: "shuffle.circle.fill"), for: .normal)
            $0.tintColor = .black
            $0.contentHorizontalAlignment = .fill
            $0.contentVerticalAlignment = .fill
        }
    }

    private func setLayout() {
        view.addSubviews(homeTitleLabel,
                         randomUserCollectionView,
                         randomButton)

        homeTitleLabel.snp.makeConstraints {
            $0.top.equalToSuperview().inset(150)
            $0.centerX.equalToSuperview()
        }

        randomUserCollectionView.snp.makeConstraints {
            $0.leading.trailing.equalToSuperview().inset(paddingValue)
            $0.top.equalTo(homeTitleLabel.snp.bottom).offset(50)
            $0.height.equalTo(326)
        }

        randomButton.snp.makeConstraints {
            $0.top.equalTo(randomUserCollectionView.snp.bottom).offset(50)
            $0.centerX.equalToSuperview()
            $0.width.height.equalTo(40)
        }
    }
}
추가로 collectionView의 Cell을 구현해준다.
//  RandomUserCollectionViewCell.swift

import UIKit

import Kingfisher
import SnapKit
import Then

final class RandomUserCollectionViewCell: UICollectionViewCell {
    static let identifier = "RandomUserCollectionViewCell"

    let profileImage = UIImageView()
    let labelStackView = UIStackView()
    let nameLabel = UILabel()
    let emailLabel = UILabel()

    override init(frame: CGRect) {
        super.init(frame: frame)
        setUI()
    }

    required init?(coder: NSCoder) {
        fatalError("init(coder:) has not been implemented")
    }

    func setUI() {
        setStyle()
        setLayout()
    }

    func setStyle() {
        self.backgroundColor = .systemGray6

        profileImage.do {
            $0.layer.cornerRadius = self.profileImage.bounds.height / 2
            $0.clipsToBounds = true
        }

        labelStackView.do {
            $0.axis = .vertical
            $0.spacing = 3
        }

        nameLabel.do {
            $0.textColor = .black
            $0.font = .systemFont(ofSize: 20)
            $0.textAlignment = .left
        }

        emailLabel.do {
            $0.textColor = .darkGray
            $0.font = .systemFont(ofSize: 15)
            $0.textAlignment = .left
        }
    }

    func setLayout() {
        self.addSubviews(profileImage,
                         labelStackView)

        [nameLabel, emailLabel].forEach {
            labelStackView.addArrangedSubview($0)
        }

        profileImage.snp.makeConstraints {
            $0.leading.equalToSuperview().inset(20)
            $0.height.width.equalTo(40)
            $0.centerY.equalToSuperview()
        }

        labelStackView.snp.makeConstraints {            $0.leading.equalTo(profileImage.snp.trailing).offset(10)
            $0.centerY.equalToSuperview()
            $0.trailing.equalToSuperview().inset(10)
        }
    }

    // 데이터 입혀주는 메소드
    func configCell(data: Person) {
        guard let url = URL(string: data.profileImage) else { return }
        profileImage.kf.setImage(with: url)
        nameLabel.text = data.name
        emailLabel.text = data.emailAddress
    }
}
ViewModel을 구현해주기에 앞서 네트워킹을 위한 Service를 구현해주었다. 사실 ViewModel에 구현해줘도 되지만.. 따로 분리해주자!
//  RandomUserService.swift

import Foundation

class RandomUserService {
    func getRandomPerson(url: URL, completion: @escaping (RandomUserResponseDTO?) -> ()) {
        URLSession.shared.dataTask(with: url) {
            (data, response, error) in
            if let error = error {
                print(error.localizedDescription)
                completion(nil)
            }
            else if let data = data {
                let personList = try? JSONDecoder().decode(RandomUserResponseDTO.self, from: data)
                if let personList = personList {
                    completion(personList)
                }
            }
        }.resume()
    }
}
ViewModel을 구현해준다. UI를 제외한 데이터를 입혀주는 등의 함수들을 모두 ViewModel에 구현해준다.
//  RandomUserViewModel.swift

import Foundation

final class RandomUserViewModel {
    var person: [Person] = []
    let userCount = 4
}

extension RandomUserViewModel {
    var numberOfSections: Int {
        return self.person.count
    }

    func networkRandomUser(completion: @escaping () -> Void) {
        guard let url = URL(string: "https://randomuser.me/api/") else {
            fatalError("Can't find URL")
        }
        if person.count > 4 {
            self.person = []
        }

        for _ in 1...userCount {
            RandomUserService().getRandomPerson(url: url) {
                randomUser in
                if let randomUser = randomUser {
                    let newPerson = Person(name: randomUser.results[0].name.first + " " + randomUser.results[0].name.last, profileImage: randomUser.results[0].picture.thumbnail, emailAddress: randomUser.results[0].email)
                    print(newPerson)
                    self.person.append(newPerson)
                }
            }
        }

        if person.count == 4 {
            completion()
        }
    }
}
마지막으로 ViewController에서 ViewModel을 연결해주고 랜덤 버튼을 누를때마다 새로고침이 되도록 구현해주었다.
//  ViewController.swift
...
    lazy var randomUserViewModel = RandomUserViewModel()
...
    override func viewDidLoad() {
        super.viewDidLoad()
        setUI()
        setCollectionView()
        setAddTarget()
    }

    private func setAddTarget() {
        self.randomButton.addTarget(self, action: #selector(randomButtonTapped), for: .touchUpInside)
    }

    @objc private func randomButtonTapped() {
        randomUserViewModel.networkRandomUser {
            self.randomUserCollectionView.reloadData()
        }
    }
...
}

extension ViewController: UICollectionViewDelegate { }

extension ViewController: UICollectionViewDataSource {
    func collectionView(_ collectionView: UICollectionView, numberOfItemsInSection section: Int) -> Int {
        return randomUserViewModel.numberOfSections
    }

    func collectionView(_ collectionView: UICollectionView, cellForItemAt indexPath: IndexPath) -> UICollectionViewCell {
        guard let cell = collectionView.dequeueReusableCell(withReuseIdentifier: RandomUserCollectionViewCell.identifier, for: indexPath) as? RandomUserCollectionViewCell else { return UICollectionViewCell() }
        let personData = randomUserViewModel.person[indexPath.row]
        cell.configCell(data: personData)
        return cell
    }
}
전체코드
https://github.com/chaentopia/MVVM_Practice
마무리
사실 Random User을 한번에 한명씩만 받아오느라... 좀 오래 걸리긴 한다.. 버튼 여러번 눌러야 4명이 싹 바뀜.. 이건 해결할 수 있는 방법을 아직 못 찾았다!! ㅜㅜ 더 해봐야겠당.
생각보다 MVVM 패턴이 복잡하진 않은 것 같다. 코드를 유지보수 관리하기에 훨씬 편한 것 같고 요즘 기업들이 MVVM을 사용할 수 있는 개발자를 원하는 이유도 알 것 같다. 그렇지만 그만큼 더 많은 코드들을 작성해봐야겠다는 생각이 들었다~~