개요
의존 관계 때문에
spring-boot-starter-oauth2-client를 사용하지 않고 Feign Client로 구현하고 싶었다.
배경
나의 멀티모듈 프로젝트는 다음과 같은 구조를 가진다.
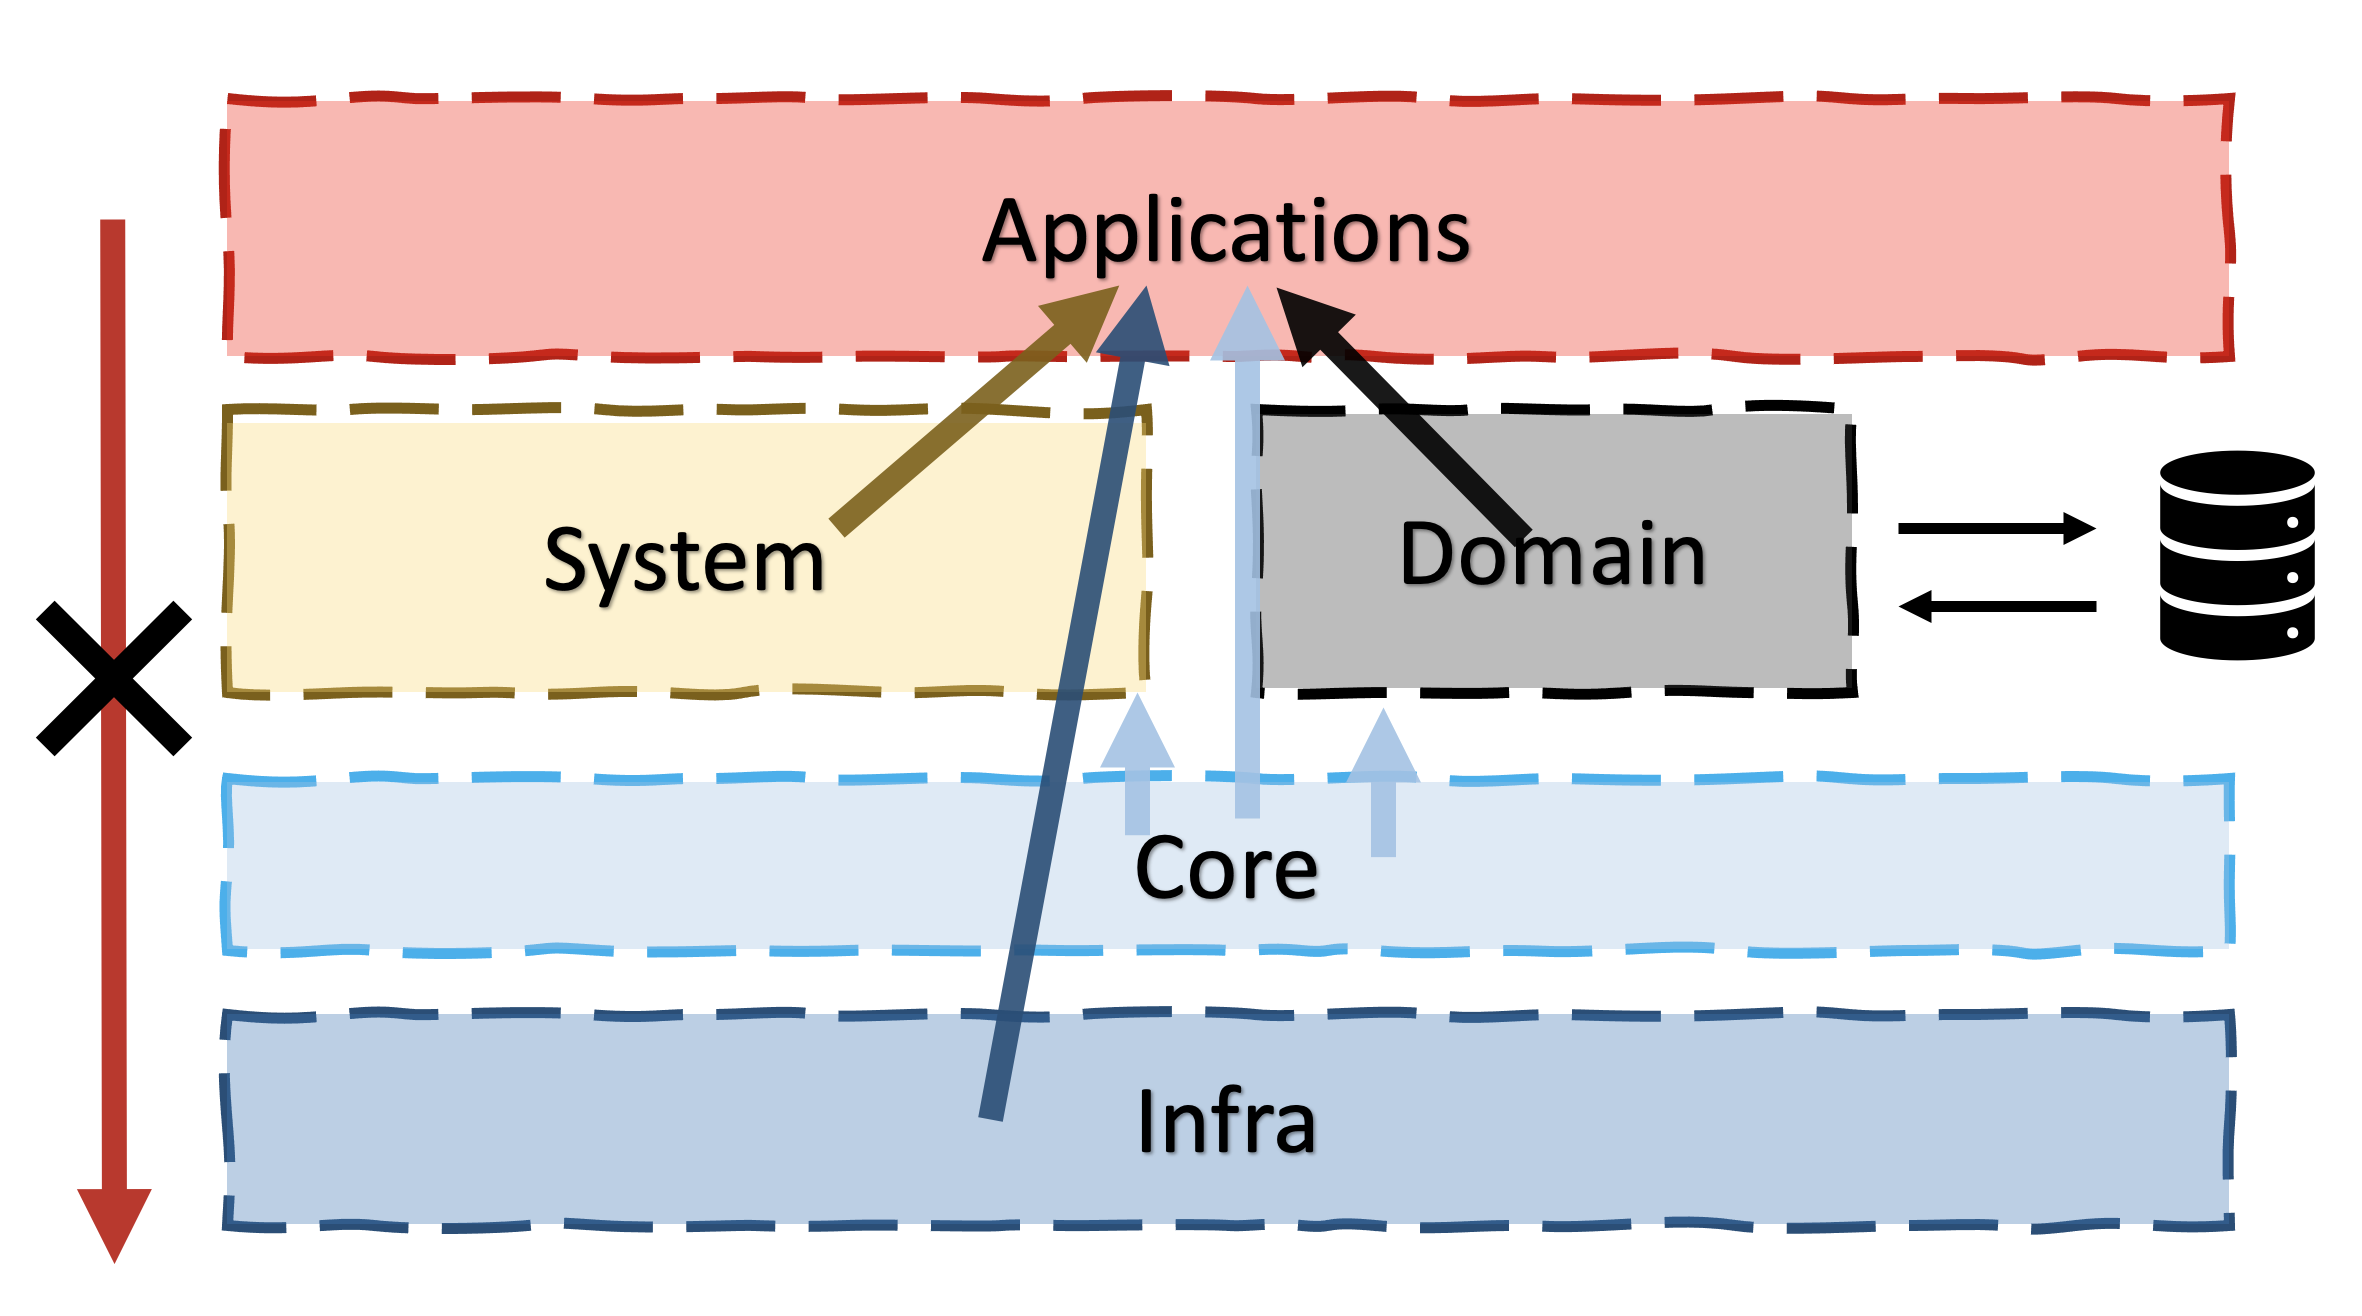
Application : Admin , Batch, Api 등 main을 포함한 jar파일들이 여기 속한다.
System : JwtFilter, Security, LogConfig 등 Application 들의 공통적이면서도 보조적인 수단들이 여기 속한다.
Domain : JPA, QueryDsl 등 DB와 가장 가까히 소통하는 라이브러리가 여기속한다.
Core : 최소한의 라이브러리를 의존하면서 자바로 구현가능한 기능들이 여기 속한다.
Infra : AWS, Feign 등 외부 라이브러리가 여기속한다.
문제점
OAuth2 라이브러리를 사용하게 되면 Spring Security가 Application 단계에서 구현되어 main을 가지는 각각의 프로젝트들에 적용해줘야하는 번거로움이 생긴다. 그렇게 된다면 multi-module을 할 필요가 없어지는 것이다. 따라서 의존성을 줄여주기 위해 FeignClient로 구현하였다.
해결
RestTemplate 로 구현된 코드들이 꽤 있어서 구현에는 어렵지 않았지만 몇가지 트러블 슈팅이 있었다. 아래 코드를 보고 겪었던 트러블 슈팅을 포스팅 하겠다.
코드
yml :kakao developer를 참고하여 아래데이터를 가져온다.
oauth2:
  kakao:
    infoUrl: https://kapi.kakao.com
    baseUrl: https://kauth.kakao.com
    clientId: 5d38e6dc1f62b10c9r3dc2e34fe6d24e62
    redirectUri: http://localhost/api/v1/login/kakao/oauth2
    secretKey: I1nEw554k2oFM1n32P126Yro7NrRVU2G
KakaoInfo : yml 데이터를 가져온다.
package com.send.moduleinfra.feign.sns.kakao;

import org.springframework.boot.context.properties.ConfigurationProperties;
import org.springframework.stereotype.Component;

import java.util.HashMap;
import java.util.Map;
import java.util.stream.Collectors;

@Component
@ConfigurationProperties(prefix = "oauth2.kakao")
public class KakaoInfo {

  private String baseUrl;
  private String clientId;
  private String redirectUri;
  private String secretKey;

  public String kakaoUrlInit() {
    Map<String, Object> params = new HashMap<>();
    params.put("client_id", getClientId());
    params.put("redirect_uri", getRedirectUri());
    params.put("response_type", "code");

    String paramStr = params.entrySet().stream()
      .map(param -> param.getKey() + "=" + param.getValue())
      .collect(Collectors.joining("&"));

    return getBaseUrl()
      +"/oauth/authorize"
      + "?"
      + paramStr;
  }

  public void setBaseUrl(String baseUrl) {
    this.baseUrl = baseUrl;
  }

  public void setClientId(String clientId) {
    this.clientId = clientId;
  }

  public void setRedirectUri(String redirectUri) {
    this.redirectUri = redirectUri;
  }

  public String getBaseUrl() {
    return baseUrl;
  }

  public String getClientId() {
    return clientId;
  }

  public String getRedirectUri() {
    return redirectUri;
  }

  public String getSecretKey() {
    return secretKey;
  }

  public void setSecretKey(String secretKey) {
    this.secretKey = secretKey;
  }
}
Controller : client가 kakao 로그인을 눌렀을 때 접근할 endpoint
  @GetMapping("/login/kakao")
  public ResponseEntity<Object> kakaoLogin()  {
    HttpHeaders httpHeaders = accountService.kakaoLogin();
    return httpHeaders != null ?
      new ResponseEntity<>(httpHeaders,HttpStatus.SEE_OTHER):
      ResponseEntity.badRequest().build();
  }
Service : Header에 Redirect 주소를 설정한다.
public HttpHeaders kakaoLogin(){
    return createHttpHeader(kakaoInfo.kakaoUrlInit());
  }

 private static HttpHeaders createHttpHeader(String str) {
    try {
      URI uri = new URI(str);
      HttpHeaders httpHeaders = new HttpHeaders();
      httpHeaders.setLocation(uri);
      return httpHeaders;
    } catch (URISyntaxException e) {
      e.printStackTrace();
    }
    return null;
  }
여기까지 정상적으로 했다면 위주소로 Social Login Page 접근이 가능할 것이다.
다음으로 로그인 성공 후 토큰을 발급받고 토큰으로 회원정보를 받아보자
KLoginTokenReq : 토큰을 요청할때 쓰는 Data 객체이다.
package com.send.moduleinfra.feign.sns.kakao.dto;


import com.send.moduleinfra.feign.sns.google.GoogleInfo;
import com.send.moduleinfra.feign.sns.kakao.KakaoInfo;
import lombok.*;

@Getter
@Setter
@NoArgsConstructor
@AllArgsConstructor
@Builder
public class KLoginTokenReq {

  private String code;
  private String client_id;
  private String client_secret;
  private String redirect_uri;
  private final String grant_type = "authorization_code";

  public static KLoginTokenReq newInstance(KakaoInfo googleInfo, String code){
    return KLoginTokenReq.builder()
      .client_id(googleInfo.getClientId())
      .client_secret(googleInfo.getSecretKey())
      .redirect_uri(googleInfo.getRedirectUri())
      .code(code)
      .build();
  }

// kakao는 Content-Type 을 application/x-www-form-urlencoded 로 받는다.
// FeignClient는 기본이 JSON으로 변경하니 아래처럼 데이터를 변환 후 보내야 한다.
  @Override
  public String toString() {
    return
      "code=" + code + '&' +
      "client_id=" + client_id + '&' +
      "client_secret=" + client_secret + '&' +
      "redirect_uri=" + redirect_uri + '&' +
      "grant_type=" + grant_type;
   }

}
KLoginTokenRes : 요청한 토큰 데이터를 받을 Data객체이다.
package com.send.moduleinfra.feign.sns.kakao.dto;

import lombok.AllArgsConstructor;
import lombok.Getter;
import lombok.NoArgsConstructor;
import lombok.Setter;

@Getter
@Setter
@NoArgsConstructor
public class KLoginTokenRes {

  private String access_token; // 애플리케이션이 Google API 요청을 승인하기 위해 보내는 토큰
  private String expires_in;   // Access Token의 남은 수명
  private String refresh_token;    // 새 액세스 토큰을 얻는 데 사용할 수 있는 토큰
  private String scope;
  private String token_type;   // 반환된 토큰 유형(Bearer 고정)
  private String id_token;
  private String refresh_token_expires_in;

  public String getAccess_token() {
    return "Bearer "+access_token;
  }
}
KTokenInfoRes : 토큰으로 사용자 정보를 받을 Data객체이다.
package com.send.moduleinfra.feign.sns.kakao.dto;

import lombok.Getter;
import lombok.NoArgsConstructor;
import lombok.Setter;

@Getter
@Setter
@NoArgsConstructor
public class KTokenInfoRes {
  private String id;
  private String expires_in;
  private String app_id;
}
여기까지 Dto세팅이 끝났다.
다음은 FeignClient Setting 이다.
KakaoLoginFeignClient : Login code를 가지고 Token을 요청하는 Feign이다
package com.send.moduleinfra.feign.sns.kakao;


import com.send.moduleinfra.feign.sns.kakao.config.KakaoFeignConfiguration;
import com.send.moduleinfra.feign.sns.kakao.dto.KLoginTokenRes;
import org.springframework.cloud.openfeign.FeignClient;
import org.springframework.stereotype.Component;
import org.springframework.web.bind.annotation.PostMapping;
import org.springframework.web.bind.annotation.RequestBody;


@FeignClient(name = "kakaoLoginFeignClient", url = "${oauth2.kakao.baseUrl}", configuration = KakaoFeignConfiguration.class)
@Component
public interface KakaoLoginFeignClient {

  @PostMapping(value = "/oauth/token")
  KLoginTokenRes getToken(
    @RequestBody String kLoginTokenReq);
}
KakaoFeignConfiguration : 앞서 말했다시피 토큰요청은 별도의 content-type이 필요하다 따라서, 별도의 설정파일을 만들어 주었다.
package com.send.moduleinfra.feign.sns.kakao.config;

import com.send.moduleinfra.feign.config.FeignClientExceptionErrorDecoder;
import feign.Logger;
import feign.RequestInterceptor;
import feign.codec.ErrorDecoder;
import org.springframework.context.annotation.Bean;

public class KakaoFeignConfiguration {
  @Bean
  public RequestInterceptor requestInterceptor() {
    return template -> template.header("Content-Type", "application/x-www-form-urlencoded");
  }
  @Bean
  public ErrorDecoder errorDecoder() {
    return  new FeignClientExceptionErrorDecoder();
  }

  @Bean
  Logger.Level feignLoggerLevel() {
    return Logger.Level.FULL;
  }

}
KakaoInfoFeignClient : Token을 가지고 회원정보를 요청하는 Feign이다.
package com.send.moduleinfra.feign.sns.kakao;

import com.send.moduleinfra.feign.config.FeignClientConfiguration;
import com.send.moduleinfra.feign.sns.google.dto.GTokenInfoRes;
import com.send.moduleinfra.feign.sns.kakao.dto.KTokenInfoRes;
import org.springframework.cloud.openfeign.FeignClient;
import org.springframework.stereotype.Component;
import org.springframework.web.bind.annotation.GetMapping;
import org.springframework.web.bind.annotation.RequestHeader;
import org.springframework.web.bind.annotation.RequestParam;

@FeignClient(name = "kakaoInfoFeignClient", url = "${oauth2.kakao.infoUrl}", configuration = FeignClientConfiguration.class)
@Component
public interface KakaoInfoFeignClient {

  @GetMapping("/v1/user/access_token_info")
  KTokenInfoRes getInfo(@RequestHeader(name = "Authorization") String Authorization);
}
Controller : 여기서 endpoint는 내가 설정했던 redirect주소가 된다.
 @GetMapping("/login/kakao/oauth2")
  public SingleResult<Object> redirectKakaoLogin(@RequestParam(value = "code")String code) {
    return responseService.getSingleResult(accountService.getKakaoTokenWithInfo(code));
  }
Service : 가입한 유저가 있으면 로그인 아니면 회원정보를 만들어 내보낸다.
public Object getKakaoTokenWithInfo(String code) {
    String userId = SocialType.K.getType() +"_" + getKakaoInfo(code).getId();
    Users users = userRepository.findByLoginId(userId).orElse(null);
    if(users == null){
      return SocialInfoRes.newInstance(userId,socialRandomPassword(userId),SocialType.K);
    }
    return createToken(users);
  }
    private KTokenInfoRes getKakaoInfo(String code) {
    return kakaoInfoFeignClient
      .getInfo(
        kakaoLoginFeignClient
          .getToken(
            KLoginTokenReq.newInstance(kakaoInfo, code).toString())
          .getAccess_token());
  }
    private String socialRandomPassword(String userId) {
      String systemMil = String.valueOf(System.currentTimeMillis());
      return passwordEncoder.encode(userId + systemMil);
  }

private LoginRes createToken(Users user) {
    return LoginRes.of(jwtProvider.createAccessToken(user.getLoginId(), user.getGroup().getFuncList()), jwtProvider.createRefreshToken(user.getLoginId()));
  }
SocialInfoRes : 소셜로그인 후 최종적으로 client에게 보여질 data 객체이다.
package com.send.apiauth.domain.auth.res;

import com.send.moduledomain.domain.user.entity.SocialType;
import lombok.*;

@Getter
@Setter
@NoArgsConstructor
@AllArgsConstructor
@Builder
public class SocialInfoRes {

  private String userId;
  private String password;
  private String type;
  private String name;

  public static SocialInfoRes newInstance(String userId, String password, SocialType socialType){
    return SocialInfoRes.builder()
      .type(socialType.getType())
      .password(password)
      .userId(userId)
      .build();
  }
}
결과
FeignClient로 소셜로그인을 구현해 보았다. OAuth2를 의존하지 않게 됨으로써 모듈의 분리, 재결합 등을 수월하게 할 수 있고, 코드의 재사용성 또한 좋아진다. 지금 구현한 코드는 어디서나 다시 재활용 하여도 의존하지 않기때문에 몇 가지 데이터만 있으면 다른프로젝트에 이식할 수 있는 환경이 되었다.
back end developer