1. 시간-분 변환기 만들기
🧩 selector(options)
Recoil에서 함수나 파생된 상태를 나타낸다.
- atom 만들기
//atoms.tsx
export const minuteState = atom({
  key: "minutes",
  default: 0,
});- useRecoilState 사용해서 input과 연결
useRecoilState : get으로부터 return한 값과 set property를 실행시키는 함수
//App.tsx
const [minutes, setMinutes] = useRecoilState(minuteState);
const onMinutesChange = (event: React.FormEvent<HTMLInputElement>) => {
setMinutes(+event.currentTarget.value);
};
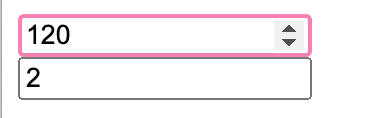
<input
value={minutes}
onChange={onMinutesChange}
type="number"
placeholder="Minutes"
/>minutes : number
event.currentTarget.value : string
→ type error!
+붙이면 number→string 으로 변환
ex) +”1” = (int)1
🧩 selector - get
atom의 값을 가져오는 속성
첫번째 argument로 option이라는 object를 가져온다
get은 state를 가져올 수 있는데 get 함수에서 어떤 값을 return하던지 간에 그 값은 저장하려는 state의 값이 된다.
get: ({ get }) => {
    const minutes = get(minuteState);
    return minutes / 60;
  },
state는 minute 한개만 존재 (atoms : minuteState)
→selector을 사용해서 state가져오고 output
selector사용
//atoms.tsx
export const hourSelector = selector({
  key: "hours",
  get: ({ get }) => {
    const minutes = get(minuteState);
    return minutes / 60;
  },
});useRecoilValue사용해서 hourSelector 값 가져오기
const hours = useRecoilValue(hourSelector);시간→분 변환
🧩 selector - set
set(변경할 atom, 변경 후 값)
atom의 state를 수정하게 도와주는 속성
첫번째 arguments로 get과 마찬가지로 option이라는 object를 가져올 수 있다.
두번째 argument는 값에 적용시킬 새로운 값이다.
두번째 argument 자리에 식별자를 입력하고 console.log(식별자)라고 입력해보면 정보를 얻을 수 있다.
//App.tsx
const [hours,setHours] = useRecoilState(hourSelector);
//atoms.tsx
export const hourSelector = selector<number>({
key: "hours",
get: ({ get }) => {
const minutes = get(minuteState);
return minutes / 60;
},
set: ({ set }, newValue) => {
const minutes = Number(newValue) * 60;
set(minuteState, minutes);
},
});selector → 타입지정

2. react-beautiful-dnd
create drag and drop for lists
Atlassian에서 만든 React DND 라이브러리
기본 세팅
import npm i react-beautiful-dnd- type지정
npm i --save-dev@types/react-beautiful-dnd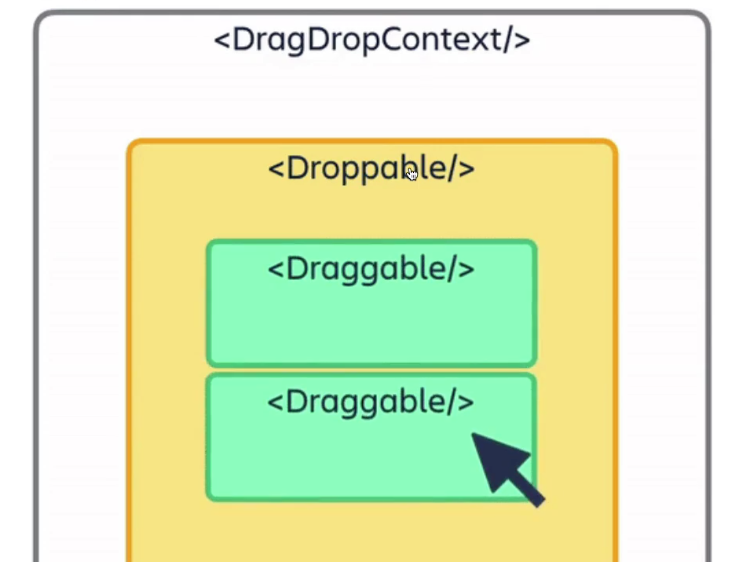
DragDropContext: DND의 상태를 제공 (DND 이벤트를 등록)
dropabble : 드롭할 수 있는 영역
draggable: 드래그할 수 있는 영역
- DragDropContext
import { DragDropContext } from 'react-beautiful-dnd';

function App() {
	const onDragEnd = () => {};
	return (
		<DragDropContext onDragEnd={onDragEnd}><div></div></DragDropContext>);
}
export default App;
onDragEnd
유저가 드래그를 끝낸 지점에서 불려지는 함수 (children 필수 필요)
- Droppable
<Droppable >
     <ul></ul>
</Droppable>
→ERROR!
droppable의 child는 함수여야함 (react요소 (ex. ul) 안됨)
🌟 수정!
<Droppable droppableId="one">
          {() => (
            <ul>
            </ul>
          )}
</Droppable>- Draggable
cf) draggable의 child는 함수여야함 (react요소 (ex. ul) 안됨)
<Droppable droppableId='one'>{() => (
						<ul><Draggable draggableId='first' index={0}>{() => <li>One</li>}
							</Draggable><Draggable draggableId='second' index={1}>{() => <li>Two</li>}
							</Draggable></ul>)}
				</Droppable>
Using innerRef
(Draggable과 Droppable컴포넌트의 내부 props정의)
draggableProps
어디에서든 드래그 가능 (전체 접근 가능)
dragHandleProps
특정 영역을 통해서만 드래그를 가능하도록 하고 싶을 때 사용한다.
ex) {...provided.dragHandleProps}
→ 움직일 수 있는 특정 부분 지정
<span {...magic.dragHandleProps}>🔥</span>
이젠 불에 가까이 가야만 커서가 바뀐다 + 움직일 수 있다
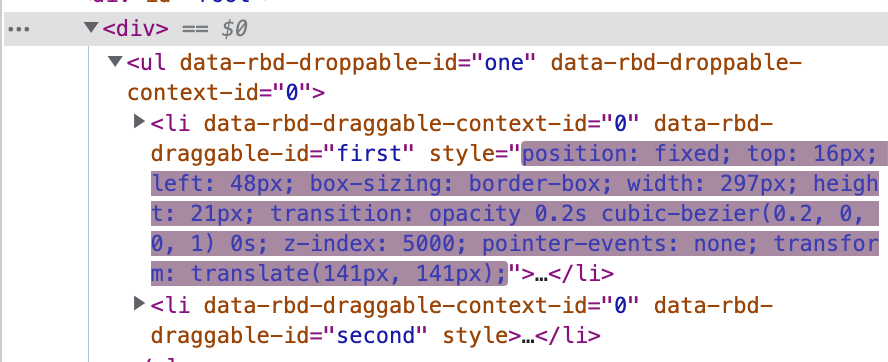
element창을 보면 움직일 때 css가 바뀌는 것을 볼 수 있다
+) magic.placeholder
Droppable 리스트가 작아지는 것을 방지
(움직여도 list size가 변하지 않고 유지된다)
드래그가 끝났을 때(재정렬) 순서 수정하기
onDragEnd 속의 다양한 정보 사용하기
result: DropResult
result.draggableId: 드래그 되었던 Draggable의 id
result.type: 드래그 되었던 Draggable의 type
result.source: Draggable이 시작된 위치(location)
result.destination: Draggable이 끝난 위치(location)
만약 Draggable이 시작한 위치와 같은 위치로 돌아오면 destination값은 null
타입 지정해주기 DropResult
const onDragEnd = ({ *destination*, *source* }: DropResult) => {};splice
배열의 기존 요소를 삭제 또는 교체하거나 새 요소를 추가하여 배열의 내용을 변경
대체로 두개 이상의 argument 가짐 array.splice(시작하는 위치, 지울 갯수, 넣을 항목 ...)
< Draggable /> list의 키
< Draggable /> list를 렌더링하는 경우 각 < Draggable />에 key prop을 추가하는 것 중요
순서 바꾸기 메커니즘
const toDos = ['a', 'b', 'c', 'd', 'e', 'f'];
-
배열의 source.index 지우기 (source : 최근 움직인 것)
toDosCopy.splice(*source*.index, 1); *//한개 지우기* -
destination.index에 지운 값 넣기
toDosCopy.splice(*destination*?.index, 0, *draggableId*); *//draggableId 추가하기*리액트에서는 주로 key를 숫자인 index로 주지만 이 경우에는 draggableId와 무조건 같아야한다
key={*toDo*} draggableId={*toDo}*ERROR) 이동시 글자 깨지는 현상 고치기!
컴포넌트의 state가 바뀌면 해당 컴포넌트의 자식들이 리렌더링됨
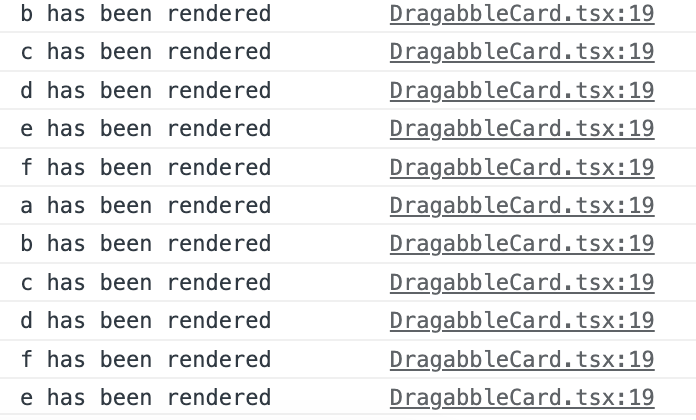
하나 움직일 때마다 모든 자식들이 렌더링된다
React.memo
export default React.memo(컴포넌트);
prop이 변하지 않는다면 컴포넌트를 렌더링하지 말라고 알려주기
컴포넌트가 동일한 props로 동일한 결과를 렌더링해낸다면, React.memo를 호출하고 결과를 Memoizing하도록 하여 성능 향상
→ 컴포넌트를 렌더링하지 않고 마지막으로 렌더링된 결과를 재사용한다

바뀐 것들만 렌더링됨
여러개의 보드 만들기
Object.keys(obj)
주어진 객체의 속성 이름들을 일반적인 반복문과 동일한 순서로 순회되는 열거할 수 있는 배열로 반환
{Object.keys(toDos).map((boardId) => (
            <Board boardId={boardId} key={boardId} toDos={toDos[boardId]} />
          ))}
ex) Object.keys(obj).map((item)=>obj[item])
const object1 = {

a: 'somestring',

b: 42,

c: false

};

console.log(Object.keys(object1)); // Array ["a", "b", "c"]
export const toDoState = atom<IToDoState>({
  key: "toDo",
  default: {
    to_do: ["a", "b"],
    doing: ["c", "d", "e"],
    done: ["f"],
  },
현재는 타입스크립트가 todoState에 3가지 선택지만 있다고 생각함
interface IToDoState {
  [key: string]: string[];
}
사용자가 board를 추가할 수 있게 interface 지정
같은 보드 내에서 이동
setToDos((allBoards) => {
        const boardCopy = [...allBoards[source.droppableId]];
        boardCopy.splice(source.index, 1); //한개 지우기
        boardCopy.splice(destination?.index, 0, draggableId); //draggableId 추가하기
        return {
          ...allBoards,
          [source.droppableId]: boardCopy
        };
💡 DropResult
draggableId: 드래그 되었던 Draggable의 id
type: 드래그 되었던 Draggable의 type
source: Draggable이 시작된 위치
destination: Draggable이 끝난 위치
모든 보드(allBoards)를 가져와서 source.droppableId를 복사(boardCopy)하고 변형한 후
allBoards와 변형된 boardCopy를 리턴한다
다른 보드로 이동
setToDos((allBoards) => {
        const sourceBoard = [...allBoards[source.droppableId]];
        const destinationBoard = [...allBoards[destination.droppableId]];
        sourceBoard.splice(source.index, 1);
        destinationBoard.splice(destination?.index, 0, draggableId);
        return {
          ...allBoards,
          [source.droppableId]: sourceBoard,
          [destination.droppableId]: destinationBoard,
        };
});-
sourceBoard와 destinationBoard에 각각 복사해주고
-
움직임이 시작되면 sourceBoard 인덱스를 삭제해주고
-
움직임이 끝나면 destinationBoard에 인덱스 넣어주기
부모 css
display: flex;
flex-direction: column;
자식 css
flex-grow: 1;
→ 부모 전체 배경 채워짐
Droppablestate snapshot
snapshot: board로 넘어왔는지 확인
isDraggingOver: boolean
현재 선택한 Draggable이 특정 Droppable위에 드래깅 되고 있는지 여부 확인
draggingOverWith: ?DraggableId
Droppable 위로 드래그하는 Draggable ID
draggingFromThisWith: ?DraggableId
현재 Droppable에서 벗어난 드래깅되고 있는 Draggable ID
isUsingPlaceholder: boolean
placeholder가 사용되고 있는지 여부
useRef()
react코드로 html요소를 지정하고 가져오는 방법
-
const inputRef = useRef<HTMLInputElement>(null); -
// input 만들고 ref 연결
<input ref={inputRef} placeholder="grab me" />
input으로 받은 것 todoList에 적용

: 기존에는 정해준 string 이동
→ input (id,text)은 object이라 그대로 하면 오류가 생김


🌟 해결 방법

1. id를 이용해 todo를 찾거나
2. todo가 있는 위치를 찾기

**2번 사용** → **source.index** 사용하기

```tsx
setToDos((allBoards) => {
      return {
        ...allBoards,
        [boardId]: [newToDo, ...allBoards[boardId]],
      };
    });
boardId가 이미 다른 todo들을 가지고 있다면 그 자리에 다시 두기 ( 대체 X)
새로운 건 추가
setToDos((allBoards) => {
        const sourceBoard = [...allBoards[source.droppableId]];
        const taskObj = sourceBoard[source.index];
        const destinationBoard = [...allBoards[destination.droppableId]];
        sourceBoard.splice(source.index, 1);
        destinationBoard.splice(destination?.index, 0, taskObj);
        return {
          ...allBoards,
          [source.droppableId]: sourceBoard,
          [destination.droppableId]: destinationBoard,
        };
      });