
styled-components
스타일드 컴포넌트는 대표적인 CSS-inJS 라이브러리로 앞에서 사용한 styled-jsx와 비슷하지만 가장 대중적으로 사용되면서 많은 기능들을 담고 있습니다.
넥스트에서는 기본적으로 styled-jsx를 지원해주기 때문에 따로 설정이 필요 없었지만, 스타일드 컴포넌트를 사용하기 위해서는 설정해주어야 할 것들이 있습니다.
1. styled-components 설치하기
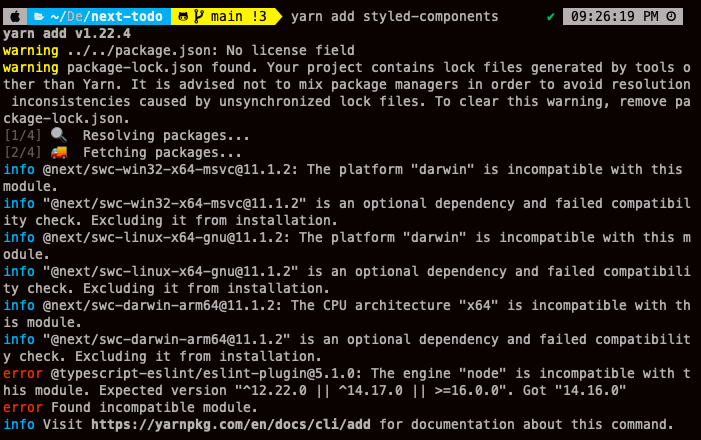
$ yarn add styled-components
$ yarn add @types/styled-components -D
> package.json
"dependencies": {
  ...
  "styled-components": "^5.3.3"
},
"devDependencies": {
  ...
  "@types/styled-components": "^5.1.15"
}
혹시나 다음과 같은 에러가 발생한다면 error message에 나오는 node version을 맞추면 해결됩니다.
1-1. styled-components 서버 사이드 렌더링 지원하기
넥스트에서 제공하는 styled-components 예제를 참고하면서 document 설정을 해보도록 하겠습니다.
styled-component 예제 확인하기
예제를 따라 document를 확장하고, 서버 사이드 렌더링 과정에서 head에 스타일을 넣는 과정을 진행하겠습니다. 추가로 서버 사이드 렌더링 때 필요한 바벨 플러그인을 추가해 주도록 하겠습니다.
> pages/_document.tsx
import Document from "next/document";
import { ServerStyleSheet } from "styled-components";

export default class MyDocument extends Document {
  static async getInitialProps(ctx) {
    const sheet = new ServerStyleSheet();
    const originalRenderPage = ctx.renderPage;

    try {
      ctx.renderPage = () =>
        originalRenderPage({
          enhanceApp: (App) => (props) =>
            sheet.collectStyles(<App {...props} />),
        });

      const initialProps = await Document.getInitialProps(ctx);

      return {
        ...initialProps,
        styles: (
          <>
            {initialProps.styles}
            {sheet.getStyleElement()}
          </>
        ),
      };
    } finally {
      sheet.seal();
    }
  }
}
.babelrc
{
  "presets": ["next/babel"],
  "plugins": [["styled-components", { "ssr": true }]]
}
styled-component가 잘 적용 되었는지 확인하기 위해서 테스트를 진행해 봅니다.
> pages/index.tsx
import { NextPage } from "next";
import styled from "styled-components";

const Container = styled.div`
  font-style: italic;
`;

const index: NextPage = () => {
  return <Container>Hello Typescript!</Container>;
};

export default index;
서버 사이드에서 스타일링이 잘 적용되었는지를 확인하기 위해 크롬 개발자 도구에서 network 탭에 들어가면 아래 이미지와 같이 서버에서 보내준 뷰를 확인할 수 있습니다.

1.2 - 글로벌 스타일 적용하기
styled-components에서 제공하는 createGlobalStyle 함수를 이용하여 글로벌 스타일을 생성하여 App 컴포넌트에 넣어줍니다.
이 과정에서 styled-reset 라이브러리를 사용하여 기존 html의 스타일을 간편하게 제거하여 사용하도록 합니다. 브라우저별로 각각 태그에 대한 기본 스타일링이 다르기 때문에 이같은 초기화를 진행 후 스타일을 적용하는 것을 권장합니다.
우선 스타일링에 관련된 디렉토리를 만들어서 GlobalStyle.ts라는 파일을 만들겠습니다.
> styles/GlobalStyle.ts
import { createGlobalStyle } from "styled-components";

const GlobalStyle = createGlobalStyle`
  body {
	margin: 0;
	box-sizing: border-box;
  }
`;

export default GlobalStyle;
_app.tsx파일을 만들어 글로벌 스타일을 적용합니다.
> pages/_app.tsx
import App, { AppContext, AppProps, AppInitialProps } from "next/app";
import GlobalStyle from "../styles/GlobalStyle";

const app = ({ Component, pageProps }: AppProps) => {
  return (
    <>
      <GlobalStyle />
      <Component {...pageProps} />
    </>
  );
};

export default app;
이후 브라우저에서 확인하면 기본 margin이 사라진 것을 확인할 수 있습니다.
1.3 - 글로벌 스타일 설정하기
글로벌 스타일을 리셋하는 방법으로는 앞의 body 예시 처럼 각각의 값을 설정해 주는 방법이 있습니다. 다만 번거로운 작업이기 때문에 만들어둔 스타일셋이 없다면 styled-reset을 사용하는 것을 권장합니다.
$ yarn add styled-resetstyled-reset을 사용하는 방법은 간편합니다. import 후 글로벌 스타일 안에 추가해주기만 하면 스타일이 적용됩니다.
>styles/GlobalStyle.ts
import { createGlobalStyle } from "styled-components";
import reset from "styled-reset";

const GlobalStyle = createGlobalStyle`
  ${reset}
* {
box-sizing: border-box;
}
`;

export default GlobalStyle;
2. font 적용하기
구글의 NotoSans, NotoSansKr 폰트를 적용해 보도록 하겠습니다.
_document.tsx 파일의 하단 부분에 googlefont cdn을 이용하여 네트워크로 받아오는 link 태그를 넣어주도록 합니다.
> pages/_document.tsx
import Document, {
  Html,
  Head,
  Main,
  NextScript,
  DocumentContext,
} from "next/document";
import { ServerStyleSheet } from "styled-components";

export default class MyDocument extends Document {
  static async getInitialProps(ctx) {
    const sheet = new ServerStyleSheet();
    const originalRenderPage = ctx.renderPage;

    try {
      ctx.renderPage = () =>
        originalRenderPage({
          enhanceApp: (App) => (props) =>
            sheet.collectStyles(<App {...props} />),
        });

      const initialProps = await Document.getInitialProps(ctx);

      return {
        ...initialProps,
        styles: (
          <>
            {initialProps.styles}
            {sheet.getStyleElement()}
          </>
        ),
      };
    } finally {
      sheet.seal();
    }
  }

  render() {
    return (
      <Html>
        <Head>
          <link
            href="https://fonts.googleapis.com/css2?family=Noto+Sans:wght@400;700&display=swap"
            rel="stylesheet"
          />
          <link
            href="https://fonts.googleapis.com/css2?family=Noto+Sans+KR:wght@400;700&family=Noto+Sans:wght@400;700&display=swap"
            rel="stylesheet"
          />
        </Head>
        <body>
          <Main />
          <NextScript />
        </body>
      </Html>
    );
  }
}
글로벌 스타일에 font-family 속성을 적용해주면 폰트 적용이 완료됩니다.
> styles/GlobalStyle.ts
import { createGlobalStyle, css } from "styled-components";
import reset from "styled-reset";

const globalStyle = css`
  ${reset};

  * {
    box-sizing: border-box;
  }
  body {
    font-family: Noto Sans, Noto Sans KR;
  }
`;

const GlobalStyle = createGlobalStyle`
  ${globalStyle}
`;

export default GlobalStyle;
이제 CSS-in-JS 라이브러리인 styled-components에 대한 환경설정까지 모두 끝났습니다.
서버 사이드 렌더링을 지원하는 과정에서 _document.tsx파일을 설정하는 부분이 다소 낯설기 때문에 링크의 공식 문서를 확인해 보시는걸 권장드립니다.
이후 글로벌 설정과 개별 파일에서 css 설정을 적용하여 활용해 보시길 바랍니다.