계수 정렬(Counting sort)
각 자료가 몇 개가 존재하는지 정리한 뒤 그 정보를 활용해 정렬하는 방식
-
먼저 자료들의 값의 범위 만큼의 공간을 가진 counts 배열을 만든다. (자료가 0 ~ 9 사이라면,
int[] counts = new int[10];) -
자료의 각 데이터(data)를 확인하여,
counts[data]의 값을 하나 더해준다. -
이 과정이 끝나면
counts[data]에는 data가 몇개인지가 저장된다. -
첫번째 원소부터 시작하여 counts 배열의 앞쪽 원소의 값을 뒤에 합해준다.
-
이후 본래의 자료 데이터(data)를 순회하여, counts 배열에 따라 결과를 정리한다
public static void main(String[] args) {
        int[] arr = {0, 1, 4, 4, 3, 0, 5, 2, 5, 1};
        int n = arr.length;

        int max = 5;
        int min = 0;
        int k = max - min + 1;

        int[] counts = new int[k];

        for (int data: arr) {
            counts[data]++;
        }
        System.out.println("Counts: " + Arrays.toString(counts));

        for (int i = 0; i < k - 1; i++) {
            // counts[i + 1] = counts[i + 1] + counts[i];
            counts[i + 1] += counts[i];
        }
        System.out.println("누적합: " + Arrays.toString(counts));

        int[] output = new int[n];
        for (int i = n - 1; i >= 0; i--) {
            counts[arr[i]]--;
            int position = counts[arr[i]];
            output[position] = arr[i];
        }

        System.out.println("결과: " + Arrays.toString(output));
    }
lotto Controller
6가지의 랜덤한 수를 보여주는 기능
		@RequestMapping("/lotto")
    public String lotto(Model model) {
        List<Integer> winningNums = new ArrayList<>();
        Random random = new Random();//임의 정수를 반환하는 메소드
        for (int i = 0; i < 6; i++) {
            winningNums.add(random.nextInt(1,46));
        }
				model.addAttribute("winningNums", winningNums);

        return "lotto";
    }
<!DOCTYPE html>
<html lang="en">
<head>
<meta charset="UTF-8">
<title>Title</title>
</head>
<body>
<!-- 로또 번호를 표시할 구역 -->
<div>
<span th:each="num: ${winningNums}">[[${num}]] - </span>
</div>
</body>
</html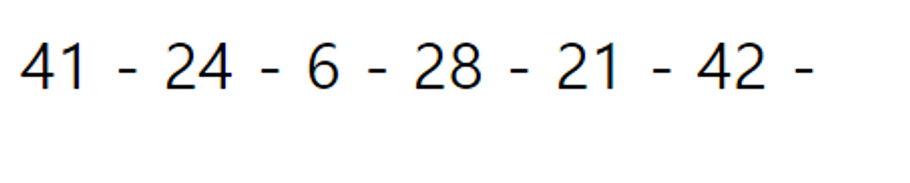
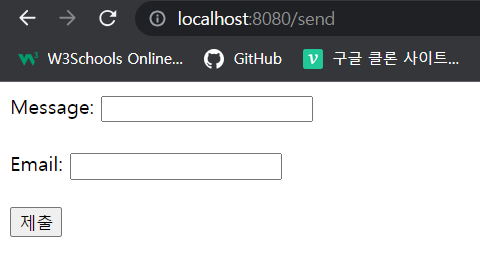
HTML Form
사용자가 정보를 입력, 선택할 때 사용하는 태그이다.
즉, 서버로 데이터를 전달 할 때 사용된다.
Form과 Controller의 데이터 요청 응답 흐름
-
Form 을 통해 msg와 email이라는 이름을 가진 text를 보내는 방법 (“/receive” url로 요청을 보낸다.)
-
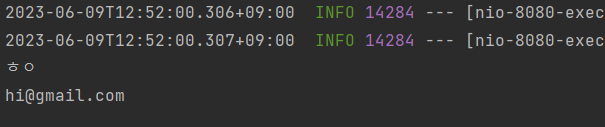
Form의 요청이 “/receive” url로 요청이 온다.
-
@RequestParam과 요청 데이터 이름을 일치 시켜서 데이터를 받는다.
@Controller
public class FormController {

    @RequestMapping("/send")
    public String getForm() {
        return "send";
    }

    @RequestMapping("/receive")
    public String receive(
            @RequestParam("msg") String msg,
            @RequestParam("email") String email
    ) {
        System.out.println(msg);
        System.out.println(email);
        return "send";
    }
}
<!DOCTYPE html>
<html lang="en">
<head>
<meta charset="UTF-8">
<title>Send</title>
</head>
<body>
<form action="/receive" method="post">
<label for="message">Message:
<input type="text" id="message" name="msg" />
</label>
<label for="email">E-mail:
<input type="text" id="email" name="email" />
</label>
<br><br>
<input type="submit">
</form>
</body>
</html>특정 메소드에 대한 요청만 받도록 제한
@RequestMapping의 경우 클라이언트가 GET 방식으로 접근하던 POST방식으로 접근하던 모두 접근이 가능하다.
이럴 경우 명확하게 메소드의 역할이 구분되지 않는다는 단점이 있다. 따라서 아래의 방법에 따라 메소드의 역할을 명확히 구분하는 것이 좋다.
방법 1. method에 RequestMethod enum값을 파라메타로 전달
@RequestMapping(value = "/send", method = RequestMethod.GET) // GET 메소드만 받음.
public String getForm() {
   return "send";
}
방법 2. 어노테이션 설정 (권장)
@GetMapping(value = "/send") // GET 메소드만 받음.
public String getForm() {
   return "send";
}
CRUD
컴퓨터 소프트웨어가 가지는 기본적인 데이터 처리 기능인 Create(생성), Read(읽기), Update(갱신), Delete(삭제)를 의미한다.
사용자 인터페이스가 갖추어야 할 기능 (정보의 참조, 검색, 갱신)을 나타내기도 한다.
CRUD 구현을 위한 프로젝트
- 학생 정보를 관리하는 프로젝트
- 학생 정보(name, email)가 어떻게 구성되어 있는지 정의
- CRUD의 Create 해보기
- CRUD의 Read 해보기
StudentDto
package com.example.crud.model;
public class StudentDto {
private Long id;
private String name;
private String email;
public StudentDto() {
}
public StudentDto(Long id, String name, String email) {
this.id = id;
this.name = name;
this.email = email;
}
public Long getId() {
return id;
}
public void setId(Long id) {
this.id = id;
}
public String getName() {
return name;
}
public void setName(String name) {
this.name = name;
}
public String getEmail() {
return email;
}
public void setEmail(String email) {
this.email = email;
}
@Override
public String toString() {
return "StudentDto{" +
"id=" + id +
", name='" + name + '\'' +
", email='" + email + '\'' +
'}';
}
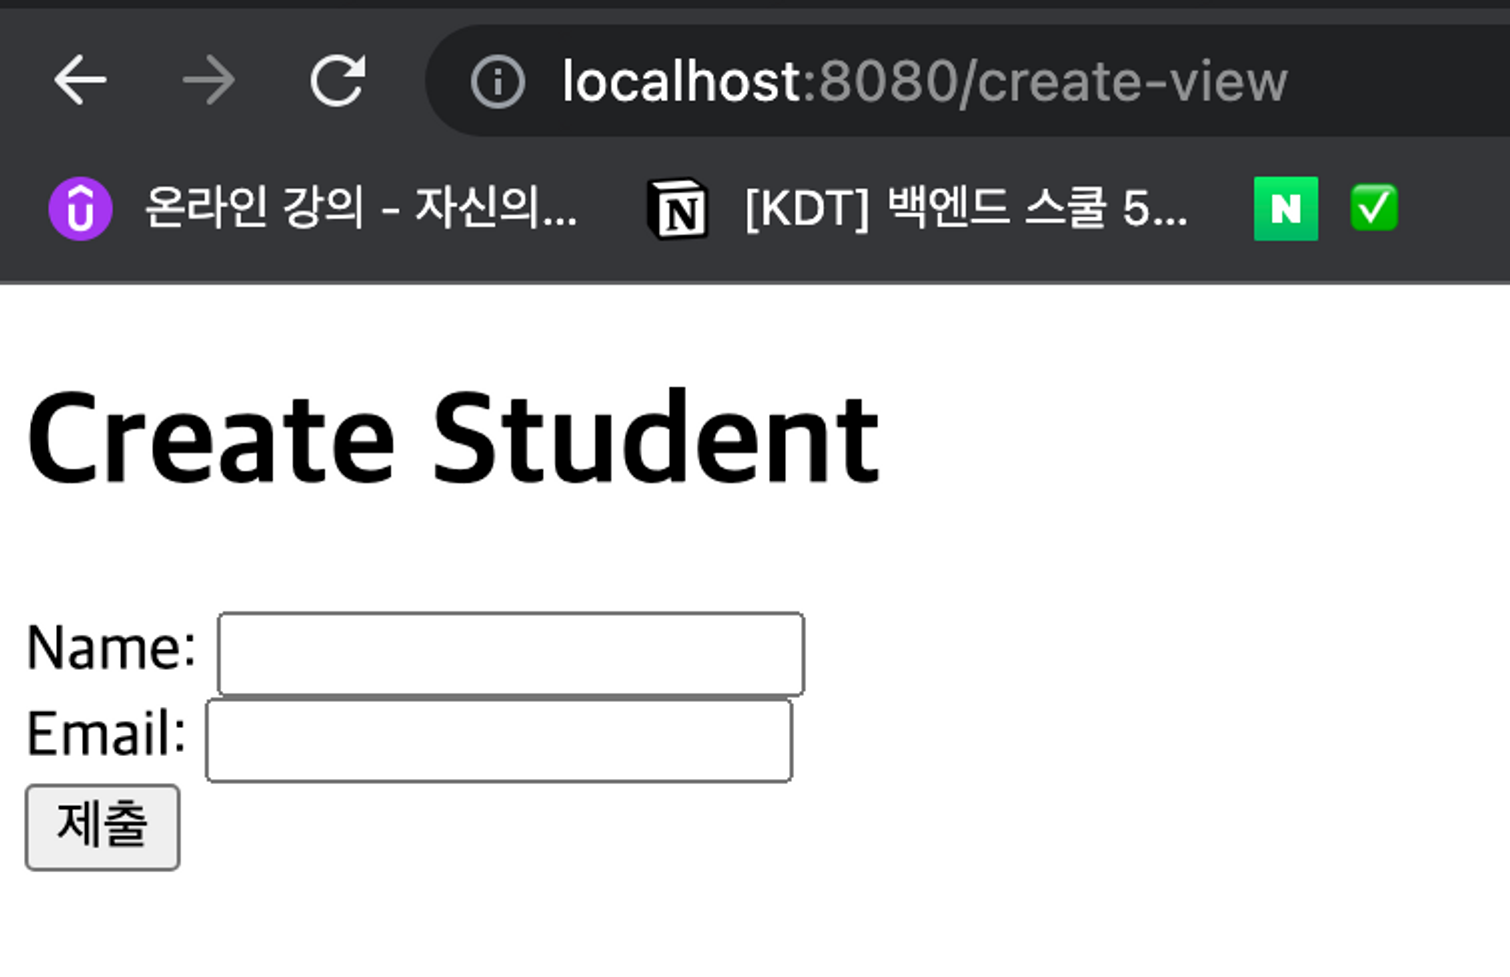
}Create.html
<!DOCTYPE html>
<html lang="en">
<head>
  <meta charset="UTF-8">
  <title>Create Student</title>
</head>
<body>

<h1>Create Student</h1>
<form action="/create" method="post">
  <!— 사용자가 제공할 데이터에 알맞은 Input과 label을 만든다. —>
  <label for="name-input">Name: <input id="name-input" name="name"></label><br>
  <label for="email-input">Email: <input id="email-input" name="email"></label><br>
  <input type="submit">
</form>
</body>
</html>
StudentController
package com.example.crud;
import com.example.crud.model.StudentDto;
import org.springframework.stereotype.Controller;
import org.springframework.web.bind.annotation.GetMapping;
import org.springframework.web.bind.annotation.PostMapping;
import org.springframework.web.bind.annotation.RequestParam;
@Controller
public class StudentController {
private final StudentService studentService;
public StudentController(StudentService studentService) {
this.studentService = studentService;
}
@GetMapping("/create-view") //URL 컨벤션, 하이픈을 연결해서 이용
public String createView() {
return "create";
}
@PostMapping("/create")
public String create(
@RequestParam("name")
String name,
@RequestParam("email")
String email
) {
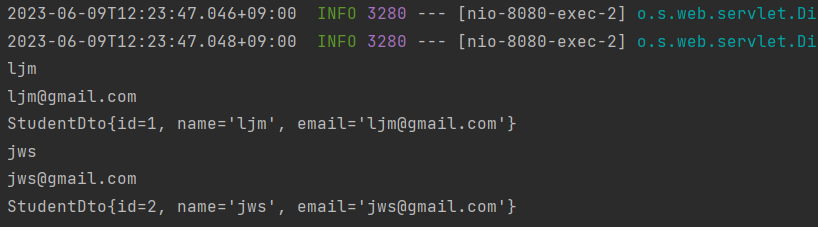
System.out.println(name);
System.out.println(email);
StudentDto studentDto = studentService.createStudent(name, email);
System.out.println(studentDto.toString());
return "redirect:/create-view"; // 처음 페이지로 돌아가게끔
}
}StudentService
package com.example.crud;

import com.example.crud.model.StudentDto;
import org.springframework.stereotype.Service;
import java.util.ArrayList;
import java.util.List;

@Service
public class StudentService {
    // 복수의 StudentDto를 담는 변수
    private final List<StudentDto> studentList = new ArrayList<>();
    private Long nextId = 1L;
    // 새로운 StudentDto를 생성하는 메소드
    public StudentDto createStudent(String name, String email) {
        StudentDto newStudent = new StudentDto(
                nextId, name, email
        );
        nextId++;
        studentList.add(newStudent);
        return newStudent;
    }
}
Read all
StudentService 메소드 추가
@Service
public class StudentService {
private Long nextId = 1L;
private final List<StudentDto> studentList = new ArrayList<>();
public StudentDto createStudent(String name, String email) {
StudentDto newStudent = new StudentDto(nextId, name, email);
nextId++;
studentList.add(newStudent);
return newStudent;
}
public List<StudentDto> readStudentAll() {
return studentList;
}
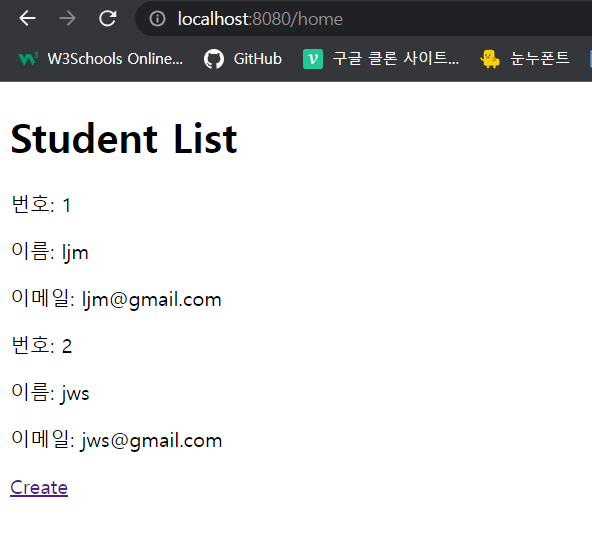
}home.html 생성
<!DOCTYPE html>
<html lang="en">
<head>
  <meta charset="UTF-8">
  <title>Students Home</title>
</head>
<body>
  <h1>Student List</h1>
  <div th:if="${studentList.isEmpty()}">
    <p>No students here...</p>
  </div>
  <div th:unless="${studentList.isEmpty()}" th:each="student: ${studentList}">
    <p>번호: [[${student.id}]]</p>
    <p>이름: [[${student.name}]]</p>
    <p>이메일: [[${student.email}]]</p>
  </div>
  <a th:href="@{/create-view}">Create</a>
</body>
</html>
StudentController 수정
@Controller
public class StudentController {
    private final StudentService studentService;

    public StudentController(StudentService studentService) {
        this.studentService = studentService;
    }

    @GetMapping("/create-view")
    public String createView() {
        return "create";
    }

    @PostMapping("/create")
    public String create(
            @RequestParam("name") String name,
            @RequestParam("email") String email) {
        System.out.println(name);
        System.out.println(email);
        StudentDto newStudent = studentService.createStudent(name, email);
        System.out.println(newStudent);
        return "redirect:/create-view";
				//제출한 뒤 /home으로 보내려면 다음과 같이 작성
        //return "redirect:/home";
        //
        //return "home";으로 할 경우, 리다이렉트하는 게 아니라 "home"이라는 view를 보여줌.
        //단, 이때 현재 코드는 view에 필요한 속성값을 넘겨주지 않기에, 에러가 발생하거나
				//view가 제대로 표시되지 않을 수 있음.
        //실제로 view의 studentList.isEmpty() 부분에서 null 에러가 발생함.
    }

    @GetMapping("/home")
    public String home(Model model) {
        model.addAttribute("studentList", studentService.readStudentAll());
        return "home";
    }
}
출처 : 멋사 백엔드 5기 16팀 해고 없는 회고팀
인사이트 타임
조퇴로 인해 추후에 혼자 풀었다.
피자 나눠 먹기 (2)
https://school.programmers.co.kr/learn/courses/30/lessons/120815
class Solution {
    public int solution(int n) {
        int answer = 0;
        for (int i = 1; i <= n; i++) {
            if (6 * i % n == 0) {
                answer = i;
                break;
            }
        }
        return answer;
    }
}
조각 수 6과 최소 값 i의 곱이 사람 수 n과 나누어 떨어지면 최소 값 i를 return.
피자 나눠 먹기 (3)
https://school.programmers.co.kr/learn/courses/30/lessons/120816
class Solution {
    public int solution(int slice, int n) {
        int answer = 0;
        if (n % slice == 0) answer = n / slice;
        else answer = n / slice + 1;
        return answer;
    }
}
조각 수가 사람 수에 나누어 떨어진다면 그 몫으로,
나누어 떨어지지 않는다면 그 몫에 1을 더한 값을 return.
review
목요일 2시 이후로 조퇴를 해버려서 오후 수업의 대부분을 놓치고 말았다. 일단 밀린 코드들부터 16팀 백엔드 위키의 내용으로 채우고 오늘 수업과 연결 지었다. 고작 반나절 빠졌을 뿐인데 이 정도의 분량이 나올줄은 몰랐다. 밀린만큼 복습을 철저히 해놔야겠다.