
⚡ 자바스크립트로 보는 자료구조 V
📌 트리(Tree)
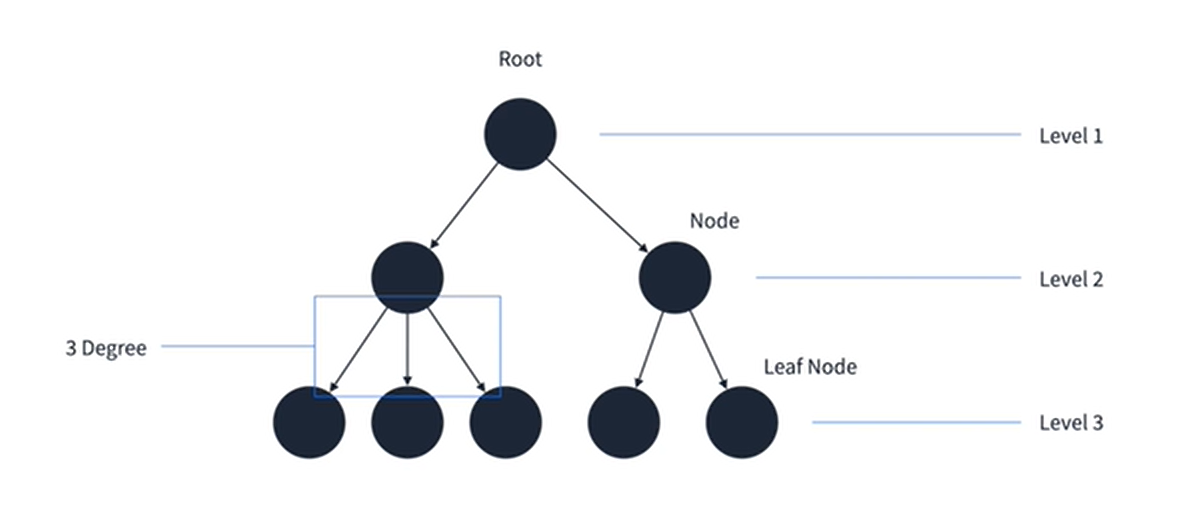
🔷 방향 그래프의 일종으로, 정점을 가리키는 간선이 하나 밖에 없는 구조
- 가장 상위의 정점을 Root, 각 정점을 Node, 더 자식이 없는 정점을 Leaf Node라고 한다.
- 정점이 자식들로 뻗는 간선의 개수를 Degree(차수)라고 한다.
- ex) 회사의 조직도, 파일의 디렉토리 구조
🔷 특징
1) 루트 정점을 제외한 모든 정점은 반드시 하나의 부모 정점을 가진다.
2) 정점이 N개인 트리는 반드시 N-1개의 간선을 가진다.
3) 루트에서 특정 정점으로 가는 경로는 유일하다.
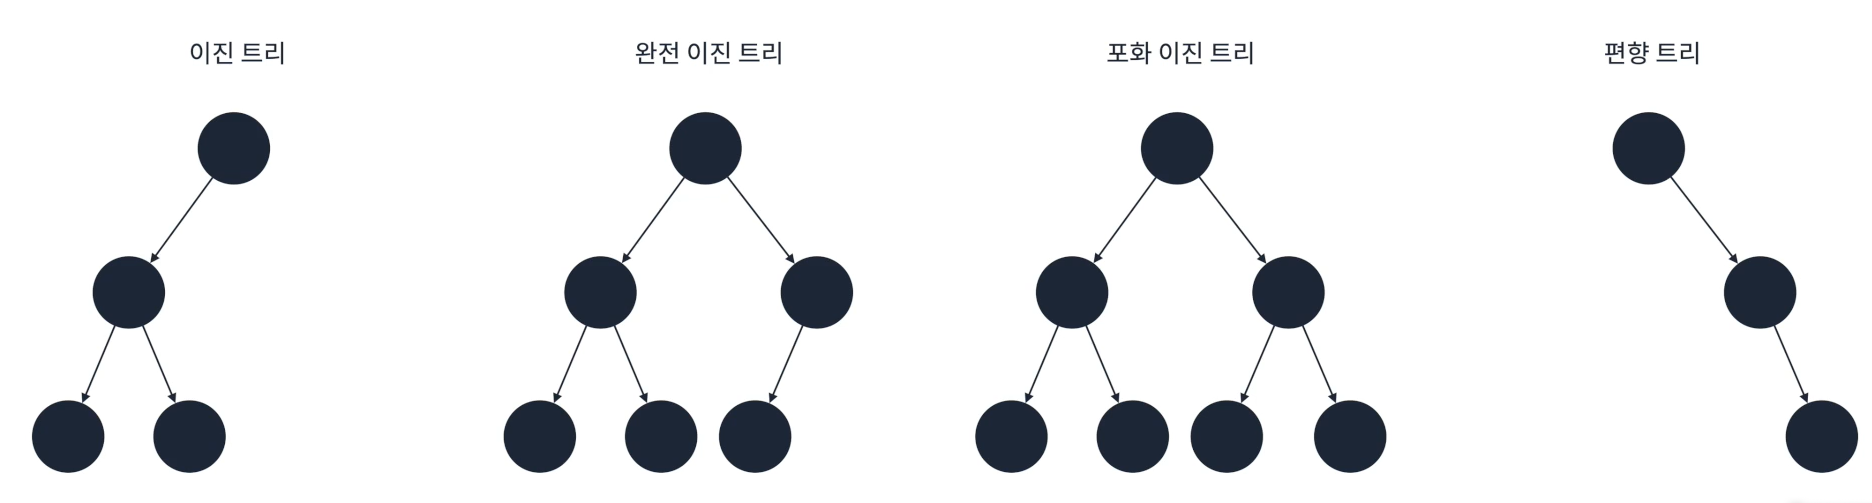
🔷 이진 트리: 각 정점이 최대 2개의 자식을 가지는 트리
-
완전 이진 트리: 마지막 레벨을 제외하고 모든 정점이 채워져있는 트리
-
포화 이진 트리: 모든 정점이 채워져있는 트리
-
편향 트리: 한쪽으로만 정점이 이어진 트리
🔷 이진 트리의 특징
1) 정점이 N개인 이진 트리는 최악의 경우 높이가 N이 될 수 있다.
2) 정점이 N개인 포화 또는 완전 이진 트리의 높이는 log N이다.
3) 높이가 h인 포화 이진 트리는 2^h - 1 개의 정점을 가진다.
4) 일반적인 이진 트리를 사용하는 경우는 많지 않다. 다음 자료구조에 응용된다.
- 이진 탐색 트리, 힙, AVL 트리, 레드 블랙 트리
🔷 트리의 구현 방법: 그래프와 마찬가지로 인접 행렬과 인접 리스트 방식으로 표현이 가능
🔷 이진 트리의 구현 방법: 배열 혹은 링크가 2개 존재하는 연결리스트로 구현 가능
// 배열로 구현한 이진 트리
// index * 2 = 왼쪽 정점
// index * 2 + 1 = 오른쪽 정점
// floor(index/2) = 부모
// 0번 index는 편의상 비워놓기
const tree = [
    undefined,
    9,
    3,8,
    2,5,undefined,7,
    undefined, undefined, undefined, 4
]
// 연결 리스트로 트리 구현하기
class Node {
constructor(value) {
this.value = value;
this.left = null;
this.right = null;
}
}
// queue를 사용하여 display 메서드 구현
class Tree {
constructor(node) {
this.root = node;
}
display() {
const queue = new Queue();
queue.enqueue(this.root);
while(queue.size) {
const currentNode = queue.dequeue();
console.log(currentNode.value);
if(currentNode.left) queue.enqueue(currentNode.left);
if(currentNode.right) queue.enqueue(currentNode.right);
}
}
}🖥 테스트 코드
const tree = new Tree(new Node(9));
tree.root.left = new Node(3);
tree.root.right = new Node(8);
tree.root.left.left = new Node(2);
tree.root.left.right = new Node(5);
tree.root.right.right = new Node(7);
tree.root.left.right.right = new Node(4);
🖨 완성된 구조

📌 힙(Heap)
🔷 완전 이진 트리의 일종으로 우선순위 큐를 위하여 만들어진 자료구조
- 우선순위 큐: 우선 순위가 높은 요소가 먼저 나가는 큐 (자료구조가 아닌 개념)
- 힙은 우선 순위 큐를 구현하기 가장 적합하다.
❗ 그렇다고 우선순위 큐와 힙이 같은 것은 아니다.
- 이진 트리 형태를 가지며 우선순위가 높은 요소가 먼저 나가기 위해 요소가 삽입, 삭제될 때 바로 정렬되는 특징이 있다.

🔷 특징
1) 우선순위가 높은 요소가 먼저 나가는 특징을 가진다.
2) 루트가 가장 큰 값이 되는 최대 힙(Max Heap)과 루트가 가장 작은 값이 되는 최소 힙(Min Heap)이 있다.
3) 자바스크립트에서는 직접 구현해서 사용해야 한다.
🔷 힙 요소 추가 알고리즘
- 요소가 추가될 때는 트리의 가장 마지막에 정점에 위치한다.
- 추가 후 부모 정점보다 우선순위가 높다면 부모 정점과 순서를 바꾼다.
- 이 과정을 반복하면 결국 가장 우선순위가 높은 정점이 루트가 된다.
- 완전 이진 트리의 높이는 log N 이기에 힙의 요소 추가 알고리즘은 O(log N)시간 복잡도를 가진다.
🔷 힙 요소 제거 알고리즘
- 요소 제거는 루트 정점만 가능하다.
- 루트 정점이 제거된 후 가장 마지막 정점이 루트에 위치한다.
- 루트 정점의 두 자식 정점 중 더 우선순위가 높은 정점과 바꾼다.
- 두 자식 정점이 우선순위가 더 낮을 때 까지 반복한다.
- 완전 이진 트리의 높이는 log N 이기에 힙의 요소 제거 알고리즘은 O(log N) 시간 복잡도를 가진다.
// 최대 힙 구현 코드
class MaxHeap {
    constructor() {
        this.heap = [null];
    }
	// 요소 추가 메서드
    push(value) {
        this.heap.push(value);
        let currentIndex = this.heap.length-1;
        let parentIndex = Math.floor(currentIndex/2);

        while(parentIndex !== 0 && this.heap[parentIndex] < value) {
            const temp = this.heap[parentIndex];
            this.heap[parentIndex] = value;
            this.heap[currentIndex] = temp;

            currentIndex = parentIndex;
            parentIndex = Math.floor(currentIndex/2);
        }
    }
	// 요소 제거 메서드
    pop() {
        const returnValue = this.heap[1];
        this.heap[1] = this.heap.pop();

        let currentIndex = 1;
        let leftIndex = 2;
        let rightIndex = 3;
        while (
            this.heap[currentIndex] < this.heap[leftIndex] ||
            this.heap[currentIndex] < this.heap[rightIndex]
        ) {
            if (this.heap[leftIndex] < this.heap[rightIndex]) {
                const temp = this.heap[currentIndex];
                this.heap[currentIndex] = this.heap[rightIndex];
                this.heap[rightIndex] = temp;
                currentIndex = rightIndex;
            } else {
                const temp = this.heap[currentIndex];
                this.heap[currentIndex] = this.heap[leftIndex];
                this.heap[leftIndex] = temp;
                currentIndex = leftIndex;
            }
            leftIndex = currentIndex * 2;
            rightIndex = currentIndex * 2 + 1;
        }
        return returnValue;
    }
}
🖥 테스트 코드
// 힙 구현 및 요소 추가 테스트 코드
const heap = new MaxHeap();
heap.push(49);
heap.push(81);
heap.push(73);
heap.push(54);
heap.push(12);
console.log(heap.heap);

// 힙 요소 제거 알고리즘 테스트 코드
// 배열을 만들어 힙에서 제거된 요소들을 순서대로 모두 넣는다.
// 정렬되어있음을 확인할 수 있다.
const array = [];
array.push(heap.pop());
array.push(heap.pop());
array.push(heap.pop());
array.push(heap.pop());
array.push(heap.pop());
console.log(array);
🖨 출력

// 최소 힙 구현 코드
class MinHeap {
    constructor() {
        this.heap = [null];
    }
	// 요소 삽입 메서드
    push(value) {
        this.heap.push(value);
        let currentIndex = this.heap.length-1;
        let parentIndex = Math.floor(currentIndex/2);

        while(parentIndex !== 0 && this.heap[parentIndex] > value) {
            const temp = this.heap[parentIndex];
            this.heap[parentIndex] = value;
            this.heap[currentIndex] = temp;

            currentIndex = parentIndex;
            parentIndex = Math.floor(currentIndex/2);
        }
    }
	// 요소 제거 메서드
    pop() {
        const returnValue = this.heap[1];
        this.heap[1] = this.heap.pop();

        let currentIndex = 1;
        let leftIndex = 2;
        let rightIndex = 3;
        while (
            this.heap[currentIndex] > this.heap[leftIndex] ||
            this.heap[currentIndex] > this.heap[rightIndex]
        ) {
            if (this.heap[leftIndex] > this.heap[rightIndex]) {
                const temp = this.heap[currentIndex];
                this.heap[currentIndex] = this.heap[rightIndex];
                this.heap[rightIndex] = temp;
                currentIndex = rightIndex;
            } else {
                const temp = this.heap[currentIndex];
                this.heap[currentIndex] = this.heap[leftIndex];
                this.heap[leftIndex] = temp;
                currentIndex = leftIndex;
            }
            leftIndex = currentIndex * 2;
            rightIndex = currentIndex * 2 + 1;
        }
        return returnValue;
    }
}
🖥 테스트 코드
// 힙 구현 및 요소 추가 테스트 코드
const heap2 = new MinHeap();
heap2.push(49);
heap2.push(81);
heap2.push(73);
heap2.push(54);
heap2.push(12);
console.log(heap2.heap);

// 힙 요소 제거 알고리즘 테스트 코드
const array2 = [];
array2.push(heap2.pop());
array2.push(heap2.pop());
array2.push(heap2.pop());
array2.push(heap2.pop());
array2.push(heap2.pop());
console.log(array2);
🖨 출력

📌 트라이(Trie)
🔷 문자열을 저장하고 효율적으로 탐색하기 위한 트리 형태의 자료구조

🔷 특징
1) 검색어 자동완성, 사전 찾기 등에 응용될 수 있다.
2) 문자열을 탐색할 때 단순하게 비교하는 것보다 효율적으로 찾을 수 있다.
3) L이 문자열의 길이일 때 탐색, 삽입은 O(L)만큼 걸린다.
4) 대신 각 정점이 자식에 대한 링크를 전부 가지고 있기에 저장 공간을 더 많이 사용한다.
🔷 구조
1) 루트는 비어있다.
2) 각 간선(링크)은 추가될 문자를 키로 가진다.
3) 각 정점은 이전 정점의 값 + 간선의 키를 값으로 가진다.
4) 해시 테이블과 연결 리스트를 이용하여 구현할 수 있다.
// 트라이 구현 코드
class Trie {
    constructor() {
        this.root = new Node();
    }

    // 요소 삽입
    insert(string) {
        let currentNode = this.root;

        for(const char of string) {
            if(!currentNode.children.has(char)) {
                currentNode.children.set(
                    char,
                    new Node(currentNode.value + char)
                );
            }

            currentNode = currentNode.children.get(char);
        }
    }

    // 요소 탐색
    has(string) {
        let currentNode = this.root;

        for(const char of string) {
            if(!currentNode.children.has(char)) {
                return false;
            }
            currentNode = currentNode.children.get(char);
        }
        return true;
    }
}
🖥 테스트 코드
const trie = new Trie();
trie.insert("cat");
trie.insert("can");
console.log(trie.has("cat")); // true
console.log(trie.has("can")); //true
console.log(trie.has("cap")); // false
🖨 출력

이렇게 다양한 자료구조들을 자바스크립트의 코드와 함께 살펴보았다.
이제 이 자료구조들을 이용한 알고리즘들을 다루도록 한다.
그림 제공: https://programmers.co.kr/