0. 자료의 출처
오해가 없도록 어떤 text를 인용했는지 원문을 첨부합니다.🤗
1. DispatcherHandler
Spring MVC에 익숙한 사람들은 Dispatcher Servlet의 역할을 안다.
간략하게 설명해보자면, 클라이언트는 스프링MVC의 Dispatcher Servlet하고만 통신을 하게 된다.
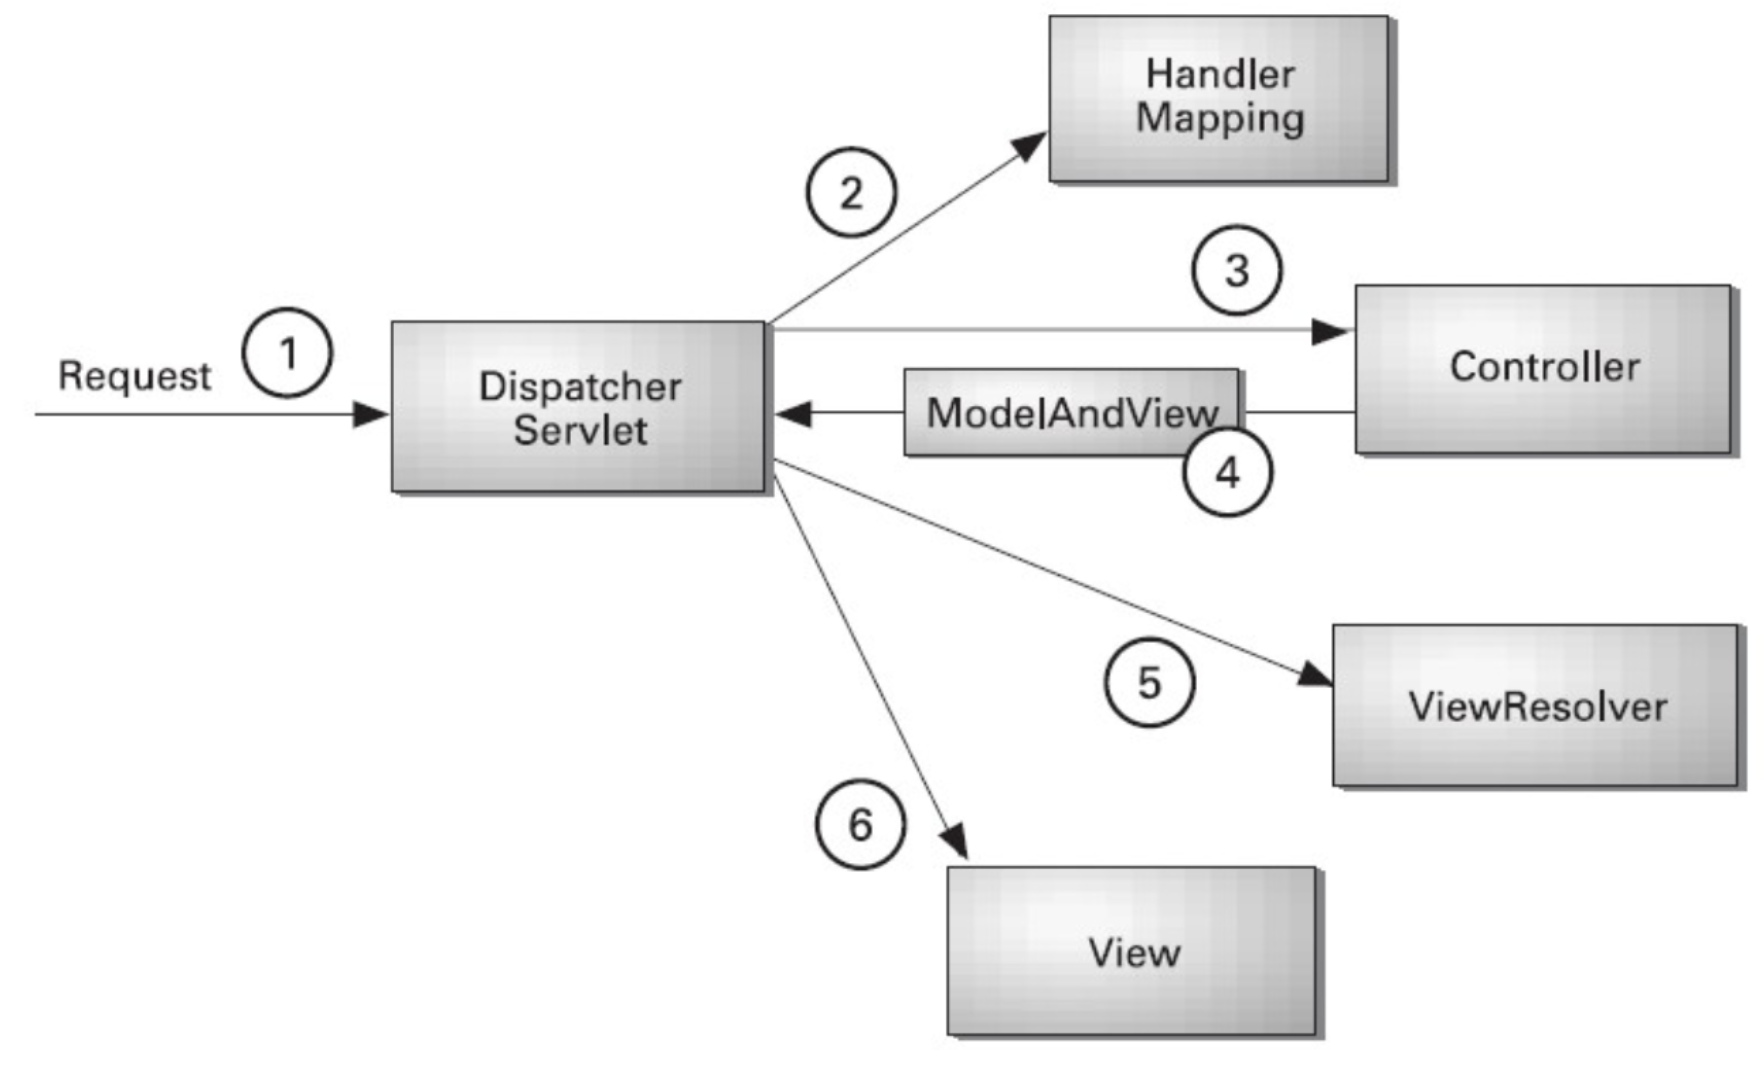
- 처음 요청이 Dispatcher Servlet으로 들어온다.
- HandlerMapping: 어떤 controller가 클라이언트가 요청한 URL을 처리할 수 있는지 찾는다. 알맞는 controller 객체를 dispatcher servlet에게 준다
- Controller: 해당 요청을 받은 컨트롤러는 ModelAndView 형태로 DispatcherServlet에게 model(데이터)를 담아 전달한다. 만약 ModelAndView형태가 아니면 HandlerAdapter가 이를 처리해서 ModelAndView객체로 만드는것
- ViewResolver: 컨트롤러에게서 전달받은 ModelAndView 객체를 풀어서 어떤 view를 제공해야할지 판단한다.
- View에 model(데이터)를 결합시켜서 dispatcher servlet에게 전달하면, 사용자는 view를 볼 수 있다.
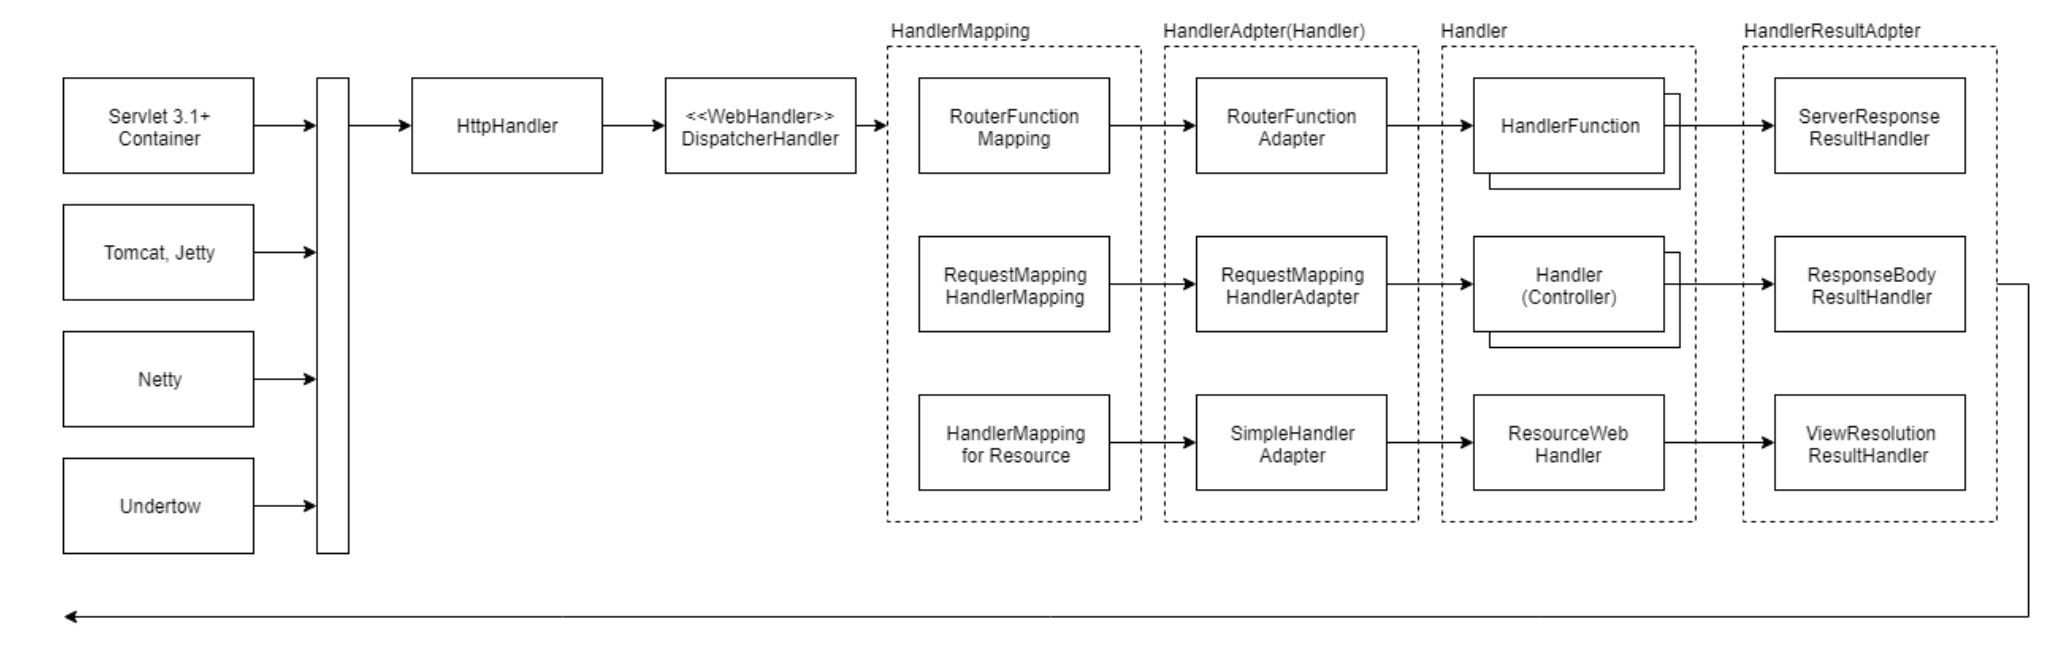
유사하게, WebFlux에서도 front controller 패턴을 따라서, WebHandler(==DispatcherHandler)가 있다.
그래서,
| Bean type | 설명 |
|---|---|
| HandlerMapping | request를 핸들러에 맵핑해준다. 맵핑 방식은 구현 방식에 달려있다. 1. RequestMappingHandlerMapping - @RequestMapping 어노테이션 메소드 맵핑 2. RouterFunctionMapping - functional endpoint 방식의 메소드 맵핑 3. SimpleUrlHandlerMapping - 명확한 URI path pattern으로 등록된 메소드 맵핑 |
| HandlerResultHandler | handler의 result를 처리하고, respone를 최종적으로 만들어준다. |
| HandlerAdapter | DispatcherHandler가 맵핑된 핸들러가 어떻게 실제로 호출될 수 있을지를 고민하지 않도록, HandlerAdapter가 디테일을 처리해준다. |
Handler Adapter들이 실제로 어떻게 작용하느냐? (Handler==controller)
| Result Handler Type | Return Values | Default Order |
|-----------------------------|--------------------------------------------------------------------------------------------------------------------------------|-------------------|
| ResponseEntityResultHandler | ResponseEntity, 전형적으로 @Controller 인스턴스들로부터의 result가 이에 해당한다. | 0 |
| ServerResponseResultHandler | ServerResponse, 전형적으로 functional endpoints로부터의 result가 이에 해당한다. | 0 |
| ResponseBodyResultHandler | @ResponseBody 메소드들이나 @RestController 클래스(@Controller + @ResponseBody) 로부터의 리턴 값들을 처리한다. | 100 |
| ViewResolutionResultHandler | CharSequence, View, Model, Map, Rendering(Srping MVC의 ModelAndView)를 처리하며, 기타 Object들은 model attribute로 간주된다. | Integer.MAX_VALUE |
그래서 일반적으로 다음 configuration을 필요로 한다.
- DispatcherHandler를 webHandler라는 bean 이름으로 등록
- WebFilter 와 WebExceptionHandler beans
- DispatcherHandler special beans
ApplicationContext context = ...
HttpHandler handler = WebHttpHandlerBuilder.applicationContext(context).build();
그래서 이런식으로 configuration을 등록한다.
2. View Resolution
Spring Webflux는 HandlerResultHandler를 사용해서 controller에서 반환한 String (view 이름) 을 View instance와 mapping 해준다.
2.1 실제 Handling
controller(Handler)에서 반환한 결과인 HandlerResult는 ViewResolutionResultHandler에게 전달된다. MVC처럼 model에 몇가지 속성이 addAttribute과 같은 메서드로 더해져 있을 것이다.
Controller(handler)의 return값 별 행동
- String, CharSequence: view이름이라서 ViewResolver들을 타게 된다.
- void: default view name이 request path에 따라 선정되고, view로 설정된다. Mono completed empty도 이것으로 취급됨
- Rendering: 각 view resolution scenario를 사용할 수 있는 API
- Model,map: request에 대한 model이 더해진다.
여전히 redirect: 붙이면 redirect도 된다.
UrlBasedViewResolver가 redirect를 수행한다.
3.Annotated Controllers: handler
@Controller와 @RestController:
Spring WebFlux provides an annotation-based programming model, where @Controller and @RestController components use annotations to express request mappings, request input, handle exceptions, and more. Annotated controllers have flexible method signatures and do not have to extend base classes nor implement specific interfaces.@RestController
public class HelloController {
@GetMapping("/hello")
public String handle() {
return "Hello WebFlux";
}
}Controller, model, RestController 등은 MVC와 달라진 것이 없다.
다만, Functional Endpoints를 제공한다.
4. Functional Endpoints
Spring WebFlux는 WebFlux.fn(가벼운 함수형 프로그래밍 모델)을 포함하고 있어서 route와 handle request를 간단하게 처리하고 immutable한 contracts를 사용할 수 있게 디자인 되어 있다.
annotation-based programming model의 대체제 처럼 쓰이지만, Reactive Core stack위에 있다.
4.1 OverView
WebFlux.fn은 HandlerFunction으로 HTTP request를 handling한다. HandlerFunction은 ServerRequest를 인자로 받아 delayed ServerResponse를 제공한다. (Mono 같은것) HandlerFunction은 annotation-based programming model의 @RequestMapping 메서드와 비슷한 것이다.
@RequestMapping("/index")
public String hello(){ return "hello";}
이 hello()함수를 HandlerFunction이라고 부르는것.
RouterFunction에 의해 incoming request가 routed to handler function. 즉 request에 따라 적절한 handler function을 주는 것이 RouterFunction. Router function에서 request가 맞으면 handler function이 return되는 것이다.
MVC에서 @RequestMapping == RouterFunction 이라고 보면 된다. 하지만 router function은 request만 전달하는 것이 아니라 특정 행동까지 전달할 수 있다.
import static org.springframework.http.MediaType.APPLICATION_JSON;
import static org.springframework.web.reactive.function.server.RequestPredicates.*;
import static org.springframework.web.reactive.function.server.RouterFunctions.route;

PersonRepository repository = ...
PersonHandler handler = new PersonHandler(repository);

RouterFunction<ServerResponse> route = route()
  .GET("/person/{id}", accept(APPLICATION_JSON), handler::getPerson)
  .GET("/person", accept(APPLICATION_JSON), handler::listPeople)
  .POST("/person", handler::createPerson)
  .build();


public class PersonHandler {

  // ...

  public Mono<ServerResponse> listPeople(ServerRequest request) {
      // ...
  }

  public Mono<ServerResponse> createPerson(ServerRequest request) {
      // ...
  }

  public Mono<ServerResponse> getPerson(ServerRequest request) {
      // ...
  }
}
RouterFunction.route()메서드는 router builder를 제공해서 router들을 만들 수 있게 해준다.
4.2 Handler Function
ServerRequest and ServerResponse are immutable interfaces that offer JDK 8-friendly access to the HTTP request and response. Both request and response provide Reactive Streams back pressure against the body streams. The request body is represented with a Reactor Flux or Mono. The response body is represented with any Reactive Streams Publisher, including Flux and Mono. For more on that, see Reactive Libraries.ServerRequest랑 ServerResponse는 immutable interface로 HTTP request랑 response에 대한 access를 제공한다.
request body는 Reactor Flux나 Mono로 표현되고, response body는 Reactive Streams Publisher로 표현되야 한다.
ServerRequest
ServerRequest는 HTTP method, URI, headers, query parameters에 대한 API를 제공하고, body는 .body 메서드들로 접근할 수 있다.
Mono<String> string = request.bodyToMono(String.class);request에서 body만 떼려면 이렇게 할 수 있다.
Flux<Person> people = request.bodyToFlux(Person.class);위는 Person object가 JSON이나 XML 형태의 form의 serialized 형태를 decode할 수 있는 상태이면 이렇게 받을수도 있다.
사실 위 예제들은 ServerRequest.body(BodyExtractor) 형태를 사용한 것이다. BodyExtractor 인터페이스를 사용한 것.
ServerResponse
이건 response에 대한 접근을 제공하고, immutable이니까 build method로 만들수 있다. (불변 .set 같은 것으로 설정할 수 없다.)
Mono<Person> person = ...
ServerResponse.ok().contentType(MediaType.APPLICATION_JSON).body(person, Person.class);
Handler Class
HandlerFunction<ServerResponse> helloWorld =
request -> ServerResponse.ok().bodyValue("Hello World");
Handler는 그냥 람다로 쓸 수 있다.
근데 너무 람다식이 길어지면 보기 어려울 것이다. 그래서 @Controller 처럼 연관성 있는 handler function을 하나의 handler class로 묶는 것이 좋을 것이다.
 import static org.springframework.http.MediaType.APPLICATION_JSON;
import static org.springframework.web.reactive.function.server.ServerResponse.ok;

public class PersonHandler {

   private final PersonRepository repository;

   public PersonHandler(PersonRepository repository) {
       this.repository = repository;
   }

   public Mono<ServerResponse> listPeople(ServerRequest request) {
       Flux<Person> people = repository.allPeople();
       return ok().contentType(APPLICATION_JSON).body(people, Person.class);
   }

   public Mono<ServerResponse> createPerson(ServerRequest request) {
       Mono<Person> person = request.bodyToMono(Person.class);
       return ok().build(repository.savePerson(person));
   }

   public Mono<ServerResponse> getPerson(ServerRequest request) {
       int personId = Integer.valueOf(request.pathVariable("id"));
       return repository.getPerson(personId)
           .flatMap(person -> ok().contentType(APPLICATION_JSON).bodyValue(person))
           .switchIfEmpty(ServerResponse.notFound().build());
   }
}
차근차근 위쪽 메서드부터 보자.
1. listPeople(ServerRequest request)는 모든 Person object를 repository에서 받아 ok().body()에서 JSON형태로 리턴해준다.
2. createPerson(ServerRequest request) 는 request로부터 새로운 person object를 만들어 저장하게 하는데, reposityory.savePerson(person)은 Mono를 리턴하도록 만들어 놓았다. 그러면 이 mono는 request가 잘 save되었을 때 completion signal만 내보내고 끝나게 된다. 이걸 build(Publisher<Void>)메서드를 통해서 completion signal(잘 save되었을 때 나오는)이 왔다는 response를 제공한다.
3. getPerson(ServerRequest request) 는 한 id 값을 받아서 한명의 사람을 return받는 handler 함수이다. url?id="tom" 과 같이 받으면 해당 사람을 찾은 뒤 있으면 flatMap 로직을, 없으면 flatMap에서 Mono로부터 empty라는 사실을 알게 되어 404 not found 응답을 보내게 된다.
4.3 RouterFunction
Router 함수는 request에 알맞는 HandlerFunction을 리턴해주는 역할로 쓰인다. router함수를 직접 쓰기 보다는 RouterFunctions utility class의 메서드를 사용해 하나를 만든다. RouterFunctions.route()는 직접 여러개의 라우트를 설정해야 하는
RouterFunctions.route(RequestPredicate,HandlerFunction)과는 다르게, builder를 제공해서 routerFunction을 만들 수 있게 한다.
그래서 보통 route() builder를 사용하도록 권장한다.
Predicate
Predicate은 참인지 거짓인지를 리턴하는 람다식같은 함수를 일컫는다.
내 RequestPredicate을 직접 만들어 써도 되지만, RequestPredicates라는 utility class가 request path, HTTP 방식, content-type 등등에 맞춘 implementation을 제공해서 주로 이걸 사용한다.
RouterFunction<ServerResponse> route = RouterFunctions.route()
  .GET("/hello-world", accept(MediaType.TEXT_PLAIN),
      request -> ServerResponse.ok().bodyValue("Hello World")).build();
이는 Accept라는 헤더에 기반해서 predicate을 만들어본 것.
이런 predicate은 주로 몇개가 합쳐져서 쓰이는 경우가 많다. 위에도 GET과 accept가 내부적으로 compose된 경우이다. GET predicate 자체도 RequestPredicates.method(HttpMethod) 와 RequestPredicates.path(String) 가 compose되어 쓰인 경우라고 볼 수 있다.
Routes
Router functions are evaluated in order: if the first route does not match, the second is evaluated, and so on. Therefore, it makes sense to declare more specific routes before general ones. This is also important when registering router functions as Spring beans, as will be described later. Note that this behavior is different from the annotation-based programming model, where the "most specific" controller method is picked automatically.

When using the router function builder, all defined routes are composed into one RouterFunction that is returned from build(). There are also other ways to compose multiple router functions together:
add(RouterFunction) on the RouterFunctions.route() builder

RouterFunction.and(RouterFunction)

RouterFunction.andRoute(RequestPredicate, HandlerFunction) — shortcut for RouterFunction.and() with nested RouterFunctions.route().
Router function들은 순서대로 evaluated된다. 만약 첫번째 route가 안맞으면 두번째가.. 이 순서로 연산이 이뤄진다. 따라서 router function을 bean으로 등록할 때도 순서를 신경써야 한다. 기존 MVC에서는 가장 specific한 controller method가 자동으로 선택되던 것과는 차이가 있다. 세부적인 route를 먼저 등록하고, 일반적인 route는 나중에 등록해야 한다. Router function builder를 사용하면, 모든 route들은 하나의 RouterFunction에 등록되어 있어야 한다. 이 'RouterFunction'은 .build()에서 return되어야 한다.
여러개의 router function을 묶으려면,
add(RouterFunction) on the RouterFunctions.route() builder

RouterFunction.and(RouterFunction)

RouterFunction.andRoute(RequestPredicate, HandlerFunction) — shortcut for RouterFunction.and() with nested RouterFunctions.route().
이들을 사용한다.
import static org.springframework.http.MediaType.APPLICATION_JSON;
import static org.springframework.web.reactive.function.server.RequestPredicates.*;

PersonRepository repository = ...
PersonHandler handler = new PersonHandler(repository);

RouterFunction<ServerResponse> otherRoute = ...

RouterFunction<ServerResponse> route = route()
  .GET("/person/{id}", accept(APPLICATION_JSON), handler::getPerson)
  .GET("/person", accept(APPLICATION_JSON), handler::listPeople)
  .POST("/person", handler::createPerson)
  .add(otherRoute)
  .build();
여기를 잘 보면, /person/{id} 형태의 가장 specific한 route가 먼저 등장한다.
잘못 읽은것인가 했는데 specific한 루트부터 쓴다는 것이 맞다. 만약 route가 맞으면 handler function이 return되고 아니면 empty Mono가 return 된다.
 import static org.springframework.http.MediaType.APPLICATION_JSON;
import static org.springframework.web.reactive.function.server.RequestPredicates.*;
import static org.springframework.web.reactive.function.server.RouterFunctions.route;

PersonRepository repository = ...
PersonHandler handler = new PersonHandler(repository);

RouterFunction<ServerResponse> route = route()
   .GET("/person/{id}", accept(APPLICATION_JSON), handler::getPerson)
   .GET("/person", accept(APPLICATION_JSON), handler::listPeople)
   .POST("/person", handler::createPerson)
   .build();


public class PersonHandler {

   // ...

   public Mono<ServerResponse> listPeople(ServerRequest request) {
       // ...
   }

   public Mono<ServerResponse> createPerson(ServerRequest request) {
       // ...
   }

   public Mono<ServerResponse> getPerson(ServerRequest request) {
       // ...
   }
}
이런식으로 정리할 수 있다. 이런 RouterFunction을 실행시키는 가장 쉬운 방법은 HttpHandler로 변환해서 install it through server adapters:
RouterFunctions.toHttpHandler(RouterFunction)
RouterFunctions.toHttpHandler(RouterFunction, HandlerStrategies)
이런식으로 변환해서 adapter에 제공하면 된다. 밑에서 서버에 적용시키는 법을 다룬다.
Nested Routes
group of router 함수들이 같은 predicate을 공유하는 것은 흔한 일이다. 이를테면 위에도 /person/{id}, /person, /person 이렇게 세개가 있다. 이 경우 @ annotated controller를 사용할때에는 클래스 단위로 @RequestMapping("/person")과 같은 설정을 붙였지만, 이 functional endpoints를 사용할 때에는 nested routes를 사용한다.
RouterFunction<ServerResponse> route = route()
  .path("/person", builder -> builder
      .GET("/{id}", accept(APPLICATION_JSON), handler::getPerson)
      .GET(accept(APPLICATION_JSON), handler::listPeople)
      .POST("/person", handler::createPerson))
  .build();
이런식으로 builder를 받아서 세부 정의를 해줄 수 있다. 이 router builder를 받는 consumer 객체를 하나 정의하는 셈이다.