🔒 필터, 인터셉터 사용 예시
- 로그인된 사람들만 특가를 확인하도록 할 때
- 모니터링만 할 수 있고 데이터 조작은 안되는 관리자모드 설정 할 때
1. 🧪 필터
(1) 필터 흐름
- Http Request -> WAS -> 필터 -> 서블릿 -> 컨트롤러 -> ...
(2) 필터 생성
1) 필터 생성 예시
Filter 인터페이스상속- 로그인이 필요한 url 접속을 위해 로그인 여부를 확인하는 필터 생성
// 필터 인터페이스 구현
public class LoginCheckFilter implements Filter{

	// 화이트리스트 -> 로그인 검증이 필요없음
	private static final String[] whitelist =
		{"/", "/members/add", "/login", "/logout", "/css/*"};

	@Override
	public void doFilter(ServletRequest request, ServletResponse response, FilterChain chain)
			throws IOException, ServletException {
		//request, response 생성
		HttpServletRequest httpRequest = (HttpServletRequest) request;
		String requestURI = httpRequest.getRequestURI();
		HttpServletResponse httpResponse = (HttpServletResponse) response;

		try {
			System.out.println("인증 필터 체크 시작 : " + requestURI);

            /* whitelist가 아닌 URI만을 검증 */
			if( isLoginCheckPath(requestURI) ) {
				/* session에 값 x -> 단순 url로 들어온 것
				   미인증 된 사람 = 로그인 안 되어 있는 사람 */
				HttpSession session = httpRequest.getSession(false);
				if( session == null || session.getAttribute(SessionConst.LOGIN_MEMBER) == null  ) {
					// 로그인창으로 redirect
					// 예를들어, 내가 로그인 하지 않은 상태로 items url을 접근
                    // -> 로그인 페이지가 보여져야 한다.
					httpResponse.sendRedirect("/login?redirectURL="+requestURI);
					return; // **중요 : 미 인증 사용자는 다음으로 진행하지않고 종료

				}
			}

			// if문 다음으로 진행
			chain.doFilter(request, response);

		} catch (Exception e) {
			e.printStackTrace();
		} finally {
			System.out.println("인증 체크 필터 종료 : " + requestURI);
		}


	}

	// whitelist인지 아닌지 체크 : whitelist인 경우 인증 체크 하지 않음
	private boolean isLoginCheckPath(String requestURI) {
		// !를 넣음으로서 whitelist에 없을 때 return하도록
		return !PatternMatchUtils.simpleMatch(whitelist, requestURI);
	}
}
- PatternMatchUtils
- 간단한 패턴 매치 판별해주는 유틸
return !PatternMatchUtils.simpleMatch(whitelist, requestURI);
- 들어온 uri가 whitelist에 있는 지 확인
2) 필터 생성 로직
① private static final String[] whitelist = {"/", "/members/add", "/login", "/logout", "/css/*"};
- 인증 필터를 적용해도 홈, 회원가입, 로그인화면, css같은 리소스에는 접근가능 해야함
- 화이트 리스트 경로는 인증과 무관하게 항상 허용
- 화이트 리스트를 제외한 나머지 보든 경로에는 인증체크 로직을 적용
②isLoginCheckPath(String requestURI)
- 화이트 리스트를 제외한 모든 경우에 인증 체크 로직을 적용
③ return;
- 필터를 더이상 진행하지 않는다라는 뜻의 코드
- 이후 필터는 물론 서블릿, 컨트롤러가 더는 호출되지 않음
- 앞서 redirect를 사용했기 때문에 redirect가 응답으로 적용되고 요청이 끝
④ httpResponse.sendRedirect("/login?redirectURL="+requestURI);
- 미 인증된 사용자는 로그인 화면으로 리다이렉트
- 로그인 이후에 다시 홈으로 이동해버리면, 원하는 경로를 다시 찾아가야 해서 불편함
- 이를 해소해 주는 코드
/login?redirectURL="+requestURI
- 사용자가 들어가고 싶어하는 페이지를 파라미터로 로그인 페이지를 열어줌
- 로그인이 완료된 후 해당 페이지로 넘어가려면 login controller에서 한번 더 처리 필요
@PostMapping("/login") public String loginv3(@ModelAttribute LoginForm form, Model model, RedirectAttributes redirectAttributes, HttpServletRequest request, // @RequestParam(defaultValue = "/") 추가 : 로그인 완료 된 후 사용자가 원하는 페이지로 넘어갈 수 있도록 @RequestParam(defaultValue = "/") String redirectURL // 파라미터가 없으면 /, 있으면 redirectURL에 넣어줌 ) { ~ 로그인 로직 ~ return "redirect:" + redirectURL; }- jsessionID 숨겨주기 > application.properties에 추가
  #jsessionID 노출되지 않도록
  server.servlet.session.tracking-modes=cookie
(3) 필터 적용
1) 필터 적용 예시
@Configuration- class에 적용 시킴으로서 필터 사용
@Bean- 스프링 컨테이너가 해당 메서드를 빈으로 인식
FilterRegistrationBean: 필터 등록 시 사용
//@Configuration
public class WebConfig {

//	@Bean
	public FilterRegistrationBean logFilter() {
		FilterRegistrationBean<Filter> filterRegistrationBean
			= new FilterRegistrationBean<>();

		filterRegistrationBean.setFilter(new LoginCheckFilter());
		filterRegistrationBean.setOrder(1);
		filterRegistrationBean.addUrlPatterns("/*");

		return filterRegistrationBean;
	}
}
2) 필터 적용 로직
①filterRegistrationBean.setFilter(new 필터생성className())
- 필터 생성한 클래스 이름 불러와서 set
②filterRegistrationBean.setOrder(1) - 필터 적용할 순서
- 1 : 첫번째
③filterRegistrationBean.addUrlPatterns("/*") - 필터 적용할 경로조건
/*: 전체 경로
2. 🧪 인터셉터
(1) 인터셉터
- 서블릿 필터와 같이 웹과 관련된 공통 관심 사항을 효과적으로 해결할 수 있는 기술
- 서블릿 필터가 서블릿이 제공하는 기술이라면, 스프링 인터셉터는 스프링 mvc가 제공하는 기술
- 둘 다 웹과 관련된 공통 관심사항을 처리 but, 적용되는 순서와 범위, 그리고 사용방법이 다름
- 필터보다 인터셉터가 더 디테일한 컨트롤이 가능
(2) 인터셉터 흐름
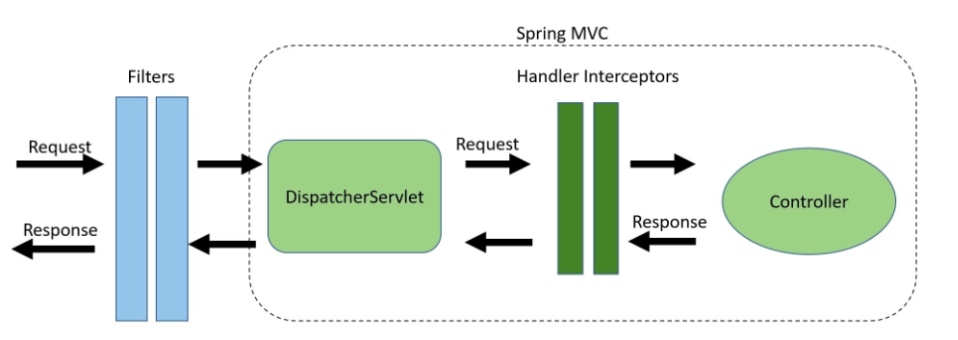
1) 기본 흐름
- HTTP요청 -> WAS -> 필터 -> 서블릿 -> 스프링 인터셉터 -> 컨트롤러
- 컨트롤러 호출 직전에 호출
- 디스패처 서블릿 이후에 등장
- 스프링 MVC가 제공하는 기능이기 때문에
- 스프링 mvc의 시작점이 디스패처 서블릿
- 스프링 인터셉터에도 URL패턴을 적용 가능
2) 스프링 인터셉터 체인
- HTTP요청 -> WAS -> 필터 -> 서블릿 -> 인터셉터1 ->
인터셉터2 -> 컨트롤러- 스프링 인터셉터는 체인으로 구성
- 중간에 인터셉터를 자유롭게 추가 가능
- 스프링 인터셉터는 체인으로 구성
(3) 인터셉터 생성
1) 인터셉터 생성 기본 예시
HandlerIntercepter 인터페이스를 구현- HandlerIntercepter 인터페이스 메서드
- 서블릿 필터는
doFilter()1개, 인터셉터는 3개로 세분화preHandle: 컨트롤러 호출 전에 호출- preHandle의 응답값이 true이면 다음으로 진행, false면 진행 ❌
- false인 경우 나머지 인터셉터는 물론이고, 핸들러 어댑터도 호출 ❌
postHandle: 컨트롤러 호출 후에 호출afterHandle: 뷰가 렌더링 된 이후에 호출
- 서블릿 필터는
public class LogIntercepter implements HandlerInterceptor{

	public static final String LOG_ID = "logId";

	@Override
	public boolean preHandle(HttpServletRequest request, HttpServletResponse response, Object handler)
			throws Exception {

		String requestURI = request.getRequestURI();
		String uuid = UUID.randomUUID().toString();

		request.setAttribute(LOG_ID, uuid);

		System.out.println("[intercepter] uuid : " + uuid);
		System.out.println("[intercepter] requestURI : " + requestURI);

		return true; // false로 전환시 진행하지 않음

	}
// 컨트롤러 호출 후 modelAndView
	@Override
	public void postHandle(HttpServletRequest request, HttpServletResponse response, Object handler,
			ModelAndView modelAndView) throws Exception {
		System.out.println("[intercepter] postHandle : " + modelAndView);
	}
// 뷰가 렌더리 된 후 logId, requestURI 출력
	@Override
	public void afterCompletion(HttpServletRequest request, HttpServletResponse response, Object handler, Exception ex)
			throws Exception {

		String requestURI = request.getRequestURI();
		String logId = (String)request.getAttribute(LOG_ID);
		// pre에서 해놨던 랜덤 값을 after에서 한번 더 꺼내옴

		System.out.println("[intercepter] logId : " + logId);
		System.out.println("[intercepter] requestURI : " + requestURI);
	}
}
2) 인터셉터 생성 응용 예시
- 기본적으로
preHandle만 사용
public class LoginCheckInterceptor implements HandlerInterceptor{

	@Override
	public boolean preHandle(HttpServletRequest request, HttpServletResponse response, Object handler)
			throws Exception {

		String requestURI = request.getRequestURI();
		System.out.println("[인증 체크 인터셉터 실행] : " + requestURI);
		// 아이디에 대한 정보 session으로 받기
		HttpSession session = request.getSession(false);

		if( session == null || session.getAttribute(SessionConst.LOGIN_MEMBER) == null  ) {
			System.out.println("[미인증 사용자 요청]");
			// 로그인으로 redirect
			response.sendRedirect("/login?redirectURL="+requestURI);
			return false;
		}
		return true;
	}
}
(4) 인터셉터 적용
1) 인터셉터 적용 예시
@Configuration: filter와 똑같이 어노테이션 적용WebMvcConfigurer인터페이스 상속
@Configuration
public class WebConfig2 implements WebMvcConfigurer{

		registry.addInterceptor(new LoginCheckInterceptor())
				.order(1)
				.addPathPatterns("/**") 	// 모든 경로 전체 가능
				.excludePathPatterns("/", "/members/add", "/login", "/logout", "/css/**"); // 이 경로들을 제외

	}
}
2) 인터셉터 적용 로직
.addInterceptor(new 인터페이스생성className())- 인터페이스 생성한 클래스 이름 불러와서 add
.order(1)- 인터페이스 적용할 순서
.addPathPatterns("/**")- 구현할 경로
.excludePathPatterns("/css/**", "/*.ico", "/error");
- 제외할 경로인터셉터 경로
/**- 모든 경로에 대해서 적용할때
- 예 :
/css/**
/*- 1개의 어떠한 경로에 상관없이 사용, 2번째 경로를 조율하고 싶을 때
- 예 :
/*.ico

안녕하세요, 한보람입니다.