🌱 타임리프
(1) 타임리프의 특징
① 서버사이드 HTML 렌더링
- 타임리프는 백엔드 서버에서 (jsp처럼) HTML을 동적으로 렌더링하는 용도로 사용
② 네츄럴 템플릿
- 타임리프는 순수 HTML을 최대한 유지
- 웹 브라우저에서 파일을 직접 열어도 내용을 확인 가능
- 서버를 통해 뷰 템플릿을 거치면 동적으로 변경된 결과를 확인 가능
③ 스프링 통합 지원
- 타임리프는 스프링과 자연스럽게 통합
- 스프링의 다양한 기능을 편리하게 사용할 수 있게 지원
(2) 기본표현식
1) 간단한 표현
${...}: 변수 표현식*{...}: 선택 변수표현식#{...}: 메시지 표현식@{...}: 링크 URL 표현식~{...}: 조각 표현식
2) 리터럴
- 텍스트 :
'one text','two text', ··· - 숫자 :
0,34,3.0 - 불린 :
true,false - 널 :
null
3) 문자 연산
- 문자 합치기 :
+ - 리터럴 대체 :
|The Name is ${name}|
4) 산술과 불린 연산
- 산술 :
-,+,-,*,/,% - 불린 :
and,or,!,not
5) 비교와 동등 연산
- 비교 :
>(gt),<(lt),>=(ge),<=(le) - 동등 :
==(eq),!=(ne)
6) 조건 연산
if-then,if-then-else
(3) 텍스트 출력
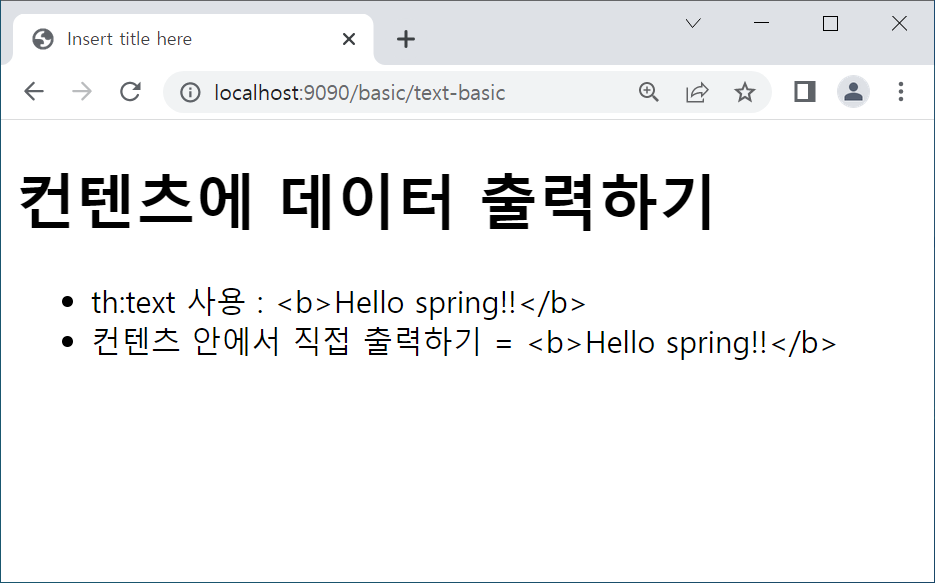
1) 텍스트 기본 출력
- th:text 사용 :
<span th:text="${data}"></span> - 컨텐츠 안에서 직접 출력하기 :
[[${data}]]
💡 예시
<java>

    @GetMapping("text-basic")
    public String textBasic(Model model) {
        model.addAttribute("data","<b>Hello spring!!</b>");
        return "basic/text-basic";
    }

<html>

    <body>
        <h1>컨텐츠에 데이터 출력하기</h1>
        <ul>
            <li>th:text 사용 : <span th:text="${data}"></span></li>
            <li>컨텐츠 안에서 직접 출력하기 = [[${data}]]</li>
        </ul>
    </body>
👍 결과
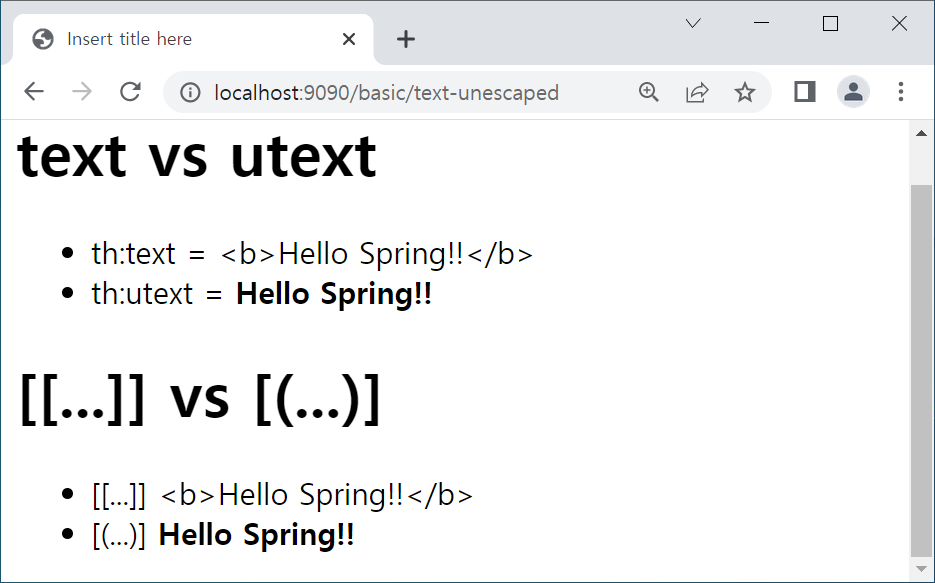
2) unescaped 태그로 출력
- th:text 사용 :
<span th:utext="${data}"></span> - inline 방식 :
<span th:inline="none">[(...)]</span> [(${data})]
💡 예시
<java>

	@GetMapping("text-unescaped")
	public String textUnescaped(Model model) {
		model.addAttribute("data", "<b>Hello Spring!!</b>");
		return "basic/text-unescaped";
	}

<html>

    <body>
        <h1>text vs utext</h1>
        <ul>
            <li>th:text = <span th:text="${data}"></span> </li>
            <li>th:utext = <span th:utext="${data}"></span> </li>
        </ul>

        <h1>
            <span th:inline="none">[[...]] vs [(...)]</span>
        </h1>
        <ul>
            <li><span th:inline="none">[[...]]</span> [[${data}]] </li>
            <li><span th:inline="none">[(...)]</span> [(${data})] </li>
        </ul>
    </body>
👍 결과
(4) 표준 표현식 구문
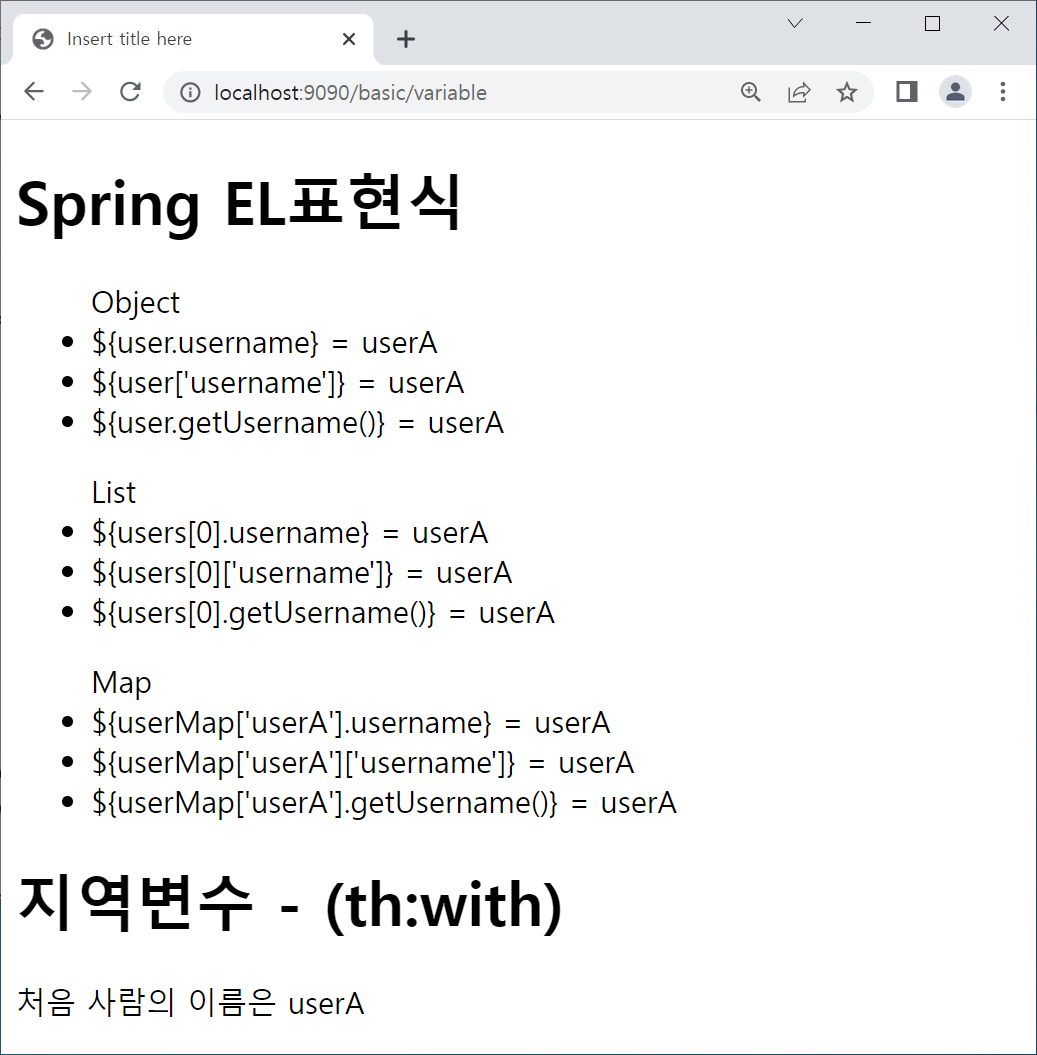
1) Spring EL
① Object
${객체.변수이름}:"${user.username}">${객체['변수이름']}:${user['username']}${객체.get변수이름()}:${user.getUsername()}
② List
${리스트이름[i].변수이름}:${users[0].username}${리스트이름[i]['변수이름']}:${users[0]['username']}${리스트이름[i].get변수이름()}:${users[0].getUsername()}
③ Map
${맵이름['키값'].변수이름}:${userMap['userA'].username}${맵이름['키값']['변수이름']}:${userMap['userA']['username']}${맵이름['키값'].get변수이름()}:<${userMap['userA'].getUsername()}
④ 지역변수 사용
- 변수로 리스트 할당
- th:with 사용 :
<div th:with="first=${users[0]}"></div>
- th:with 사용 :
- 지역변수 사용
- 예시 :
<span th:text=${first.username}></span>
- 예시 :
💡 예시
- JAVA
	// 객체 만들기
    public class User {

	private String username;
	private int age;

	public String getUsername() {
		return username;
	}
	public void setUsername(String username) {
		this.username = username;
	}
	public int getAge() {
		return age;
	}
	public void setAge(int age) {
		this.age = age;
	}
	public User(String username, int age) {
		super();
		this.username = username;
		this.age = age;
	}

	// controller

	@GetMapping("variable")
    public String textVariable (Model model) {

      User userA = new User("userA", 10);
      User userB = new User("userB", 20);

      List<User> list = new ArrayList<>();
      list.add(userA);
      list.add(userB);

      Map<String, User> map = new HashMap<>();
      map.put("userA", userA);
      map.put("userB", userB);

      model.addAttribute("user",userA);
      model.addAttribute("users",list);
      model.addAttribute("userMap",map);

      return "basic/variable
}- Html
<body>
	<h1>Spring EL표현식</h1>
	<ul>Object
		<li>
			${user.username} = <span th:text="${user.username}"></span>
		</li>
		<li>
			${user['username']} = <span th:text="${user['username']}"></span>
		</li>
		<li>
			${user.getUsername()} = <span th:text="${user.getUsername()}"></span>
		</li>
	</ul>
	<ul>
		List
		<li>
			${users[0].username} = <span th:text="${users[0].username}"></span>
		</li>
		<li>
			${users[0]['username']} = <span th:text="${users[0]['username']}"></span>
		</li>
		<li>
			${users[0].getUsername()} = <span th:text="${users[0].getUsername()}"></span>
		</li>
	</ul>
		<ul>
		Map
		<li>
			${userMap['userA'].username} = <span th:text="${userMap['userA'].username}"></span>
		</li>
		<li>
			${userMap['userA']['username']} = <span th:text="${userMap['userA']['username']}"></span>
		</li>
		<li>
			${userMap['userA'].getUsername()} = <span th:text="${userMap['userA'].getUsername()}"></span>
		</li>
	</ul>

	<h1>지역변수 - (th:with)</h1>
	<!-- 변수로 리스트 할당 -->
	<div th:with="first=${users[0]}">
		<p>
			처음 사람의 이름은
			<span th:text=${first.username}></span>
		</p>
	</div>
</body>
👍 결과
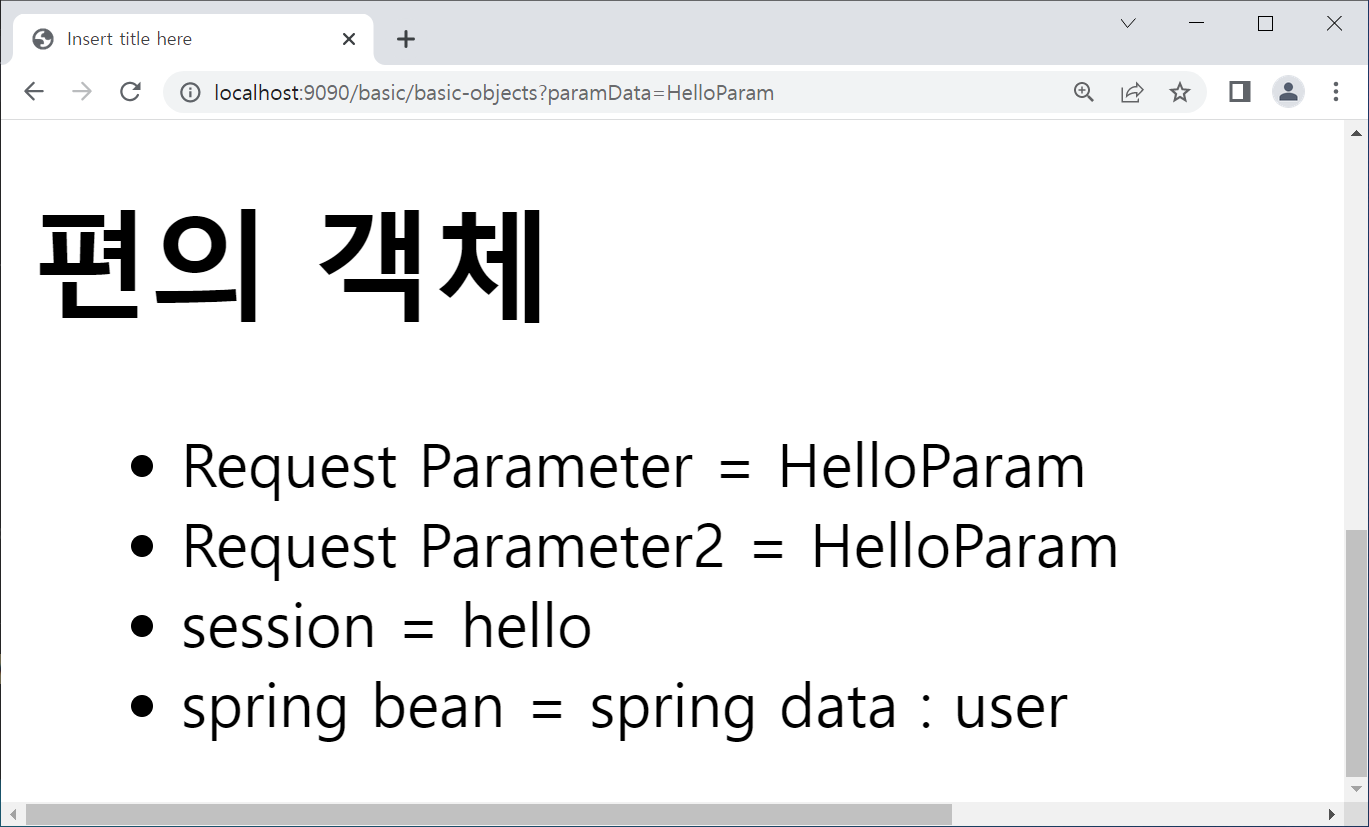
2) 기본 및 편의 객체
- 기본 객체 :
${#request},${#response},${#session},${#servletContext},${#locale} - 편의 객체 :
- 리퀘스트 파라미터 :
${#request.getParameter('파라미터 이름')},${param.파라미터 이름} - 세션 :
${session.key값} - @Component("객체이름") = 스프링 Bean 사용
${@객체이름.메서드이름('파라미터')}:${@helloBean.hello('user')}
- 리퀘스트 파라미터 :
💡 편의 객체 예시
- Java
	// 파라미터용
	<a href="basic/basic-objects?paramData=HelloParam"></a>

    // 세션용
	@GetMapping("/basic-objects")
	public String basicObjects(HttpSession session) {
		session.setAttribute("sessionData", "hello");
		return "basic/basic-objects";
	}

    // HelloBean.java
    @Component("helloBean")
    public class HelloBean {
        public String hello(String data) {
            return "spring data : " + data;
        }
}- Html
<body>
	<h1>편의 객체</h1>
	<ul>
		<li>
			Request Parameter = <span th:text="${#request.getParameter('paramData')}"></span>
		</li>

		<li>
			Request Parameter2 = <span th:text="${param.paramData}"></span>
		</li>

		<li>
			session = <span th:text="${session.sessionData}"></span>
		</li>

		<li>
			<!-- hellobean의 메소드 hello에 변수user을 대입 -->
			spring bean = <span th:text="${@helloBean.hello('user')}"></span>
		</li>
	</ul>
</body>
👍 결과
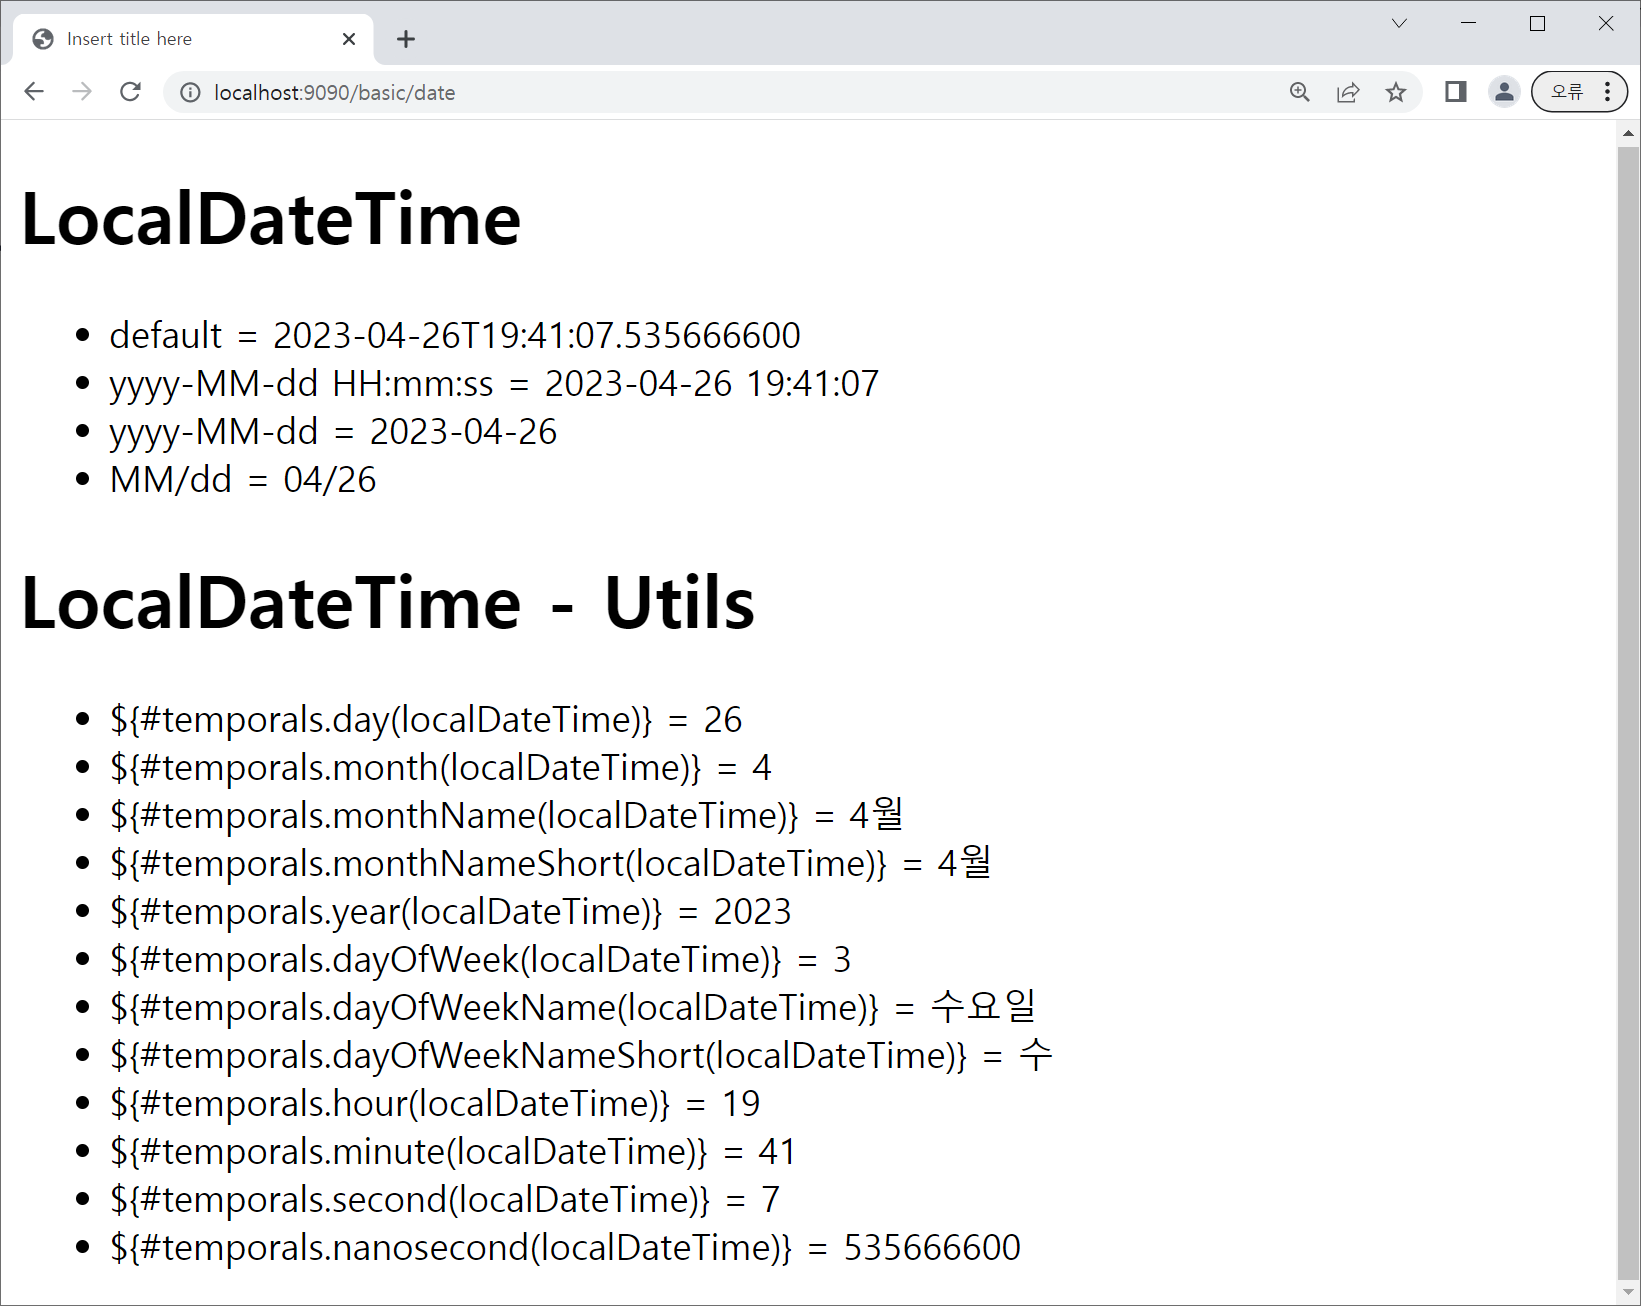
3) 날짜
- 기본 표현 :
${localDateTime} - 형식에 맞춘 표현 :
${#temporals.format(localDateTime, 'yyyy-MM-dd HH:mm:ss')}${#temporals.format(localDateTime, 'yyyy-MM-dd')}- 이 외 변형해서 사용 가능
- 디테일한 표현 :
- 년 :${#temporals.year(localDateTime)}
- 월 :${#temporals.month(localDateTime)}
- 일 :${#temporals.day(localDateTime)}
- 요일 :${#temporals.dayOfWeek(localDateTime)}
- 이 외 변형해서 사용 가능
💡 예시 - Java
	@GetMapping("/date")
	public String basicDate(Model model) {
		model.addAttribute("localDateTime", LocalDateTime.now());
		return "basic/date";
}- Html
<body>
	<h1>LocalDateTime</h1>
	<ul>
		<li>default = <span th:text="${localDateTime}"></span></li>
		<li>yyyy-MM-dd HH:mm:ss =
		<span th:text="${#temporals.format(localDateTime, 'yyyy-MM-dd HH:mm:ss')}"></span></li>
		<li>yyyy-MM-dd =
		<span th:text="${#temporals.format(localDateTime, 'yyyy-MM-dd')}"></span></li>
		<li>MM/dd =
		<span th:text="${#temporals.format(localDateTime, 'MM/dd')}"></span></li>

	</ul>

	<h1>LocalDateTime - Utils</h1>
	<ul>
		<li>${#temporals.day(localDateTime)} =
			<span th:text="${#temporals.day(localDateTime)}"></span>
		</li>
		<li>${#temporals.month(localDateTime)} =
			<span th:text="${#temporals.month(localDateTime)}"></span>
		</li>
		<li>${#temporals.monthName(localDateTime)} =
			<span th:text="${#temporals.monthName(localDateTime)}"></span>
		</li>
		<li>${#temporals.monthNameShort(localDateTime)} =
			<span th:text="${#temporals.monthNameShort(localDateTime)}"></span>
		</li>
		<li>${#temporals.year(localDateTime)} =
			<span th:text="${#temporals.year(localDateTime)}"></span>
		</li>

		<li>${#temporals.dayOfWeek(localDateTime)} =
			<span th:text="${#temporals.dayOfWeek(localDateTime)}"></span>
		</li>
		<li>${#temporals.dayOfWeekName(localDateTime)} =
			<span th:text="${#temporals.dayOfWeekName(localDateTime)}"></span>
		</li>
		<li>${#temporals.dayOfWeekNameShort(localDateTime)} =
			<span th:text="${#temporals.dayOfWeekNameShort(localDateTime)}"></span>
		</li>
		<li>${#temporals.hour(localDateTime)} =
			<span th:text="${#temporals.hour(localDateTime)}"></span>
		</li>
		<li>${#temporals.minute(localDateTime)} =
			<span th:text="${#temporals.minute(localDateTime)}"></span>
		</li>
		<li>${#temporals.second(localDateTime)} =
			<span th:text="${#temporals.second(localDateTime)}"></span>
		</li>
		<li>${#temporals.nanosecond(localDateTime)} =
			<span th:text="${#temporals.nanosecond(localDateTime)}"></span>
		</li>
	</ul>
</body>
👍 결과
4) 링크 URL
- url 기본
-th:href="@{/hello}"- 결과 :
http://localhost:9090/hello
- 결과 :
- 쿼리 parameter
th:href=@{/hello(param1=${param1}, param2=${param2})}@GetMapping("/link") public String basicLink(Model model) { model.addAttribute("param1","data1"); model.addAttribute("param2","data2"); return "basic/link"; }- 결과 :
/hello?param1=data1¶m2=data2 - 파라미터는 컨트롤러에서 처리
- 경로 variable
th:href="@{/hello/{param1}/{param2}(param1=${param1},param2=${param2})}- 결과 :
http://localhost:9090/hello/data1/data2
- 쿼리 parameter + 경로 variable
th:href="@{/hello/{param1}(param1=${param1},param2=${param2})}- 결과 :
http://localhost:9090/hello/data1?param2=data2
5) 리터럴
- 리터럴 : 소스 코드 상에 고정된 값을 말하는 용어
- 타임리프의 리터럴 : 문자열(String), 숫자(Number), 불리언(Boolean), null
- 문자 리터럴 1 : 원칙상 항상
""(큰 따옴표) 안에''(작은 따옴표)로 표현th:text="'hello' + ' world'"th:text="'hello world'"
- 문자 리터럴 2 : 공백없이 쭉 이어진다면 작은 따옴표를 생략 가능
th:text="hello"
- 문자 + data
th:text="'hello ' + ${data}"
- 리터럴 대체 :
||를 사용하면 작은 따옴표와+를 대체할 수 있다."|hello ${data}|"
6) 연산
- 산술연산
<span th:text="10 + 2"></span>- 출력 : 12
- 비교연산
<span th:text="1 >= 10"></span>- 출력 : false
- 조건식
<span th:text="(10 % 2 == 0)?'짝수':'홀수'"></span>"- 출력 : 짝수
- Elvis 연산자 : 조건식의 축약버전
 	@GetMapping("/operation")
		public String basicOperation(Model model) {
		model.addAttribute("data","Spring");
		model.addAttribute("nullData", null);
		return "basic/operation";
		}
<span th:text="${data}?:'데이터가 없습니다.'"></span>- 출력 : Spring
th:text="${nullData}?:'데이터가 없습니다.'"- 출력 : 데이터가 없습니다.
- No-Operation
<span th:text="${data}?:_">데이터가 없습니다.</span>- 출력 : Spring
<span th:text="${nullData}?:_">데이터가 없습니다.</span>- 출력 : 데이터가 없습니다.
(5) 속성 값 설정
1) 속성 설정
th:*- 속성을 지정하면 타임리프는 기존 속성을 th:*로 지정한 속성으로 대체
- 기존 속성이 없다면 새로 생성
<input type="text" name="mock" th:name="userA">- 결과 : 속성값 name = userA로 설정
2) 속성 추가
th:attrappend- 속성 값 뒤에 값을 추가
<input type="text" class="text" th:attrappend="class='large'">- 속성 값 : class="text" ->
class="textlarge"
- 속성 값 뒤에 값을 추가
th:attrprepend- 속성 값 앞에 값을 추가
<input type="text" class="text" th:attrprepend="class='large'">- 속성 값 : class="text" ->
class="largetext"
- 속성 값 앞에 값을 추가
th:classappend- 자연스럽게 추가
<input type="text" class="text" th:classappend="large">- 속성 값 : class="text" ->
class="text large"
- 자연스럽게 추가
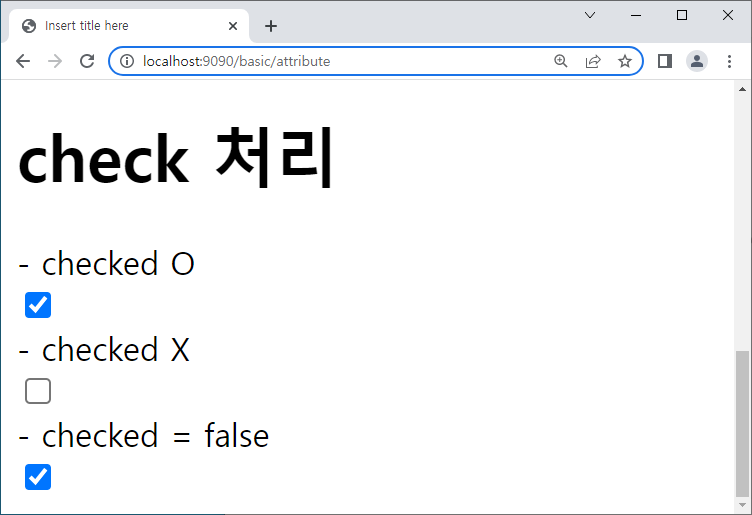
3) check 처리
-
checked O
<input type="text" class="text" th:attrappend="class='large'">
-
checked X
<input type="checkbox" name="active" th:checked="false">
-
checked = false
<input type="checkbox" name="active" checked="false">
👍 결과
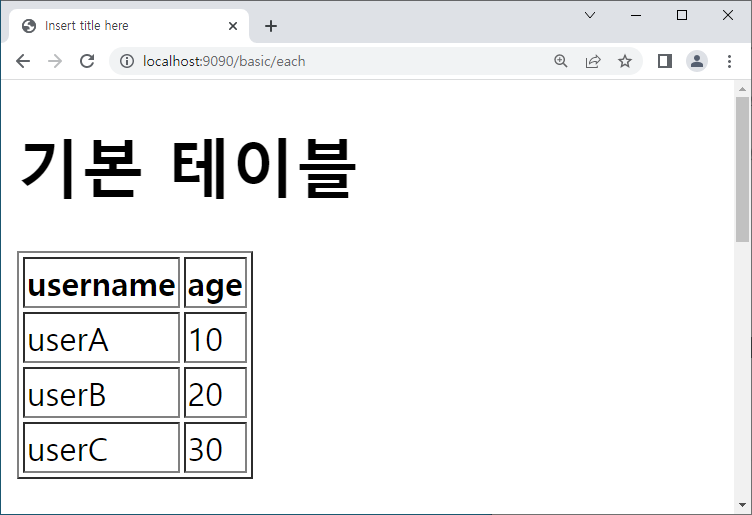
(6) 반복 <th:each>
1) 기본 반복
💡 예시
- Java
	@GetMapping("/each")
	public String basicEach(Model model) {
		addUsers(model);
		return "basic/each";
	}
private void addUsers(Model model) {
List<User> list = new ArrayList<>();
list.add(new User("userA", 10));
list.add(new User("userB", 20));
list.add(new User("userC", 30));
model.addAttribute("users", list);
}- Html
	<table border="1">
		<tr>
			<th>username</th>
			<th>age</th>
		</tr>
		<!-- arraylist 이름 users를 user이름 아래 하나씩 담아줌 -->
		<tr th:each="user : ${users}">
			<td th:text="${user.username}">username</td>
			<td th:text="${user.age}">0</td>
		</tr>
	</table>
👍 결과
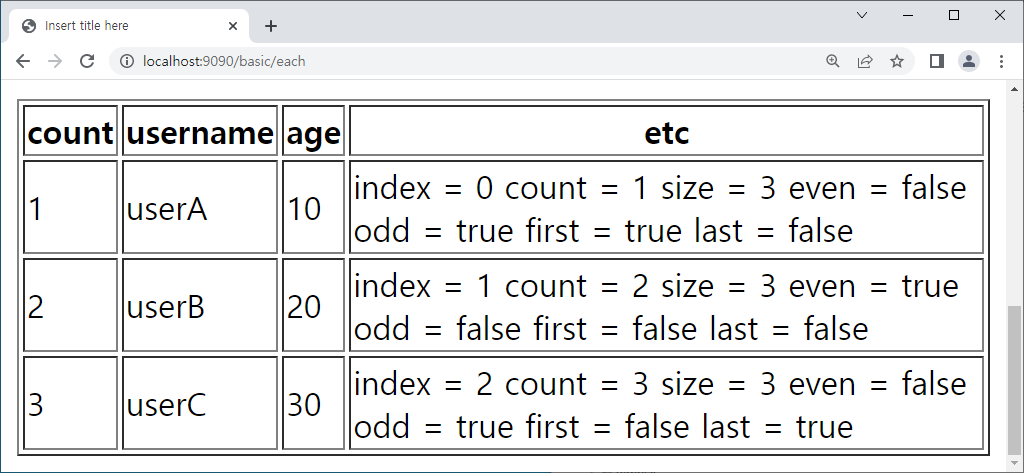
2) 반복 상태 유지
- 반복문에서 두번째 파라미터를 설정해
반복의 상태확인 가능- 예) count, size, even, true
- 두번째 파라미터는 생략 가능, 생략하면 지정한 변수명(user) + Stat
- 예) userStat
💡 예시
- Html
	<table border="1">
		<tr>
			<th>count</th>
			<th>username</th>
			<th>age</th>
			<th>etc</th>
		</tr>
		<tr th:each="user, userStat : ${users}">
			<td th:text="${userStat.count}"></td>
			<td th:text="${user.username}"></td>
			<td th:text="${user.age}"></td>
			<td>
				index = <span th:text="${userStat.index}"></span>
				count = <span th:text="${userStat.count}"></span>
				size = <span th:text="${userStat.size}"></span>
				even = <span th:text="${userStat.even}"></span>
				odd = <span th:text="${userStat.odd}"></span>
				first = <span th:text="${userStat.first}"></span>
				last = <span th:text="${userStat.last}"></span>
			</td>
		</tr>
	</table>
👍 결과
(7) 조건부 평가
1) if, unless
if: 만약 ~ 한다면unless: 만약 ~ 하지 않는다면- 해당 조건이 맞지 않으면 태그 자체를 렌더링 안 함
💡 예시
- Html
<table border = "1">
<tr>
<th>count</th>
<th>username</th>
<th>age</th>
</tr>
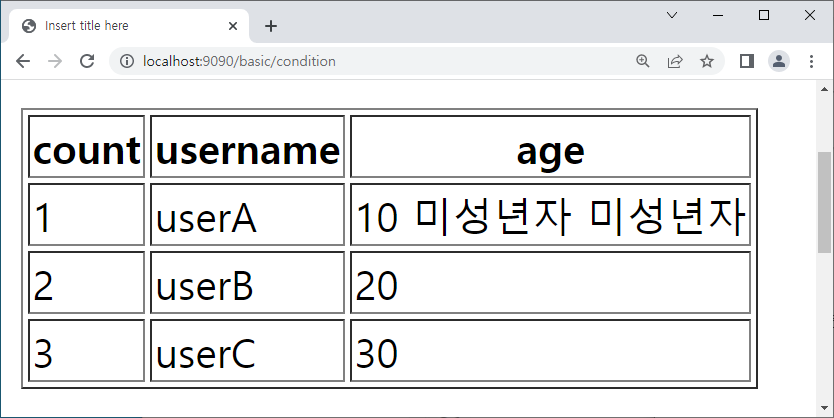
<tr th:each="user, userStat : ${users}">
<td th:text="${userStat.count}"></td>
<td th:text="${user.username}"></td>
<td>
<span th:text="${user.age}"></span>
<span th:text="'미성년자'" th:if="${user.age lt 20}"></span>
<span th:text="'미성년자'" th:unless="${user.age ge 20}"></span>
</td>
</tr>
</table>👍 결과
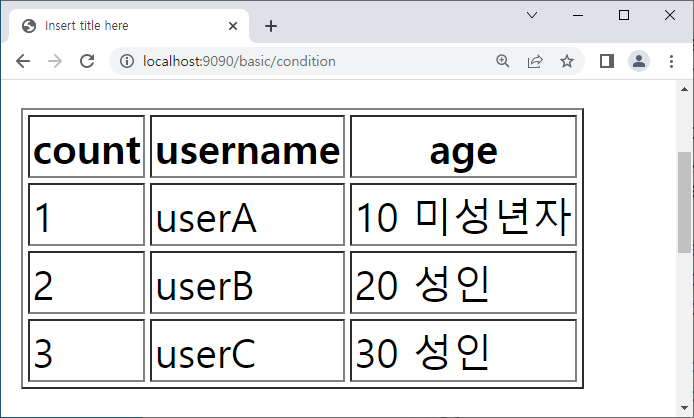
💡 렌더링 예시
<span th:text="'미성년자'" th:unless="${user.age ge 20}"></span>
=><span th:text="'성인'" th:unless="${user.age lt 20}"></span>
👍 결과
2) switch
- 조건을 만족하지 않으면 해당 tag가 조회되지 않는다.
💡 예시
- Html
<table border="1">
<tr>
<th>count</th>
<th>username</th>
<th>age</th>
</tr>
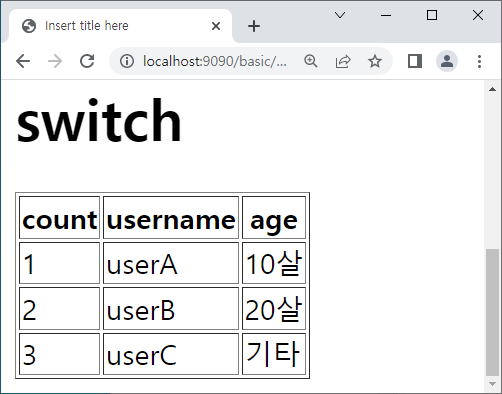
<tr th:each="user,userStat : ${users}">
<td th:text="${userStat.count}"></td>
<td th:text="${user.username}"></td>
<td th:switch=${user.age}>
<span th:case="10">10살</span>
<span th:case="20">20살</span>
<span th:case="*">기타</span>
</td>
</tr>
</table>👍 결과
(8) 기타
1) 주석
① 주석 노출 : 기본 html 주석
<!-- -->
② 주석 노출 x : 타임리프 주석
- 한 줄 주석 :
<!--/* 내용 */--> - 여러 줄 주석
<!--/* -->내용<!-- */--><!--/*내용*/-->
2) 블록
- 반복할 내용을 포함하는 블록(block) 역할
- 표에 담지 않고도 반복문을 돌릴 수 있다
💡 예시
- Html
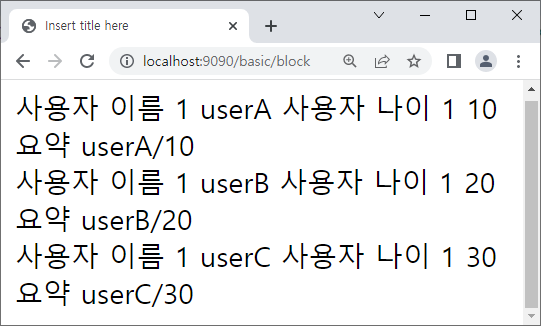
	<th:block th:each="user : ${users}">
		<div>
			사용자 이름1<span th:text="${user.username}"></span>
			사용자 나이1<span th:text="${user.age}"></span>
		</div>
		<div>
			요약<span th:text="${user.username} +'/' + ${user.age}"></span>
		</div>
	</th:block>
👍 결과
3) 자바스크립트 인라인
- 자바스크립트 영역에 자바스크립트 인라인을 사용하면 타임리프가 관여해 도와줌
① 기본 inline
💡 예시
- Java
	@GetMapping("/javascript")
	public String basicJavascript(Model model) {
		model.addAttribute("user", new User("userD", 40));
		addUsers(model);
		return "basic/javascript";
}- Html
	<script th:inline="javascript">
		let username = [[${user.username}]];
		let age = [[${user.age}]];
    </script>
👍 결과(페이지 소스보기)
	<script>
		let username = "userD";
		let age = 40;
    </script>
② 내추럴 템플릿 표기법
/*[[${객체.변수이름}]]*/ "test"
💡 예시
- Html
	<script th:inline="javascript">
		let username2 = /*[[${user.username}]]*/ "test username";
    </script>
👍 결과(페이지 소스보기)
	<script>
		// 자바스크립트 내추럴 템플릿
		let username2 = "userD";
    </script>
③ 객체 담기
- JSON 형태로 받아옴
💡 예시
- Html
	<script th:inline="javascript">
		let user = [[${user}]];
    </script>
👍 결과(페이지 소스보기)
	<script>
		// 객체
		let user = {"username":"userD","age":40};
    </script>
④ 자바스크립트 인라인 each
💡 예시
- Html
	<script th:inline="javascript">
		/*<![CDATA[*/
			[# th:each="user, stat : ${users}"]
				let user[[${stat.count}]] = [[${user}]];
			[/]
		/*]]>*/
    </script>
👍 결과(페이지 소스보기)
	<script>
		/*<![CDATA[*/

				let user1 = {"username":"userA","age":10};
				let user2 = {"username":"userB","age":20};
				let user3 = {"username":"userC","age":30};

		/*]]>*/
    </script>
4) 템플릿 레이아웃
th:fragment- 다른 html에서 해당 html을 사용하고 싶을 때 사용
💡 예시
- 다른 html에서 copy, copyParam이란 이름으로 해당 html 사용 가능
	<footer th:fragment="copy">
		footer 자리 입니다.
	</footer>

	<footer th:fragment="copyParam(param1,param2)">
		<p>파라미터 자리입니다.</p>
		<p th:text="${param1}"></p>
		<p th:text="${param2}"></p>
	</footer>
① th:insert
💡 예시
- Html
	<h2>부분 포함 insert</h2>
	<div th:insert="~{template/fragment/footer :: copy}"></div>
👍 결과(페이지 소스보기)
	<h2>부분 포함 insert</h2>
	<div><footer>
		footer 자리 입니다.
	</footer></div>
② th:replace
💡 예시
- Html
	<h2>부분 포함 : replace</h2>
	<div th:replace="~{template/fragment/footer :: copy}"></div>
    </script>
👍 결과(페이지 소스보기)
	<h2>부분 포함 : replace</h2>
	<footer>
		footer 자리 입니다.
	</footer>
③ th:replace 단순 표현식
💡 예시
- Html
	<h2>부분 포함 단순 표현식</h2>
	<div th:replace="template/fragment/footer :: copy"></div>
👍 결과(페이지 소스보기)
<h2>부분 포함 단순 표현식</h2>
<footer>
footer 자리 입니다.
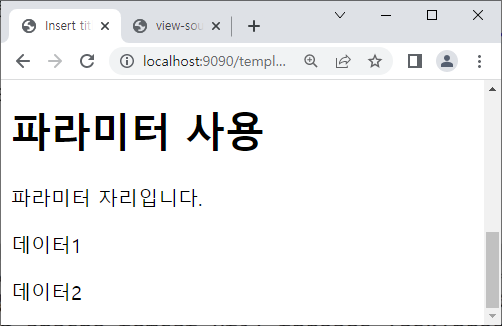
</footer>④ 파라미터 사용 : th:replace
💡 예시
	<h1>파라미터 사용</h1>
		<div th:replace="~{template/fragment/footer :: copyParam('데이터1','데이터2')}">
        </div>
👍 결과(페이지 소스보기)
	<h1>파라미터 사용</h1>
	<footer>
		<p>파라미터 자리입니다.</p>
		<p>데이터1</p>
		<p>데이터2</p>
	</footer>
👍 결과

안녕하세요, 한보람입니다.