1.HTML 태그
1. 태그의 속성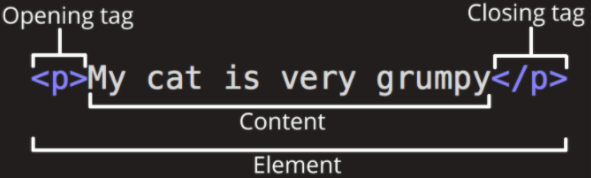
💡The opening tag: This consists of the name of the element (in this example, p for paragraph), wrapped in opening and closing angle brackets. This opening tag marks where the element begins or starts to take effect. In this example, it precedes the start of the paragraph text.
💡The content: This is the content of the element. In this example, it is the paragraph text.
💡The closing tag: This is the same as the opening tag, except that it includes a forward slash before the element name. This marks where the element ends. Failing to include a closing tag is a common beginner error that can produce peculiar results.
2. img 태그

💡 img 태그 이름 ,src라는 속성이 있고, 그 속성의 값은 “codestates-log.png”이다.
💡 닫는 태그 필요없다.
2. HTML vs CSS vs JavaScript
💡HTML은 웹 문서를 구조적으로 표현하기 위한 언어다.
💡CSS는 구조적인 문서를 어떻게 시각적으로 표현하는지에 대한 언어다.
💡JavaScript는 본래 브라우저에 웹 문서를 표현하기 위한 스크립팅 언어였으나, 이제는 node.js를 활용하여 서버 제작은 물론이고, PC를 위한 앱/프로그램을 만들 수 있는 범용적인 프로그래밍 언어가 되었다.
💡웹 문서 표준을 서술하는 언어는 없고, HTML Living Standard에서 상세한 웹 표준을 제시하고 있다. 여러 표준 중 가장 바람직한 표준이라고 볼 수 있다. 다만, 개발을 위하여 모든 내용을 숙지할 필요는 없고 MDN이 가장 신뢰성 있는 공식 문서로 참고하면 된다.
3. CSS 스타일을 적용하는 3가지 방법
1. 인라인 스타일: 같은 줄에서 스타일을 적용
2. 내부 스타일 시트: CSS 파일 내에 작성하는 내용을 별도의 파일로 구분하지 않고 style 태그 내에서 작성
3. 외부 스타일 시트: link태그의 rel에 스타일 시트를 연결
(ex. Style sheet이름이 layout이라면..)
<link rel="stylesheet" href="layout.css" />4. 기본적인 셀렉터(selector)
1. id로 이름 붙여서 스타일링 적용하기
<h4 id=“이름”> 내용 </h4> //“#”을 이용해 선택!💡!!! id는 한문서에서 한번만 사용가능하다. 즉, 문서 내에서 단 하나의 요소에만 적용할 수 있는 유일한 이름이다. 그런데 만약, 모든 li요소에 스타일링을 하고 싶다면…? id는 사용할 수 없다 그래서 class를 사용!
2. Class로 스타일 분류하여 적용하기
💡동일한 기능을 하는 CSS를 여러 요소에 적용하기 위해 class를 사용
💡모든 li요소에 동일한 clss를 추가하면, 동일한 스타일을 여러 element에 적용할 수 있다.
💡“.”을 이용해 선택!
<ul>
<li class=“menu-item”> Home </li>
<li class=“menu-item”> Mac </li>
<li class=“menu-item”> iPhone </li>
<li class=“menu-item”> iPad </li>
</ul>
그리고 다음과 같이 스타일을 적용하면
.menu-item {text-decoration: underline;}만약, 여러 class를 하나의 요소에 적용하려고 하면 class 이름에 “(공백) selected”를 붙여주면 된다. 예를들어
<li class=“menu-item selected”> Home </li>
<li class=“menu-item selected”> Mac </li>
<li class=“menu-item”> iPhone </li>
<li class=“menu-item selected”> iPad </li>
그리고 css 코드에
.selected {
Font-weight: bold;
}
입력하면 Home,Mac,iPad의 글씨만 굵어지는것을 볼 수 있다. 💡iPhone은 selected를 입력하지 않았기때문에 그대로 적용되는 것을 볼수있다!
3.💡id와 class의 차이점