Express.
최소한의 코드로 빠르게 node 서버를 만들 수 있습니다.
제가 경험이 아직 부족하지만 소규모 프로젝트에선 충분히 도움을 드릴 수 있을 것 같습니다.
우리의 목표는 typescript + express + mongoose + heroku 배포 입니다.
express의 프로젝트 구조를 아주 유연합니다. 진짜 본인이 쓰기 나름입니다.
딱 우리가 RESTful API를 유지보수하기 좋게 만들어 봅시다.
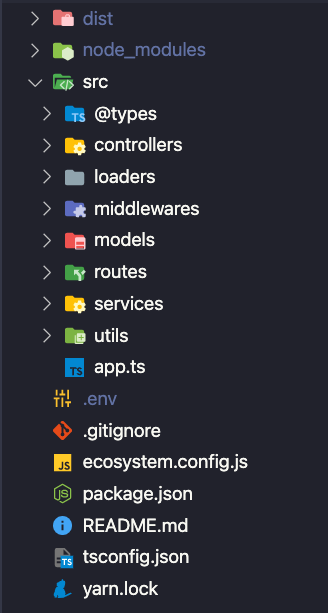
최종 디랙토리는 좀 어지러보이지만 알고보면 정말 간단하고 쉽습니다.
mac을 기준으로 진행하겠습니다.
참고로 절대경로는 도입하지 않았습니다.
빌드이후로 경로를 파싱을 해야하는데 좀 번거롭습니다.
프로젝트에서 디랙토리의 깊이가 2중 이상으로 빠지지않아 절대경로의 필요성을 못느껴 생략했습니다.
필요하시면 여기를 참고 하시면 될 것 같습니다.
Express 실행시키기.
express-generator는 안씁니다. 너무 지저분하다고 느껴집니다.
딱 필요한 것만 셋팅합시다. node과 yarn은 준비 되어 있겠죠?
mkdir 프로젝트 이름
cd 프로젝트 이름
yarn add express typescript ts-node nodemon dotenv cors @types/node @types/express @types/cors
yarn tsc --init
heroku 배포를 위해 그냥 모두 dependencies에 추가합니다.
tsconfig.json
{
  "compilerOptions": {
    "typeRoots": ["./node_modules/@types", "./@types"],
    "target": "ES6",
    "module": "CommonJS",
    "moduleResolution": "node", //모듈 해석 방법 설정: 'node' (Node.js)
    "esModuleInterop": true,
    "strict": true,
    "sourceMap": true,
    "allowJs": true,
    "checkJs": true,
    "outDir": "./dist",
    "rootDir": "./src"
  },
  "include": ["src/**/*.d.ts", "src/**/*.js", "src/**/*.ts"]
}
취향것 설정해주면 됩니다. 빌드파일은 dist 폴더에 생성이 됩니다.
package.json
{
  "name": "프로젝트 이름",
  "description": "✨ 프로젝트 설명",
  "version": "1.0.0",
  "license": "MIT",
  ...
  "scripts": {
    "dev": "nodemon --watch \"src/**/*.ts\" --exec ts-node --files src/app.ts",
    "build": "tsc -p .",
    "start": "node dist/app.js"
  }
}
yarn start은 build(yarn build)된 앱을 실행하는 스크립트입니다.
src/app.ts
import "dotenv/config"; // env파일 사용
import cors from "cors";
import express from "express";

const app = express();
const PORT = process.env.PORT || 1234;

app.use(cors()); // CORS 이슈 해결
app.use(express.urlencoded({ extended: true })); // query 받기
app.use(express.json()); // body 받기

const router = express.Router();
router.get("/api", (req, res, next) => {
  res.json({ message: "welcome!" });
});

app.listen(PORT, () => {
  console.log(`
  ┏━━━━━━━━━━━━━━━━━━━━━━━━━━━━━━━━━━━━━┓
  ┃   Server listening on port: ${PORT}    ┃
  ┃     http://localhost:${PORT}/api       ┃
  ┗━━━━━━━━━━━━━━━━━━━━━━━━━━━━━━━━━━━━━┛
  `);
});
body-paser는 레거시이기 때문에 쓰지 않습니다. express v4.16.0부터 내부적으로 모듈이 포함이 되었습니다. ( 참고 )
이제 시작 세팅이 끝났습니다. 한번 실행해보죠!
yarn dev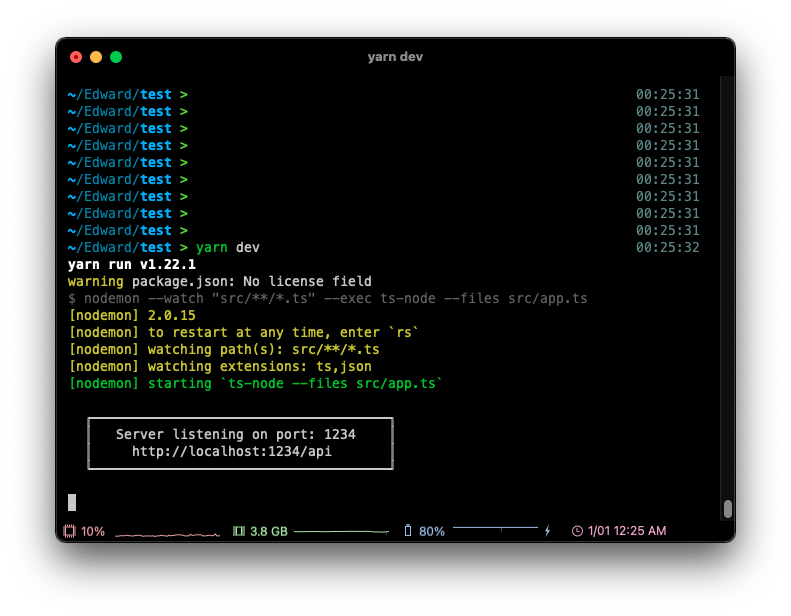
🎉 🎉
nodemon이라는 친구가 소스코드에서(src/**/*.ts) 변경이 있으면 바로 새로 앱을 구동시켜줍니다
튜토리얼을 깼으니 git에 save합시다! 켠김에 왕까지는 위험합니다..
.gitignore
# production
/node_modules
/dist

# misc
.DS_Store

# debug
npm-debug.log*
yarn-debug.log*
yarn-error.log*
package-lock.json

# env
.env
.env.local
.env.development.local
.env.test.local
.env.production.local
터미널을 통해서 git remote연결
git remote add origin 레포지토리url
git add .
git commit -m "커밋 메시지"
git push -u origin main
이제 Express 개발 여정의 시작.
이제 크게 3단계를 거치면 튼튼한 벡엔드를 구성할 수 있습니다.
mongoDB 연결 - REST API 구현 - 요청 응답 제어
진짜 시작하기 전, 제가 사용한 디랙토리 컨벤션에 대해 살펴 봅시다.
| 폴더명 | 용도 |
|---|---|
| @types | 선언 타입을 관리한다. |
| loaders | DB, corn-job 등 세팅 작업을 로드한다. |
| middlewares | express의 꽃 미들웨어. |
| models | mongoose의 데이터 schema, model을 관리한다. |
| utils | 개발에 유용한 모듈을 관리한다. |
| routes | API의 경로를 관리한다. |
| controllers | route의 요청과 응답을 제어한다. (유효한 요청인지 판단) |
| services | 실제 서비스(CRUD, 작업)를 제공한다. |
routes - controllers - services 이렇게 약한 의존성이 생깁니다.
API 데이터 통신 관심사를 3단계로 나누어 앱을 쉽게 유지보수할 수 있다고 생각하시면 됩니다.
추가 구체적으로 이유는 여기를 참고하면 좋을거 같아요.
@types
/@types
       /models/QTContent.d.ts
       /models/User.d.ts
       /index.d.ts
제가 프로젝트에서 실제로 사용한 구조입니다.
.d.ts 파일은 선언 파일입니다. 타입 추론을 돕는데 interface, type를 관리하는 곳이라고 생각하면 될거 같아요.
declare module "@types" {
  interface IUser {
    name: string;
    create_date?: Date;
    //...
  }
}
선언하면 아래와 같이 선언한 타입을 쉽게 활용할 수 있습니다.
import { IUser } from "@types";

const user: IUser = {
  name: "hello world"
}
무궁무진한 활용법이 있는데 제가 아직 부족해서 선뜻 유용한 팁들을 드리기 어렵네요..
여러분 프로젝트 상황에 맞춰 잘 활용하면 될 것 같습니다.
index.ts (모듈 다시 내보내기)
각 디랙토리를 보면 index.ts 파일이 있는데
/middlewares/index.ts
export * from "./decodeRequest";
export * from "./validator";
/controllers/UserController.ts
import { decodeRequest, validatorErrorChecker } from "../middlewares";묶어서 import 할 수 있어서 import 코드가 깔끔해집니다. 모듈 관리하기도 좋구요.
export * as UserService from "./UserService";이런식으로 객체처럼 묶어서 활용할 수도 있습니다. 자세한 것은 여기를 참고해보시면 됩니다.
자! 이제 진짜 개발을 시작해봅시다!

참고