
시큐리티 설정을 하며
이번 프로젝트에서 시큐리티 관련 설정의 경우 이전에 함께하게 된 프로젝트에서 다른 분이 작성하신 설정을 레퍼런스로 하여 일부분을 Hiit 프로젝트에 맞도록 수정하여 사용하였습니다.
그렇기에 "이번에는 이런 이유로 이렇게 설정했었구나?!"하는 느낌으로 가볍게 글을 적어보려 합니다.
들어가며
제가 이번에 시큐리티 설정을 하며 느낀 시큐리티는 "적절한 곳에 적절한 필터를 설정하자!"가 핵심이라는 생각이 들었습니다.
그렇기에 이번 글은 시큐리티의 다른 설정보다 필터에 관한 부분에 조금 더 집중해 볼까 합니다.
실제로 시큐리티 공식 문서에도 위와 같은 그림을 통해 설명하고 있습니다.
@EnableWebSecurity
그럼 이번에도 시큐리티 패키지를 보며 조금 더 들어가 봅시다.
우선 우리가 검색을 통해 알 수 있는 가장 쉬운 시큐리티 설정 방법은 @EnableWebSecurity 를 이용하는 것입니다.
@EnableWebSecurity(debug = true)
public class SecurityConfig { ... }
위와 같이 간단히 설정할 수 있습니다.
@Retention(RetentionPolicy.RUNTIME)
@Target(ElementType.TYPE)
@Documented
@Import({ WebSecurityConfiguration.class, SpringWebMvcImportSelector.class, OAuth2ImportSelector.class,
		HttpSecurityConfiguration.class })
@EnableGlobalAuthentication
@Configuration
public @interface EnableWebSecurity {

  boolean debug() default false;
}
이러한 @EnableWebSecurity는 위와 같이 구성되어 있습니다.
우리는 WebSecurityConfiguration 클래스 그리고 HttpSecurityConfiguration 클래스만 함께 살펴보며 우리가 어떤 것을 설정해 주어야 시큐리티를 더 잘 사용할 수 있을지 고민해 봅시다.
WebSecurityConfiguration
우선 WebSecurityConfiguration 부터 살펴봅시다.
@Configuration(proxyBeanMethods = false)
public class WebSecurityConfiguration implements ImportAware, BeanClassLoaderAware {
	...

	@Bean
	public static DelegatingApplicationListener delegatingApplicationListener() {
		return new DelegatingApplicationListener();
	}

	@Bean
	@DependsOn(AbstractSecurityWebApplicationInitializer.DEFAULT_FILTER_NAME)
	public SecurityExpressionHandler<FilterInvocation> webSecurityExpressionHandler() {
		return this.webSecurity.getExpressionHandler();
	}

	@Bean(name = AbstractSecurityWebApplicationInitializer.DEFAULT_FILTER_NAME)
	public Filter springSecurityFilterChain() throws Exception {
    ...
    return this.webSecurity.build();
	}

	@Bean
	@DependsOn(AbstractSecurityWebApplicationInitializer.DEFAULT_FILTER_NAME)
	public WebInvocationPrivilegeEvaluator privilegeEvaluator() {
		return this.webSecurity.getPrivilegeEvaluator();
	}

	@Bean
	public static BeanFactoryPostProcessor conversionServicePostProcessor() {
		return new RsaKeyConversionServicePostProcessor();
	}
}
WebSecurityConfiguration를 통해 빈을 설정하는 코드만 남겨 정리한 것인데 특징적인 것은 new 키워드를 통해 생성하거나 webSecurity를 활용한다는 것입니다.
만약 @EnableWebSecurity를 사용하지 않는다면 new 키워드를 통해 생성되는 빈의 경우 설정 파일에서 동일하게 빈으로 등록해서 주면 될 것인데 webSecurity를 통해 등록되는 것은 어떻게 해야 할까요? webSecurity는 무엇일까요?
WebSecurity의 자바독에는 아래와 같이 설명되어 있습니다.
The WebSecurity is created by WebSecurityConfiguration to create the FilterChainProxy known as the Spring Security Filter Chain (springSecurityFilterChain). The springSecurityFilterChain is the Filter that the DelegatingFilterProxy delegates to.설명에 따르면 시큐리티 필터 체인을 생성해줍니다.
public WebSecurity(ObjectPostProcessor<Object> objectPostProcessor) {
  super(objectPostProcessor);
}
그리고 WebSecurity를 생성하는 생성자는 위의 생성자 하나입니다.
objectPostProcessor만 무엇인지 알면 직접 생성해줄 수 있을 것 같은데 확인해 봅시다.
objectPostProcessor는 많은 정보를 담고 있습니다.
빈 정보까지 담고 있는 것을 보니 우리는 스프링에게 감사하고 이것을 그냥 사용하는게 좋겠네요. ㅎㅎㅎ
HttpSecurityConfiguration
이제 HttpSecurityConfiguration를 살펴 봅시다.
@Configuration(proxyBeanMethods = false)
class HttpSecurityConfiguration {
  ...

	@Bean(HTTPSECURITY_BEAN_NAME)
	@Scope("prototype")
	HttpSecurity httpSecurity() throws Exception {
		WebSecurityConfigurerAdapter.LazyPasswordEncoder passwordEncoder = new WebSecurityConfigurerAdapter.LazyPasswordEncoder(
				this.context);
		AuthenticationManagerBuilder authenticationBuilder = new WebSecurityConfigurerAdapter.DefaultPasswordEncoderAuthenticationManagerBuilder(
				this.objectPostProcessor, passwordEncoder);
		authenticationBuilder.parentAuthenticationManager(authenticationManager());
		HttpSecurity http = new HttpSecurity(this.objectPostProcessor, authenticationBuilder, createSharedObjects());
		// @formatter:off
		http
			.csrf(withDefaults())
			.addFilter(new WebAsyncManagerIntegrationFilter())
			.exceptionHandling(withDefaults())
			.headers(withDefaults())
			.sessionManagement(withDefaults())
			.securityContext(withDefaults())
			.requestCache(withDefaults())
			.anonymous(withDefaults())
			.servletApi(withDefaults())
			.apply(new DefaultLoginPageConfigurer<>());
		http.logout(withDefaults());
		// @formatter:on
		applyDefaultConfigurers(http);
		return http;
	}
}
설정하고 있는 빈은 HttpSecurity 하나뿐이고 해당 설정에서 필터에 관한 설정도 하는 것이 눈에 띕니다.
하지만 스코프가 prototype으로 http 요청마다 HttpSecurity 빈을 하나씩 만들어 주는 것 같은데 "개발자가 설정해 주어도 괜찮을까?" 하는 생각이 듭니다.
HttpSecurity
그럼 Http Security 클래스를 한번 살펴봅시다.
클래스 위에 자바독으로 아래와 같은 설명과 사용 예제가 추가되어 있습니다.
A HttpSecurity is similar to Spring Security's XML <http> element in the namespace configuration. It allows configuring web based security for specific http requests. By default it will be applied to all requests, but can be restricted using requestMatcher(RequestMatcher) or other similar methods.Example Usage
The most basic form based configuration can be seen below. The configuration will require that any URL that is requested will require a User with the role "ROLE_USER". It also defines an in memory authentication scheme with a user that has the username "user", the password "password", and the role "ROLE_USER". For additional examples, refer to the Java Doc of individual methods on HttpSecurity.
@Configuration
@EnableWebSecurity
public class FormLoginSecurityConfig {
@Bean
public SecurityFilterChain securityFilterChain(HttpSecurity http) throws Exception {
http.authorizeRequests().antMatchers("/**").hasRole("USER").and().formLogin();
return http.build();
}
@Bean
public UserDetailsService userDetailsService() {
UserDetails user = User.withDefaultPasswordEncoder()
.username("user")
.password("password")
.roles("USER")
.build();
return new InMemoryUserDetailsManager(user);
}
}요청에 대해 시큐리티를 적용할 수 있다는 설명과 SecurityFilterChain을 설정하는 예제가 나와 있습니다.
드디어 글 초반에 보았던 SecurityFilterChain이 등장하였습니다.
이제 SecurityFilterChain를 설정하는 방법을 알았으니 설정해 봅시다.
SecurityFilterChain
앞서 언급한 것처럼 시큐리티에 관해 깊이 알아볼 것은 아니니 우선 레퍼런스로 삼은 코드를 보며 전체적으로 어떤 역활을 하는 코드인지 정도 알아봅시다.
	@Bean
	public SecurityFilterChain localSecurityFilterChain(HttpSecurity http) throws Exception {
		http.csrf().disable(); // non-browser clients이기에 csrf 설정을 끕니다.
		http.formLogin().disable(); // formLogin을 사용하지 않습니다.
		http.httpBasic().disable(); // httpBasic 인증을 사용하지 않습니다.
		http.authorizeRequests() // 요청별로 허용/거부/인증 설정을 해줍니다.
				.antMatchers(
						HttpMethod.GET,
						"주소...")
				.permitAll()
				.antMatchers(
						HttpMethod.POST, "주소...")
				.permitAll()
				.antMatchers("주소...")
				.authenticated()
				.anyRequest()
				.denyAll();

		http.addFilterAt(
				generateAuthenticationFilter(), AbstractPreAuthenticatedProcessingFilter.class); // 필터를 추가해줍니다.

		http.exceptionHandling() // 예외를 처리합니다.
				.authenticationEntryPoint(authenticationEntryPoint)
				.accessDeniedHandler(accessDeniedHandler);

		http.sessionManagement().sessionCreationPolicy(SessionCreationPolicy.STATELESS); // 무상태 세션 정책을 사용합니다.
		return http.build();
	}
이번 글에서는 필터를 위주로 보기로 하였기에 필터 부분을 조금 더 주의 깊게 살펴 봅시다.
위의 설정을 보며 알 수 있는 것은 필터를 그냥 설정하는 것이 아닌 위치를 지정해준다는 것입니다.
뭔가 특이합니다.
필터의 순서가 어떻게 정해지는지 천천히 알아가봅시다.
필터 순서
public final class HttpSecurity extends AbstractConfiguredSecurityBuilder<DefaultSecurityFilterChain, HttpSecurity>
		implements SecurityBuilder<DefaultSecurityFilterChain>, HttpSecurityBuilder<HttpSecurity> {
  ...
	private FilterOrderRegistration filterOrders = new FilterOrderRegistration();
}
위의 설정 코드에서 필터를 설정해 주었던 HttpSecurity를 보면 filterOrders를 가지고 있습니다.
그리고 FilterOrderRegistration을 보면 아래와 같이 많은 필터의 순서가 이미 정해진 것을 확인할 수 있습니다.
	FilterOrderRegistration() {
		Step order = new Step(INITIAL_ORDER, ORDER_STEP);
		put(DisableEncodeUrlFilter.class, order.next());
		put(ForceEagerSessionCreationFilter.class, order.next());
		put(ChannelProcessingFilter.class, order.next());
		order.next(); // gh-8105
		put(WebAsyncManagerIntegrationFilter.class, order.next());
		put(SecurityContextHolderFilter.class, order.next());
		put(SecurityContextPersistenceFilter.class, order.next());
		put(HeaderWriterFilter.class, order.next());
		put(CorsFilter.class, order.next());
		put(CsrfFilter.class, order.next());
		put(LogoutFilter.class, order.next());
		this.filterToOrder.put(
				"org.springframework.security.oauth2.client.web.OAuth2AuthorizationRequestRedirectFilter",
				order.next());
		this.filterToOrder.put(
				"org.springframework.security.saml2.provider.service.servlet.filter.Saml2WebSsoAuthenticationRequestFilter",
				order.next());
		put(X509AuthenticationFilter.class, order.next());
		put(AbstractPreAuthenticatedProcessingFilter.class, order.next());
		this.filterToOrder.put("org.springframework.security.cas.web.CasAuthenticationFilter", order.next());
		this.filterToOrder.put("org.springframework.security.oauth2.client.web.OAuth2LoginAuthenticationFilter",
				order.next());
		this.filterToOrder.put(
				"org.springframework.security.saml2.provider.service.servlet.filter.Saml2WebSsoAuthenticationFilter",
				order.next());
		put(UsernamePasswordAuthenticationFilter.class, order.next());
		order.next(); // gh-8105
		this.filterToOrder.put("org.springframework.security.openid.OpenIDAuthenticationFilter", order.next());
		put(DefaultLoginPageGeneratingFilter.class, order.next());
		put(DefaultLogoutPageGeneratingFilter.class, order.next());
		put(ConcurrentSessionFilter.class, order.next());
		put(DigestAuthenticationFilter.class, order.next());
		this.filterToOrder.put(
				"org.springframework.security.oauth2.server.resource.web.BearerTokenAuthenticationFilter",
				order.next());
		put(BasicAuthenticationFilter.class, order.next());
		put(RequestCacheAwareFilter.class, order.next());
		put(SecurityContextHolderAwareRequestFilter.class, order.next());
		put(JaasApiIntegrationFilter.class, order.next());
		put(RememberMeAuthenticationFilter.class, order.next());
		put(AnonymousAuthenticationFilter.class, order.next());
		this.filterToOrder.put("org.springframework.security.oauth2.client.web.OAuth2AuthorizationCodeGrantFilter",
				order.next());
		put(SessionManagementFilter.class, order.next());
		put(ExceptionTranslationFilter.class, order.next());
		put(FilterSecurityInterceptor.class, order.next());
		put(AuthorizationFilter.class, order.next());
		put(SwitchUserFilter.class, order.next());
	}
너무 많네요..ㅎㅎ
너무 많으니 기본 상태에서 활성화되는 필터만 확인해 봅시다.
확인하는 방법은 간단합니다.
@EnableWebSecurity의 옵션 중 debug를 true로 설정합니다.
그리고 서버에 접속하면 아래와 같은 로그를 볼 수 있습니다.
Security filter chain: [
  DisableEncodeUrlFilter
  WebAsyncManagerIntegrationFilter
  SecurityContextPersistenceFilter
  HeaderWriterFilter
  CorsFilter
  LogoutFilter
  RequestCacheAwareFilter
  SecurityContextHolderAwareRequestFilter
  AnonymousAuthenticationFilter
  SessionManagementFilter
  ExceptionTranslationFilter
  FilterSecurityInterceptor
]
어떤 필터가 있는지 살펴 보았으니 다시 FilterOrderRegistration로 돌아가 봅시다.
FilterOrderRegistration의 메서드를 확인해 보면 필터의 순서를 지정하는 메서드가 존재합니다.
하지만 해당 메서드들의 접근 제어자는 모두 default 이었습니다.
HttpSecurity 역시 확인해 보아도 위에서 선언되지 않은 필터를 추가하는 메서드는 확인할 수 없었습니다.
이를 통해 알 수 있는 것은 우리가 미리 선언되고 등록되지 않은 필터의 순서를 직접적으로 정할 수 없다는 것입니다.
필터의 순서를 직접적으로 추가할 수 없는 대신 우리는 기존 필터를 대체하거나(at), 특정 필터 전에 필터를 추가하거나(addFilterBefore), 이후에 필터를 추가하는(addFilterAfter) 방법으로 간접적으로 필터의 순서를 정할 수 있습니다.
이렇게 필터 순서를 설정하는 방법을 알아보았으니 이제 본격적으로 필터가 어떻게 구성되는지 알아봅시다.
필터 구성
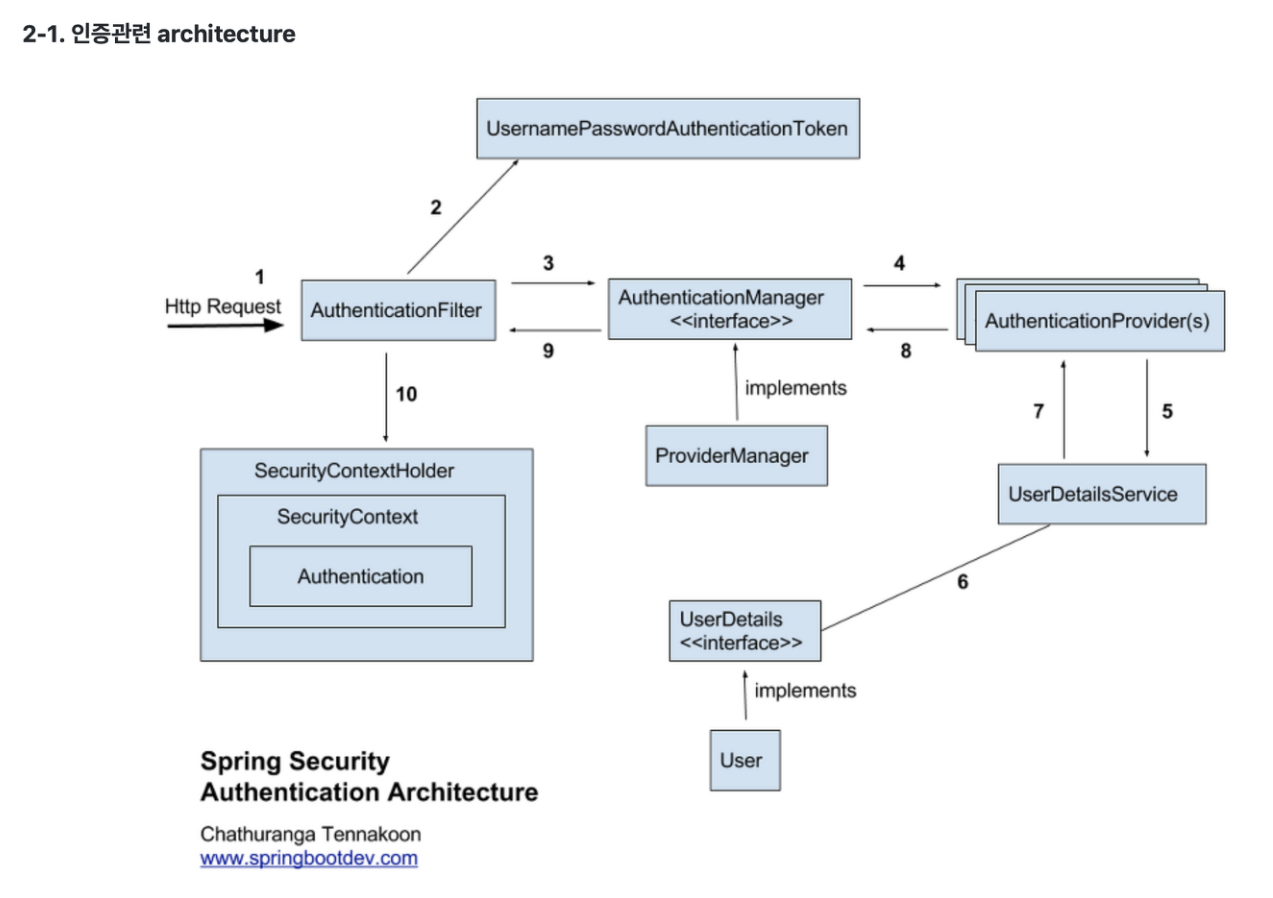
위의 사진은 필터가 어떻게 구성되어 있는지 잘 보여주는 사진입니다.
이를 직관적으로 해석하면 다음 두 문장이 나올 것입니다.
-
필터는 인증 관리자를 가집니다.
-
이 인증 관리자는 많은 인증 공급자를 가집니다.
조금 더 풀어서 살펴봅시다.
Http 요청이 필터를 지나면서 Authentication (Token) 객체를 만듭니다.
Authentication (Token) 객체는 인증 관리자에게 전달하고 인증 관리자는 관리자가 가지고 있는 인증 공급자에게 토큰을 전달하여 우선 처리할 수 있는지 확인합니다.
인증 공급자가 처리할 수 있다면 인증 공급자는 해당 Authentication (Token) 객체를 처리하고 Authentication 객체를 갱신합니다.
여전히 조금 아쉽죠?
문장으로 보는 것도 좋지만 디버깅하며 코드를 따라가 봅시다.
우선 이번 프로젝트에서는 AbstractPreAuthenticatedProcessingFilter를 확장한 필터를 사용하여 AbstractPreAuthenticatedProcessingFilter를 사용하여 필터를 구성한 경우를 따라가며 코드를 살펴봅시다.
디버깅 중에 가장 먼저 확인할 브레이크 포인트는 FilterChainProxy의 346번째 줄 nextFilter.doFilter 입니다.
해당 코드를 통해 선언된 필터의 doFilter 메서드를 실행시킵니다. (시큐리티 필터 체인의 시작점입니다.)
위의 코드는 AbstractPreAuthenticatedProcessingFilter의 doFilter 관련 코드입니다.
196번째 줄을 보면 AbstractPreAuthenticatedProcessingFilter가 가지고 있는 인증 관리자에게 PreAuthenticatedAuthenticationToken을 전달하는 것을 확인할 수 있습니다.
다른 필터에는 다른 타입의 토큰을 생성하여 인증 관리자에게 전달해 줍니다. (ex UsernamePasswordAuthenticationFilter : UsernamePasswordAuthenticationToken)
174번째 줄을 보면 이렇게 전달받은 토큰을 인증 관리자는 자신이 가지고 있는 인증 공급자가 지원할 수 있는 토큰인지 확인는 것을 확인할 수 있습니다.
위 사진은 지원 가능한 토큰인지 확인하는 예제 코드입니다.
만약 인증 공급자가 지원할 수 있는 토큰이라면 인증 공급자는 인증을 진행하고 Authentication 객체를 반환해 줍니다.
위 사진은 인증을 진행하는 예제 코드입니다.
이렇게 필터를 문제 없이 통과한다면 Authentication 객체는 SecurityContextHolder.getContext() 에 저장되고 필요한 Http 요청의 생명주기가 끝날 때까지 사용할 수 있게 됩니다.
마치며
이번 프로젝트 이전까지는 구글링을 통해 대중적으로 널리 퍼진 코드나 책을 통해 알게 된 코드를 통해 주로 설정을 해왔습니다.
아니 단순히 복사하고 붙여놓았습니다.
그러다 보니 설정을 온전히 이해한 경우는 없었고 항상 설정 관련 오류가 발생하며 긴 시간이 걸려 해결한 기억이 납니다.
이전 설정 관련 글을 포함해서 이번 글까지 설정과 관련된 글을 적으며 해당 설정을 어떻게 등록되고 활용되는지에 관해 조금 더 깊이 알아보았습니다.
이를 통해 내가 작성한 코드가 어떠한 설정을 하는 것인지 더 명확히 알 수 있게 되었고 추후 설정 관련 오류가 발생하여도 어떤 부분을 우선하여 찾아보아야 하는지 우선순위가 생긴 것 같습니다.
제 글을 보고 이전의 저처럼 그냥 구글링을 통해 찾은 코드를 붙여넣기만 하였던 누군 가중 한 명만이라도 "나도 설정들이 어떻게 등록되는지 알아볼까?" 하는 마음이 생기면 참 좋을 것 같습니다.
그런데 아마 처음 해당 설정을 사용하거나 경험이 많이 없다면 이해하기 힘들 것입니다.
그럴 때면 너무 좌절하지 않았으면 좋겠습니다.
대신 "아 이런 게 있지!" 하고 마음 한구석에 담아두고 다음에 관련 공부도 하고 프로젝트로 경험도 쌓은 후에 다시 한번 살펴보았으면 좋겠습니다.
아마 그때는 이전에는 보이지 않던 것들이 보이고 이해되지 않던 것들이 이해될 것입니다.
저 역시 그랬고요!
이렇게 말하고 있지만 아직 저도 한 발짝 정도 더 깊이 알아본 것뿐입니다.
아직은 한 발짝 깊이 들어가 기쁨으로 더 깊이 있는 이해되지 않던 것들을 가리고 있는데 저 역시 마음 한쪽에 담아두고 이번 프로젝트를 마치고 다시 들추어 보아야겠습니다.
그때는 한층 더 성장해 있겠죠...???
감사합니다.