본 문서는 인프런의 스프링 입문 - 코드로 배우는 스프링 부트, 웹 MVC, DB 접근 기술 (김영한) 강의를 공부하며 작성한 개인 노트입니다.
👁️ 프로젝트 생성
프로젝트 시작
- Project: Gradle - Groovy
- Spring Boot: 2.3.x
- Language: Java
- Packaging: Jar
- Java:11
- Dependencies: Spring Web, Thymeleaf
build.gradle 파일 살펴보기
- sourceCompatibility: 무슨 자바 버전과 맞는지
- repositories { mavenCentral() }:
- dependencies: 프로젝트 선택시 고른 라이브러리 및 디폴트
.gitignore 파일 살펴보기
- 소스 코드 관리
- 깃에는 필요한 소스코드만 올라가야 함 (결과X)
- 자동적으로 해줌
👒 라이브러리 살펴보기
Gradle은 의존관계가 있는 라이브러리를 함께 설치함
- spring-boot-starter-web
- spring-boot-starter-tomcat: 웹서버 (톰캣)
- spring-webmvc
- spring-boot-starter-thymeleaf
- spring-boot-starter
- spring-boot
- spring-core
- spring-boot-starter-logging
- spring-boot
- spring-boot-starter-test: 테스트 라이브러리
🚘 View 환경설정
Welcome page
- 스프링에서는 resources/static/index.html의 파일이 자동으로 첫 페이지로 설정된다
thymeleaf 템플릿엔진
thymeleaf 메뉴얼을 확인하며 하는 것이 좋다
- 템플릿 html 파일에서 보이는 th가 thymeleaf를 뜻한다
컨트롤러 셋팅
- src/main/java/hello.hellospring 에 controller 패키지 생성
- controller 패키지 내에 HelloController 생성
- 템플릿과 연결됨
<p th:text="안녕하세요, ' + ${data}" >안녕하세요. 손님</p>- ${data}의 값이 컨트롤러에서 추가된 값으로 치환됨
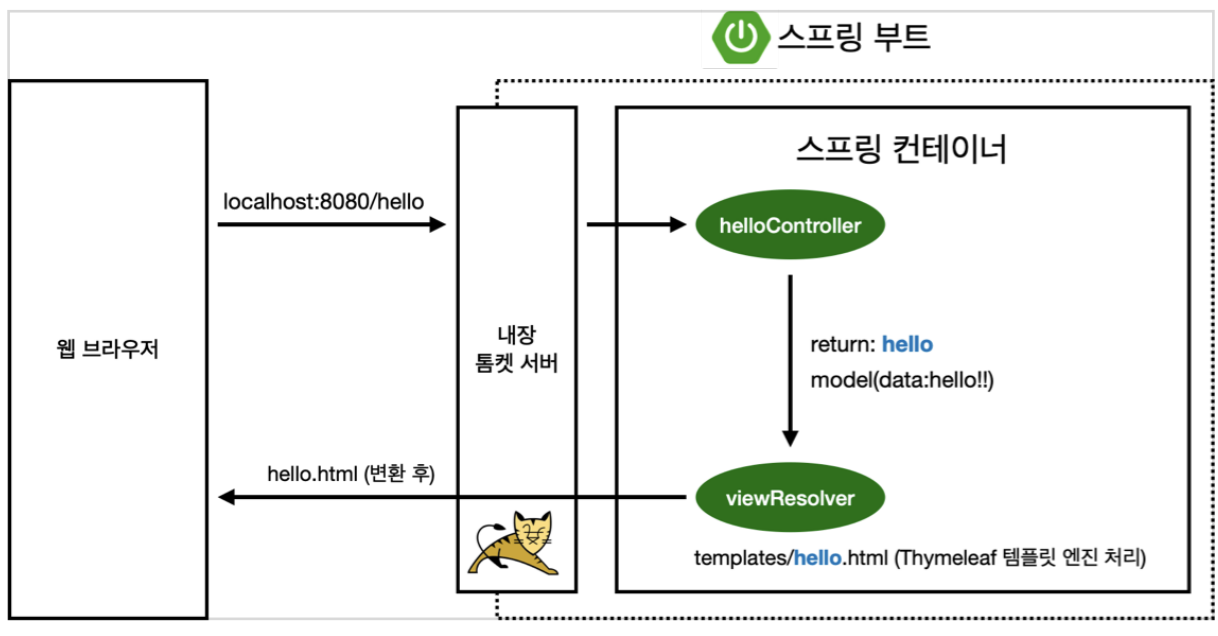
- 컨트롤러에서 값을 리턴하면 viewResolver가 처리하는 구조
- viewResolver는 스프링 부트 템플릿엔진 기본 viewName 매핑
- resources:templates/ +{ViewName}+ .html
🔱 빌드하고 실행하기
- 프로젝트 위치로 이동
- ./gradlew build
- cd build/libs
- java -jar hello-spring-0.0.1-SNAPSHOT.jar
- 실행 확인

우당탕탕